

Grow Okra at Home and unlock the secrets to a thriving garden right outside your door! Have you ever dreamed of plucking fresh, vibrant okra straight from your own backyard? It’s easier than you think, and this DIY guide is your passport to a bountiful harvest. For generations, okra has been a staple in Southern cuisine and beyond, with roots tracing back to Africa. Its rich history is intertwined with resilience and resourcefulness, qualities we can all embrace in our own gardening journeys.
But why should you bother learning to grow okra at home? Well, store-bought okra simply can’t compare to the flavor and freshness of homegrown. Plus, you’ll have complete control over what goes into your plants, ensuring a healthy and organic harvest. Imagine the satisfaction of serving up a delicious okra gumbo or crispy fried okra, knowing you nurtured it from seed to table. I’m here to share simple, effective DIY tricks and hacks that will transform your garden into an okra paradise, even if you’re a complete beginner. Let’s get our hands dirty and start growing!
Growing Okra at Home: A Beginner’s Guide
Hey there, fellow gardening enthusiasts! Ever thought about growing your own okra? It’s surprisingly easy, and nothing beats the taste of fresh, homegrown okra. I’m going to walk you through everything you need to know to successfully cultivate this Southern staple in your own backyard (or even in containers!).
Choosing the Right Okra Variety
Before we get our hands dirty, let’s talk about okra varieties. There are tons of options, each with its own unique characteristics. Picking the right one for your climate and preferences is key.
* Clemson Spineless: This is a classic, reliable variety that’s known for its smooth pods and high yields. It’s a great choice for beginners because it’s relatively easy to grow and adapts well to different conditions.
* Burgundy: If you’re looking for something a little different, Burgundy okra has beautiful red pods that add a pop of color to your garden. The pods turn green when cooked.
* Emerald: This variety is prized for its tender, spineless pods and excellent flavor. It’s a good option if you plan on eating your okra raw or lightly cooked.
* Dwarf Green Long Pod: Perfect for container gardening or small spaces, this variety produces compact plants with long, slender pods.
Consider your climate, space constraints, and taste preferences when making your selection. I personally love Clemson Spineless because it’s so productive and easy to care for.
Preparing Your Okra Planting Site
Okra loves sunshine and well-drained soil. Here’s how to get your planting site ready:
* Sunlight: Okra needs at least 6-8 hours of direct sunlight per day. Choose a spot in your garden that gets plenty of sun throughout the day.
* Soil: Okra prefers well-drained, fertile soil with a pH between 6.0 and 7.0. If your soil is heavy clay or sandy, amend it with compost or other organic matter to improve drainage and fertility.
* Soil Testing: I highly recommend getting your soil tested before planting. This will tell you what nutrients are lacking and allow you to amend the soil accordingly. You can purchase a soil testing kit online or at your local garden center.
* Clearing the Area: Remove any weeds, rocks, or debris from the planting area.
* Tilling or Digging: Loosen the soil to a depth of at least 12 inches. This will make it easier for the okra roots to penetrate the soil.
* Adding Compost: Incorporate a generous amount of compost into the soil. Compost provides essential nutrients and improves soil structure. I usually add about 2-3 inches of compost to the planting area.
* Fertilizing (Optional): If your soil is particularly poor, you can add a balanced fertilizer (e.g., 10-10-10) to the soil before planting. Follow the instructions on the fertilizer package.
Planting Okra Seeds
Okra is a warm-weather crop, so it’s important to wait until the soil has warmed up before planting. Here’s how to plant okra seeds:
1. Timing: Plant okra seeds 2-3 weeks after the last expected frost. The soil temperature should be at least 65°F (18°C).
2. Soaking Seeds (Optional): Soaking okra seeds in water for 12-24 hours before planting can help improve germination rates.
3. Planting Depth: Plant okra seeds 1/2 to 1 inch deep.
4. Spacing: Space okra plants 12-18 inches apart in rows that are 3-4 feet apart. If you’re planting in containers, use a container that is at least 12 inches in diameter and 12 inches deep.
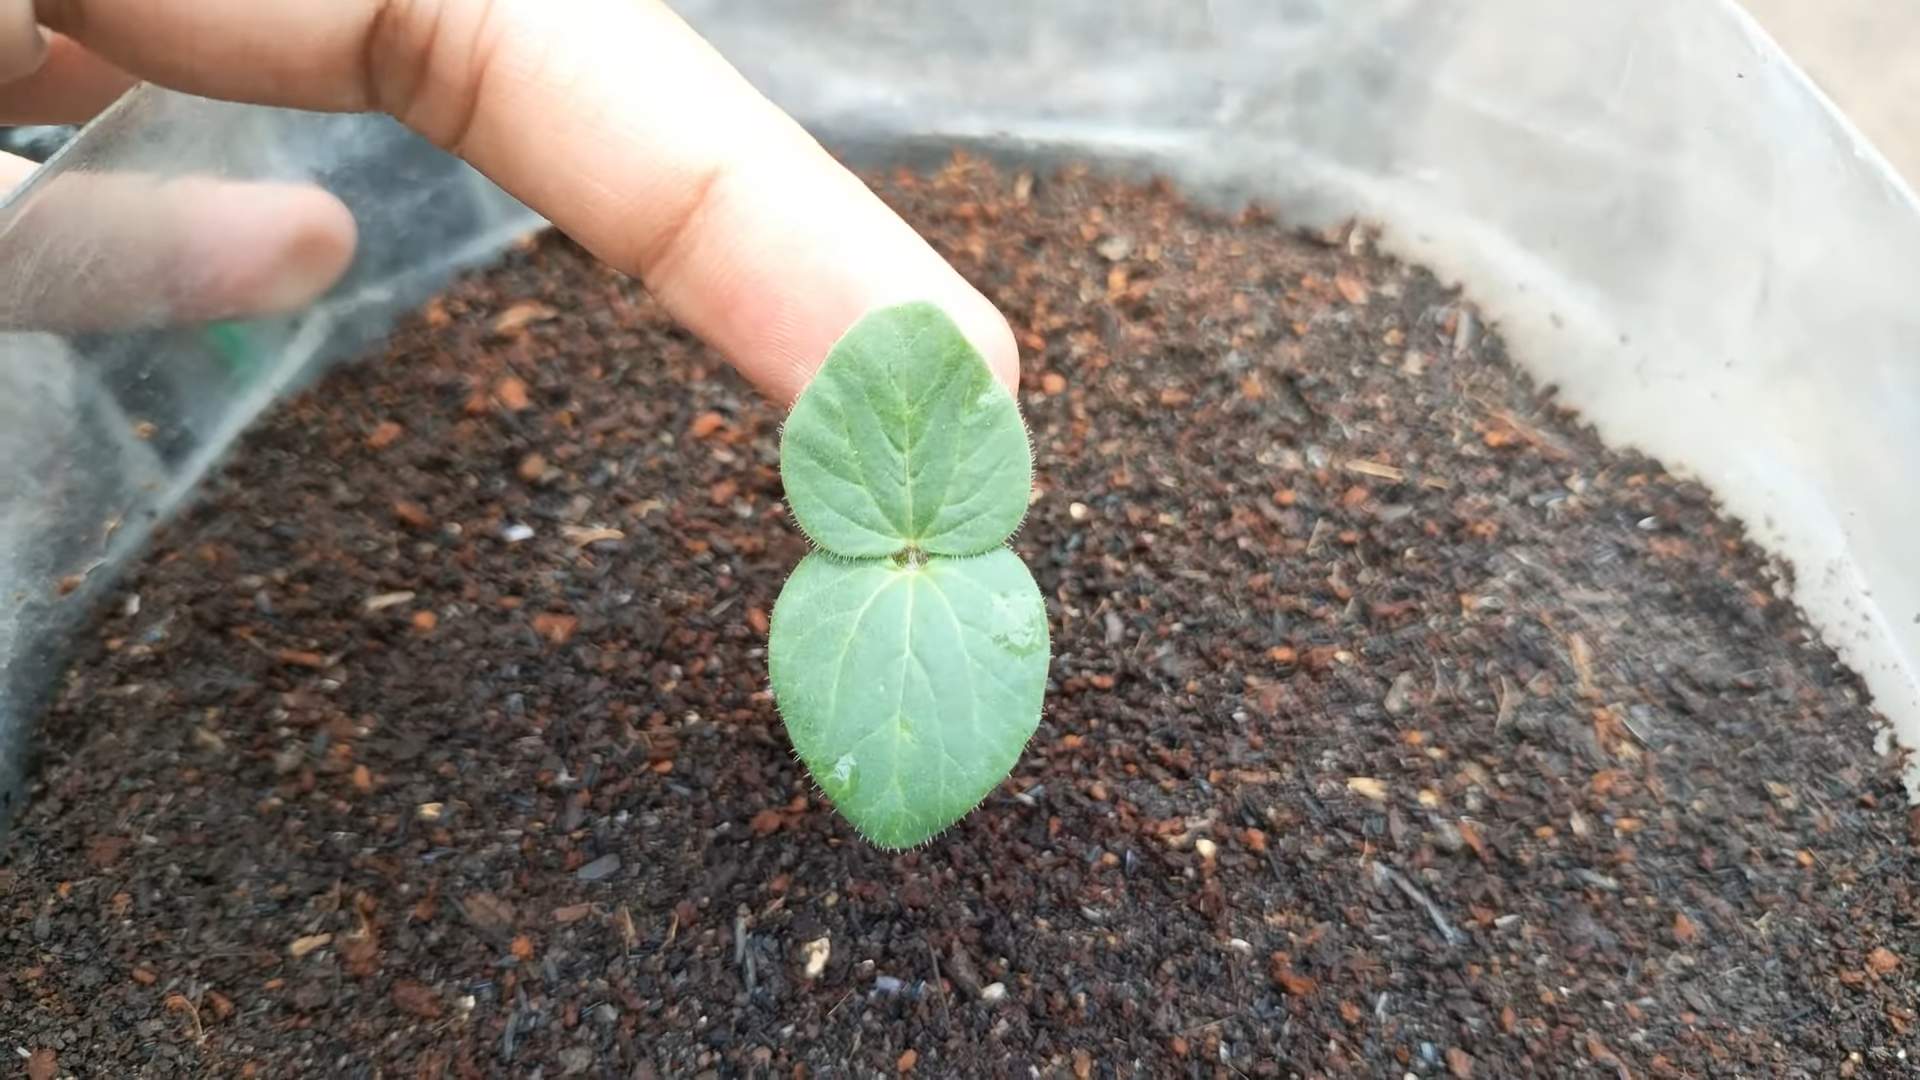
5. Watering: Water the seeds thoroughly after planting. Keep the soil moist but not soggy until the seeds germinate.
Caring for Your Okra Plants
Once your okra plants have sprouted, it’s important to provide them with proper care to ensure healthy growth and abundant yields.
* Watering: Okra needs consistent moisture, especially during hot, dry weather. Water deeply once or twice a week, or more often if the soil dries out quickly. Avoid overhead watering, as this can promote fungal diseases. Drip irrigation or soaker hoses are ideal for watering okra.
* Fertilizing: Okra is a heavy feeder, so it benefits from regular fertilization. Side-dress your okra plants with a balanced fertilizer every 4-6 weeks. You can also use a liquid fertilizer, such as fish emulsion or seaweed extract, to provide a boost of nutrients.
* Weeding: Keep the area around your okra plants free of weeds. Weeds compete with okra for water and nutrients. Hand-pull weeds or use a hoe to remove them. Mulching can also help suppress weed growth.
* Mulching: Apply a layer of mulch around your okra plants to help retain moisture, suppress weeds, and regulate soil temperature. Organic mulches, such as straw, hay, or wood chips, are ideal.
* Pruning: Pruning okra is not essential, but it can help improve air circulation and promote bushier growth. Remove any yellowing or damaged leaves. You can also pinch off the top of the plant to encourage branching.
* Pest Control: Okra can be susceptible to certain pests, such as aphids, flea beetles, and corn earworms. Inspect your plants regularly for signs of pests. If you find pests, you can try using insecticidal soap, neem oil, or other organic pest control methods.
* Disease Control: Okra can also be affected by certain diseases, such as powdery mildew and root rot. To prevent diseases, provide good air circulation, avoid overhead watering, and ensure that the soil is well-drained. If you notice signs of disease, you can try using a fungicide.
Harvesting Okra
Harvesting okra at the right time is crucial for ensuring tender, flavorful pods.
1. Timing: Okra pods are typically ready to harvest 50-65 days after planting.
2. Pod Size: Harvest okra pods when they are 2-4 inches long. Larger pods tend to be tough and fibrous.
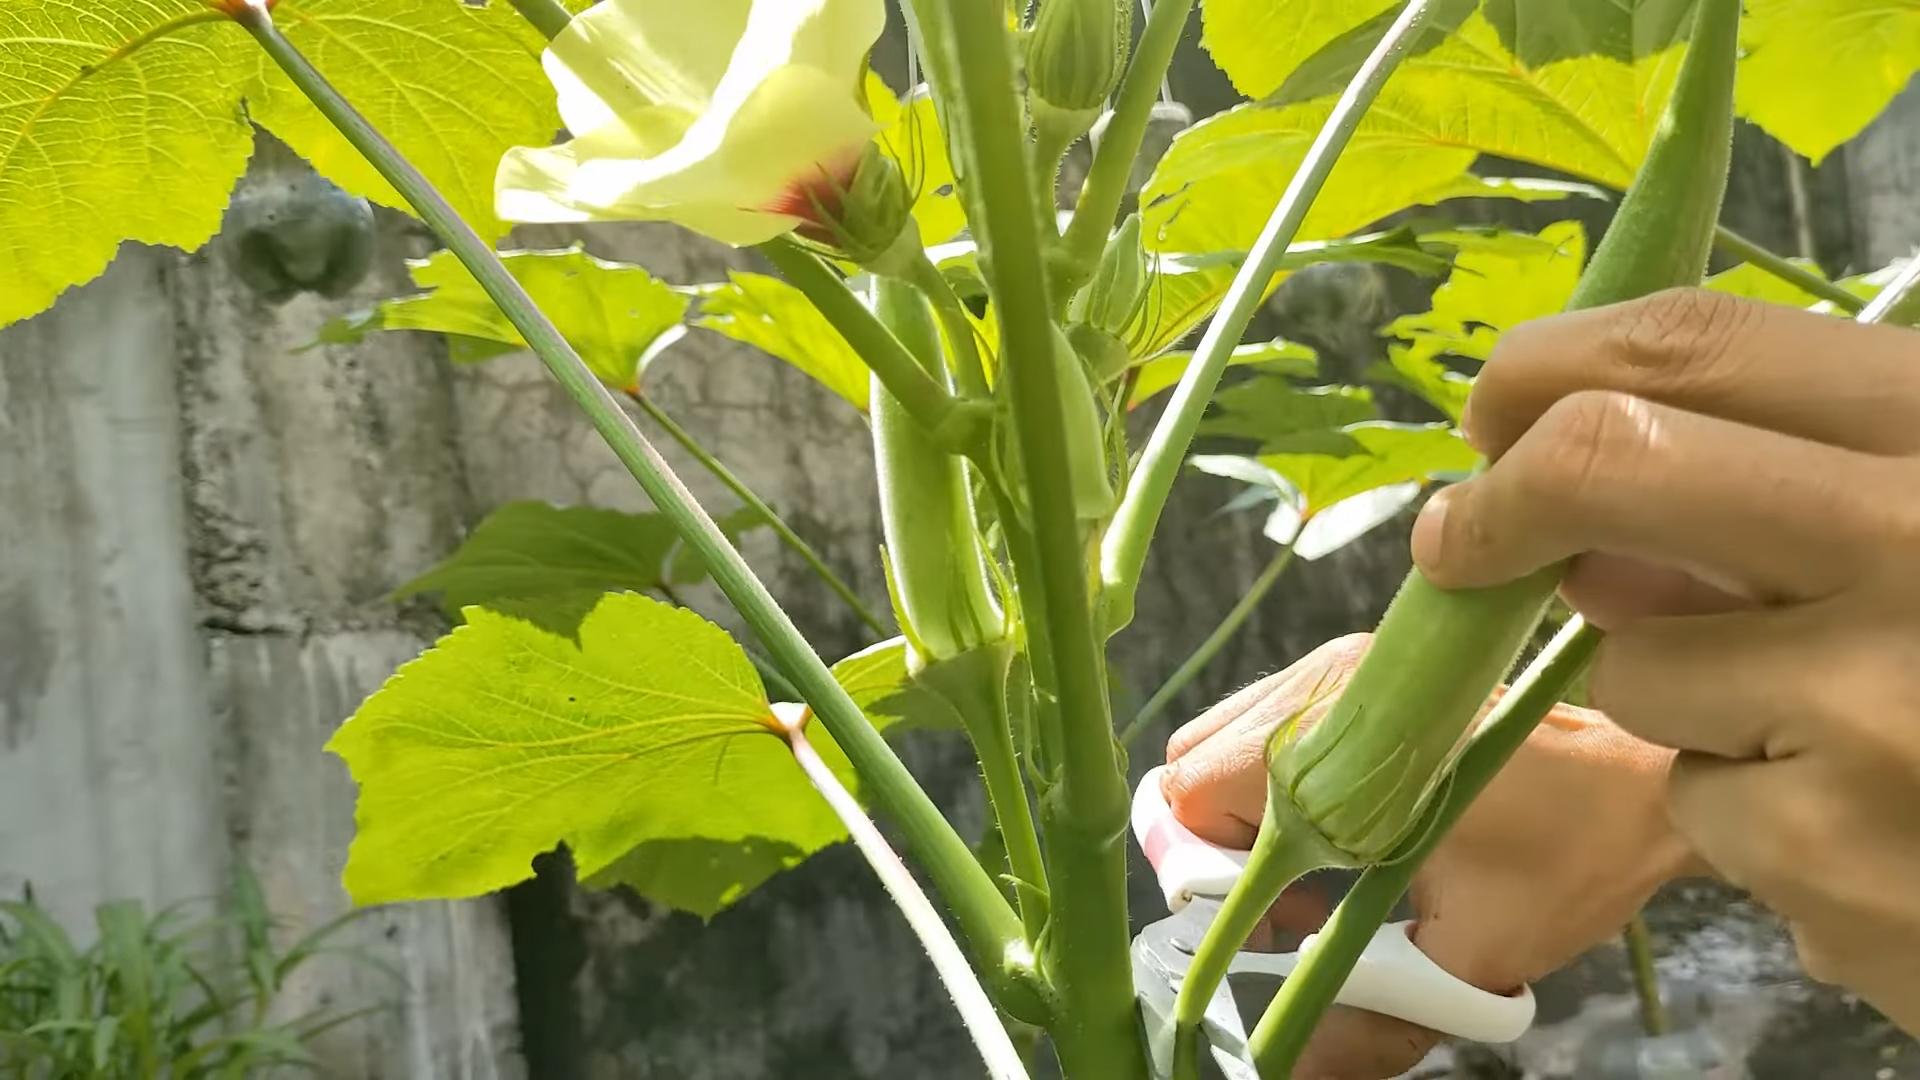
3. Harvesting Technique: Use a sharp knife or pruning shears to cut the pods from the plant. Be careful not to damage the plant.
4. Frequency: Harvest okra pods every 1-2 days. Okra plants produce pods quickly, so it’s important to harvest them regularly to prevent them from becoming overgrown.
5. Handling: Okra pods can be prickly, so wear gloves when harvesting.
6. Storage: Store okra pods in the refrigerator for up to a week.
Dealing with Common Okra Problems
Even with the best care, you might encounter some problems while growing okra. Here are a few common issues and how to address them:
* Yellowing Leaves: Yellowing leaves can be caused by a variety of factors, including nutrient deficiencies, overwatering, or disease. Check the soil pH and nutrient levels. Ensure that the soil is well-drained. If you suspect a disease, treat the plant with an appropriate fungicide.
* Stunted Growth: Stunted growth can be caused by poor soil, lack of sunlight, or pest infestations. Amend the soil with compost or fertilizer. Ensure that the plant is getting enough sunlight. Inspect the plant for pests and treat accordingly.
* Lack of Pod Production: Lack of pod production can be caused by insufficient pollination, high temperatures, or nutrient deficiencies. Attract pollinators to your garden by planting flowers. Ensure that the plant is getting enough water and fertilizer.
* Tough Pods: Tough pods are usually the result of harvesting okra too late. Harvest okra pods when they are 2-4 inches long.
Growing Okra in Containers
Don’t have a garden? No problem! You can still grow okra in containers.
* Container Size: Choose a container that is at least 12 inches in diameter and 12 inches deep.
* Potting Mix: Use a high-quality potting mix that is well-draining.
* Sunlight: Place the container in a location that gets at least 6-8 hours of direct sunlight per day.
* Watering: Water the container regularly, especially during hot, dry weather.
* Fertilizing: Fertilize the container okra plants every 2-3 weeks with a balanced fertilizer.
* Variety: Select a compact or dwarf okra variety that is well-suited for container gardening.
Enjoying Your Homegrown Okra
Now for the best part: enjoying the fruits (or rather, pods!) of your labor. There are countless ways to prepare okra. Here are a few of my favorites:
* Fried Okra: A Southern classic! Slice the okra, dredge it in cornmeal, and fry it
Conclusion
So, there you have it! Growing okra at home is not only achievable, but it’s also incredibly rewarding. From the vibrant blossoms to the crisp, delicious pods, every stage of the process offers a unique connection to your food. We’ve walked you through the essential steps, from selecting the right seeds and preparing your soil to nurturing your plants and harvesting your bounty. But why is this DIY approach a must-try?
Firstly, consider the unparalleled freshness. Store-bought okra simply can’t compare to the flavor and texture of okra picked straight from your garden. The difference is truly remarkable. Secondly, you have complete control over the growing process. You can choose organic methods, avoiding harmful pesticides and herbicides, ensuring that your family is consuming the healthiest possible produce. Thirdly, growing okra at home is a fantastic way to reduce your carbon footprint. By sourcing your food locally, you’re minimizing transportation costs and supporting sustainable practices. Finally, it’s an incredibly satisfying experience. There’s something deeply fulfilling about nurturing a plant from seed to harvest, and sharing the fruits (or in this case, the pods) of your labor with loved ones.
But the journey doesn’t end here! Feel free to experiment with different varieties of okra. Clemson Spineless is a classic choice, known for its smooth pods and excellent flavor. Burgundy okra offers a beautiful visual appeal with its deep red stems and pods. For those with limited space, dwarf varieties like Baby Bubba are perfect for container gardening.
Consider companion planting to enhance your okra’s growth and deter pests. Basil, marigolds, and peppers are all excellent choices. You can also try different soil amendments to improve drainage and fertility. Adding compost or well-rotted manure to your soil will provide your okra plants with the nutrients they need to thrive.
Don’t be afraid to get creative with your okra recipes! While fried okra is a Southern staple, there are countless other ways to enjoy this versatile vegetable. Add it to soups, stews, and gumbos for a thickening agent and a boost of flavor. Grill it for a smoky, charred taste. Or pickle it for a tangy, crunchy snack.
We wholeheartedly encourage you to embark on this gardening adventure and experience the joy of growing okra at home. It’s a simple, sustainable, and incredibly rewarding way to connect with nature and enjoy fresh, delicious produce.
Now, we want to hear from you! Share your experiences, tips, and tricks in the comments below. What varieties of okra have you grown? What challenges have you faced, and how did you overcome them? What are your favorite okra recipes? Let’s create a community of okra enthusiasts and learn from each other. Happy gardening!
Frequently Asked Questions (FAQ)
What is the best time to plant okra?
The ideal time to plant okra is in late spring or early summer, after the last frost has passed and the soil has warmed up to at least 65 degrees Fahrenheit (18 degrees Celsius). Okra thrives in warm weather and requires plenty of sunshine to produce a good harvest. Planting too early can result in stunted growth and reduced yields. If you live in a region with a short growing season, you can start your okra seeds indoors 4-6 weeks before the last frost and transplant them outdoors once the weather warms up.
How much sunlight does okra need?
Okra requires at least 6-8 hours of direct sunlight per day to thrive. Choose a planting location that receives full sun throughout the day. If your okra plants don’t receive enough sunlight, they may become leggy and produce fewer pods.
What type of soil is best for growing okra?
Okra prefers well-drained, fertile soil with a pH between 6.0 and 7.0. Amend your soil with compost or well-rotted manure before planting to improve drainage and fertility. Avoid planting okra in heavy clay soil, as this can lead to root rot. If you have clay soil, consider adding sand or other organic matter to improve drainage.
How often should I water my okra plants?
Okra plants need consistent moisture, especially during hot, dry weather. Water deeply and regularly, aiming to keep the soil consistently moist but not waterlogged. Avoid overhead watering, as this can promote fungal diseases. A good rule of thumb is to water your okra plants when the top inch of soil feels dry to the touch. Mulching around your plants can help to retain moisture and suppress weeds.
How do I fertilize my okra plants?
Okra plants benefit from regular fertilization. Apply a balanced fertilizer (e.g., 10-10-10) at planting time and then again every 4-6 weeks during the growing season. You can also use a side dressing of compost or well-rotted manure to provide your okra plants with additional nutrients. Avoid over-fertilizing, as this can lead to excessive foliage growth and reduced pod production.
How do I harvest okra?
Okra pods are typically ready to harvest 50-65 days after planting. Harvest the pods when they are 2-4 inches long and still tender. Use a sharp knife or pruning shears to cut the pods from the plant. Wear gloves when harvesting okra, as the pods can be prickly and irritating to the skin. Harvest okra regularly, every 1-2 days, to encourage continued production. If you allow the pods to become too large, they will become tough and fibrous.
What are some common pests and diseases that affect okra?
Some common pests that affect okra include aphids, flea beetles, and corn earworms. You can control these pests with insecticidal soap, neem oil, or other organic pest control methods. Common diseases that affect okra include powdery mildew and root rot. Prevent these diseases by providing good air circulation, avoiding overhead watering, and ensuring that your soil is well-drained.
Can I grow okra in containers?
Yes, you can grow okra in containers, but you’ll need to choose a large container (at least 10 gallons) and use a well-draining potting mix. Dwarf varieties of okra are particularly well-suited for container gardening. Be sure to provide your container-grown okra plants with plenty of sunlight and water, and fertilize them regularly.
Why are my okra leaves turning yellow?
Yellowing okra leaves can be caused by several factors, including nutrient deficiencies, overwatering, underwatering, or disease. Check the soil moisture level and adjust your watering accordingly. Fertilize your plants with a balanced fertilizer to address any nutrient deficiencies. Inspect your plants for signs of disease and treat them accordingly.
How do I save okra seeds for next year?
To save okra seeds, allow some of the pods to mature fully on the plant. The pods will become dry and brown. Once the pods are completely dry, harvest them and remove the seeds. Store the seeds in a cool, dry place in an airtight container. Okra seeds can remain viable for several years if stored properly.
Leave a Comment