

Grow Bitter Gourd at Home? Absolutely! Imagine stepping into your backyard and harvesting fresh, vibrant bitter gourds, ready to add a unique and healthy twist to your meals. It’s easier than you think, and this DIY guide will show you exactly how to make it happen, even if you’re a complete beginner.
Bitter gourd, also known as bitter melon, has a rich history, particularly in Asian cultures where it’s been used for centuries, not just for its distinctive flavor but also for its impressive health benefits. From traditional Ayurvedic medicine to modern culinary creations, this vegetable has earned its place as a nutritional powerhouse. But you don’t need to rely on the grocery store to enjoy its goodness.
Why should you learn to grow bitter gourd at home? Well, for starters, you’ll have access to fresher, more flavorful produce, free from harmful pesticides. Plus, gardening is incredibly therapeutic! It’s a fantastic way to de-stress, connect with nature, and enjoy the satisfaction of nurturing something from seed to harvest. In this article, I’ll share my favorite DIY tricks and hacks to help you cultivate thriving bitter gourd vines, regardless of your garden size or experience level. Let’s get started and unlock the secrets to growing this amazing vegetable right in your own backyard!
Grow Your Own Bitter Gourd: A Comprehensive DIY Guide
Hey there, fellow gardening enthusiasts! I’m so excited to share my experience and guide you through growing your own bitter gourd, also known as bitter melon or karela. Don’t let the name scare you; with a little patience and these simple steps, you can enjoy fresh, homegrown bitter gourd right from your backyard! It’s a rewarding experience, and the taste of homegrown produce is simply unbeatable.
Choosing the Right Variety and Starting Seeds
First things first, let’s talk about choosing the right variety and getting those seeds started.
* Variety Selection: There are several varieties of bitter gourd available, each with slightly different characteristics in terms of size, shape, and bitterness. Some popular choices include ‘Long Green’, ‘White Long’, and ‘Arka Harit’. I personally prefer ‘Long Green’ because it’s relatively easy to grow and produces a good yield. Do some research and see which variety is best suited for your climate and taste preferences.
* Seed Starting vs. Direct Sowing: You can either start your bitter gourd seeds indoors or directly sow them into the ground. Starting indoors gives you a head start, especially if you live in a region with a shorter growing season. I usually prefer starting indoors to ensure a healthy start.
* Seed Soaking (Optional but Recommended): Soaking the seeds in lukewarm water for 24 hours before planting can significantly improve germination rates. This helps soften the hard seed coat and allows moisture to penetrate more easily.
Step-by-Step Seed Starting Guide:
1. Prepare Your Seed Starting Tray: Fill a seed starting tray or small pots with a well-draining seed starting mix. I like to use a mix of peat moss, vermiculite, and perlite.
2. Sow the Seeds: Make a small hole (about 1/2 inch deep) in the center of each pot or cell. Place one or two seeds in each hole and cover them gently with the seed starting mix.
3. Water Gently: Water the seeds gently using a spray bottle or watering can with a fine rose. Avoid overwatering, as this can lead to fungal diseases.
4. Provide Warmth and Light: Place the seed starting tray in a warm location with plenty of sunlight. A sunny windowsill or a greenhouse is ideal. You can also use a grow light if you don’t have enough natural light. The ideal temperature for germination is between 75-85°F (24-29°C).
5. Keep the Soil Moist: Keep the soil consistently moist, but not soggy. Check the soil moisture daily and water as needed.
6. Transplant Seedlings: Once the seedlings have developed a few sets of true leaves (usually after 2-3 weeks), they are ready to be transplanted into larger pots or directly into the garden.
Preparing the Garden Bed
Now that our seeds are sprouting, let’s get the garden bed ready for transplanting. Bitter gourd needs a sunny location and well-drained soil.
* Sunlight: Bitter gourd thrives in full sun, so choose a location that receives at least 6-8 hours of direct sunlight per day.
* Soil Preparation: The soil should be well-draining and rich in organic matter. Amend the soil with compost or well-rotted manure before planting. This will improve soil fertility and drainage.
* Trellis System: Bitter gourd is a climbing vine, so you’ll need to provide a trellis or other support system for it to grow on. A sturdy trellis, fence, or even a pergola will work well. I’ve used a simple A-frame trellis made from bamboo poles in the past, and it worked great.
* Soil pH: Bitter gourd prefers a slightly acidic to neutral soil pH (between 6.0 and 7.0). You can test your soil pH using a soil testing kit and amend it accordingly.
Step-by-Step Garden Bed Preparation:
1. Clear the Area: Remove any weeds, rocks, or debris from the planting area.
2. Loosen the Soil: Use a garden fork or tiller to loosen the soil to a depth of at least 12 inches.
3. Amend the Soil: Incorporate compost or well-rotted manure into the soil. I usually add about 2-3 inches of compost to the topsoil and mix it in thoroughly.
4. Install the Trellis: Set up your trellis system before planting the seedlings. This will prevent you from disturbing the roots later on. Make sure the trellis is sturdy enough to support the weight of the mature vines.
5. Water the Soil: Water the soil thoroughly before planting the seedlings. This will help settle the soil and provide moisture for the roots.
Transplanting and Caring for Your Bitter Gourd Plants
Once the garden bed is ready and the seedlings are strong enough, it’s time to transplant them.
* Timing: Transplant the seedlings after the last frost date in your area. Bitter gourd is sensitive to frost, so it’s important to wait until the weather is warm and settled.
* Spacing: Space the seedlings about 18-24 inches apart. This will allow them enough room to grow and spread out.
* Watering: Water the plants regularly, especially during dry periods. Bitter gourd needs consistent moisture to thrive.
* Fertilizing: Fertilize the plants every 2-3 weeks with a balanced fertilizer. I like to use a liquid fertilizer diluted to half strength.
* Pruning: Prune the plants regularly to encourage branching and fruit production. Remove any yellowing or dead leaves.
* Pest and Disease Control: Keep an eye out for pests and diseases. Common pests of bitter gourd include aphids, spider mites, and squash bugs. Common diseases include powdery mildew and downy mildew. Treat any infestations or infections promptly with appropriate organic pesticides or fungicides.
Step-by-Step Transplanting Guide:
1. Harden Off Seedlings: Before transplanting, gradually acclimate the seedlings to outdoor conditions by placing them outside for a few hours each day for a week. This process is called “hardening off” and helps the seedlings adjust to the sun, wind, and temperature changes.
2. Dig Holes: Dig holes in the prepared garden bed, spacing them 18-24 inches apart. The holes should be slightly larger than the root balls of the seedlings.
3. Remove Seedlings from Pots: Gently remove the seedlings from their pots, being careful not to damage the roots. If the roots are tightly bound, gently loosen them before planting.
4. Plant Seedlings: Place the seedlings in the holes and backfill with soil. Make sure the top of the root ball is level with the surrounding soil.
5. Water Thoroughly: Water the seedlings thoroughly after planting. This will help settle the soil and provide moisture for the roots.
6. Mulch: Apply a layer of mulch around the plants to help retain moisture, suppress weeds, and regulate soil temperature. I like to use straw or shredded leaves as mulch.
7. Train the Vines: As the vines grow, train them to climb the trellis. Gently guide the vines towards the trellis and tie them loosely with twine or plant ties.
Pollination and Fruit Development
Bitter gourd plants produce both male and female flowers. The female flowers have a small, immature fruit behind them, while the male flowers do not.
* Pollination: Bitter gourd relies on insects, such as bees, for pollination. If you don’t see many bees in your garden, you may need to hand-pollinate the flowers.
* Hand-Pollination: To hand-pollinate, use a small paintbrush to transfer pollen from the male flowers to the female flowers. Do this in the morning, when the flowers are open.
* Fruit Development: After pollination, the female flowers will develop into fruits. The fruits will start out small and green and gradually grow larger.
Step-by-Step Hand-Pollination Guide:
1. Identify Male and Female Flowers: Look for male flowers (which have a long stem and no fruit behind them) and female flowers (which have a small, immature fruit behind them).
2. Collect Pollen: Use a small paintbrush to collect pollen from the male flowers. Gently brush the anthers (the pollen-bearing parts) of the male flowers to collect the pollen.
3. Transfer Pollen: Transfer the pollen to the stigma (the receptive part) of the female flowers. Gently brush the pollen onto the stigma.
4. Repeat: Repeat this process for all the female flowers that you want to pollinate.
5. Monitor Fruit Development: After pollination, monitor the female flowers to see if they develop into fruits. If the flowers wither and fall off, it means they were not successfully pollinated.
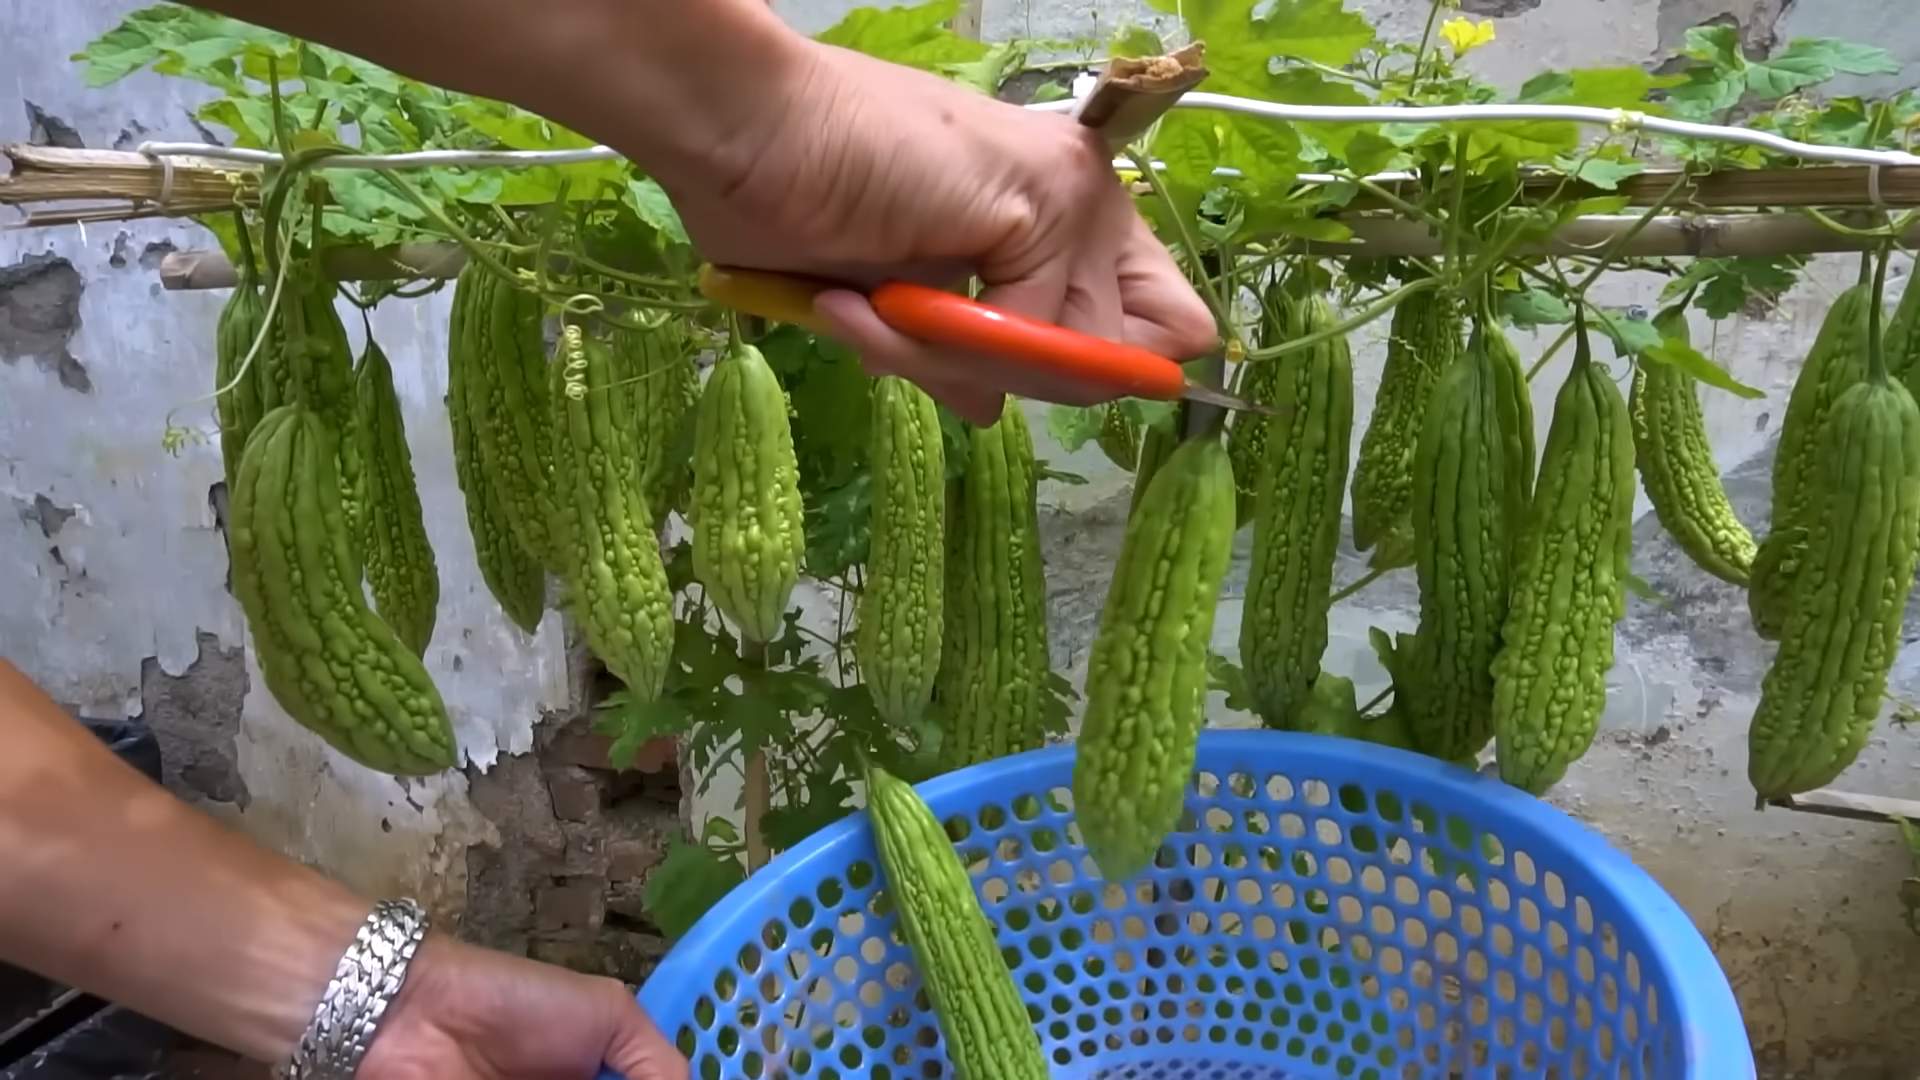
Harvesting and Enjoying Your Bitter Gourd
The moment we’ve all been waiting for! Harvesting your homegrown bitter gourd.
Conclusion
So, there you have it! Cultivating your own bitter gourd at home isn’t just a gardening project; it’s an investment in your health, a connection to nature, and a surprisingly rewarding experience. We’ve walked you through the essential steps, from selecting the right seeds and preparing the soil to providing the necessary support and diligently caring for your growing vines.
Why is this DIY trick a must-try? Because store-bought bitter gourd simply can’t compare to the vibrant flavor and freshness of homegrown produce. You control the entire process, ensuring that your bitter gourd is free from harmful pesticides and bursting with nutrients. Plus, there’s an undeniable satisfaction in harvesting something you’ve nurtured from seed to fruit.
But the benefits extend beyond just taste and health. Growing your own bitter gourd is a sustainable practice that reduces your carbon footprint and promotes biodiversity in your backyard. It’s also a fantastic way to engage with your family, teaching children about the wonders of nature and the importance of healthy eating.
Now, let’s talk about variations. While we’ve focused on a general approach, feel free to experiment with different growing techniques. Consider trying vertical gardening methods to maximize space, especially if you have a small yard or balcony. You can also explore different varieties of bitter gourd, each with its unique shape, size, and flavor profile. Some popular options include the Chinese bitter melon, the Indian bitter gourd, and the Japanese goya.
Another exciting variation is to incorporate companion planting. Marigolds, for example, can help deter pests, while basil can improve the overall health of your bitter gourd plants. Don’t be afraid to get creative and tailor your growing approach to your specific environment and preferences.
Ready to embark on your bitter gourd growing adventure? We encourage you to give this DIY trick a try. It may seem daunting at first, but with a little patience and dedication, you’ll be rewarded with a bountiful harvest of delicious and nutritious bitter gourd.
And most importantly, we want to hear about your experience! Share your tips, tricks, and challenges in the comments below. Let’s create a community of passionate home gardeners who are dedicated to growing their own food and living a healthier, more sustainable lifestyle. Did you find a particularly effective method for pest control? Did you discover a unique way to support your vines? We’re all ears! Your insights could help other aspiring gardeners succeed in their own bitter gourd growing endeavors.
Remember, gardening is a journey, not a destination. There will be ups and downs, successes and failures. But with each experience, you’ll learn something new and grow as a gardener. So, embrace the challenge, get your hands dirty, and enjoy the process of cultivating your own bitter gourd at home. We are confident that you will find the experience incredibly rewarding. Happy gardening!
Frequently Asked Questions (FAQs)
What is the best time of year to plant bitter gourd?
The ideal time to plant bitter gourd is during the late spring or early summer, after the last frost has passed and the soil has warmed up. Bitter gourd thrives in warm weather and requires a long growing season of at least 90-120 days. In regions with mild winters, you may be able to start seeds indoors earlier and transplant them outdoors once the weather permits. However, in colder climates, it’s best to wait until the soil temperature consistently reaches at least 65°F (18°C) before planting. Starting seeds indoors 4-6 weeks before the last expected frost can give you a head start.
How much sunlight does bitter gourd need?
Bitter gourd requires at least 6-8 hours of direct sunlight per day to thrive. Choose a planting location that receives ample sunlight throughout the day. If you’re growing bitter gourd indoors, supplement with grow lights if necessary to ensure adequate light exposure. Insufficient sunlight can lead to stunted growth, reduced fruit production, and increased susceptibility to pests and diseases.
What type of soil is best for growing bitter gourd?
Bitter gourd prefers well-drained, fertile soil that is rich in organic matter. The ideal soil pH is between 6.0 and 7.0. Before planting, amend the soil with compost, well-rotted manure, or other organic materials to improve drainage, fertility, and water retention. Avoid planting in heavy clay soil, as it can become waterlogged and inhibit root growth. If you have clay soil, consider adding sand or perlite to improve drainage.
How often should I water bitter gourd plants?
Water bitter gourd plants regularly, especially during hot, dry weather. Aim to keep the soil consistently moist but not waterlogged. Water deeply at the base of the plants, avoiding wetting the foliage, which can increase the risk of fungal diseases. The frequency of watering will depend on the weather conditions, soil type, and plant size. As a general rule, water when the top inch of soil feels dry to the touch. During periods of heavy rainfall, reduce watering accordingly.
What are some common pests and diseases that affect bitter gourd?
Bitter gourd can be susceptible to various pests and diseases, including aphids, spider mites, squash bugs, powdery mildew, and downy mildew. Regularly inspect your plants for signs of infestation or disease. To prevent pest and disease problems, practice good garden hygiene, such as removing weeds and debris, providing adequate spacing between plants, and avoiding overhead watering. If you detect pests or diseases, take action promptly. You can use organic pest control methods, such as insecticidal soap, neem oil, or diatomaceous earth. For fungal diseases, consider using a copper-based fungicide or a baking soda solution.
How do I know when bitter gourd is ready to harvest?
Bitter gourd is typically ready to harvest about 8-12 weeks after planting, depending on the variety and growing conditions. The fruits should be firm, green, and slightly immature. Overripe bitter gourd will turn yellow or orange and become more bitter. Use a sharp knife or pruning shears to cut the fruits from the vine, leaving a short stem attached. Harvest bitter gourd regularly to encourage continued fruit production.
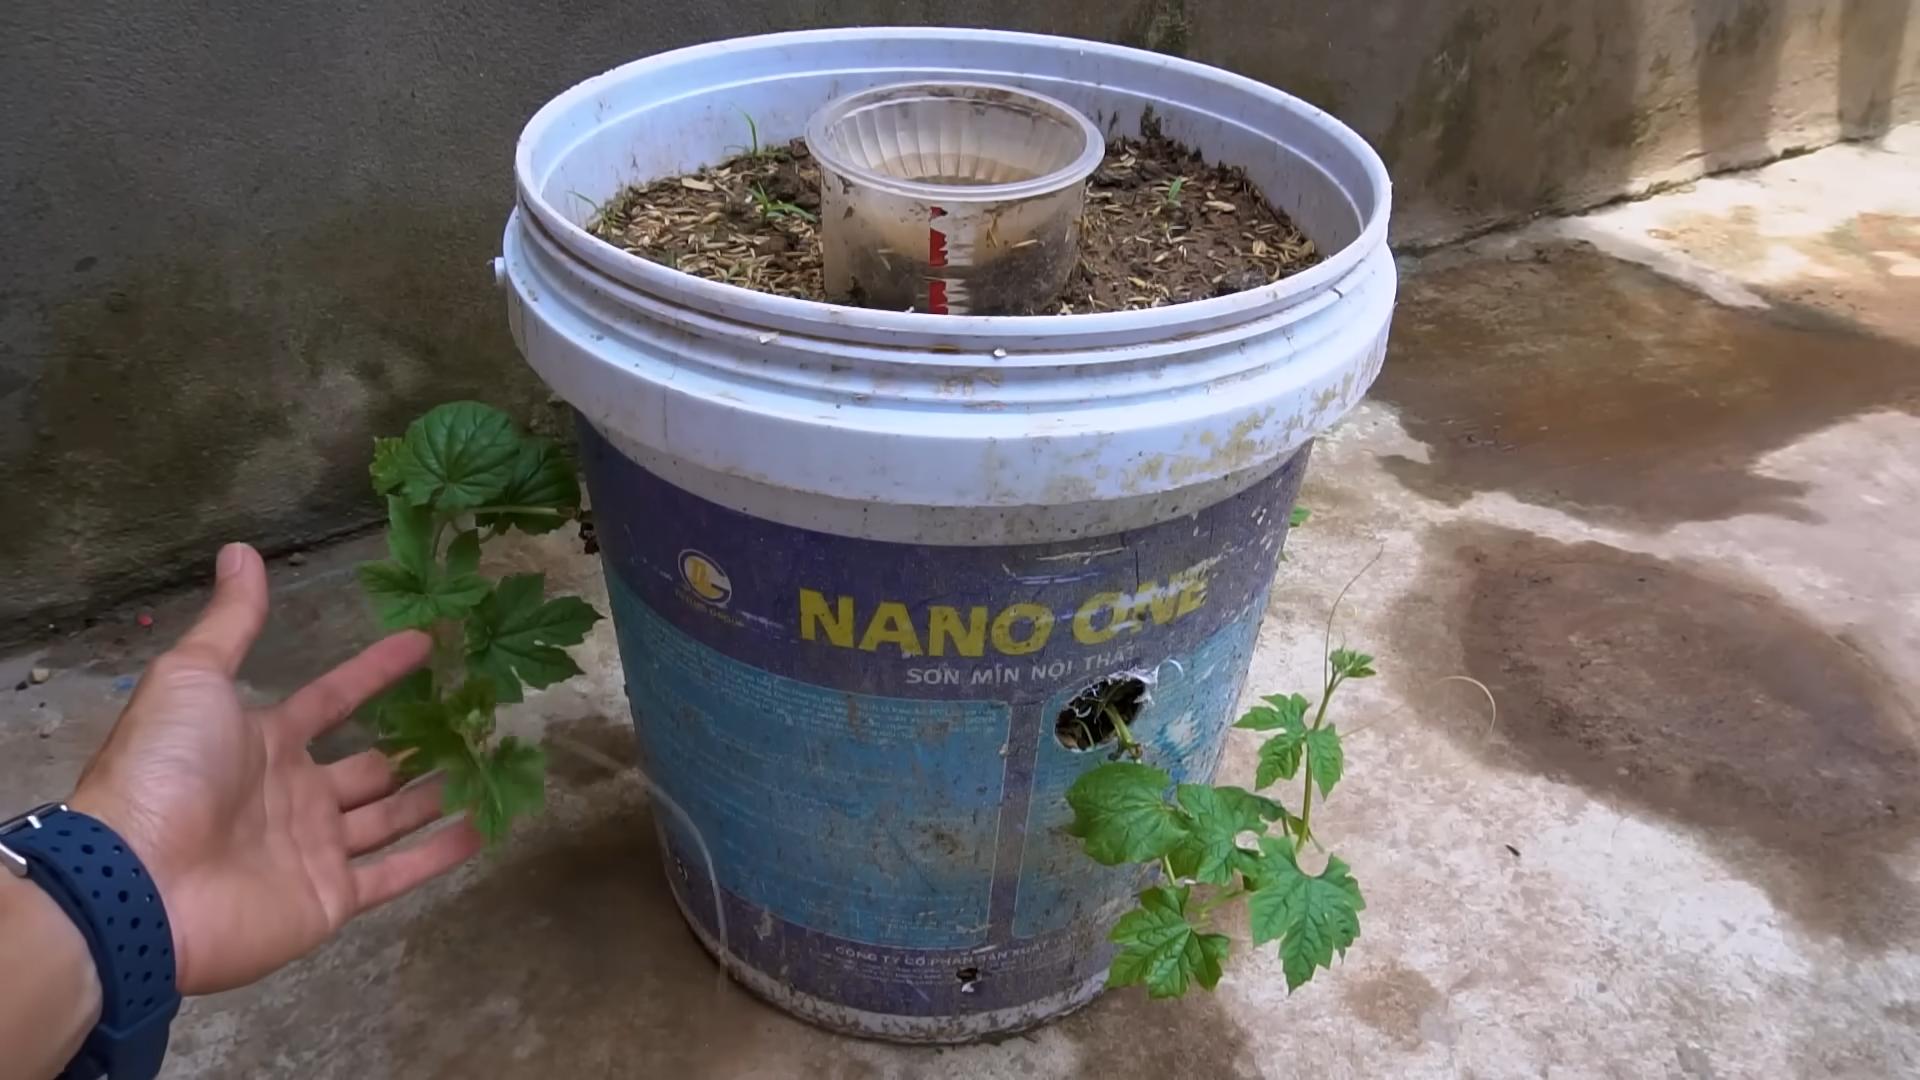
Can I grow bitter gourd in containers?
Yes, bitter gourd can be successfully grown in containers, provided you choose a large enough container and provide adequate support for the vines. Select a container that is at least 12 inches in diameter and depth. Use a well-draining potting mix and provide a trellis or other support structure for the vines to climb. Water and fertilize container-grown bitter gourd plants regularly, as they tend to dry out and deplete nutrients more quickly than plants grown in the ground.
How can I reduce the bitterness of bitter gourd?
Bitter gourd is known for its characteristic bitterness, but there are several ways to reduce its intensity. Before cooking, you can soak the sliced bitter gourd in salted water for about 30 minutes to draw out some of the bitterness. You can also blanch the bitter gourd in boiling water for a few minutes before cooking. Another technique is to rub the sliced bitter gourd with salt and then rinse it thoroughly before cooking. Some people also find that removing the seeds and pith can help reduce the bitterness.
Is bitter gourd good for my health?
Yes, bitter gourd is a highly nutritious vegetable that offers numerous health benefits. It is rich in vitamins, minerals, and antioxidants, and it has been shown to have anti-diabetic, anti-inflammatory, and anti-cancer properties. Bitter gourd can help regulate blood sugar levels, boost the immune system, and improve digestion. It is also a good source of fiber, which can help promote satiety and weight management. Incorporating bitter gourd into your diet can be a great way to improve your overall health and well-being.
How do I save seeds from my bitter gourd for next year?
To save seeds from your bitter gourd, allow a few fruits to fully mature on the vine. The fruits will turn yellow or orange and become soft. Once the fruits are ripe, harvest them and scoop out the seeds. Wash the seeds thoroughly to remove any pulp or debris. Spread the seeds out on a paper towel to dry completely. Once the seeds are dry, store them in an airtight container in a cool, dark, and dry place. Properly stored bitter gourd seeds can remain viable for several years.


Leave a Comment