

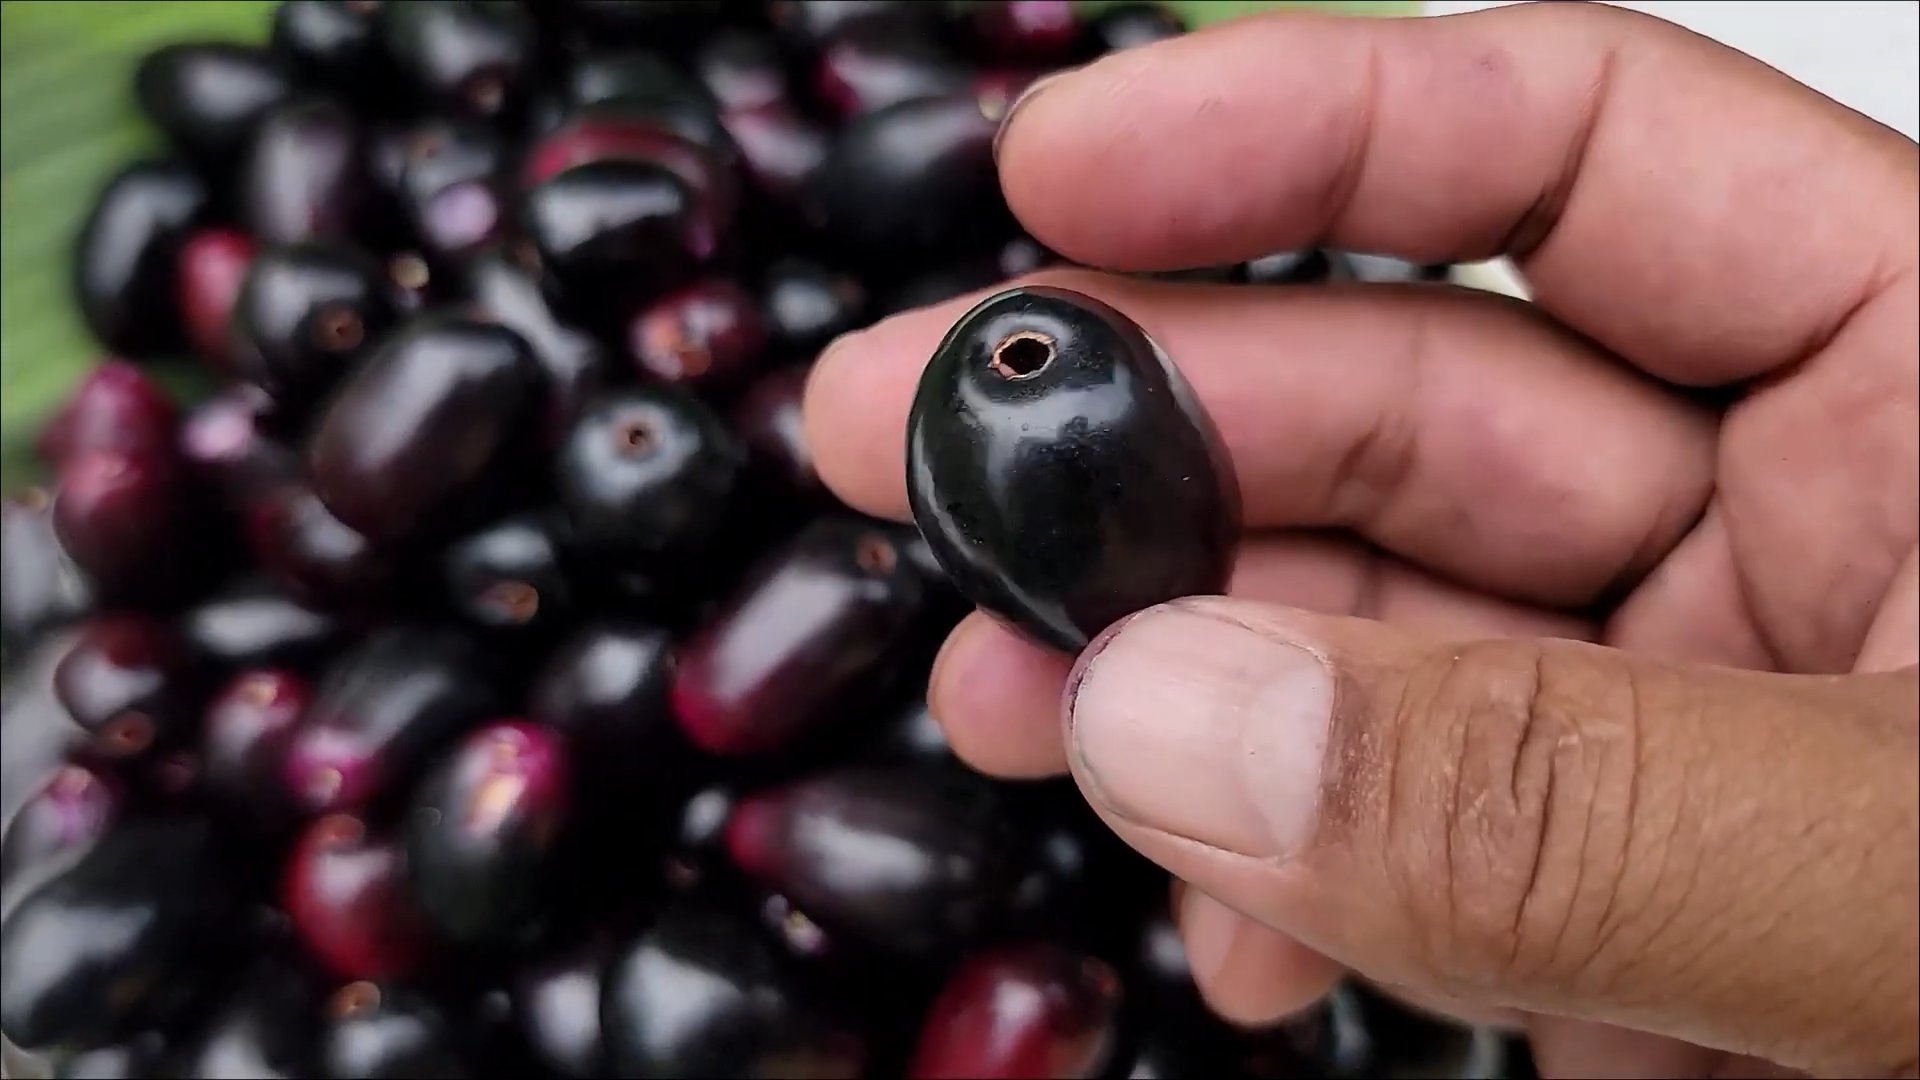
Growing Java Plum at Home might seem like a tropical dream, but trust me, it’s more attainable than you think! Have you ever imagined stepping into your backyard and plucking a juicy, dark purple Java Plum straight from the tree? It’s a truly rewarding experience, and this DIY guide is your ticket to making that dream a reality.
The Java Plum, also known as Jambolan, has a rich history, deeply rooted in traditional medicine and culinary practices across Asia and beyond. For centuries, it’s been cherished not only for its unique sweet and tart flavor but also for its purported health benefits. But you don’t need to travel to the tropics to enjoy this amazing fruit.
I know what you’re thinking: “Can I really grow a Java Plum tree myself?” Absolutely! Many people are hesitant to try growing exotic fruits, fearing it’s too complicated or requires specialized knowledge. But with the right guidance and a few simple tricks, you can successfully cultivate your own Java Plum tree, even in a less-than-tropical climate. This DIY article will break down the process into easy-to-follow steps, covering everything from selecting the right variety to providing the optimal growing conditions. So, get ready to embark on a fun and fruitful journey of growing Java Plum at Home and enjoy the delicious rewards of your labor!

Growing Java Plum (Jamun) at Home: A Comprehensive DIY Guide
Hey there, fellow plant enthusiasts! I’m super excited to share my experience and knowledge on growing Java Plum, also known as Jamun, right in your own backyard. It’s a rewarding experience, and trust me, nothing beats the taste of homegrown, juicy Jamuns! This guide will walk you through every step, from choosing the right variety to harvesting your delicious bounty.
Choosing the Right Java Plum Variety
Before we dive into the nitty-gritty, let’s talk about choosing the right Java Plum variety. While most Java Plums are similar, some subtle differences can impact fruit size, taste, and tree size.
* Consider your climate: Java Plums thrive in warm, tropical, and subtropical climates. If you live in an area with harsh winters, you might need to consider a container-grown tree that can be moved indoors.
* Fruit size and taste: Some varieties produce larger, sweeter fruits than others. Do some research on local nurseries or online resources to find a variety that suits your taste preferences. Look for descriptions like “large fruit,” “sweet flavor,” or “disease resistant.”
* Tree size: Java Plum trees can grow quite large, so consider the space you have available. If you have a smaller yard, look for semi-dwarf varieties or be prepared to prune regularly.
* Grafted vs. Seedling: Grafted trees are generally preferred because they produce fruit sooner and are more likely to have the desired characteristics of the parent tree. Seedling trees can take longer to bear fruit and may not be true to type.
Propagation Methods
There are two main ways to propagate Java Plum: from seed and through grafting. Grafting is the preferred method for faster and more reliable results, but growing from seed is also possible.
* From Seed:
* Collect seeds from ripe, healthy fruits.
* Clean the seeds thoroughly to remove any pulp.
* Sow the seeds in a well-draining potting mix.
* Keep the soil moist but not waterlogged.
* Germination can take several weeks or even months.
* Grafting:
* This method involves joining a scion (a cutting from a desired variety) to a rootstock (the base of another Java Plum tree).
* It’s best to leave grafting to experienced gardeners or nursery professionals, as it requires specific skills and equipment.
Planting Your Java Plum Tree
Now for the exciting part – planting your Java Plum tree! This is a crucial step, so let’s get it right.
1. Choose the Right Location: Java Plums need plenty of sunlight, so select a spot that receives at least 6-8 hours of direct sunlight per day. Also, ensure the location has well-draining soil. Avoid areas where water tends to pool after rain.
2. Prepare the Soil: Java Plums prefer slightly acidic to neutral soil (pH 6.0-7.0). Amend the soil with organic matter like compost or well-rotted manure to improve drainage and fertility. I usually dig in a generous amount of compost a few weeks before planting.
3. Dig the Planting Hole: Dig a hole that is twice as wide as the root ball and just as deep. This allows the roots to spread easily.
4. Remove the Tree from the Container: Gently remove the tree from its container. If the roots are pot-bound (tightly circling the root ball), carefully loosen them with your fingers or a small tool.
5. Plant the Tree: Place the tree in the hole, ensuring that the top of the root ball is level with the surrounding soil. Backfill the hole with the amended soil, gently firming it around the roots.
6. Water Thoroughly: Water the newly planted tree deeply to settle the soil and provide moisture to the roots.
7. Mulch Around the Tree: Apply a layer of organic mulch, such as wood chips or straw, around the base of the tree. This helps retain moisture, suppress weeds, and regulate soil temperature. Be sure to keep the mulch a few inches away from the trunk to prevent rot.
8. Stake the Tree (Optional): If you live in a windy area, you may want to stake the tree for the first year to provide support and prevent it from being uprooted.
Caring for Your Java Plum Tree
Once your Java Plum tree is planted, it’s essential to provide proper care to ensure its healthy growth and fruit production.
Watering
* Frequency: Water regularly, especially during the first year after planting. Keep the soil consistently moist but not waterlogged. As the tree matures, you can reduce watering frequency, but be sure to water deeply during dry spells. I usually check the soil moisture by sticking my finger a couple of inches into the ground. If it feels dry, it’s time to water.
* Method: Water at the base of the tree, avoiding wetting the foliage. This helps prevent fungal diseases.
Fertilizing
* Timing: Fertilize your Java Plum tree in early spring and again in mid-summer.
* Type: Use a balanced fertilizer formulated for fruit trees. Follow the instructions on the fertilizer package for application rates. I like to use a slow-release fertilizer, as it provides a steady supply of nutrients over time.
* Organic Options: You can also use organic fertilizers like compost tea or well-rotted manure.
Pruning
* Timing: Prune your Java Plum tree in late winter or early spring, before new growth begins.
* Purpose: Pruning helps maintain the tree’s shape, remove dead or diseased branches, and improve air circulation.
* Technique: Remove any crossing or rubbing branches, as well as any branches that are growing inward. Thin out the canopy to allow sunlight to penetrate to the inner branches.
* Training: Train the tree to a central leader system, where one main trunk extends upward and lateral branches grow outward.
Pest and Disease Control
* Common Pests: Java Plum trees can be susceptible to pests like aphids, scale, and fruit flies.
* Common Diseases: Fungal diseases like anthracnose and leaf spot can also affect Java Plums.
* Prevention: Regularly inspect your tree for signs of pests or diseases. Remove any affected leaves or branches.
* Treatment: Use organic pest control methods like insecticidal soap or neem oil to control pests. For fungal diseases, use a copper-based fungicide. Always follow the instructions on the product label. I prefer to use organic methods whenever possible to avoid harming beneficial insects and the environment.
Weed Control
* Importance: Keep the area around your Java Plum tree free of weeds. Weeds compete with the tree for water and nutrients.
* Methods: Hand-pull weeds regularly or use a hoe to cultivate the soil. Apply a layer of mulch to suppress weed growth.
Harvesting Your Java Plums
The moment you’ve been waiting for – harvesting your delicious Java Plums!
* Timing: Java Plums typically ripen in late summer or early fall. The fruits will turn from green to a deep purple or black color when ripe.
* Method: Gently pick the fruits from the tree. Ripe fruits should come off easily.
* Storage: Java Plums are best eaten fresh, but they can also be stored in the refrigerator for a few days.
Troubleshooting Common Problems
Even with the best care, you might encounter some problems while growing your Java Plum tree. Here are some common issues and how to address them:
* Yellowing Leaves: This could be a sign of nutrient deficiency, overwatering, or poor drainage. Check the soil pH and nutrient levels. Ensure the soil is well-draining and adjust your watering schedule accordingly.
* Lack of Fruit: This could be due to insufficient sunlight, poor pollination, or nutrient deficiency. Ensure the tree receives at least 6-8 hours of direct sunlight per day. Consider hand-pollinating the flowers if you suspect poor pollination. Fertilize the tree with a balanced fertilizer.
* Pest Infestations: Regularly inspect your tree for signs of pests and take action promptly. Use organic pest control methods whenever possible.
* Disease Problems: Remove any affected leaves or branches and treat the tree with a fungicide. Improve air circulation by pruning the tree.
Container Growing Java Plums
If you live in a colder climate or have limited space, you can grow Java Plums in containers.
* Choose the Right Container: Select a large container with drainage holes.
* Use a Well-Draining Potting Mix: Use a high-quality potting mix that drains well.
* Water Regularly: Container-grown trees dry out more quickly than those planted in the ground, so water regularly.
* Fertilize Regularly: Container-grown trees also need more frequent fertilization.
* Overwintering: In colder
Conclusion
So, there you have it! Growing Java Plum at home, while it might seem like a tropical dream, is entirely achievable with a little patience, the right conditions, and this simple DIY trick. We’ve walked you through the process, from selecting the perfect seed or sapling to providing the ideal environment for your Java Plum tree to thrive. But the real magic lies in the specific technique we’ve highlighted – a method designed to significantly boost your chances of success.
Why is this DIY trick a must-try? Because it addresses the most common challenges faced by home growers. It tackles the issues of seed germination rates, soil composition, and early seedling development head-on. By implementing this method, you’re not just planting a seed; you’re actively creating an environment that encourages robust growth and increases the likelihood of a bountiful harvest in the years to come. Think of it as giving your Java Plum tree the ultimate head start!
But don’t stop there! The beauty of gardening lies in experimentation. Feel free to explore variations on this DIY trick to suit your specific climate and resources. For instance, if you live in a particularly dry area, consider incorporating water-retaining crystals into your soil mix. Or, if you’re using a container, experiment with different types of potting soil to find the blend that your Java Plum tree loves best. You could even try grafting a known fruiting variety onto your seedling for faster results. The possibilities are endless!
The key takeaway is this: Growing Java Plum at home is a rewarding experience that connects you with nature and provides you with delicious, homegrown fruit. And with this DIY trick in your arsenal, you’re well-equipped to overcome the hurdles and enjoy the fruits (literally!) of your labor.
We wholeheartedly encourage you to give this DIY trick a try. Don’t be intimidated by the process; it’s simpler than you might think. And once you’ve embarked on your Java Plum growing journey, we’d love to hear about your experiences! Share your successes, your challenges, and any variations you’ve tried in the comments below. Let’s create a community of Java Plum enthusiasts and learn from each other’s experiences. Together, we can unlock the secrets to successfully growing these delicious tropical fruits in our own backyards. So, grab your seeds or saplings, get your hands dirty, and let the Java Plum adventure begin!
Frequently Asked Questions (FAQ)
What is the ideal climate for growing Java Plum?
Java Plum thrives in warm, tropical, and subtropical climates. It prefers temperatures between 68°F (20°C) and 95°F (35°C). While it can tolerate short periods of cooler temperatures, prolonged exposure to frost can damage or even kill the tree. If you live in an area with cold winters, consider growing your Java Plum in a large container that can be moved indoors during the colder months. Ensure the indoor environment provides adequate sunlight or supplement with grow lights.
How long does it take for a Java Plum tree to bear fruit?
The time it takes for a Java Plum tree to bear fruit can vary depending on several factors, including the method of propagation (seed vs. grafted sapling), the climate, and the overall health of the tree. Seed-grown trees typically take longer to fruit, often requiring 7-10 years. Grafted saplings, on the other hand, can start producing fruit in as little as 3-5 years. Providing optimal growing conditions, including well-drained soil, adequate sunlight, and regular fertilization, can help accelerate the fruiting process.
What kind of soil is best for Java Plum trees?
Java Plum trees prefer well-drained soil that is rich in organic matter. The ideal soil pH is slightly acidic to neutral, ranging from 6.0 to 7.0. If your soil is heavy clay, amend it with compost, peat moss, or other organic materials to improve drainage and aeration. Sandy soils can be improved by adding organic matter to help retain moisture and nutrients. Regular soil testing can help you determine if your soil is lacking any essential nutrients and guide your fertilization strategy.
How often should I water my Java Plum tree?
Watering frequency depends on the climate, soil type, and the age of the tree. Young trees require more frequent watering than established trees. In general, water deeply whenever the top inch of soil feels dry to the touch. During hot, dry weather, you may need to water more frequently. Avoid overwatering, as this can lead to root rot. Ensure that the soil is well-draining to prevent waterlogging. Mulching around the base of the tree can help retain moisture and reduce the need for frequent watering.
What are some common pests and diseases that affect Java Plum trees?
Java Plum trees are generally relatively pest and disease-resistant, but they can be susceptible to certain problems. Common pests include aphids, scale insects, and fruit flies. Diseases that can affect Java Plum trees include fungal infections like leaf spot and root rot. Regularly inspect your tree for signs of pests or diseases. If you notice any problems, take action promptly. Organic pest control methods, such as neem oil or insecticidal soap, can be effective for controlling many pests. Proper watering and drainage can help prevent fungal diseases.
Can I grow Java Plum in a container?
Yes, you can grow Java Plum in a container, especially if you live in an area with cold winters. Choose a large container with drainage holes. Use a high-quality potting mix that is well-draining and rich in organic matter. Container-grown trees will require more frequent watering and fertilization than trees grown in the ground. Be sure to provide adequate sunlight or supplement with grow lights. As the tree grows, you may need to repot it into a larger container.
How do I prune my Java Plum tree?
Pruning is essential for maintaining the shape and health of your Java Plum tree. Prune young trees to establish a strong central leader and remove any dead, damaged, or crossing branches. Mature trees should be pruned annually to remove any suckers, water sprouts, and overcrowded branches. Pruning can also help improve air circulation and sunlight penetration, which can reduce the risk of disease. The best time to prune Java Plum trees is in late winter or early spring, before new growth begins.
What are the nutritional benefits of Java Plum?
Java Plum is a nutritious fruit that is rich in vitamins, minerals, and antioxidants. It is a good source of vitamin C, iron, and potassium. Java Plum also contains compounds that may help regulate blood sugar levels, making it a beneficial fruit for people with diabetes. The fruit is also low in calories and fat, making it a healthy addition to any diet.
How can I use Java Plum in cooking?
Java Plum can be used in a variety of culinary applications. The fruit can be eaten fresh, or it can be used to make jams, jellies, juices, and wines. Java Plum can also be used in savory dishes, such as chutneys and sauces. The fruit has a slightly tart and sweet flavor that pairs well with both sweet and savory ingredients.
Where can I find Java Plum seeds or saplings?
Java Plum seeds can be collected from ripe fruits. However, keep in mind that trees grown from seed may not be true to type and may take longer to fruit. Grafted saplings are a more reliable option, as they are guaranteed to produce fruit of a specific variety. You can find Java Plum saplings at some nurseries or online retailers that specialize in tropical fruit trees. Be sure to choose a reputable source to ensure that you are getting a healthy and disease-free plant.
Leave a Comment