

Pee Stain Removal DIY: Let’s face it, accidents happen! Whether you’re dealing with a new puppy, a toddler in training, or even just a clumsy moment, pee stains are an unfortunate reality of life. But don’t despair! Before you resign yourself to living with that lingering odor and unsightly mark, I’m here to tell you that you can conquer those pee stains with some simple, effective DIY solutions.
For centuries, people have been devising clever ways to clean and deodorize their homes using natural ingredients. Think about it – before the age of commercial cleaners, our ancestors relied on the power of sunshine, vinegar, and baking soda to keep their homes fresh and clean. This resourceful spirit lives on in these pee stain removal DIY methods, offering a budget-friendly and often more eco-friendly alternative to harsh chemicals.
Why is mastering pee stain removal so important? Well, beyond the obvious aesthetic reasons, lingering pee stains can actually attract pets to re-mark the same spot, creating a never-ending cycle of mess and odor. Plus, the ammonia in urine can damage fabrics and even affect indoor air quality. That’s why I’m excited to share these tried-and-true DIY tricks that will help you banish those stains and odors for good, leaving your home smelling fresh and clean!
DIY Pee Stain Removal: A Comprehensive Guide to Freshening Up Your Home
Okay, let’s face it, accidents happen. Whether you have a new puppy, a senior dog with bladder control issues, or even little kids who sometimes miss the mark, pee stains are a common household woe. But don’t despair! You don’t need to resign yourself to living with lingering odors and unsightly marks. I’m going to walk you through a few tried-and-true DIY methods for tackling those pesky pee stains and restoring your home to its fresh, clean glory.
Understanding the Enemy: Why Pee Stains are So Stubborn
Before we dive into the solutions, it’s helpful to understand why pee stains are so difficult to remove. Urine contains uric acid, which crystallizes and clings to fibers, causing that characteristic ammonia smell. The longer the stain sits, the deeper it penetrates and the harder it becomes to eliminate. Plus, the moisture can encourage mold and mildew growth, compounding the problem. That’s why acting fast is key!
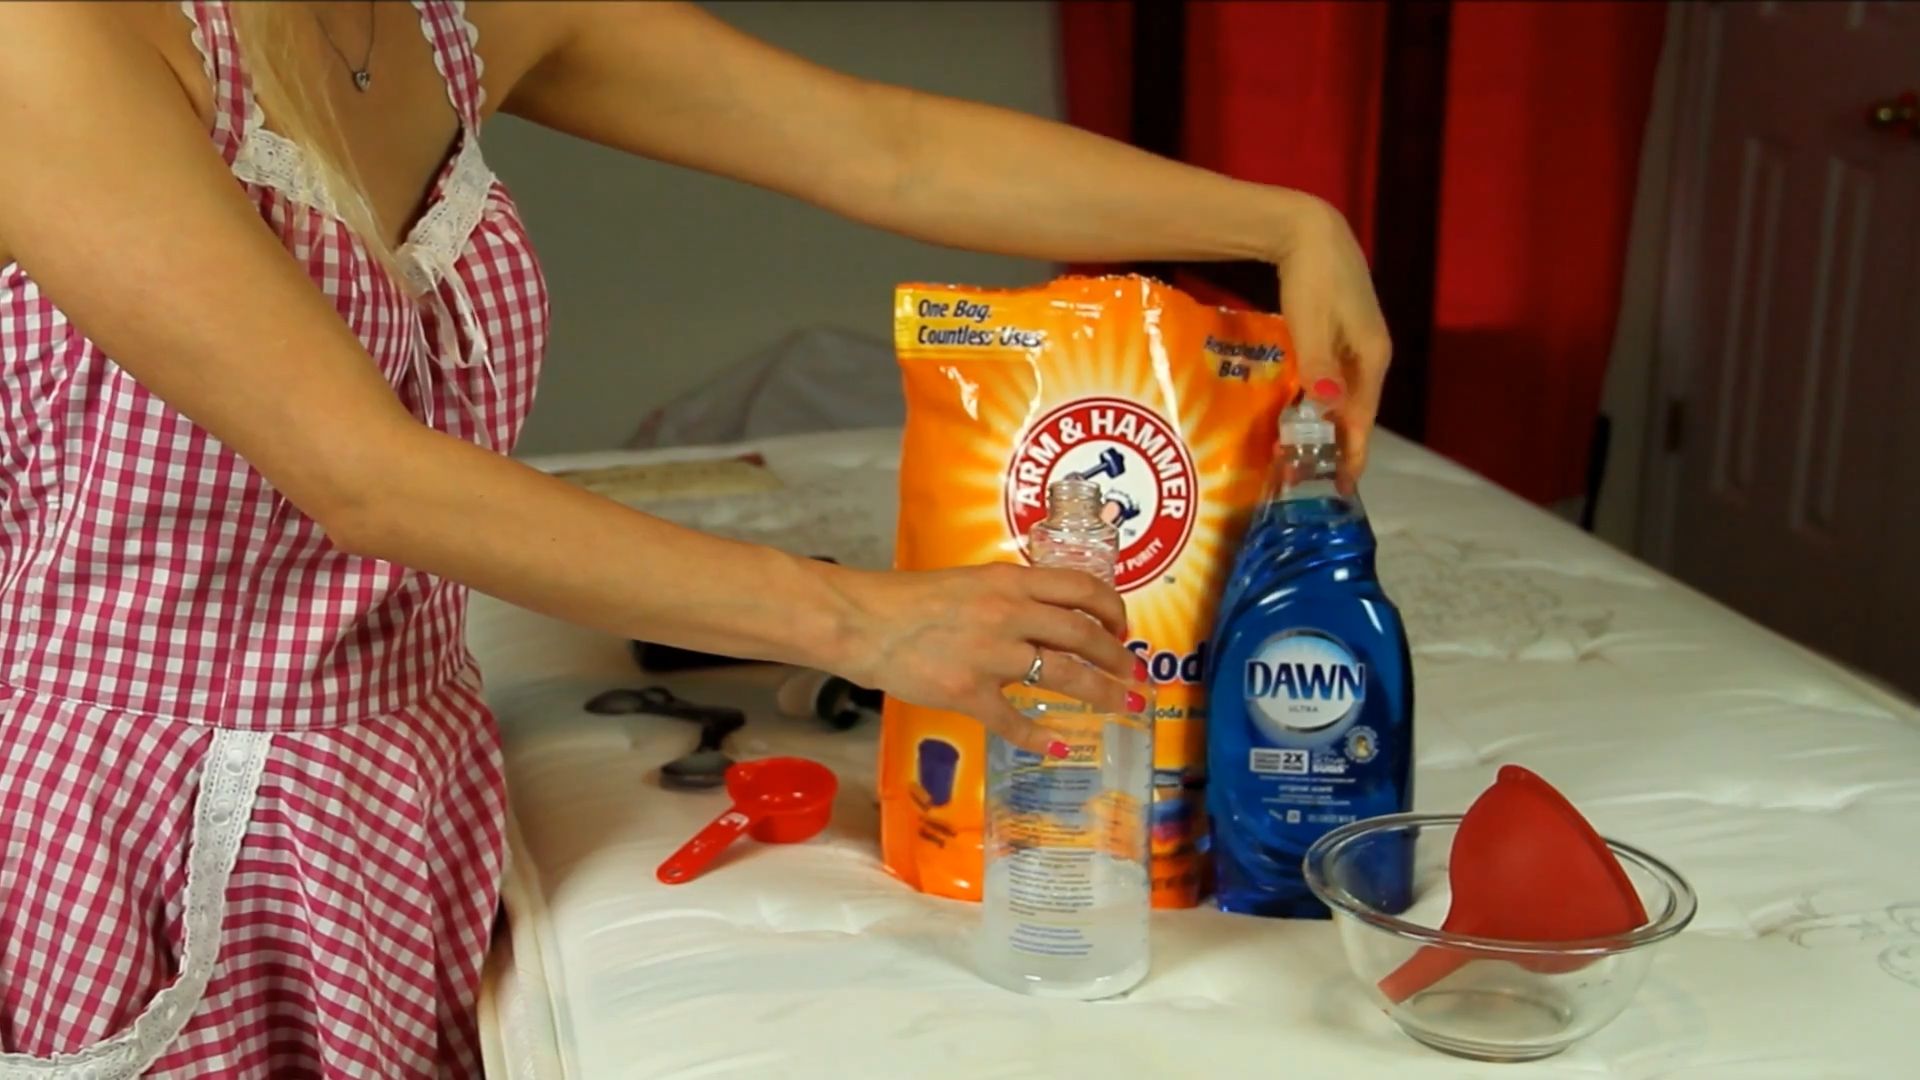
General Supplies You’ll Need
No matter which method you choose, having these supplies on hand will make the process much smoother:
* Paper towels or absorbent cloths: For blotting up excess liquid. Microfiber cloths are great!
* Spray bottle: For applying cleaning solutions.
* Baking soda: A natural odor absorber and mild abrasive.
* White vinegar: A powerful cleaning agent and odor neutralizer.
* Enzyme cleaner: Specifically designed to break down uric acid. (More on this later!)
* Gloves: To protect your hands.
* Old toothbrush or scrub brush: For working the solution into the stain.
* Vacuum cleaner: For removing baking soda residue.
* Water: For rinsing.
Method 1: The Vinegar and Baking Soda Power Duo
This is my go-to method for fresh pee stains, and it works wonders on carpets, rugs, and even upholstery.
Step-by-Step Instructions:
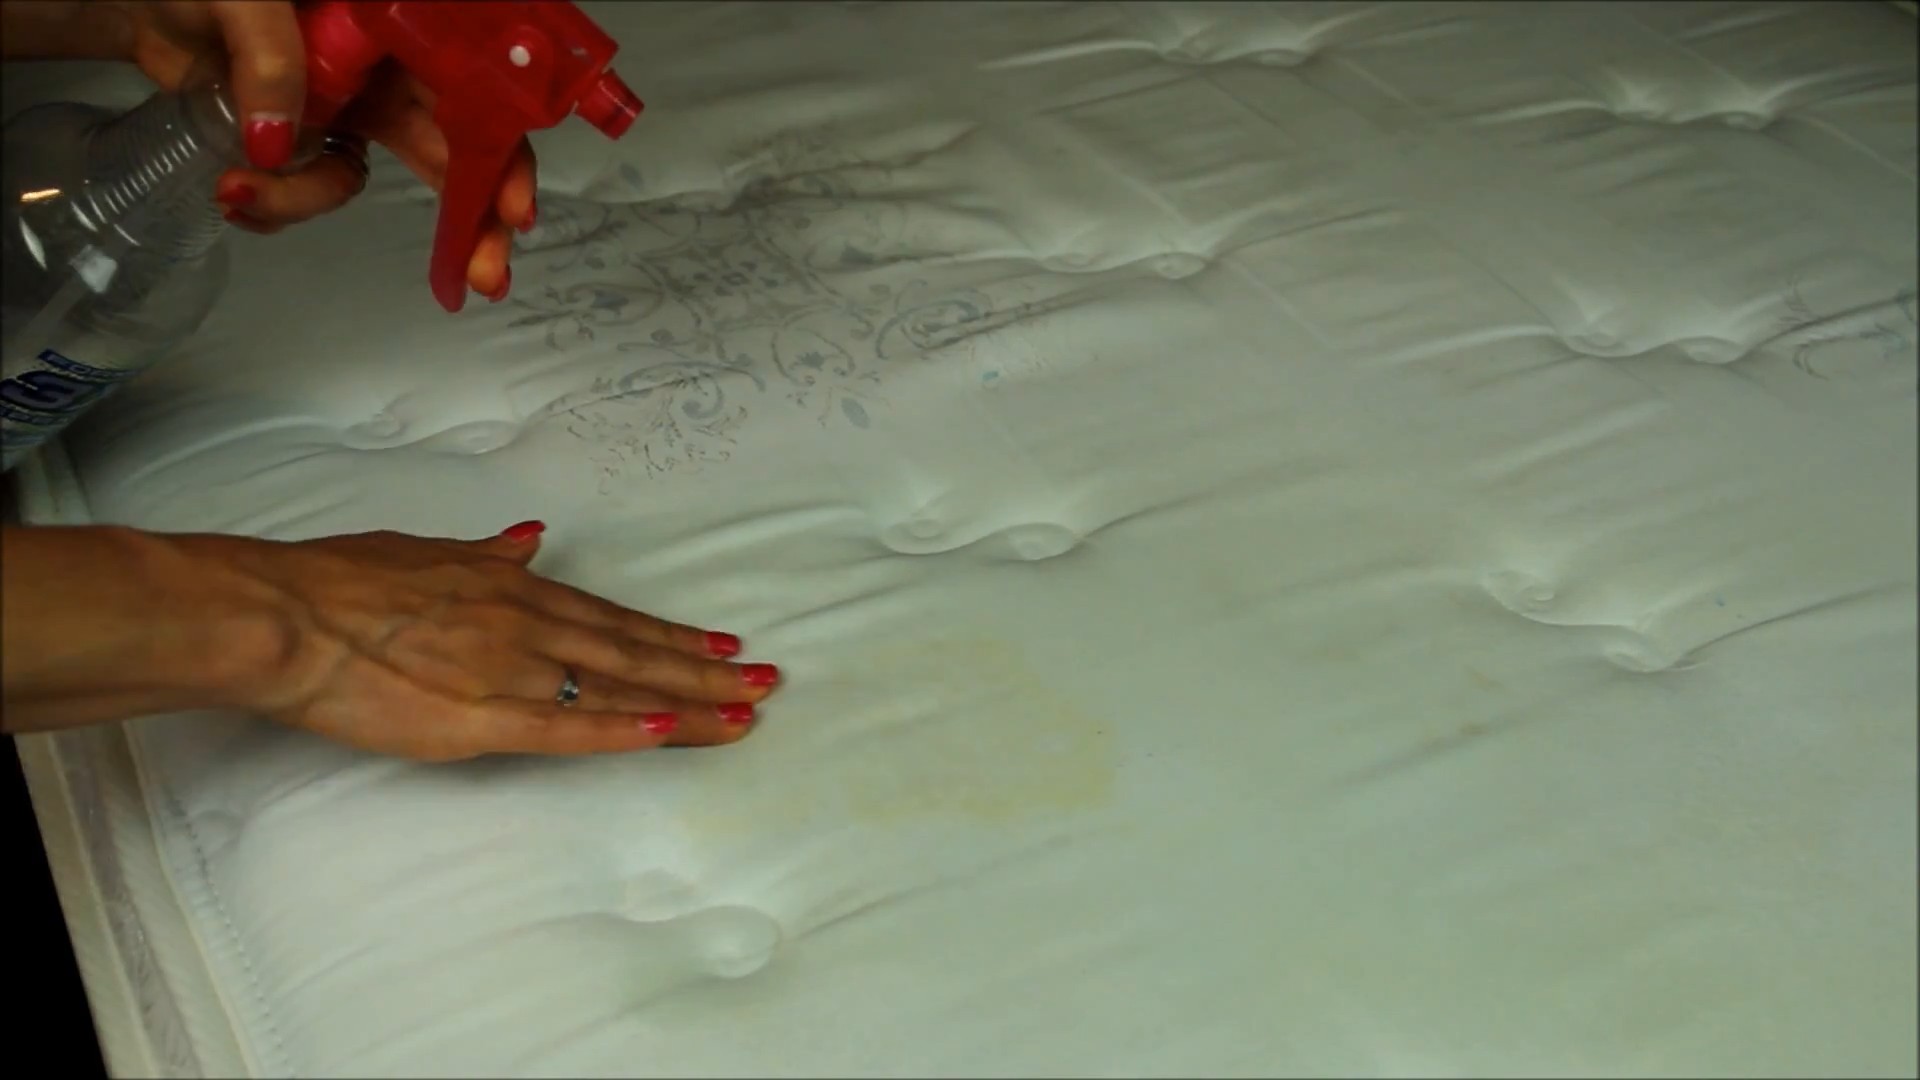
1. Blot, Blot, Blot! As soon as you discover the stain, grab some paper towels or an absorbent cloth and blot up as much of the urine as possible. Don’t rub, as this will only spread the stain. Apply firm pressure and keep blotting until the area is as dry as you can get it.
2. Vinegar to the Rescue: In a spray bottle, mix equal parts white vinegar and water. Generously spray the affected area, making sure to saturate the stain. Don’t be shy!
3. Let it Soak: Allow the vinegar solution to sit for at least 10-15 minutes. This gives the vinegar time to break down the uric acid crystals.
4. Blot Again: After the soaking period, blot up the vinegar solution with clean paper towels or a cloth. Again, focus on blotting rather than rubbing.
5. Baking Soda Magic: Once the area is relatively dry, generously sprinkle baking soda over the entire stain. Make sure it’s completely covered.
6. Wait Patiently: Now comes the waiting game. Let the baking soda sit for several hours, or even overnight. This allows it to absorb any remaining moisture and odors.
7. Vacuum it Up: Once the baking soda has done its job, vacuum it up thoroughly. You may need to go over the area a few times to remove all the residue.
8. Inspect and Repeat: Take a close look at the area. If you can still see or smell the stain, repeat the process. Sometimes, stubborn stains require a second or even third treatment.
Method 2: The Enzyme Cleaner Advantage
Enzyme cleaners are specifically formulated to break down the organic compounds in urine, making them incredibly effective at removing both stains and odors. They’re a must-have for pet owners!
Choosing the Right Enzyme Cleaner:
Not all enzyme cleaners are created equal. Look for a cleaner that is specifically designed for pet urine and is safe for the surface you’re cleaning. Read the label carefully and follow the manufacturer’s instructions.
Step-by-Step Instructions:
1. Blot, Blot, Blot! Just like with the vinegar method, start by blotting up as much of the urine as possible.
2. Apply the Enzyme Cleaner: Generously spray the enzyme cleaner onto the affected area, making sure to saturate the stain. Follow the instructions on the bottle, as some cleaners require you to pre-treat the area with water.
3. Let it Work its Magic: This is crucial! Enzyme cleaners need time to work. Allow the cleaner to sit for the recommended time, which is usually several hours or even overnight. Don’t rush this step!
4. Blot (If Necessary): Some enzyme cleaners require you to blot up the excess solution after the soaking period, while others are designed to air dry. Check the instructions on the bottle.
5. Air Dry: Allow the area to air dry completely. Avoid using a fan or hairdryer, as this can set the stain.
6. Inspect and Repeat: Once the area is dry, inspect it for any remaining stains or odors. If necessary, repeat the process.
Method 3: Hydrogen Peroxide for Light-Colored Surfaces
Important Note: Hydrogen peroxide can bleach dark-colored fabrics, so this method is best suited for light-colored carpets, rugs, and upholstery. Always test a small, inconspicuous area first to ensure it doesn’t cause discoloration.
Step-by-Step Instructions:
1. Blot, Blot, Blot! You know the drill – blot up as much of the urine as possible.
2. Prepare the Solution: In a spray bottle, mix 1/2 cup of 3% hydrogen peroxide with 1 tablespoon of dish soap (the clear kind, not the colored or scented kind).
3. Test Patch: Before applying the solution to the entire stain, test it on a small, hidden area to make sure it doesn’t cause discoloration. Let it sit for a few minutes, then blot it up and check for any changes in color.
4. Apply the Solution: If the test patch is successful, spray the hydrogen peroxide solution onto the stain, making sure to saturate it.
5. Let it Sit: Allow the solution to sit for 10-20 minutes.
6. Blot and Rinse: Blot up the solution with a clean cloth. Then, rinse the area with clean water and blot it dry again.
7. Air Dry: Allow the area to air dry completely.
8. Vacuum: Once the area is dry, vacuum it to remove any residue.
Dealing with Old, Stubborn Pee Stains
Old pee stains are notoriously difficult to remove, but don’t give up hope! You may need to combine methods or repeat the process several times. Here are a few tips for tackling those stubborn stains:
* Pre-Soak: Before applying any cleaning solution, try pre-soaking the stain with warm water. This can help to loosen the uric acid crystals.
* Use a Scrub Brush: For tough stains, use an old toothbrush or scrub brush to work the cleaning solution into the fibers. Be gentle, but persistent.
* Steam Cleaning: If you have access to a steam cleaner, it can be a powerful tool for removing old pee stains. The heat and steam can help to break down the uric acid and lift the stain.
* Professional Help: If you’ve tried everything and the stain is still there, it may be time to call in a professional carpet cleaner. They have specialized equipment and cleaning solutions that can often remove even the most stubborn stains.
Preventing Future Pee Stains
Prevention is always better than cure! Here are a few tips for preventing future pee stains:
* Potty Training: If you have a new puppy or kitten, be consistent with potty training. Take them outside frequently and reward them when they eliminate in the right spot.
* Regular Walks: Make sure your dog gets regular walks to prevent accidents indoors.
* Clean Up Accidents Immediately: The sooner you clean up a pee stain, the easier it will be to remove.
* Waterproof Mattress Protectors: If you have young children or elderly family members, consider using waterproof mattress protectors to prevent urine from soaking into the mattress.
* Consider Pet Diapers: For older dogs with incontinence issues, pet diapers can be a lifesaver.
A Final Word of Encouragement
Removing pee stains can be a frustrating process, but with patience and persistence, you can restore your home to its fresh, clean state. Don’t be afraid to experiment with different methods and repeat the process as needed. And remember, a little bit of prevention goes a long way! Good luck, and happy cleaning!
Conclusion
So, there you have it! This simple, yet incredibly effective, pee stain removal DIY method is a game-changer for anyone dealing with the unfortunate reality of pet accidents or, well, any other kind of pee-related mishap. We’ve all been there, frantically scrubbing with commercial cleaners that promise the world but often fall short, leaving behind lingering odors and unsightly stains. This DIY solution, however, tackles the problem head-on with readily available ingredients, saving you money and, more importantly, your sanity.
Why is this a must-try? Because it works! The combination of baking soda, hydrogen peroxide, and dish soap creates a powerful cleaning trifecta. Baking soda absorbs the odor, hydrogen peroxide lifts the stain and disinfects, and dish soap helps to break down the stain and lift it away from the fibers. Unlike some harsh chemical cleaners, this method is generally safe for most surfaces (always test in an inconspicuous area first!), and it’s a more environmentally friendly option.
But the beauty of this pee stain removal DIY doesn’t stop there. Feel free to experiment with variations to suit your specific needs and preferences. For instance, if you’re dealing with a particularly stubborn stain on a light-colored fabric, you might consider adding a squeeze of lemon juice to the hydrogen peroxide for an extra bleaching boost. Just be cautious and test it first to ensure it doesn’t discolor the material. Alternatively, for older, set-in stains, you might need to repeat the process a few times or let the baking soda sit for a longer period before vacuuming.
Another variation involves the type of dish soap you use. While any mild dish soap will work, consider using a dish soap specifically designed for grease-cutting, as this can be particularly effective on stains that have been absorbed into carpets or upholstery. Essential oils can also be added to the solution for a pleasant fragrance. Lavender, eucalyptus, or tea tree oil are all excellent choices, but be sure to use them sparingly, as some essential oils can be irritating to pets.
Ultimately, the key to success with this pee stain removal DIY is patience and persistence. Don’t be discouraged if the stain doesn’t disappear immediately. Repeat the process as needed, and remember to thoroughly dry the treated area to prevent mold or mildew growth.
We are confident that this DIY method will become your go-to solution for tackling those unwanted pee stains. It’s cost-effective, environmentally conscious, and, most importantly, it delivers results. So, ditch those expensive commercial cleaners and give this simple yet powerful DIY trick a try.
We’re eager to hear about your experiences! Did this method work for you? Did you try any variations? Share your tips, tricks, and success stories in the comments below. Your feedback will not only help other readers but also contribute to refining and improving this already fantastic pee stain removal DIY. Let’s conquer those stains together!
Frequently Asked Questions (FAQ)
What surfaces can I use this pee stain removal DIY on?
This DIY solution is generally safe for most surfaces, including carpets, upholstery, mattresses, and even some hard surfaces like tile or wood. However, it’s crucial to test the solution in an inconspicuous area first to ensure it doesn’t cause any discoloration or damage. Pay particular attention to delicate fabrics or surfaces with special finishes. For example, some types of wood flooring may be sensitive to hydrogen peroxide. Always err on the side of caution and test before applying the solution to the entire stain.
How long should I let the baking soda sit on the stain?
The amount of time you let the baking soda sit on the stain depends on the severity and age of the stain. For fresh stains, 30 minutes to an hour may be sufficient. However, for older, set-in stains, you may need to let the baking soda sit overnight or even for 24 hours. The longer the baking soda sits, the more effectively it can absorb the odor and moisture from the stain. After the baking soda has sat for the desired amount of time, thoroughly vacuum it up before proceeding with the next step.
Can I use a different type of dish soap?
Yes, you can use a different type of dish soap. However, it’s best to use a mild, clear dish soap that doesn’t contain any harsh chemicals or dyes. Dish soaps specifically designed for grease-cutting can be particularly effective, as they help to break down the stain and lift it away from the fibers. Avoid using dish soaps that are heavily scented or contain added moisturizers, as these can leave behind a residue that attracts dirt and grime.
Is hydrogen peroxide safe to use on colored fabrics?
Hydrogen peroxide can have a bleaching effect, so it’s important to use it with caution on colored fabrics. Always test the solution in an inconspicuous area first to ensure it doesn’t cause any discoloration. If you’re concerned about bleaching, you can dilute the hydrogen peroxide with water or use a lower concentration (3% is typically recommended). For delicate or brightly colored fabrics, you may want to consider using an alternative stain removal method.
What if the stain is still visible after trying this method?
If the stain is still visible after trying this method, don’t give up! Repeat the process as needed, allowing the baking soda to sit for a longer period each time. You can also try using a stronger concentration of hydrogen peroxide (but always test in an inconspicuous area first). For particularly stubborn stains, you may need to consult a professional carpet or upholstery cleaner.
How do I prevent pee stains from happening in the first place?
Prevention is always better than cure! To prevent pee stains from happening in the first place, consider using waterproof mattress protectors and upholstery covers. Regularly clean and vacuum your carpets and upholstery to remove any lingering odors or stains. If you have pets, make sure they have access to designated potty areas and clean up accidents immediately. Training your pets to eliminate outside can also help to prevent indoor accidents.
Can I use this method on old, dried pee stains?
Yes, this method can be used on old, dried pee stains, but it may require more effort and patience. Start by rehydrating the stain with a damp cloth or sponge. Then, apply a generous amount of baking soda and let it sit for at least 24 hours to absorb the odor and moisture. After vacuuming up the baking soda, proceed with the hydrogen peroxide and dish soap solution. You may need to repeat the process several times to completely remove the stain and odor.
What if I don’t have hydrogen peroxide?
If you don’t have hydrogen peroxide, you can try using white vinegar as an alternative. White vinegar has disinfecting and deodorizing properties that can help to remove pee stains and odors. Mix equal parts white vinegar and water in a spray bottle and apply it to the stain. Let it sit for 15-20 minutes, then blot it up with a clean cloth. Follow up with baking soda to absorb any remaining odor.
Is this method safe for pets?
While the ingredients in this DIY solution are generally considered safe, it’s important to keep pets away from the treated area until it’s completely dry. Hydrogen peroxide can be irritating if ingested, and some essential oils can be toxic to pets. Always supervise your pets and prevent them from licking or chewing on the treated area. If you’re concerned about the safety of this method for your pets, consult with your veterinarian.
How do I get rid of the pee smell after cleaning the stain?
Even after removing the stain, the pee smell may linger. To get rid of the pee smell, ensure the area is thoroughly dry. You can use a fan or dehumidifier to speed up the drying process. You can also sprinkle baking soda over the area and let it sit overnight to absorb any remaining odor. Vacuum up the baking soda in the morning. Air fresheners or odor eliminators can also help to mask the smell, but it’s important to address the source of the odor first.

Leave a Comment