

Banana plant propagation might sound intimidating, but trust me, it’s easier than you think! Have you ever admired those lush, tropical banana plants and wished you could have your own mini-plantation at home? Well, you absolutely can! This isn’t just about adding a touch of the exotic to your garden; it’s about connecting with a plant that has nourished cultures for centuries. Bananas, originating in Southeast Asia, have been cultivated for thousands of years, playing a vital role in food security and cultural traditions across the globe.
But why bother with banana plant propagation yourself? Simple: it’s cost-effective, rewarding, and allows you to multiply your favorite banana variety without breaking the bank. Instead of buying new plants, you can create them from the ones you already have! Plus, it’s a fantastic way to learn more about plant life cycles and develop your green thumb. In this article, I’m going to share some simple, DIY tricks and hacks that will guide you through the process, ensuring you’ll be harvesting your own homegrown bananas in no time. Get ready to roll up your sleeves and dive into the wonderful world of banana plant propagation!
Propagating Banana Plants: A Beginner’s Guide to Growing Your Own Tropical Paradise
Hey there, fellow plant enthusiasts! Ever dreamt of having your own mini banana plantation? Well, you’re in luck! Propagating banana plants is surprisingly easier than you might think. I’m going to walk you through the process, step-by-step, so you can expand your banana family and enjoy these tropical beauties even more.
Understanding Banana Plant Propagation
Before we dive in, let’s talk a little about how banana plants reproduce. Unlike many plants that rely on seeds, bananas are typically propagated through offshoots, also known as “pups” or “suckers.” These pups are essentially baby banana plants that grow from the base of the mother plant. They share the same genetic makeup, meaning you’ll get a clone of the original plant.
There are a few different types of pups, but we’ll focus on the most common and successful method: separating pups with well-developed roots. This method gives the new plant the best chance of survival.
Materials You’ll Need
To get started, gather these supplies:
* A mature banana plant with pups (obviously!). Look for pups that are at least 1-3 feet tall.
* A sharp, clean knife or pruning saw. Cleanliness is crucial to prevent disease.
* A shovel or spade.
* Gardening gloves (to protect your hands).
* A bucket or container for the separated pup.
* Well-draining potting mix (a mix of peat moss, perlite, and vermiculite works well).
* Watering can or hose.
* Optional: Rooting hormone (can help encourage root growth, but not always necessary).
* Optional: Fungicide (to prevent fungal infections after separation).
Identifying the Right Pup
Not all pups are created equal! You want to choose a pup that’s healthy and has a good chance of thriving on its own. Here’s what to look for:
* Size: The pup should be at least 1-3 feet tall. Smaller pups might not have enough energy reserves to survive the transplant.
* Roots: Ideally, you want a pup that has already started developing its own roots. You might be able to see them poking out from the base of the pup.
* Health: The pup should be free from pests and diseases. Look for healthy green leaves and a sturdy stem. Avoid pups that are yellowing, wilting, or have any signs of infestation.
* Location: Choose a pup that’s growing a little bit away from the mother plant. This will make it easier to separate without damaging the mother plant’s roots.
Separating the Pup from the Mother Plant
This is the most crucial step, so take your time and be careful!
1. Prepare the Potting Mix: Fill your bucket or container with the well-draining potting mix. Moisten the mix slightly, but don’t make it soggy.
2. Dig Around the Pup: Using your shovel or spade, carefully dig around the base of the pup. Try to expose as much of the root system as possible without disturbing the mother plant.
3. Locate the Connection: You’ll need to find the point where the pup is connected to the mother plant’s rhizome (the underground stem). This is where you’ll make the cut.
4. Make the Cut: Using your sharp, clean knife or pruning saw, carefully cut the pup away from the mother plant’s rhizome. Make a clean, angled cut. Be very careful not to damage the mother plant’s rhizome. This might require some digging and maneuvering to get a good angle. I usually try to cut downwards, away from the main plant.
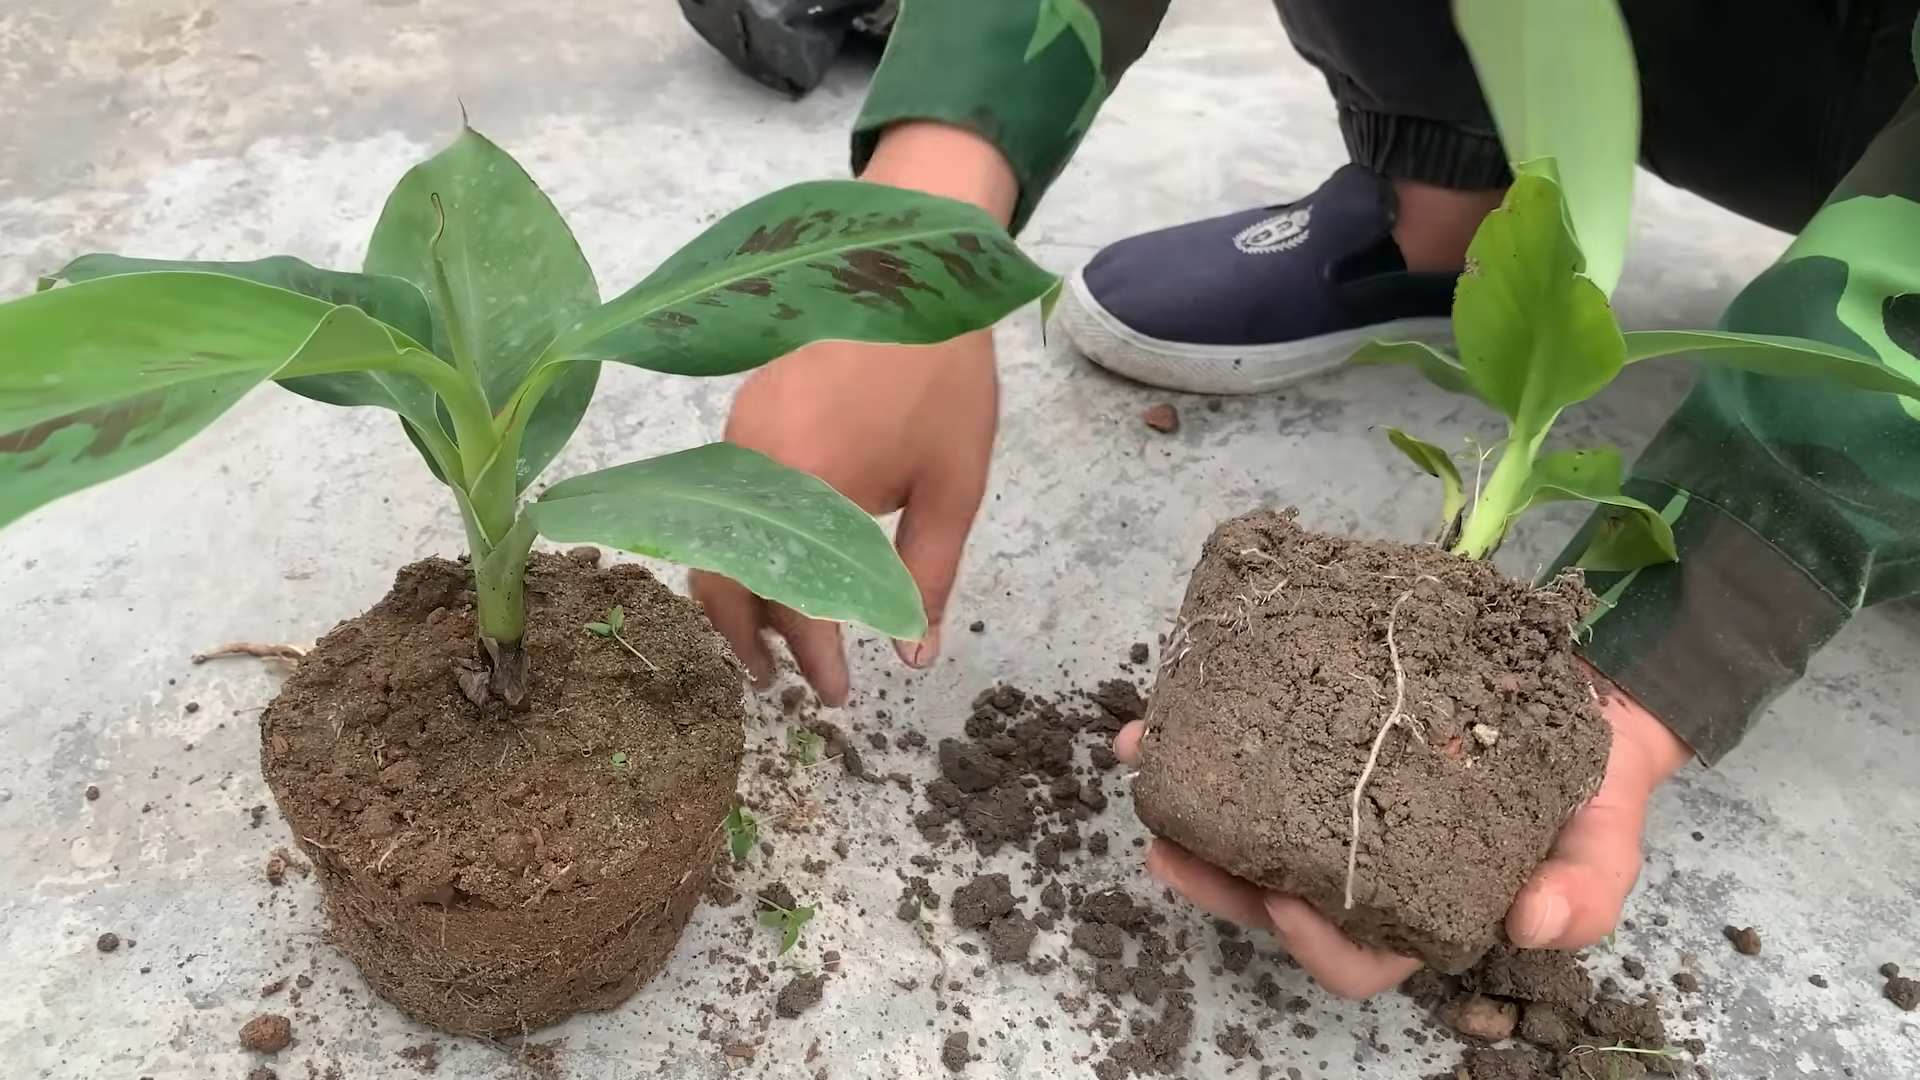
5. Remove the Pup: Gently lift the separated pup from the ground. If it has a good root system, it should come out fairly easily. If it’s stuck, try wiggling it gently to loosen it.
6. Inspect the Roots: Once you’ve removed the pup, inspect the roots. Trim away any damaged or dead roots with your clean knife or pruning shears.
7. Optional: Apply Rooting Hormone and Fungicide: If you’re using rooting hormone, dip the cut end of the pup’s rhizome into the powder or liquid. This will help encourage root growth. You can also apply a fungicide to the cut surface to prevent fungal infections.
Planting the Separated Pup
Now it’s time to give your new banana plant a home!
1. Create a Planting Hole: In the prepared container, dig a hole large enough to accommodate the pup’s root system.
2. Plant the Pup: Carefully place the pup in the hole, making sure the top of the rhizome is level with the soil surface.
3. Backfill with Potting Mix: Gently backfill the hole with potting mix, firming it around the roots.
4. Water Thoroughly: Water the newly planted pup thoroughly until water drains out of the bottom of the container.
Caring for Your New Banana Plant
Proper care is essential for the survival and growth of your new banana plant.
1. Location: Place the container in a warm, sunny location. Banana plants need at least 6-8 hours of sunlight per day.
2. Watering: Keep the soil consistently moist, but not soggy. Water when the top inch of soil feels dry to the touch. Overwatering can lead to root rot.
3. Humidity: Banana plants thrive in humid environments. If you live in a dry climate, you can increase humidity by misting the leaves regularly or placing the container on a tray filled with pebbles and water.
4. Fertilizing: Feed your new banana plant with a balanced fertilizer every 2-3 weeks during the growing season (spring and summer). Follow the instructions on the fertilizer label.
5. Protection from Cold: Banana plants are sensitive to frost. If you live in an area with cold winters, you’ll need to protect your plant from freezing temperatures. You can bring the container indoors or cover the plant with a frost blanket.
6. Pest and Disease Control: Keep an eye out for pests and diseases. Common banana plant pests include aphids, spider mites, and mealybugs. Treat infestations promptly with insecticidal soap or neem oil. Fungal diseases can be prevented by providing good air circulation and avoiding overwatering.
Troubleshooting
Even with the best care, you might encounter some challenges. Here are a few common problems and how to address them:
* Yellowing Leaves: This could be a sign of overwatering, underwatering, nutrient deficiency, or pest infestation. Check the soil moisture, fertilize if necessary, and inspect for pests.
* Wilting Leaves: This is usually a sign of underwatering. Water the plant thoroughly.
* Slow Growth: This could be due to insufficient sunlight, nutrient deficiency, or cold temperatures. Move the plant to a sunnier location, fertilize regularly, and protect it from cold.
* Root Rot: This is caused by overwatering. Allow the soil to dry out slightly between waterings and ensure the container has good drainage. If the root rot is severe, you may need to repot the plant with fresh potting mix.
Transplanting to the Garden (Optional)
Once your banana plant has established a strong root system (usually after a few months), you can transplant it to the garden if you live in a warm climate.
1. Choose a Location: Select a sunny location with well-draining soil. Banana plants need plenty of space to grow, so choose a spot that’s at least 10-15 feet away from other plants and structures.
2. Prepare the Soil: Dig a hole that’s twice as wide and as deep as the container. Amend the soil with compost or other organic matter to improve drainage and fertility.
3. Remove the Plant from the Container: Gently remove the banana plant from the container. If the roots are tightly bound, you can loosen them slightly with your fingers.
4. Plant the Banana Plant: Place the banana plant in the hole, making sure the top of the root ball is level with the soil surface.
5. Backfill with Soil: Backfill the hole with soil, firming it around the roots.
6. Water Thoroughly: Water the newly transplanted banana plant thoroughly.
7. Mulch: Apply a layer of mulch around the base of the plant to help retain moisture and suppress weeds.
Patience is Key
Remember, propagating banana plants takes time and patience. Don’t be discouraged if your first attempt isn’t successful. Keep learning, keep experimenting, and you’ll eventually have a thriving banana plantation of your own! I hope this guide helps you on your banana-growing journey. Happy planting!
Conclusion
So, there you have it! Mastering banana plant propagation at home is not just a fun project; it’s a gateway to expanding your own tropical paradise, sharing the joy of homegrown fruit with friends and family, and contributing to a more sustainable lifestyle. We’ve walked you through the steps, from identifying suitable pups to nurturing them into thriving new banana plants.
Why is this DIY trick a must-try? Because it empowers you to take control of your garden, multiply your banana harvest without spending a fortune, and experience the unique satisfaction of nurturing life from a simple offshoot. Imagine the pride you’ll feel when you harvest your first bunch of bananas from a plant you propagated yourself! It’s a rewarding experience that connects you to the natural world in a tangible way.
But the journey doesn’t end here. Feel free to experiment with different potting mixes to find what works best for your local climate and soil conditions. Consider using organic fertilizers to give your young banana plants a healthy boost. And don’t be afraid to try different propagation methods, such as dividing the rhizome, once your plants are mature enough.
Variations and Suggestions:
* Experiment with different banana varieties: Each variety may have slightly different propagation needs. Research the specific requirements of your chosen banana type for optimal results.
* Use rooting hormone: While not always necessary, a rooting hormone can significantly speed up the rooting process, especially for more challenging varieties.
* Create a mini-greenhouse: Increase humidity around your newly potted pups by covering them with a clear plastic bag or container. This will help them retain moisture and encourage root development. Remember to ventilate regularly to prevent mold growth.
* Consider hydroponics: For a more advanced approach, explore hydroponic propagation methods. This can lead to faster growth and healthier plants.
* Share the love: Once your banana plants are thriving, consider gifting pups to friends and neighbors. Spread the joy of homegrown bananas and encourage others to try this rewarding DIY project.
We’re confident that with a little patience and care, you’ll be successfully propagating banana plants in no time. Remember to provide your new plants with plenty of sunlight, water, and nutrients, and they’ll reward you with lush foliage and delicious fruit for years to come.
Now, it’s your turn! We encourage you to try this DIY banana plant propagation method and share your experiences with us. What challenges did you encounter? What tips and tricks did you discover along the way? Your feedback will help us improve this guide and inspire others to embark on their own banana-growing adventures. Share your photos and stories in the comments below – we can’t wait to see your success! Happy growing!
Frequently Asked Questions (FAQ)
Q: What is the best time of year to propagate banana plants?
A: The ideal time for banana plant propagation is during the warmer months, typically spring or early summer. This is when the plants are actively growing and have the best chance of establishing roots quickly. The warmer temperatures and longer daylight hours provide the optimal conditions for growth and development. Avoid propagating during the colder months, as the plants will be dormant and less likely to root successfully. If you live in a region with mild winters, you may be able to propagate year-round, but be sure to provide adequate warmth and light to your young plants.
Q: How do I know which pups are suitable for propagation?
A: Look for pups that are at least 1-3 feet tall and have several healthy leaves. The pups should be well-formed and free from any signs of disease or pests. Avoid using pups that are too small or weak, as they may not have enough energy reserves to establish roots. Also, avoid using pups that are growing too close to the mother plant, as they may be competing for resources. The best pups are those that are growing independently and have a strong connection to the rhizome.
Q: What type of potting mix should I use for banana plant propagation?
A: A well-draining potting mix is essential for successful banana plant propagation. A mixture of equal parts peat moss, perlite, and vermiculite is a good starting point. You can also add some compost or well-rotted manure to provide additional nutrients. Avoid using heavy clay soils, as they can retain too much moisture and lead to root rot. The potting mix should be loose and airy to allow for good drainage and aeration. You can also purchase specialized potting mixes designed for tropical plants, which often contain the ideal blend of ingredients for banana plant growth.
Q: How often should I water my newly propagated banana plants?
A: Water your newly propagated banana plants regularly, keeping the soil consistently moist but not waterlogged. Check the soil moisture level daily and water when the top inch of soil feels dry to the touch. Avoid overwatering, as this can lead to root rot. During the warmer months, you may need to water more frequently. During the cooler months, you can reduce the watering frequency. The key is to maintain a consistent level of moisture without allowing the soil to become saturated.
Q: How much sunlight do my newly propagated banana plants need?
A: Banana plants thrive in full sunlight, so provide your newly propagated plants with at least 6-8 hours of direct sunlight per day. If you are growing your plants indoors, place them near a sunny window or use grow lights to supplement the natural light. Insufficient sunlight can lead to stunted growth and reduced fruit production. However, be careful not to expose your young plants to intense, direct sunlight immediately after propagation, as this can scorch their leaves. Gradually acclimate them to full sun over a period of several days.
Q: How long does it take for banana plant pups to develop roots?
A: The time it takes for banana plant pups to develop roots can vary depending on several factors, including the variety of banana, the size of the pup, and the environmental conditions. Generally, you can expect to see roots developing within 2-4 weeks. You can check for root development by gently tugging on the pup. If it feels firmly anchored in the soil, it has likely developed roots. Once the roots are established, you can begin to fertilize your plants regularly.
Q: When can I transplant my newly propagated banana plants into larger pots or into the ground?
A: Once your banana plant pups have developed a strong root system and are actively growing, you can transplant them into larger pots or into the ground. This typically takes 2-3 months after propagation. Choose a location that receives plenty of sunlight and has well-draining soil. When transplanting, be careful not to damage the roots. Dig a hole that is slightly larger than the root ball and gently place the plant in the hole. Backfill with soil and water thoroughly.
Q: What are some common problems I might encounter when propagating banana plants?
A: Some common problems you might encounter when propagating banana plants include root rot, pest infestations, and nutrient deficiencies. Root rot can be caused by overwatering or poor drainage. To prevent root rot, use a well-draining potting mix and avoid overwatering. Pest infestations can be controlled with insecticidal soap or neem oil. Nutrient deficiencies can be addressed by fertilizing your plants regularly with a balanced fertilizer. Be sure to monitor your plants regularly for any signs of problems and take action promptly to prevent them from becoming severe.
Q: Can I propagate banana plants from seed?
A: While it is possible to propagate banana plants from seed, it is a much more challenging and time-consuming process than propagating from pups. Banana seeds are often difficult to germinate, and the resulting plants may not be true to type, meaning they may not produce the same type of fruit as the parent plant. For these reasons, propagating from pups is the preferred method for most home gardeners.
Q: How do I care for my banana plant after it has been transplanted?
A: After transplanting your banana plant, water it regularly and fertilize it every 2-3 weeks with a balanced fertilizer. Provide it with plenty of sunlight and protect it from strong winds. Monitor it regularly for any signs of pests or diseases. As your banana plant grows, you may need to provide it with support to prevent it from toppling over. With proper care, your banana plant will thrive and produce delicious fruit for years to come.
Leave a Comment