

DIY Cardboard Safe Project: Ever dreamt of having your own secret vault, a place to stash your treasures away from prying eyes? I know I have! Forget expensive safes and complicated security systems. We’re diving into a fun, budget-friendly project that’s perfect for kids and adults alike: building your very own cardboard safe!
While elaborate safes have been around for centuries, protecting valuables for royalty and the wealthy, the idea of a homemade safe taps into something much more personal. It’s about creativity, resourcefulness, and the satisfaction of building something with your own two hands. Think of it as a modern take on the classic piggy bank, but with a whole lot more personality and a dash of DIY ingenuity.
Why do you need this DIY Cardboard Safe Project in your life? Well, beyond the sheer fun of it, it’s a fantastic way to teach kids about saving, responsibility, and the basics of engineering. Plus, it’s a great way to recycle those cardboard boxes piling up in your garage! For adults, it’s a chance to unleash your inner child, de-stress with a hands-on project, and create a unique storage solution that’s both functional and conversation-starting. So, grab your cardboard, scissors, and glue – let’s get building!
“`html
DIY Cardboard Safe: Protect Your Treasures!
Hey there, fellow DIY enthusiasts! Ever wanted a secret hiding place for your valuables, but didn’t want to break the bank? Well, I’ve got just the project for you: a super cool, surprisingly secure cardboard safe! This project is perfect for kids, teens, or even adults who want a fun and functional way to stash their stuff. Let’s get started!
Materials You’ll Need
Before we dive in, let’s gather our supplies. Don’t worry, most of these are probably already lying around your house!
* **Cardboard Boxes:** You’ll need a few different sizes. A large, sturdy box for the main body of the safe, a medium box for the door, and some smaller boxes or cardboard scraps for internal mechanisms and reinforcement. Think about the size of the items you want to store when choosing your boxes.
* **Craft Knife or Box Cutter:** Be super careful with these! Adult supervision is a must if you’re a younger crafter.
* **Ruler or Measuring Tape:** Precision is key for a smooth-operating safe.
* **Pencil or Pen:** For marking measurements and drawing outlines.
* **Hot Glue Gun and Glue Sticks:** This is our main adhesive. Hot glue dries quickly and creates a strong bond.
* **Scissors:** For smaller cuts and trimming.
* **Skewer or Thin Dowel Rod:** This will act as the hinge for our door.
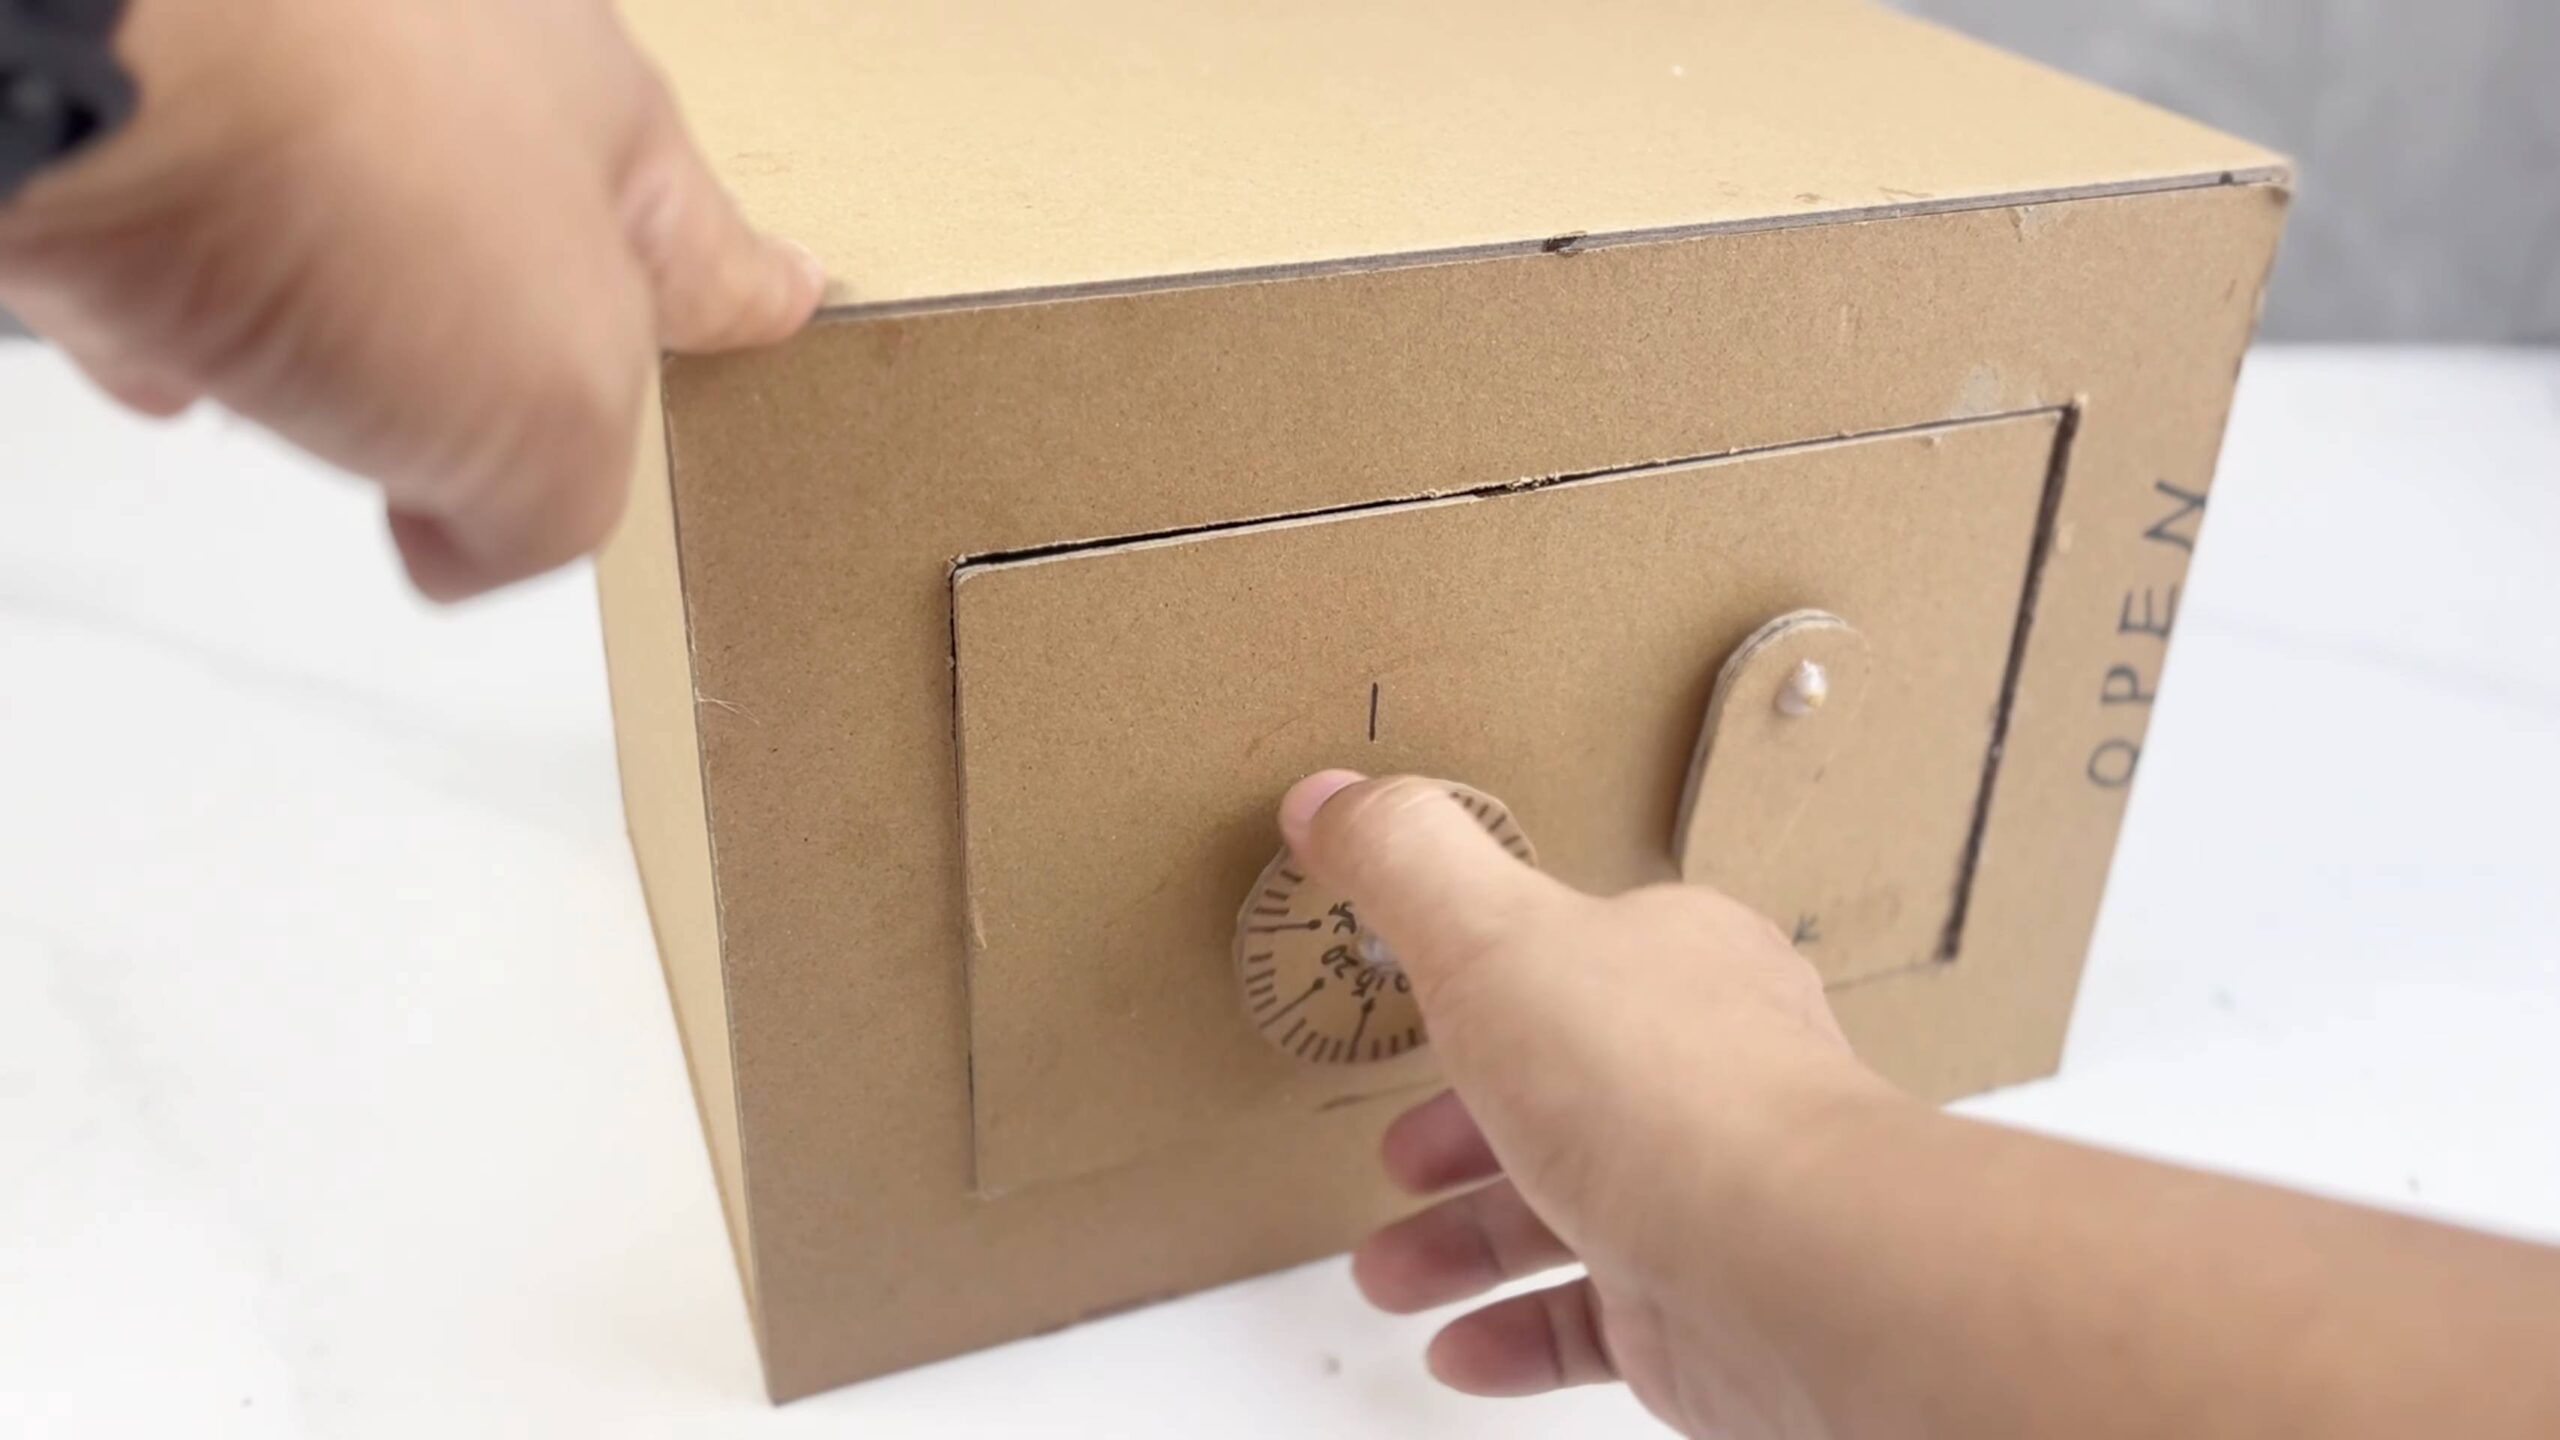
* **Combination Lock (Optional):** If you want to add an extra layer of security, a small combination lock is a great addition.
* **Paint, Markers, or Decorative Paper (Optional):** For customizing the look of your safe.
* **Small Magnets (Optional):** For a magnetic locking mechanism.
* **Metal Washers (Optional):** To work with the magnets for a stronger hold.
* **Drinking Straws (Optional):** For creating a smooth sliding bolt mechanism.
Building the Main Body
This is the foundation of our safe, so let’s make it strong!
1. **Choose Your Box:** Select the largest and sturdiest cardboard box you have. This will be the main body of your safe. Make sure it’s clean and free of any major damage.
2. **Reinforce the Box (Optional):** If your box feels a little flimsy, you can reinforce the inside with extra layers of cardboard. Cut cardboard pieces to fit the inside walls and bottom of the box, and glue them in place with hot glue. This will add extra strength and stability.
3. **Cut the Opening:** Decide where you want the door to be located (front, top, or side). Using your ruler and pencil, draw a rectangle on the box where the door will go. Make sure to leave a border of at least 2 inches around the rectangle to provide a frame for the door. Carefully cut out the rectangle using your craft knife or box cutter. Remember to cut on a protected surface!
4. **Smooth the Edges:** Once you’ve cut out the opening, smooth the edges with scissors or sandpaper to prevent any sharp edges.
Creating the Door
Now, let’s build the door that will protect our treasures!
1. **Choose Your Box:** Select a medium-sized cardboard box that is slightly larger than the opening you cut in the main body. This will allow the door to overlap the opening and create a secure closure.
2. **Cut the Door to Size:** Using your ruler and pencil, measure the opening in the main body. Add about 1 inch to each side of the measurement to create an overlap. Cut the door to this size from your chosen cardboard box.
3. **Reinforce the Door (Optional):** Just like with the main body, you can reinforce the door with extra layers of cardboard. This will make it more resistant to bending or breaking.
4. **Add a Handle (Optional):** You can create a simple handle by cutting a small strip of cardboard and folding it into a loop. Glue the loop to the front of the door. Alternatively, you can use a small knob or pull from an old drawer.
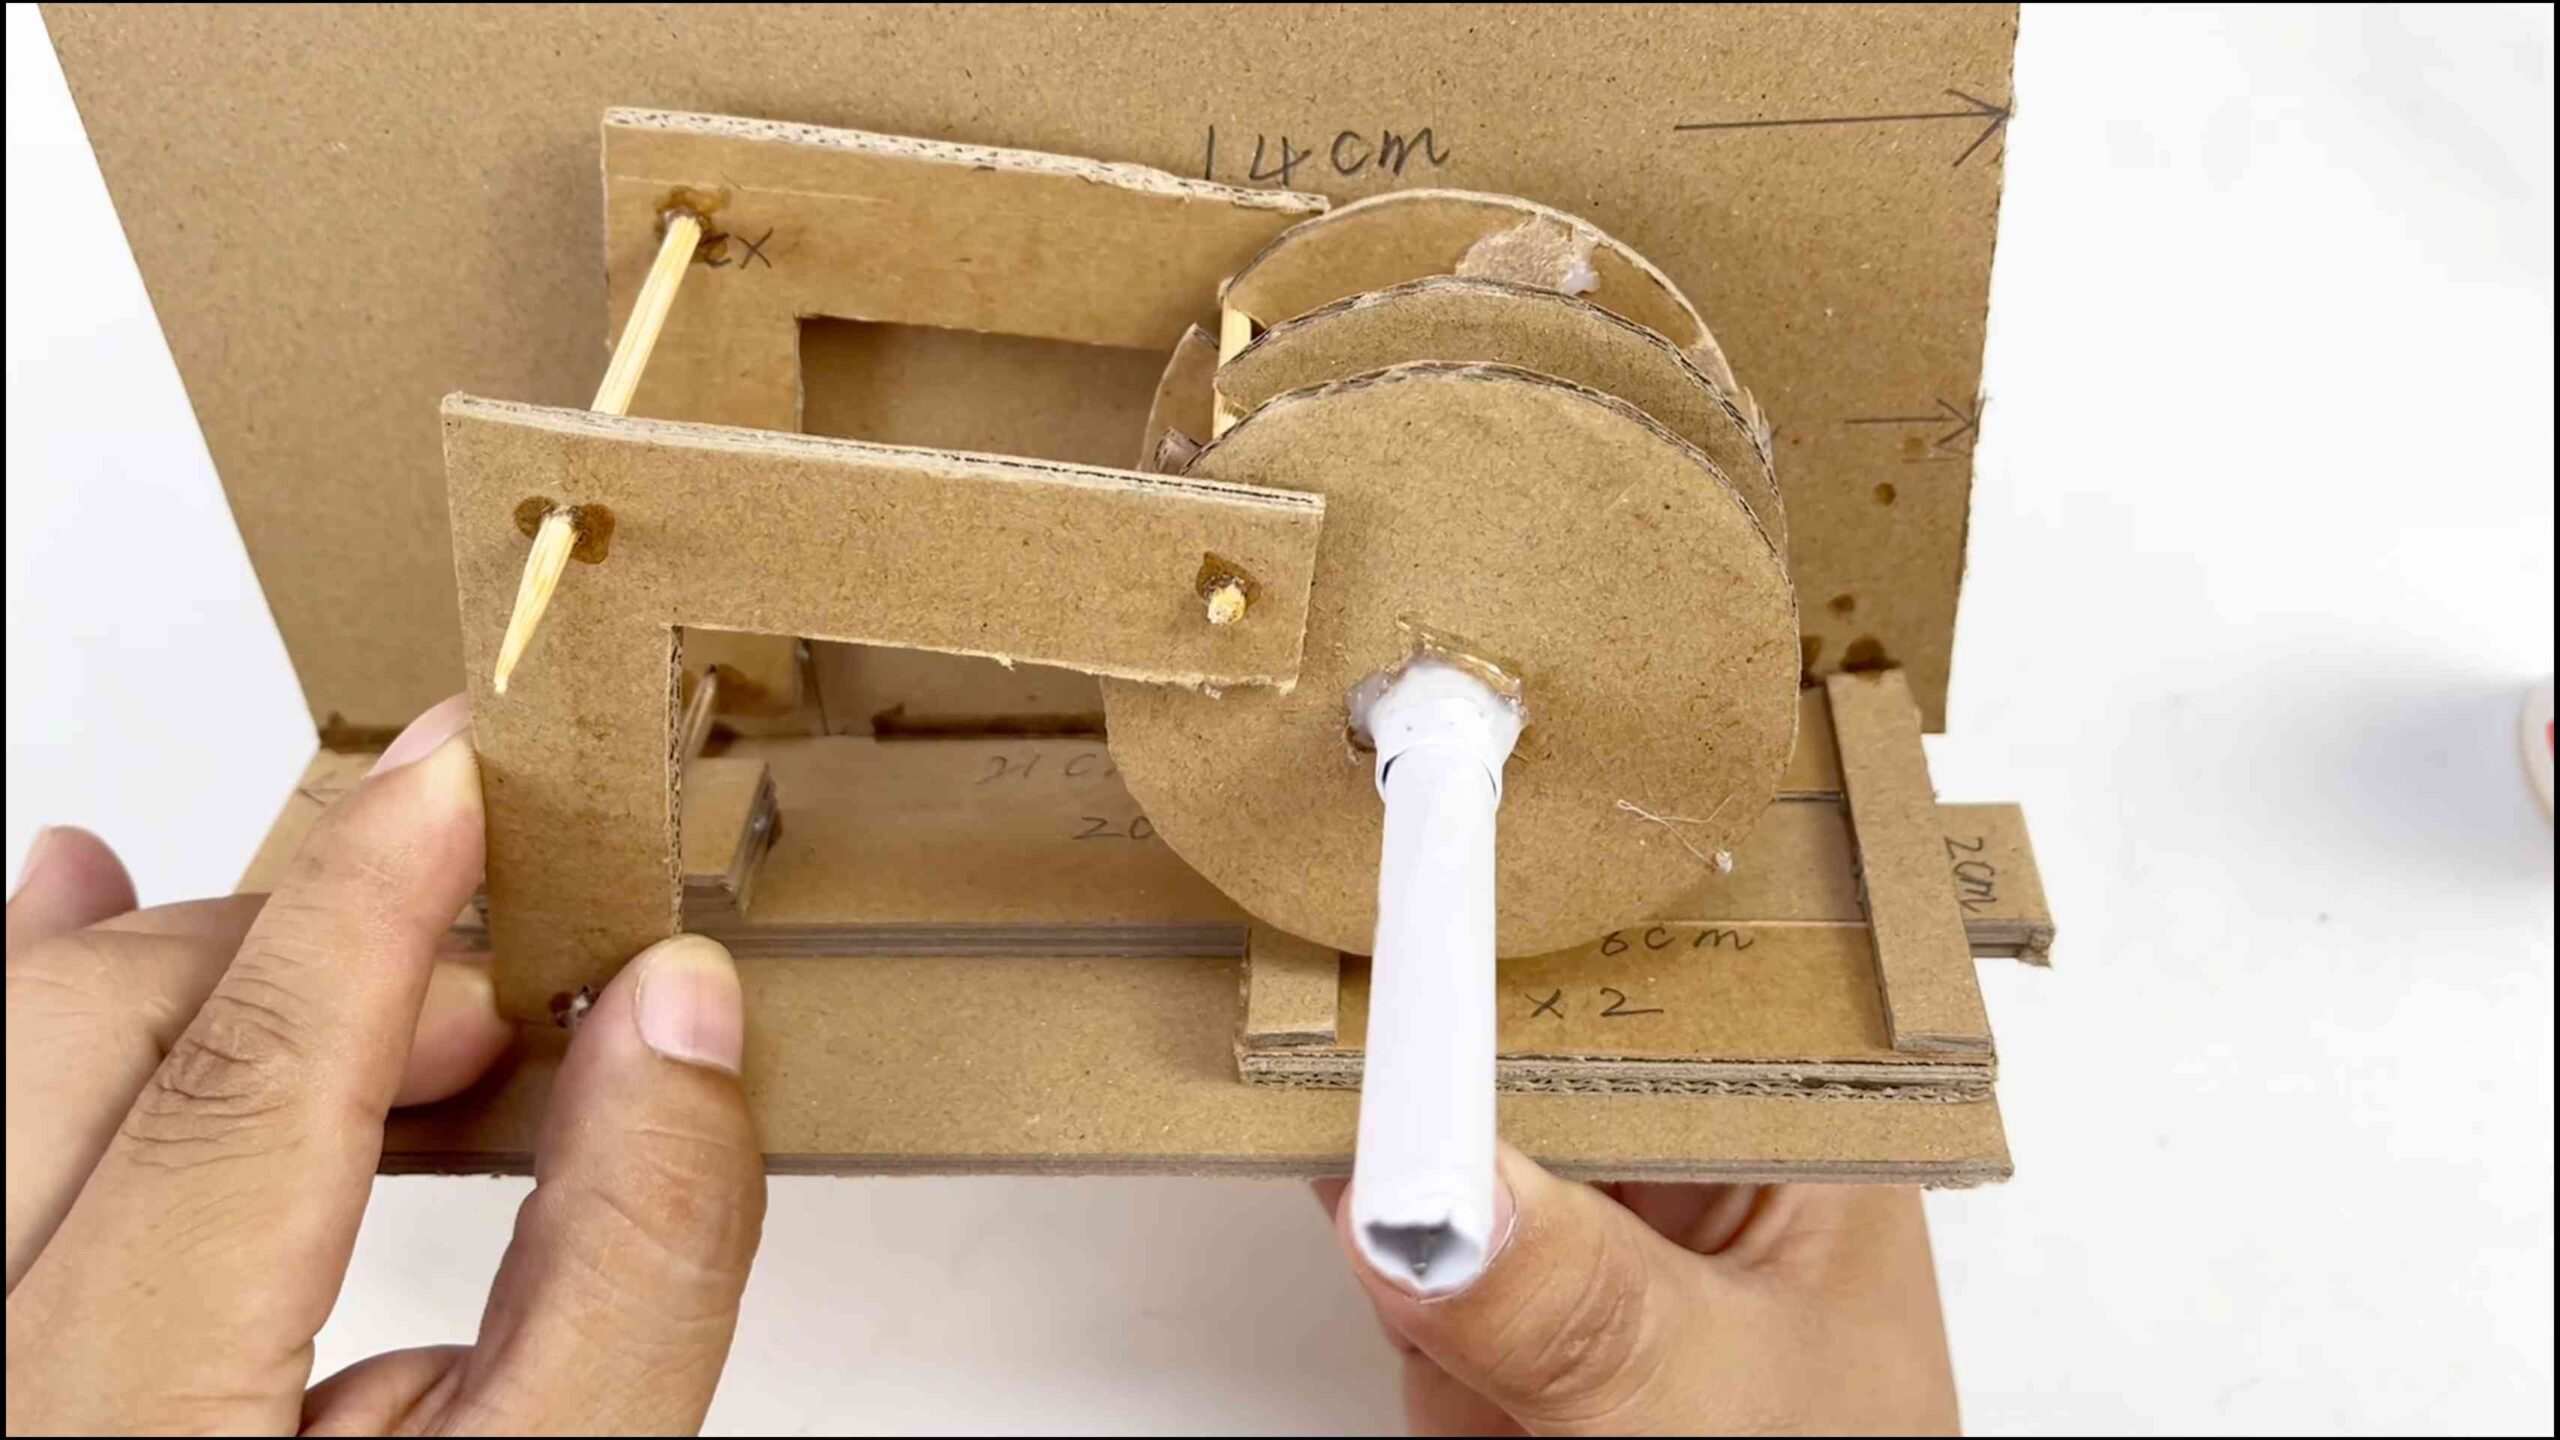
Constructing the Hinge
The hinge is what allows the door to open and close smoothly.
1. **Prepare the Hinge Pieces:** Cut two strips of cardboard, each about 4 inches long and 1 inch wide. Fold each strip in half lengthwise to create a crease.
2. **Attach the Hinge to the Door:** Glue one half of each hinge strip to the inside edge of the door, along the side that will be hinged. Make sure the hinges are aligned and evenly spaced.
3. **Attach the Hinge to the Main Body:** Glue the other half of each hinge strip to the inside of the main body, along the edge of the opening. Make sure the hinges are aligned with the hinges on the door.
4. **Insert the Skewer or Dowel Rod:** Once the glue has dried, carefully insert the skewer or dowel rod through the loops created by the folded hinge strips. This will connect the door to the main body and allow it to swing open and closed. You might need to trim the skewer to the correct length.
Implementing a Locking Mechanism (Sliding Bolt)
Let’s add a simple but effective locking mechanism using a sliding bolt.
1. **Create the Bolt:** Cut a strip of cardboard about 6 inches long and 1 inch wide. This will be our sliding bolt.
2. **Create the Guides:** Cut two short pieces of drinking straw, about 1 inch long each. Glue these straws to the inside of the main body, near the edge of the door opening. These straws will act as guides for the sliding bolt. Make sure the straws are aligned so that the bolt can slide smoothly through them.
3. **Insert the Bolt:** Slide the cardboard bolt through the straws.
4. **Create a Locking Slot:** Cut a small slot in the door that aligns with the bolt when the door is closed. When the bolt is slid into this slot, it will prevent the door from opening.
5. **Add a Stop (Optional):** Glue a small piece of cardboard to the inside of the main body to act as a stop for the bolt. This will prevent the bolt from sliding out completely.
Implementing a Locking Mechanism (Magnetic Lock)
This option uses magnets for a satisfying and secure closure.
1. **Attach Magnets to the Door:** Glue a small magnet to the inside of the door, near the edge that will meet the main body when closed.
2. **Attach Washers to the Main Body:** Glue a metal washer to the inside of the main body, in a position that aligns with the magnet on the door when the door is closed. The washer will provide a strong surface for the magnet to attract to.
3. **Test the Closure:** Close the door and make sure the magnet and washer align properly and create a strong hold. You may need to adjust the position of the magnet or washer to achieve the desired level of security.
Implementing a Locking Mechanism (Combination Lock)
This is the most secure option, using a real combination lock.
1. **Prepare the Door:** Drill a hole through the door that is large enough to accommodate the hasp of your combination lock.
2. **Prepare the Main Body:** Drill a corresponding hole through the main body, in a position that aligns with the hole in the door when the door is closed.
3. **Attach the Lock:** Close the door and insert the hasp of the combination lock through the holes in the door and main body. Lock the lock to secure the door.
Customizing Your Safe
Now for the fun part – making your safe look awesome!
1. **Paint or Decorate:** Use paint, markers, or decorative paper to decorate the outside of your safe. You can create a camouflage pattern, add your initials, or draw your favorite characters.
2. **Add Labels:** Label the different compartments inside your safe to keep your treasures organized.
3. **Line the Inside (Optional):** Line the inside of your safe with felt or fabric to protect your valuables from scratches.
4. **Add Secret Compartments (Optional):** Get creative and add secret compartments to your safe. You can hide them behind false walls or under removable panels.
Final Touches and Testing
1. **Test the Door:** Make sure the door opens and closes smoothly and that the locking mechanism works properly.
2. **Reinforce Weak Spots:** If you notice any weak spots, reinforce them with extra cardboard and hot glue.
3. **Hide Your Safe:** Find a good hiding place for your safe. Under your bed, in a closet, or behind a bookshelf are all good options.
And there you have it! Your very own DIY cardboard safe. Now you have a secure place to store your treasures, and you learned some cool crafting skills along the way. Remember to be creative and have fun with this project. Happy crafting!
“`
Conclusion
So, there you have it! Creating your own DIY Cardboard Safe isn’t just a fun afternoon project; it’s a surprisingly practical way to learn about basic security principles, exercise your creativity, and even teach valuable lessons about resourcefulness to kids. Forget expensive store-bought safes for now; this project proves that security doesn’t always have to break the bank. It’s about ingenuity and understanding how simple mechanisms can provide a layer of protection.
Why is this DIY trick a must-try? Because it’s more than just a craft project. It’s a hands-on learning experience that fosters problem-solving skills. It encourages you to think critically about security vulnerabilities and how to address them. Plus, it’s incredibly satisfying to build something functional from readily available materials. Imagine the pride you’ll feel knowing you created a secure space for your small valuables using nothing more than cardboard, glue, and a bit of ingenuity.
But the fun doesn’t stop there! This project is ripe for customization. Feeling artistic? Decorate your safe with paint, markers, or even decoupage. Want to increase the security? Consider adding multiple locking mechanisms, reinforcing the cardboard with extra layers, or even incorporating a simple combination lock using brads and paper fasteners. You could even camouflage your safe to blend in with its surroundings. Think about lining the inside with felt or fabric to protect delicate items. The possibilities are truly endless!
For a more advanced version, explore incorporating a small electronic lock salvaged from an old toy or gadget. This would require some basic electronics knowledge, but it would significantly enhance the security and add a cool tech element to your DIY Cardboard Safe. Another variation involves creating a false bottom to conceal a secret compartment. This adds an extra layer of deception and makes it even harder for anyone to discover the safe’s contents.
We strongly encourage you to give this DIY Cardboard Safe project a try. It’s a fantastic way to spend quality time with family, unleash your inner inventor, and create a unique and functional item for your home. Don’t be afraid to experiment with different designs, materials, and locking mechanisms. The key is to have fun and learn along the way.
Once you’ve built your own DIY Cardboard Safe, we’d love to hear about your experience! Share your photos, tips, and variations in the comments below. Let’s inspire each other with our creativity and resourcefulness. What challenges did you encounter? What innovative solutions did you come up with? Your feedback will help others learn and improve their own DIY Cardboard Safe projects. So, grab your cardboard, gather your tools, and get ready to build your very own secure space! We can’t wait to see what you create!
Frequently Asked Questions (FAQ)
What kind of cardboard is best for this project?
The ideal cardboard for your DIY Cardboard Safe is corrugated cardboard, the kind you find in shipping boxes. The thicker the cardboard, the more robust and secure your safe will be. Double-walled corrugated cardboard is even better if you can get your hands on it. Avoid using thin cardboard like cereal boxes, as it won’t provide much protection. If you only have thinner cardboard, consider layering it to increase its strength. Remember to choose cardboard that is clean and free of any damage or excessive wear.
What kind of glue should I use?
A strong adhesive is crucial for a durable DIY Cardboard Safe. Hot glue is a popular choice because it dries quickly and creates a strong bond. However, be careful when using hot glue, as it can burn your fingers. White glue or wood glue are also good options, but they require a longer drying time. Consider using clamps or weights to hold the pieces together while the glue dries. Avoid using weak glues like school glue, as they won’t provide sufficient strength for the safe. Experiment with different glues on scrap cardboard to see which one works best for you.
How can I make my DIY Cardboard Safe more secure?
There are several ways to enhance the security of your DIY Cardboard Safe. First, reinforce the cardboard with extra layers, especially around the locking mechanism and hinges. Second, use a more complex locking system, such as a combination lock or a multi-point latch. Third, camouflage your safe to blend in with its surroundings. Fourth, consider adding a hidden compartment or a false bottom. Fifth, use tamper-evident seals to detect if someone has tried to open the safe. Finally, remember that a cardboard safe is not impenetrable, so don’t store highly valuable items in it.
Can I use this DIY Cardboard Safe to store valuable items?
While a DIY Cardboard Safe can provide a basic level of security, it’s not a substitute for a real safe. It’s best used for storing small, less valuable items, such as keepsakes, small amounts of cash, or personal documents. Avoid storing highly valuable items like jewelry, expensive electronics, or important legal documents in a cardboard safe. A determined thief could easily break into a cardboard safe, so it’s important to be realistic about its limitations.
How long will it take to build a DIY Cardboard Safe?
The time it takes to build a DIY Cardboard Safe depends on the complexity of the design and your skill level. A simple design can be completed in a few hours, while a more complex design with multiple locking mechanisms and reinforcements may take a day or two. Be sure to factor in drying time for the glue. It’s best to work on the project in stages, allowing each section to dry completely before moving on to the next. Don’t rush the process, as this can lead to mistakes and a weaker final product.
Is this project suitable for children?
This project can be a fun and educational activity for children, but adult supervision is required, especially when using sharp tools like scissors or knives and hot glue. Choose a simpler design for children to work on, and focus on the creative aspects of the project, such as decorating the safe. Teach children about the importance of security and resourcefulness while they are building their own DIY Cardboard Safe.
What tools will I need for this project?
The tools you’ll need for this project include:
* A sharp utility knife or scissors
* A ruler or measuring tape
* A pencil or marker
* Glue (hot glue, white glue, or wood glue)
* Clamps or weights (optional)
* Paint, markers, or other decorative materials (optional)
* Brads or paper fasteners (for a combination lock)
How can I make the locking mechanism more effective?
To make the locking mechanism more effective, consider using multiple latches or locks. You can also reinforce the area around the locking mechanism with extra layers of cardboard. A combination lock made with brads and paper fasteners can add an extra layer of security. Be sure to test the locking mechanism thoroughly to ensure that it is working properly. You can also add a hasp and padlock for added security.
What if I don’t have enough cardboard?
If you don’t have enough cardboard, you can ask friends, family, or local businesses for spare boxes. You can also purchase cardboard sheets from craft stores or online retailers. If you’re using multiple pieces of cardboard, be sure to overlap them and glue them together securely to create a strong bond.
How do I prevent the cardboard from bending or warping?
To prevent the cardboard from bending or warping, reinforce it with extra layers. You can also use cardboard tubes or wooden dowels to provide additional support. When gluing the cardboard together, be sure to apply even pressure to prevent warping. Store the finished safe in a dry place to prevent moisture from damaging the cardboard.

Leave a Comment