

DIY Gold Chain Wall Lamp: Ever dreamed of adding a touch of glamour and unique personality to your living space without breaking the bank? I know I have! Forget those generic, mass-produced lamps you see everywhere. We’re diving into a fun and surprisingly simple project that will transform your walls and illuminate your room with a warm, stylish glow.
The concept of using chains in interior design isn’t entirely new. Historically, chains have symbolized strength and connection, often incorporated into architectural details and decorative elements. Think of grand chandeliers suspended by ornate chains in historical castles – we’re taking that inspiration and giving it a modern, DIY twist!
Why a DIY Gold Chain Wall Lamp, you ask? Well, let’s face it, finding unique and affordable lighting can be a real challenge. Store-bought options often lack character or come with a hefty price tag. This project allows you to unleash your creativity, customize the design to perfectly match your aesthetic, and save money in the process. Plus, there’s nothing quite like the satisfaction of saying, “I made that!” when guests admire your stunning new wall lamp. So, grab your tools, and let’s get started on creating a statement piece that will brighten up your home!
DIY Gold Chain Wall Lamp: A Touch of Glam for Your Home
Hey there, fellow DIY enthusiasts! I’m so excited to share this project with you – a stunning gold chain wall lamp that will add a touch of elegance and personality to any room. Forget those generic store-bought lamps; we’re crafting something truly unique and eye-catching. This project is surprisingly simple, even for beginners, and the result is absolutely worth the effort. Let’s get started!
What You’ll Need: The Supply List
Before we dive in, let’s gather all the necessary materials. Having everything on hand will make the process smooth and enjoyable.
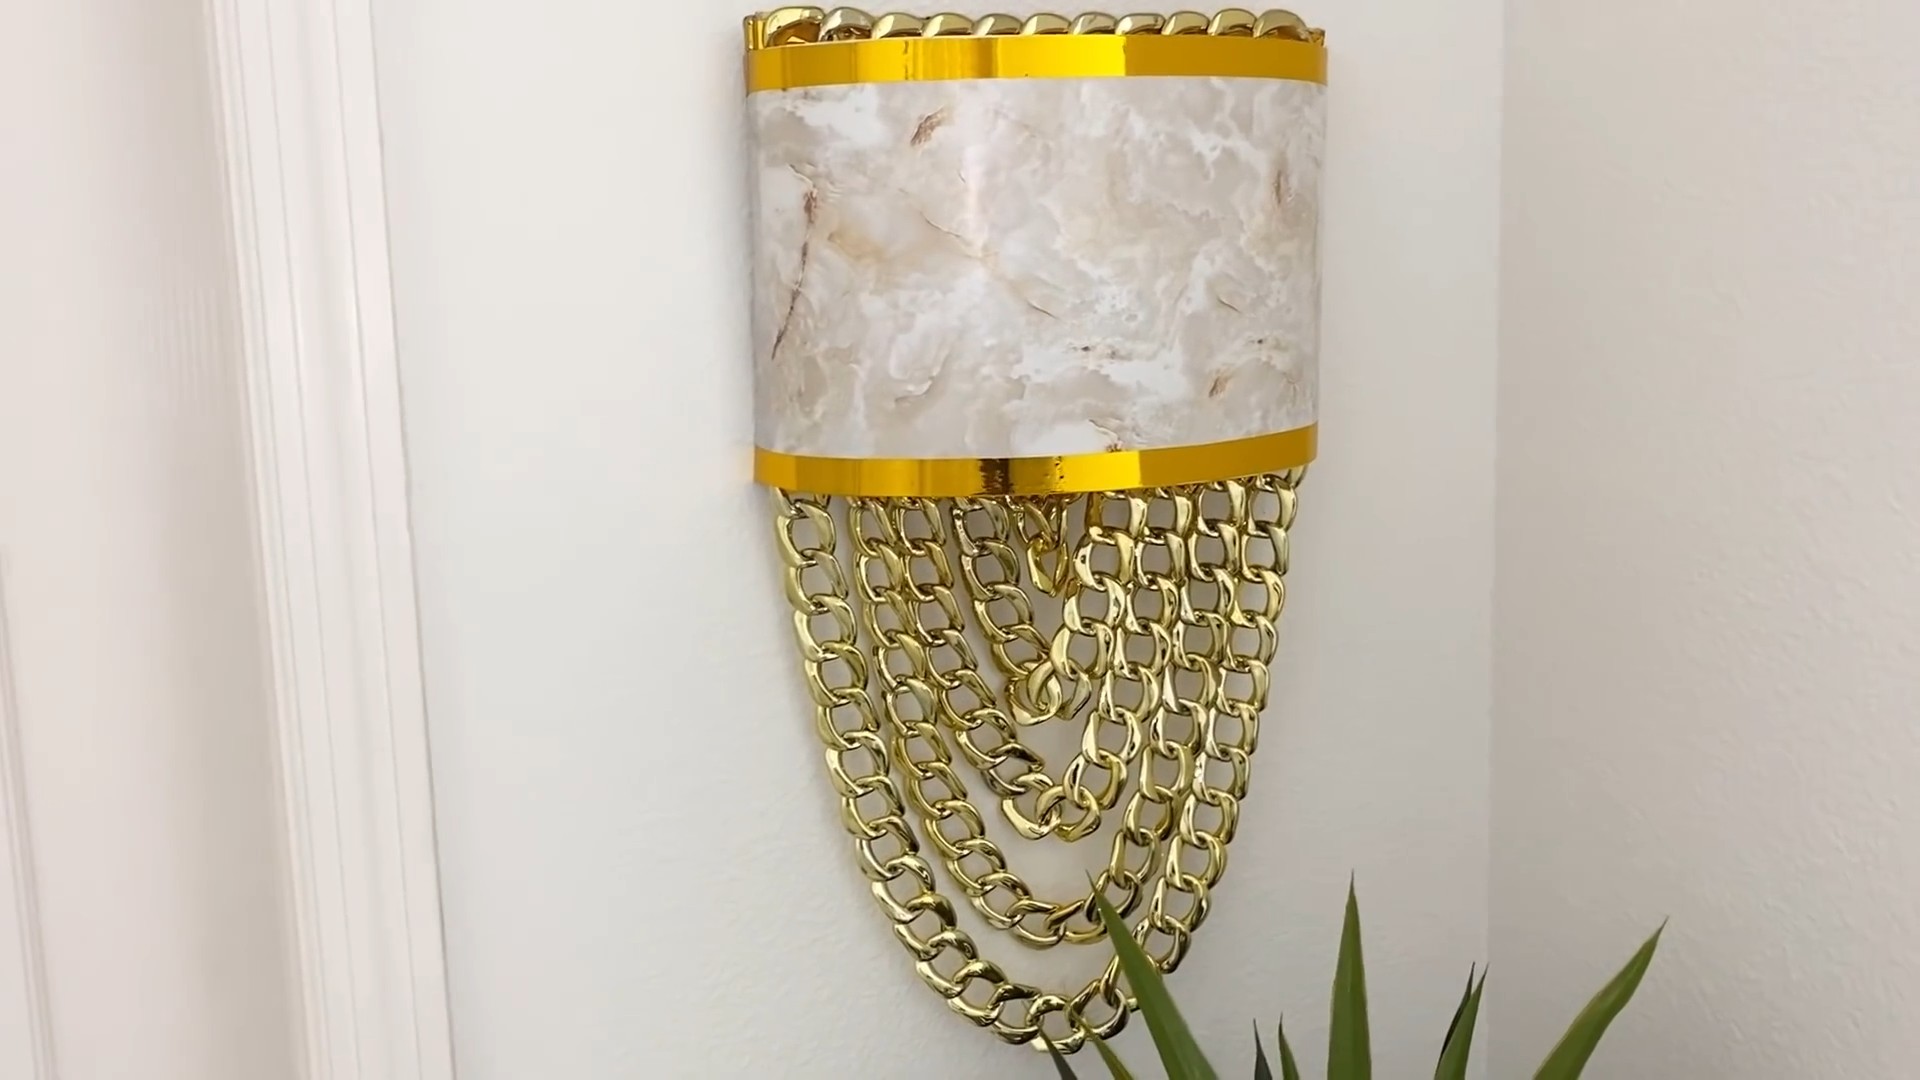
* **Gold Chain:** This is the star of the show! I recommend a sturdy, decorative chain. The length will depend on how long you want your lamp to be. I used about 6 feet for mine, but measure your space to be sure. Consider the weight capacity of the chain as well, especially if you plan on using a heavier lampshade.
* **Wall Sconce Kit:** You can find these at most hardware stores or online. Look for one that includes a backplate, wiring, socket, and mounting hardware. Make sure it’s compatible with the type of light bulb you want to use.
* **Lampshade:** Choose a lampshade that complements your décor. I opted for a simple, drum-shaped shade in a neutral color to let the gold chain really shine. Consider the size and shape of the shade in relation to the chain and the overall aesthetic you’re going for.
* **Light Bulb:** Select a bulb that fits your socket and provides the desired level of brightness. LED bulbs are energy-efficient and come in a variety of color temperatures.
* **Spray Paint (Optional):** If your sconce kit isn’t the color you want, grab a can of spray paint in your desired shade. Gold or brass would look fantastic with the chain!
* **Wire Strippers:** Essential for safely working with electrical wires.
* **Screwdriver:** You’ll need this for attaching the sconce to the wall and securing the wiring.
* **Pliers:** Helpful for manipulating the chain and tightening connections.
* **Drill (Optional):** Depending on your wall type, you might need a drill to create pilot holes for the mounting screws.
* **Safety Glasses:** Always protect your eyes when working with tools.
* **Gloves (Optional):** To protect your hands from dirt and paint.
* **Measuring Tape:** For accurate measurements.
* **Pencil:** For marking locations.
* **Wire Connectors (Wire Nuts):** To safely connect the wires.
Phase 1: Preparing the Sconce and Chain
This phase involves getting the sconce ready and preparing the chain for hanging.
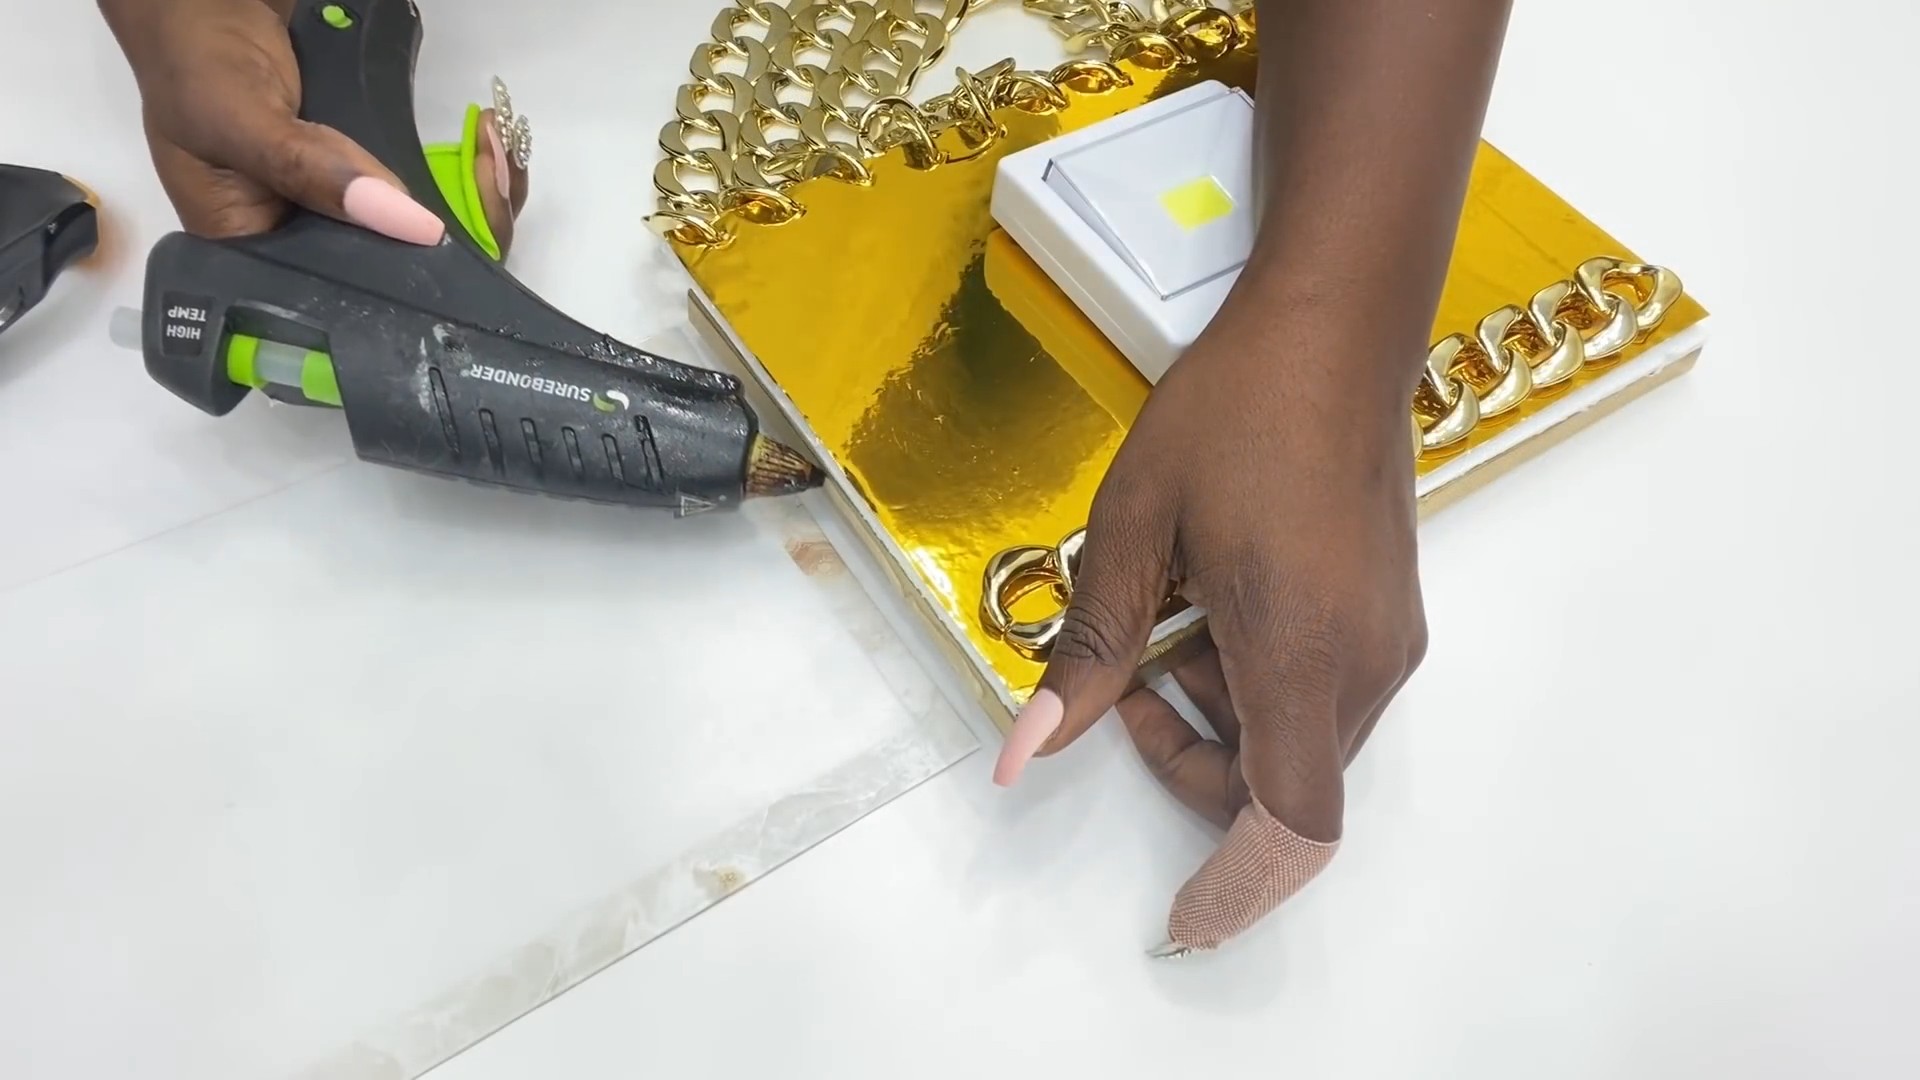
1. **Prepare the Sconce:** If you’re happy with the color of your sconce kit, you can skip this step. If not, now’s the time to spray paint it. Make sure to do this in a well-ventilated area and follow the instructions on the spray paint can. Apply several thin coats for a smooth, even finish. Let it dry completely before moving on. I chose to spray mine a beautiful, antique gold to match the chain.
2. **Measure and Cut the Chain:** Determine the desired length of your chain. Remember to account for the length of the lampshade and the height at which you want the lamp to hang. Use pliers to carefully cut the chain to the correct length. I found it helpful to lay the chain out on the floor and use a measuring tape to get an accurate measurement.
3. **Attach the Chain to the Sconce:** Most sconce kits have a loop or hook at the top. If yours doesn’t, you may need to add one using a small eye bolt. Attach the chain to this loop or hook using pliers to open and close a link in the chain. Make sure the connection is secure.
Phase 2: Wiring the Sconce
Important Safety Note: If you’re not comfortable working with electrical wiring, please consult a qualified electrician. Electricity can be dangerous, and it’s always better to be safe than sorry.
1. **Turn Off the Power:** Before you even think about touching any wires, turn off the power to the circuit you’ll be working on at the breaker box. This is absolutely crucial for your safety. Double-check that the power is off by using a non-contact voltage tester.
2. **Identify the Wires:** Carefully remove the existing wiring from the sconce backplate. Identify the hot (usually black), neutral (usually white), and ground (usually green or bare copper) wires. If you’re unsure which wire is which, consult an electrician.
3. **Connect the Wires:** Using wire connectors (wire nuts), connect the wires from the sconce to the wires in your wall. Match the colors: black to black, white to white, and green/bare copper to green/bare copper. Twist the wire connectors tightly to ensure a secure connection.
4. **Secure the Wires:** Carefully tuck the wires back into the electrical box, making sure they’re not pinched or strained.
Phase 3: Mounting the Sconce and Attaching the Lampshade
Now for the final touches!
1. **Mount the Sconce Backplate:** Align the sconce backplate with the electrical box in the wall. Use the screws provided in the sconce kit to attach the backplate securely to the wall. If you’re mounting the sconce on drywall, you may need to use drywall anchors to provide extra support.
2. **Attach the Sconce:** Carefully attach the sconce to the backplate, following the instructions in your sconce kit. Make sure it’s securely fastened.
3. **Attach the Lampshade:** Most lampshades have a fitting that attaches to the socket. Follow the instructions that came with your lampshade to attach it to the sconce.
4. **Install the Light Bulb:** Screw in your chosen light bulb.
5. **Turn On the Power:** Go back to the breaker box and turn the power back on to the circuit.
6. **Test the Lamp:** Flip the switch and admire your handiwork!
Tips and Tricks for a Perfect Finish
* Chain Length Adjustments: Don’t be afraid to experiment with the chain length until you find the perfect height for your lamp. You can always remove or add links as needed.
* Chain Finish: If you can’t find a gold chain you love, you can always spray paint a plain chain gold. Just make sure to use a primer first for better adhesion.
* Lampshade Customization: Get creative with your lampshade! You can add trim, fabric, or even paint to personalize it and make it truly unique.
* Cord Management: If you’re not hardwiring the sconce, you’ll need to run a cord down the wall. Consider using cord covers to conceal the cord and create a cleaner look. You can paint the cord covers to match your wall color.
* Consider a Dimmer Switch: Adding a dimmer switch will allow you to adjust the brightness of the lamp and create different moods.
* Safety First: Always double-check all your connections and make sure everything is secure before turning on the power.
Troubleshooting
* Lamp Doesn’t Turn On: Double-check that the light bulb is working and that all the wiring connections are secure. Make sure the power is turned on at the breaker box.
* Sconce is Wobbly: Make sure the sconce backplate is securely attached to the wall. If necessary, use drywall anchors for extra support.
* Lampshade is Crooked: Adjust the lampshade fitting until the shade is straight.
Variations and Customization
This project is a great starting point for creating your own unique wall lamp. Here are a few ideas to get your creative juices flowing:
* Different Chain Materials: Instead of gold chain, try using rope, beads, or even vintage keys.
* Unique Lampshade Shapes: Experiment with different lampshade shapes, such as square, rectangular, or even conical.
* Add Embellishments: Decorate the chain with crystals, beads, or other embellishments to add extra sparkle and personality.
* Use Different Finishes: Try using different finishes on the sconce, such as brushed nickel, bronze, or even a distressed finish.
* Create a Double Sconce: Use two sconce kits and a longer chain to create a double sconce for a larger space.
I hope you enjoyed this DIY project! I absolutely love how my gold chain wall lamp turned out, and I’m sure you’ll love yours too. Happy crafting! Remember to always prioritize safety when working with electricity, and don’t hesitate to ask for help if you need it. Now go forth and create something beautiful!
Conclusion
So, there you have it! Transforming an ordinary space into a haven of sophisticated charm is now within your reach, thanks to this incredibly simple yet stunning DIY gold chain wall lamp project. Forget expensive designer lighting; with a little creativity and minimal effort, you can achieve a high-end look that reflects your unique style.
Why is this DIY trick a must-try? Because it’s more than just a lamp; it’s a statement piece. It’s a conversation starter. It’s a testament to your resourcefulness and artistic flair. It allows you to inject personality into your home without breaking the bank. The warm glow emanating from the gold chain creates an ambiance that’s both inviting and luxurious, instantly elevating the mood of any room. Plus, the satisfaction of creating something beautiful with your own hands is simply unparalleled.
But the beauty of this project lies not only in its simplicity but also in its versatility. Feel free to experiment with different chain styles. Consider using a thicker, chunkier chain for a bolder, more industrial look, or opt for a delicate, finer chain for a more subtle and elegant feel. You could even incorporate different metallic finishes, such as silver or copper, to match your existing décor.
Don’t be afraid to play around with the bulb selection as well. An Edison bulb will add a vintage touch, while a globe bulb will provide a more modern aesthetic. You can also experiment with different wattages to achieve your desired level of brightness. Think about adding a dimmer switch for ultimate control over the ambiance.
Furthermore, consider the placement of your DIY gold chain wall lamp. It would look stunning flanking a bed as bedside lighting, adding a touch of glamour to your bedroom. Alternatively, it could be used to highlight artwork in your living room or to create a cozy reading nook in your study. The possibilities are endless!
This DIY project isn’t just about creating a lamp; it’s about unleashing your inner designer and transforming your living space into a reflection of your unique personality. It’s about proving that you don’t need to spend a fortune to create a stylish and inviting home. It’s about embracing the joy of DIY and the satisfaction of creating something beautiful with your own two hands.
We wholeheartedly encourage you to give this DIY gold chain wall lamp project a try. It’s a fun, rewarding, and surprisingly easy way to add a touch of luxury and personality to your home. And once you’ve created your masterpiece, we’d love to see it! Share your photos and experiences with us on social media using #DIYGoldChainLamp. We can’t wait to see your creative interpretations and how you’ve personalized this project to suit your own unique style. Let’s inspire each other and spread the joy of DIY!
Frequently Asked Questions (FAQ)
What type of chain is best for this project?
The best type of chain depends on the look you’re going for. For a more delicate and elegant look, a finer, thinner chain is ideal. For a bolder, more industrial look, opt for a thicker, chunkier chain. Consider the weight of the chain as well, especially if you’re using a heavier lampshade. Gold-plated or brass chains are popular choices for achieving that classic gold look, but you can also experiment with other metals like silver or copper. Ultimately, the choice is yours, so have fun experimenting!
What kind of light bulb should I use?
The type of light bulb you use will significantly impact the overall aesthetic of your lamp. Edison bulbs are a great choice for adding a vintage touch, while globe bulbs offer a more modern look. LED bulbs are energy-efficient and come in a variety of shapes and sizes. Consider the color temperature of the bulb as well. Warm white bulbs create a cozy and inviting ambiance, while cool white bulbs provide a brighter, more energizing light. Experiment with different wattages to achieve your desired level of brightness.
How do I hang the lamp securely?
Safety is paramount when hanging any type of lighting fixture. Make sure to use appropriate hardware, such as wall anchors or screws, that are designed to support the weight of the lamp. If you’re unsure about how to properly install the lamp, it’s always best to consult with a qualified electrician. Consider using a stud finder to locate wall studs for added support. Ensure that the electrical wiring is properly connected and that the lamp is securely mounted to the wall before using it.
Can I use a dimmer switch with this lamp?
Yes, you can definitely use a dimmer switch with this lamp, provided that you use a dimmable light bulb. A dimmer switch will give you ultimate control over the ambiance of your room, allowing you to adjust the brightness to suit your mood and needs. Make sure to choose a dimmer switch that is compatible with the type of light bulb you’re using (e.g., LED dimmer for LED bulbs).
Where is the best place to hang this lamp?
The best place to hang your DIY gold chain wall lamp depends on your personal preferences and the layout of your room. It would look stunning flanking a bed as bedside lighting, adding a touch of glamour to your bedroom. Alternatively, it could be used to highlight artwork in your living room or to create a cozy reading nook in your study. Consider the height of the lamp as well. It should be positioned at a height that is both functional and aesthetically pleasing.
How much does this DIY project cost?
The cost of this DIY project will vary depending on the materials you choose and where you purchase them. However, it’s generally a very affordable project, especially compared to buying a similar lamp from a retail store. You can often find chains and other materials at craft stores, hardware stores, or online retailers. Consider repurposing materials you already have on hand to save even more money.
What if I’m not good at DIY projects?
Don’t worry if you’re not a seasoned DIYer! This project is designed to be simple and easy to follow, even for beginners. Take your time, follow the instructions carefully, and don’t be afraid to ask for help if you need it. There are plenty of online resources and tutorials available to guide you through the process. The most important thing is to have fun and enjoy the creative process!
Can I customize the lamp with other embellishments?
Absolutely! Feel free to get creative and add your own personal touch to the lamp. You could embellish the chain with beads, crystals, or other decorative elements. You could also paint the chain a different color or add a decorative lampshade. The possibilities are endless! Let your imagination run wild and create a lamp that is truly unique and reflects your personal style.
How do I clean the gold chain?
To keep your gold chain looking its best, it’s important to clean it regularly. You can use a soft cloth and a mild soap solution to gently wipe down the chain. Avoid using harsh chemicals or abrasive cleaners, as these can damage the finish. For more stubborn dirt or grime, you can soak the chain in warm soapy water for a few minutes before wiping it clean. Make sure to dry the chain thoroughly after cleaning to prevent tarnishing.
What if the chain is too long or too short?
If the chain is too long, you can simply remove some of the links using pliers. If the chain is too short, you can add additional links or purchase a longer chain. Make sure to measure the desired length of the chain before cutting or adding links to ensure that the lamp hangs at the correct height.

Leave a Comment