

Deep cleaning your kitchen can feel like climbing Mount Everest, right? But what if I told you it doesn’t have to be a daunting task? Imagine a sparkling, fresh-smelling kitchen, free from hidden grime and grease, where you actually enjoy spending time. That’s the promise of a truly deep clean, and this DIY guide is your Sherpa, leading you to the summit of kitchen cleanliness!
For generations, a clean kitchen has been the heart of the home. From ancient hearths to modern culinary spaces, maintaining a hygienic cooking area has been crucial for health and well-being. Think about it – our grandmothers and great-grandmothers didn’t have fancy gadgets or specialized cleaners, yet they managed to keep their kitchens spotless using simple, resourceful methods. We’re tapping into that same spirit of ingenuity with these DIY tricks.
Let’s face it, life gets busy. We often only have time for surface-level cleaning. But neglecting a deep cleaning your kitchen can lead to a build-up of bacteria, mold, and unpleasant odors. This not only impacts your health but also the longevity of your appliances and surfaces. This article will provide you with easy-to-follow, cost-effective DIY solutions to tackle even the most stubborn kitchen messes. So, grab your gloves, put on some music, and let’s get started on transforming your kitchen into a pristine and inviting space!

Deep Cleaning Your Kitchen: A DIY Guide to Sparkling Surfaces
Okay, let’s face it, the kitchen is the heart of the home, but it’s also a magnet for grime, spills, and general chaos. A quick wipe-down here and there just doesn’t cut it sometimes. That’s where deep cleaning comes in! I’m going to walk you through my tried-and-true method for getting your kitchen sparkling clean, from top to bottom. Get ready to roll up your sleeves!
What You’ll Need: Your Arsenal of Cleaning Supplies
Before we dive in, let’s gather our supplies. Having everything on hand will make the process so much smoother. Here’s my go-to list:
* Cleaning cloths: Microfiber cloths are my absolute favorite. They’re super absorbent and great for lifting dirt. Stock up on a bunch!
* Sponges: You’ll need these for scrubbing tougher messes.
* Spray bottles: Essential for homemade cleaning solutions.
* Dish soap: A classic for a reason.
* Baking soda: This is a natural cleaning powerhouse!
* White vinegar: Another natural wonder, perfect for disinfecting and cutting through grease.
* Lemon juice: Adds a fresh scent and helps with cleaning.
* Hydrogen peroxide: Great for sanitizing and tackling stains.
* All-purpose cleaner: For general cleaning tasks.
* Glass cleaner: For sparkling windows and mirrors.
* Oven cleaner: If your oven needs some serious TLC.
* Floor cleaner: Choose one appropriate for your floor type.
* Scrub brush: For those stubborn spots.
* Toothbrush: An old toothbrush is perfect for cleaning grout and tight spaces.
* Rubber gloves: Protect your hands!
* Trash bags: For all the discarded items.
* Vacuum cleaner: To get rid of loose crumbs and debris.
* Step stool: For reaching high places.
* Screwdriver: You might need this to remove vent covers or appliance parts for cleaning.
Phase 1: Decluttering and Prepping
Before we start scrubbing, let’s declutter and prep the kitchen. This will make the cleaning process much more efficient.
1. Clear the countertops: Remove everything from your countertops – appliances, utensils, decorations, everything! This will give you a clear surface to work with.
2. Empty the sink: Wash any dishes in the sink or load them into the dishwasher. A clean sink is a happy sink!
3. Take out the trash: Empty all trash cans and replace the liners.
4. Remove rugs and mats: Roll up any rugs or mats and set them aside to be cleaned later.
5. Open windows: Ventilation is key, especially when using cleaning products. Open windows to let in fresh air.
Phase 2: Tackling the Appliances
Now, let’s move on to the appliances. These often get overlooked, but they can harbor a lot of grime.
Cleaning the Refrigerator
1. Unplug the refrigerator: This is important for safety.
2. Remove all food: Take out all the food from the refrigerator and freezer. Discard any expired or spoiled items.
3. Remove shelves and drawers: Take out all the removable shelves, drawers, and bins.
4. Wash shelves and drawers: Wash the shelves, drawers, and bins with warm, soapy water. Rinse thoroughly and let them air dry.
5. Wipe down the interior: Wipe down the interior of the refrigerator with a solution of warm water and baking soda. This will help to neutralize odors.
6. Clean the door seals: Use a damp cloth to clean the door seals. These can accumulate dirt and mildew.
7. Clean the exterior: Wipe down the exterior of the refrigerator with an all-purpose cleaner.
8. Replace shelves and drawers: Once the shelves and drawers are dry, replace them in the refrigerator.
9. Restock the refrigerator: Put the food back into the refrigerator, organizing it as you go.
10. Plug in the refrigerator: Plug the refrigerator back in.
Cleaning the Oven
1. Remove racks and trays: Take out all the racks and trays from the oven.
2. Clean the racks and trays: Wash the racks and trays with warm, soapy water. For stubborn stains, you can soak them in a solution of baking soda and water.
3. Apply oven cleaner: Follow the instructions on your oven cleaner. Most oven cleaners require you to spray the interior of the oven and let it sit for a few hours or overnight.
4. Scrub the interior: After the oven cleaner has had time to work, scrub the interior of the oven with a scrub brush.
5. Wipe clean: Wipe the interior of the oven clean with a damp cloth. Rinse thoroughly to remove any residue from the oven cleaner.
6. Replace racks and trays: Once the racks and trays are clean and dry, replace them in the oven.
Cleaning the Microwave
1. Microwave a bowl of water: Fill a microwave-safe bowl with water and microwave it for 2-3 minutes, or until the water boils. This will create steam that will loosen any stuck-on food.
2. Let it sit: Let the bowl of water sit in the microwave for a few minutes to allow the steam to work its magic.
3. Wipe down the interior: Carefully remove the bowl of water and wipe down the interior of the microwave with a damp cloth.
4. Clean the turntable: Remove the turntable and wash it with warm, soapy water.
5. Clean the exterior: Wipe down the exterior of the microwave with an all-purpose cleaner.
Cleaning the Dishwasher
1. Remove food debris: Check the drain at the bottom of the dishwasher and remove any food debris.
2. Clean the spray arms: Remove the spray arms and clean them under running water. Use a toothpick or small brush to clear any clogs.
3. Run a cleaning cycle: Add a dishwasher cleaner to the dispenser and run a cleaning cycle. You can also use a cup of white vinegar.
4. Wipe down the exterior: Wipe down the exterior of the dishwasher with an all-purpose cleaner.
Phase 3: Countertops, Cabinets, and Backsplash
Now that the appliances are sparkling, let’s move on to the countertops, cabinets, and backsplash.
Cleaning Countertops
1. Choose the right cleaner: Use a cleaner that is appropriate for your countertop material. For example, granite countertops require a special cleaner.
2. Spray and wipe: Spray the countertop with the cleaner and wipe it down with a clean cloth.
3. Pay attention to edges and corners: These areas can accumulate dirt and grime.
4. Dry the countertop: Dry the countertop with a clean cloth to prevent water spots.
Cleaning Cabinets
1. Dust the cabinets: Use a microfiber cloth to dust the cabinets.
2. Wash the cabinets: Mix warm water with a few drops of dish soap. Dip a clean cloth into the soapy water and wring it out well. Wipe down the cabinets, paying attention to areas that are prone to grease and grime.
3. Rinse the cabinets: Rinse the cabinets with a clean, damp cloth.
4. Dry the cabinets: Dry the cabinets with a clean cloth.
Cleaning the Backsplash
1. Choose the right cleaner: Use a cleaner that is appropriate for your backsplash material.
2. Spray and wipe: Spray the backsplash with the cleaner and wipe it down with a clean cloth.
3. Clean the grout: Use an old toothbrush and a grout cleaner to clean the grout lines.
4. Rinse the backsplash: Rinse the backsplash with a clean, damp cloth.
5. Dry the backsplash: Dry the backsplash with a clean cloth.
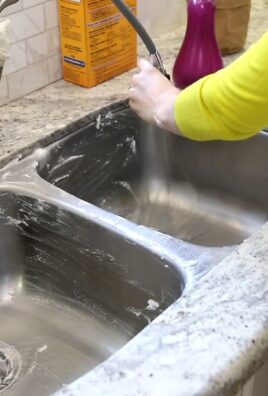
Phase 4: Sink and Faucet
The sink and faucet are used multiple times a day, so they need a good cleaning.
1. Rinse the sink: Rinse the sink with water to remove any loose debris.
2. Sprinkle with baking soda: Sprinkle baking soda all over the sink.
3. Scrub the sink: Use a sponge or scrub brush to scrub the sink.
4. Rinse with vinegar: Rinse the sink with white vinegar. This will create a fizzing action that will help to remove any remaining grime.
5. Rinse with water: Rinse the sink with water.
6. Clean the faucet: Use a cleaner that is appropriate for your faucet finish. Wipe down the faucet with

Conclusion
So, there you have it! Deep cleaning your kitchen might seem like a daunting task, but with these simple yet effective DIY tricks, you can transform your culinary space into a sparkling, hygienic haven. We’ve covered everything from tackling stubborn grease on your stovetop to banishing grime from your grout, all using readily available household ingredients. The beauty of these methods lies not only in their effectiveness but also in their cost-effectiveness and eco-friendliness. You’re not just cleaning; you’re contributing to a healthier environment by reducing your reliance on harsh chemicals.
Why is this deep cleaning approach a must-try? Because a clean kitchen is more than just aesthetically pleasing; it’s crucial for food safety and overall well-being. Eliminating hidden bacteria and mold can prevent foodborne illnesses and create a more enjoyable cooking experience. Plus, a well-maintained kitchen simply functions better. Drawers glide smoothly, appliances operate efficiently, and you’ll find yourself spending less time searching for misplaced items.
But the cleaning doesn’t have to stop here! Feel free to experiment with variations to suit your specific needs and preferences. For instance, if you’re sensitive to the smell of vinegar, try substituting it with lemon juice for a similar degreasing effect and a refreshing citrus scent. You can also add a few drops of your favorite essential oil to your cleaning solutions for an extra boost of fragrance. Lavender, tea tree, and eucalyptus are all excellent choices for their antibacterial properties.
Consider using old toothbrushes for scrubbing hard-to-reach areas like faucet bases and tile grout. Microfiber cloths are your best friend for wiping down surfaces, as they trap dirt and grime effectively without leaving streaks. And don’t forget the power of steam! A steam cleaner can work wonders on ovens, microwaves, and even sealed countertops, loosening stubborn residue without the need for harsh chemicals.
We’ve shown you how to deep clean your kitchen like a pro, now it’s your turn to put these tips into action. We are confident that you will be amazed at the results.
We encourage you to embark on this kitchen transformation journey and experience the satisfaction of a truly clean and organized space. Don’t be afraid to get your hands dirty and embrace the process. Remember, even small steps can make a big difference.
Most importantly, we want to hear about your experience! Share your before-and-after photos, your favorite DIY cleaning hacks, and any challenges you encountered along the way. Let’s create a community of clean kitchen enthusiasts who inspire and support each other. Leave your comments and questions below, and let’s keep the conversation going. Happy cleaning!
Frequently Asked Questions (FAQ)
What if I don’t have all the ingredients listed in the recipes?
Don’t worry! The beauty of these DIY cleaning solutions is their flexibility. Many ingredients can be substituted based on what you have on hand. For example, if you don’t have white vinegar, you can often use apple cider vinegar or lemon juice as a substitute. Baking soda is a versatile cleaner and can be used in many different applications. If you’re missing a specific essential oil, you can simply omit it or substitute it with another oil that has similar properties. The key is to experiment and find what works best for you. Just be sure to research any potential interactions between ingredients before mixing them.
How often should I deep clean my kitchen?
The frequency of deep cleaning depends on how often you cook and how much traffic your kitchen gets. As a general rule, aim for a deep clean every 1-3 months. However, you may need to do it more often if you have young children or pets, or if you frequently cook messy meals. Regular maintenance, such as wiping down countertops and sweeping the floor daily, can help extend the time between deep cleans. Pay attention to areas that tend to get dirty quickly, such as the stovetop, sink, and refrigerator, and address them as needed.
Are these DIY cleaning solutions safe for all surfaces?
While most of these DIY cleaning solutions are safe for a wide range of surfaces, it’s always a good idea to test them in an inconspicuous area first, especially on delicate materials like marble, granite, or wood. Avoid using abrasive cleaners on surfaces that scratch easily. For example, baking soda can be too abrasive for some types of countertops. Always read the manufacturer’s instructions for your appliances and surfaces before using any cleaning product, even a DIY one.
How do I get rid of stubborn stains on my countertops?
Stubborn stains on countertops can be challenging, but there are several DIY remedies you can try. For coffee or tea stains, try making a paste of baking soda and water and applying it to the stain for a few minutes before wiping it away. For grease stains, try using a mixture of dish soap and hot water. For more persistent stains, you can try using a poultice made of baking soda and hydrogen peroxide. Apply the poultice to the stain, cover it with plastic wrap, and let it sit overnight before wiping it away. Remember to always test any cleaning solution in an inconspicuous area first.
What’s the best way to clean my oven without harsh chemicals?
Cleaning your oven without harsh chemicals is definitely possible! One effective method is to make a paste of baking soda and water and coat the inside of your oven with it, avoiding the heating elements. Let the paste sit overnight, then wipe it away with a damp cloth. For stubborn baked-on food, you can use a plastic scraper to loosen it before wiping. Another option is to use a steam cleaner to loosen the grime. Simply fill the steam cleaner with water and direct the steam at the oven walls. The steam will help to soften the baked-on food, making it easier to wipe away.
How can I prevent my kitchen from getting dirty so quickly?
Prevention is key to keeping your kitchen clean and tidy. Make it a habit to wipe up spills immediately to prevent them from setting. Sweep or vacuum the floor regularly to remove crumbs and dirt. Wash dishes after each meal to prevent them from piling up. Store food properly to prevent spoilage and odors. Use cutting boards to protect your countertops from scratches and stains. And finally, involve the whole family in keeping the kitchen clean. Assigning chores to each family member can help to distribute the workload and make it easier to maintain a clean kitchen.
What are some eco-friendly alternatives to disposable cleaning supplies?
There are many eco-friendly alternatives to disposable cleaning supplies that can help you reduce your environmental impact. Instead of paper towels, use reusable microfiber cloths. Instead of disposable sponges, use washable and reusable sponges made from natural materials like cellulose or cotton. Instead of plastic spray bottles, use refillable glass spray bottles. You can also make your own cleaning solutions using natural ingredients like vinegar, baking soda, and lemon juice. By making these simple changes, you can significantly reduce your waste and create a more sustainable cleaning routine.


Leave a Comment