

House cleaning tricks – we all need them, right? Let’s be honest, who actually enjoys spending their precious weekends scrubbing and dusting? I know I’d rather be curled up with a good book or exploring the great outdoors! But a clean home is a happy home, and that’s where these clever DIY solutions come in.
For centuries, people have been devising ingenious ways to keep their homes spick and span. From ancient Egyptians using natron (a naturally occurring salt mixture) for cleaning to the Victorian era’s obsession with polishing silver, the quest for a spotless abode is a timeless pursuit. But in today’s busy world, we need quick, effective, and often budget-friendly solutions. That’s why I’ve compiled a list of my absolute favorite house cleaning tricks and DIY hacks that will transform your cleaning routine from a chore into a breeze.
Imagine spending less time cleaning and more time doing the things you love. Think of the money you’ll save by using everyday household items instead of expensive cleaning products. These DIY cleaning tricks are not only effective but also eco-friendly, reducing your reliance on harsh chemicals. So, are you ready to unlock the secrets to a sparkling clean home without breaking a sweat? Let’s dive in and discover some game-changing DIY cleaning hacks that will revolutionize your cleaning routine!

DIY House Cleaning Hacks: Sparkling Clean with Minimal Effort!
Okay, let’s be honest, cleaning isn’t exactly anyone’s favorite pastime. But a clean house? That’s a game-changer! I’ve compiled some of my go-to DIY cleaning hacks that will save you time, money, and a whole lot of elbow grease. Get ready to transform your home into a sparkling sanctuary!
Cleaning the Kitchen Like a Pro
The kitchen, the heart of the home, often bears the brunt of our daily activities. Let’s tackle some common kitchen cleaning challenges.
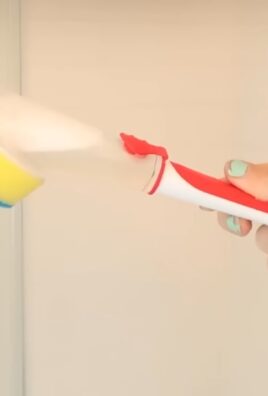
Cleaning a Greasy Stovetop
That stubborn grease on your stovetop? Don’t despair! This simple hack will have it looking brand new.
1. Gather Your Supplies: You’ll need baking soda, dish soap, white vinegar, a sponge, a scrub brush (an old toothbrush works great for tight spots!), and a clean cloth.
2. Create a Baking Soda Paste: In a bowl, mix baking soda with a little water to form a thick paste. The consistency should be similar to toothpaste.
3. Apply the Paste: Generously apply the baking soda paste to the greasy areas of your stovetop. Let it sit for at least 15-20 minutes. The longer it sits, the better it works!
4. Scrub Away the Grease: Using your sponge or scrub brush, scrub the paste in a circular motion. For really tough spots, use the old toothbrush to get into those nooks and crannies.
5. Vinegar Power: Fill a spray bottle with white vinegar. Spray the vinegar over the baking soda paste. This will create a fizzing reaction that helps to lift the grease even further.
6. Wipe Clean: Wipe away the paste and vinegar with a damp sponge or cloth. Rinse the sponge frequently to avoid spreading the grease around.
7. Dry and Shine: Finally, dry the stovetop with a clean cloth to prevent water spots and leave it sparkling.
De-Gunking Your Microwave
Microwaves are notorious for splatters and spills. Here’s how to clean yours without harsh chemicals.
1. Lemon Steam Clean: Cut a lemon in half and place it in a microwave-safe bowl. Add about a cup of water to the bowl.
2. Microwave Magic: Microwave the lemon and water mixture for 3-5 minutes, or until the water boils and the microwave is filled with steam.
3. Let it Sit: Leave the microwave door closed for another 5-10 minutes. The steam will loosen the grime and make it easier to wipe away.
4. Wipe Away the Mess: Carefully remove the bowl (it will be hot!). Use a sponge or cloth to wipe down the inside of the microwave. The grime should come off easily.
5. Lemon Fresh Scent: The lemon will leave your microwave smelling fresh and clean!
Cleaning a Smelly Dishwasher
A smelly dishwasher? No thanks! Here’s how to freshen it up.
1. Vinegar Power Wash: Place a dishwasher-safe cup filled with white vinegar on the top rack of your empty dishwasher.
2. Run a Hot Cycle: Run the dishwasher on a hot cycle. The vinegar will help to dissolve grease, food particles, and mineral buildup.
3. Baking Soda Boost: After the cycle is complete, sprinkle a cup of baking soda on the bottom of the dishwasher.
4. Short Hot Cycle: Run a short, hot cycle. The baking soda will help to absorb any remaining odors.
5. Clean the Filter: Don’t forget to clean the dishwasher filter! Remove it and rinse it thoroughly under running water. Use a brush to scrub away any stubborn debris.
Bathroom Bliss: Cleaning Hacks for a Sparkling Sanctuary
The bathroom can be a breeding ground for germs and grime. Let’s tackle those tough bathroom cleaning tasks.
Cleaning Soap Scum in the Shower
Soap scum is the bane of every bathroom cleaner’s existence. But fear not! This hack will make it disappear.
1. Vinegar and Dish Soap Solution: In a spray bottle, mix equal parts white vinegar and dish soap.
2. Heat it Up (Optional): For extra cleaning power, you can heat the vinegar in the microwave for a minute or two before mixing it with the dish soap. Be careful when handling hot vinegar!
3. Spray and Soak: Spray the solution generously onto the soap scum-covered surfaces. Let it sit for at least 15-20 minutes.
4. Scrub and Rinse: Use a sponge or scrub brush to scrub away the soap scum. Rinse thoroughly with water.
5. Prevent Future Buildup: To prevent future soap scum buildup, wipe down the shower walls and door after each use.
Cleaning a Grimy Showerhead
A clogged showerhead can reduce water pressure and make your shower less enjoyable. Here’s how to clean it.
1. Vinegar Soak: Fill a plastic bag with white vinegar.
2. Secure the Bag: Secure the bag around the showerhead with a rubber band or twist tie, ensuring that the showerhead is completely submerged in the vinegar.
3. Soak Overnight: Let the showerhead soak in the vinegar overnight.
4. Remove and Rinse: Remove the bag and rinse the showerhead thoroughly with water.
5. Scrub Away Remaining Debris: Use an old toothbrush to scrub away any remaining debris from the showerhead nozzles.
Cleaning a Toilet Bowl Stain
Toilet bowl stains can be unsightly and embarrassing. Here’s how to get rid of them.
1. Baking Soda and Vinegar Power: Pour a cup of baking soda into the toilet bowl.
2. Add Vinegar: Slowly pour two cups of white vinegar into the toilet bowl. The mixture will fizz.
3. Let it Sit: Let the mixture sit for at least 30 minutes, or even overnight for stubborn stains.
4. Scrub and Flush: Scrub the toilet bowl with a toilet brush and flush.
Living Room Refresh: Cleaning Hacks for a Cozy Space
The living room is where we relax and unwind. Let’s keep it clean and inviting.
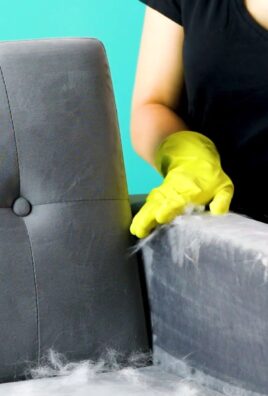
Cleaning Upholstery Stains
Spills happen! Here’s how to tackle upholstery stains.
1. Identify the Stain: Different stains require different treatments. For example, oil-based stains require a different approach than water-based stains.
2. Blot, Don’t Rub: Immediately blot the stain with a clean cloth or paper towel. Avoid rubbing, as this can spread the stain.
3. DIY Cleaning Solution: For most stains, a mixture of mild dish soap and water will work wonders. Mix a few drops of dish soap with a cup of water.
4. Test in an Inconspicuous Area: Before applying the solution to the stain, test it in an inconspicuous area of the upholstery to ensure that it doesn’t damage the fabric.
5. Apply and Blot: Apply the cleaning solution to the stain with a clean cloth. Gently blot the stain, working from the outside in.
6. Rinse and Dry: Rinse the area with a clean, damp cloth. Blot dry with a clean towel.
7. Air Dry: Allow the upholstery to air dry completely.
Dusting Like a Pro
Dust can accumulate quickly and make your home look dingy. Here’s how to dust effectively.
1. Gather Your Supplies: You’ll need a microfiber cloth, a duster with an extendable handle (for hard-to-reach areas), and a vacuum cleaner with a brush attachment.
2. Dust from Top to Bottom: Start by dusting high surfaces, such as ceiling fans and light fixtures, and work your way down. This will prevent dust from falling onto already cleaned surfaces.
3. Microfiber Magic: Use a microfiber cloth to dust furniture, shelves, and other surfaces. Microfiber cloths are excellent at trapping dust and preventing it from being spread around.
4. Vacuum Upholstery: Use the vacuum cleaner with the brush attachment to vacuum upholstery and carpets. This will remove dust, dirt, and pet hair.
5. Don’t Forget the Details: Pay attention to details, such as picture frames, lamps, and decorative items.
Freshening Up Carpets
Carpets can trap odors and dirt. Here’s how to freshen them up without expensive carpet cleaners.
1. Baking Soda Deodorizer: Sprinkle baking soda generously over your carpets.
2. Let it Sit: Let the baking soda sit for at least 30 minutes, or even overnight for stubborn odors.
3. Vacuum Thoroughly: Vacuum the carpets thoroughly to remove the baking soda.
General Cleaning Tips for a Happier Home
Here are a few extra tips to keep your home sparkling clean.
* Make it a

Conclusion
So, there you have it! Mastering these simple yet incredibly effective DIY house cleaning tricks can truly transform your home cleaning routine. We’ve explored methods that are not only budget-friendly but also environmentally conscious, allowing you to ditch harsh chemicals and embrace natural alternatives. From sparkling surfaces to fresher air, the benefits are undeniable.
Why is this a must-try? Because it empowers you to take control of your cleaning process, tailoring it to your specific needs and preferences. No more relying on expensive, store-bought products with questionable ingredients. You’ll know exactly what’s going into your cleaning solutions, ensuring a safer and healthier environment for you and your family. Plus, the satisfaction of creating something yourself and seeing the immediate results is incredibly rewarding.
Looking for variations? Absolutely! For a citrus boost, add lemon or orange peels to your vinegar cleaning solutions. Experiment with different essential oil combinations to create your signature scent. For tougher stains, consider adding a paste of baking soda and water for extra scrubbing power. The possibilities are endless, so don’t be afraid to get creative and personalize these tricks to suit your home.
We wholeheartedly encourage you to give these DIY house cleaning tricks a try. Start with one or two that resonate with you and gradually incorporate them into your regular cleaning schedule. You’ll be amazed at the difference they can make. Not only will your home be cleaner and fresher, but you’ll also be contributing to a more sustainable lifestyle.
But the journey doesn’t end here! We want to hear about your experiences. Did you discover a particularly effective variation? Did you encounter any challenges along the way? Share your tips, tricks, and stories in the comments below. Let’s create a community where we can all learn from each other and elevate our cleaning game together. Your insights could be invaluable to someone else who’s just starting out. So, roll up your sleeves, gather your supplies, and get ready to experience the joy of a sparkling clean home, powered by the magic of DIY! Embrace these **house cleaning tricks** and unlock a world of natural, effective, and affordable cleaning solutions.
Frequently Asked Questions (FAQ)
Q: Are these DIY cleaning solutions safe for all surfaces?
A: While most of these DIY cleaning solutions are generally safe for a wide range of surfaces, it’s always a good idea to test them in an inconspicuous area first, especially on delicate materials like marble, granite, or wood. Vinegar, for example, can be too acidic for some natural stone surfaces. Baking soda, while generally safe, can be abrasive if used too vigorously on certain finishes. When in doubt, dilute the solution further or consult the manufacturer’s recommendations for your specific surface. Always prioritize safety and avoid using harsh chemicals or abrasive materials that could damage your belongings.
Q: How long do these DIY cleaning solutions last?
A: The shelf life of DIY cleaning solutions can vary depending on the ingredients used. Solutions containing water are more prone to bacterial growth and should be used within a week or two. Solutions made with vinegar or alcohol tend to last longer, up to a month or two, due to their natural preservative properties. To maximize the shelf life of your DIY cleaning solutions, store them in airtight containers in a cool, dark place. Label each container with the date it was made so you can keep track of its freshness. If you notice any changes in color, odor, or consistency, it’s best to discard the solution and make a fresh batch.
Q: Can I use essential oils other than the ones mentioned in the recipes?
A: Absolutely! Essential oils are a fantastic way to add fragrance and enhance the cleaning power of your DIY solutions. Feel free to experiment with different essential oil combinations to create your signature scent. Some popular choices for cleaning include tea tree oil (known for its antibacterial properties), lavender oil (for its calming aroma), lemon oil (for its degreasing abilities), and eucalyptus oil (for its refreshing scent). When using essential oils, be sure to use pure, therapeutic-grade oils and follow the recommended dilution guidelines. A few drops are usually sufficient for most cleaning solutions. Also, be mindful of any allergies or sensitivities you or your family members may have before using a particular essential oil.
Q: What’s the best way to clean a greasy stovetop using DIY methods?
A: A greasy stovetop can be a challenge, but DIY methods can be surprisingly effective. Start by sprinkling baking soda generously over the greasy areas. Then, spray a mixture of equal parts vinegar and water onto the baking soda. Let the mixture fizz for a few minutes, then scrub with a non-abrasive sponge or cloth. The baking soda will help to lift the grease, while the vinegar will help to dissolve it. For stubborn grease, you can also try making a paste of baking soda and water and applying it directly to the greasy areas. Let the paste sit for a few minutes before scrubbing. Rinse thoroughly with water and dry with a clean cloth. For extra cleaning power, you can add a few drops of lemon essential oil to the mixture.
Q: How can I naturally freshen the air in my home?
A: There are several natural ways to freshen the air in your home without resorting to chemical-laden air fresheners. One simple method is to simmer a pot of water on the stovetop with slices of citrus fruits, such as lemons, oranges, or grapefruits. You can also add spices like cinnamon sticks, cloves, or star anise for a warm and inviting aroma. Another option is to place bowls of baking soda around your home to absorb odors. You can also add a few drops of your favorite essential oils to the baking soda for a more fragrant effect. Houseplants are also excellent natural air purifiers. Some of the best air-purifying plants include snake plants, spider plants, and peace lilies.
Q: Are these DIY cleaning solutions safe for pets and children?
A: While these DIY cleaning solutions are generally safer than commercial cleaners, it’s still important to exercise caution when using them around pets and children. Keep all cleaning solutions out of reach of children and pets. Avoid using essential oils that are known to be toxic to pets, such as tea tree oil. When cleaning surfaces that pets or children may come into contact with, rinse thoroughly with water to remove any residue. If you’re concerned about potential sensitivities or allergies, you can also opt for simpler cleaning solutions made with just water and vinegar or baking soda. Always supervise children when they are helping with cleaning and teach them about the importance of safety.
Q: What are some eco-friendly alternatives to paper towels?
A: Reducing your reliance on paper towels is a great way to minimize waste and protect the environment. There are several eco-friendly alternatives to choose from. Microfiber cloths are highly absorbent and can be used to clean a variety of surfaces. They are also reusable and can be washed in the washing machine. Old t-shirts or towels can be cut into rags and used for cleaning. These rags can also be washed and reused. Swedish dishcloths are another popular option. They are made from cellulose and cotton and are highly absorbent and durable. They are also biodegradable and compostable. When choosing alternatives to paper towels, look for options that are made from sustainable materials and that can be easily washed and reused.
Leave a Comment