

House cleaning hacks that work are like secret weapons in the battle against dust bunnies and grime! Let’s be honest, nobody *loves* spending their weekends scrubbing toilets and battling stubborn stains. But what if I told you there were clever, easy ways to make your cleaning routine faster, more efficient, and even a little bit…fun?
For generations, resourceful homemakers have passed down cleaning tips and tricks, often born out of necessity and a desire to keep their homes sparkling with minimal effort. Think about it – our grandmothers didn’t have the arsenal of fancy cleaning products we have today! They relied on ingenuity and everyday items like vinegar and baking soda to keep their homes fresh and inviting. These time-tested methods are the foundation of many of the house cleaning hacks that work we’ll be exploring today.
In today’s busy world, time is precious. We’re all juggling work, family, and social lives, and spending hours cleaning just isn’t feasible. That’s where these DIY cleaning hacks come in. They’re designed to save you time, money, and energy, allowing you to enjoy a cleaner, more comfortable home without sacrificing your precious free time. Plus, many of these hacks utilize natural ingredients, making them a healthier and more eco-friendly alternative to harsh chemical cleaners. So, get ready to discover some game-changing tips that will transform your cleaning routine and leave you with a sparkling home you can be proud of!

DIY House Cleaning Hacks That Actually Work!
Okay, let’s be honest, cleaning isn’t exactly anyone’s favorite pastime. But a clean house? That’s a game-changer! I’ve compiled some of my absolute favorite DIY cleaning hacks that are not only super effective but also save you money and are often more eco-friendly than store-bought cleaners. Get ready to transform your cleaning routine!
Cleaning Your Microwave Like a Pro (Without Scrubbing!)
This is one of my go-to hacks because, let’s face it, microwaves can get *nasty* fast. This method uses the power of steam to loosen up all that splattered food, making it a breeze to wipe clean.
What You’ll Need:
* 1 cup of water
* 1/4 cup of white vinegar (or lemon juice)
* Microwave-safe bowl
* Sponge or cloth
Step-by-Step Instructions:
1. Mix the Solution: In your microwave-safe bowl, combine the water and white vinegar (or lemon juice). The vinegar helps to break down grease and grime, while the lemon juice adds a fresh scent.
2. Microwave It: Place the bowl in the microwave and heat on high for 5-7 minutes. You want the solution to boil and create a good amount of steam.
3. Let it Sit: Once the timer goes off, *don’t* open the microwave immediately! Let the steam work its magic for another 3-5 minutes. This is crucial for loosening all the stuck-on food particles.
4. Wipe It Down: Carefully remove the bowl (it will be hot!). Use a sponge or cloth to easily wipe away all the loosened food debris. You’ll be amazed at how easily it comes off!
5. Final Touches: For any stubborn spots, you can dip your sponge in the remaining solution and give them a little extra attention.
Unclogging Drains the Natural Way
Forget those harsh chemical drain cleaners! This method uses baking soda and vinegar, a powerful (and safe!) combination to break down clogs.
What You’ll Need:
* 1 cup baking soda
* 2 cups white vinegar
* Boiling water
Step-by-Step Instructions:
1. Pour in the Baking Soda: Carefully pour one cup of baking soda down the drain. Try to get as much of it into the drain opening as possible.
2. Add the Vinegar: Next, pour two cups of white vinegar down the drain. You’ll immediately see a fizzing reaction – that’s the baking soda and vinegar working together to break down the clog.
3. Let it Fizz: Let the mixture fizz and bubble for at least 30 minutes, or even better, overnight. This gives the baking soda and vinegar enough time to dissolve the clog.
4. Flush with Boiling Water: After the waiting period, carefully pour a pot of boiling water down the drain. This will help to flush away any remaining debris.
5. Repeat if Necessary: If the drain is still clogged, repeat the process. For really stubborn clogs, you might need to do this a couple of times.
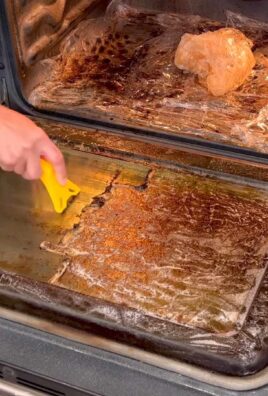
Cleaning Your Oven with Baking Soda Paste
Oven cleaning is the worst, right? But this baking soda paste method is surprisingly effective and avoids those nasty chemical fumes.
What You’ll Need:
* 1 cup baking soda
* Water
* Sponge or cloth
* Spray bottle with water
* Rubber gloves (optional, but recommended)
* Plastic scraper (optional)
Step-by-Step Instructions:
1. Empty the Oven: Remove all racks, baking sheets, and anything else that’s inside your oven.
2. Make the Paste: In a bowl, mix the baking soda with enough water to form a thick, spreadable paste. The consistency should be similar to frosting.
3. Apply the Paste: Using your hands (with gloves on, if you prefer) or a sponge, spread the baking soda paste all over the inside of your oven, avoiding the heating elements. Be generous with the application, especially on areas with baked-on grease and grime.
4. Let it Sit: This is the key! Let the baking soda paste sit in your oven for at least 12 hours, or even overnight. The longer it sits, the more effective it will be at loosening the grime.
5. Scrub and Wipe: After the waiting period, use a sponge or cloth to scrub away the baking soda paste. You might need to use a bit of elbow grease, especially on stubborn areas. A plastic scraper can also be helpful for removing thick layers of grime.
6. Rinse and Repeat: Use a spray bottle filled with water to rinse away any remaining baking soda residue. You might need to wipe down the oven several times to remove all the paste.
7. Replace the Racks: Once the oven is clean and dry, replace the racks and you’re good to go!
Making Your Own All-Purpose Cleaner
Why buy expensive all-purpose cleaners when you can easily make your own with just a few simple ingredients? This recipe is effective, eco-friendly, and smells great!
What You’ll Need:
* Spray bottle
* 1/4 cup white vinegar
* 1 tablespoon baking soda
* Water
* 10-15 drops of your favorite essential oil (optional, for scent)
Step-by-Step Instructions:
1. Combine Ingredients: In your spray bottle, combine the white vinegar and baking soda. Be prepared for a little fizzing!
2. Add Water: Slowly add water to the spray bottle, leaving a little room at the top.
3. Add Essential Oils (Optional): If you want to add a scent, add 10-15 drops of your favorite essential oil. Lemon, lavender, and tea tree oil are all great choices.
4. Shake Well: Secure the spray nozzle and shake the bottle well to combine all the ingredients.
5. Use and Enjoy: Your all-purpose cleaner is now ready to use! Simply spray it on surfaces and wipe clean with a cloth or sponge.
Cleaning Grout with Baking Soda and Hydrogen Peroxide
Dirty grout can make your entire bathroom or kitchen look dingy. This method uses the power of baking soda and hydrogen peroxide to brighten and clean grout lines.
What You’ll Need:
* Baking soda
* Hydrogen peroxide
* Old toothbrush or grout brush
* Spray bottle with water
Step-by-Step Instructions:
1. Make a Paste: In a small bowl, mix baking soda and hydrogen peroxide to form a thick paste. The consistency should be similar to toothpaste.
2. Apply the Paste: Using an old toothbrush or grout brush, apply the paste to the grout lines. Be sure to cover all the dirty areas.
3. Let it Sit: Let the paste sit on the grout lines for at least 5-10 minutes. This allows the baking soda and hydrogen peroxide to penetrate and loosen the dirt and grime.
4. Scrub the Grout: After the waiting period, use the toothbrush or grout brush to scrub the grout lines. You’ll see the dirt and grime start to lift away.
5. Rinse and Wipe: Use a spray bottle filled with water to rinse away the baking soda and hydrogen peroxide residue. Wipe the area clean with a cloth or sponge.
6. Repeat if Necessary: For heavily soiled grout, you might need to repeat the process.
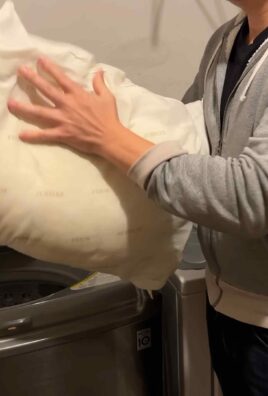
Freshening Your Mattress with Baking Soda
Mattresses can harbor dust mites, odors, and moisture. This simple baking soda trick will help to freshen and deodorize your mattress.
What You’ll Need:
* Baking soda
* Vacuum cleaner with upholstery attachment
* Essential oils (optional)
* Sifter or strainer (optional)
Step-by-Step Instructions:
1. Strip the Bed: Remove all bedding, including sheets, blankets, and pillows.
2. Sprinkle Baking Soda: Generously sprinkle baking soda all over the surface of your mattress. If you want to add a scent, you can mix a few drops of your favorite essential oil with the baking soda before sprinkling it on the mattress. A sifter or strainer can help to distribute the baking soda evenly.
3. Let it Sit: This is important! Let the baking soda sit on the mattress for at least 30 minutes, or even better, for several hours. The longer it sits, the more effective it will be at absorbing odors and moisture.
4. Vacuum Thoroughly: After the waiting period, use a vacuum cleaner with an upholstery attachment to thoroughly vacuum the entire surface of the mattress. Be sure to get into all the nooks and crannies.
5. Flip and Repeat: Flip the mattress over and repeat the process

Conclusion
So, there you have it! These house cleaning hacks aren’t just about saving time and money; they’re about reclaiming your space and creating a healthier, happier home. We’ve explored some truly game-changing techniques, from the surprisingly effective power of vinegar and baking soda to the often-overlooked cleaning potential of everyday items. But the real magic lies in their simplicity and accessibility. You don’t need fancy equipment or expensive chemicals to achieve a sparkling clean.
The beauty of these DIY cleaning solutions is their adaptability. Feel free to experiment with different essential oils to customize the scents of your cleaners. Lavender, lemon, and tea tree oil are all excellent choices, offering not only pleasant aromas but also added antibacterial and antifungal properties. For tougher stains, consider adding a bit of borax to your cleaning mixtures, but always remember to handle it with care and keep it out of reach of children and pets.
Don’t be afraid to tweak the recipes to suit your specific needs and preferences. If you find a particular hack works exceptionally well on a certain surface, make a note of it! Building your own personalized cleaning arsenal is part of the fun.
These house cleaning hacks are a must-try because they empower you to take control of your cleaning routine, using safe, natural ingredients that are both effective and environmentally friendly. They offer a sustainable alternative to harsh commercial cleaners, reducing your exposure to potentially harmful chemicals and minimizing your impact on the planet. Plus, let’s be honest, there’s a certain satisfaction that comes from creating your own cleaning solutions and seeing them work wonders.
We truly believe that incorporating these hacks into your cleaning routine will transform the way you approach housework. It’s no longer a dreaded chore but a manageable and even enjoyable task. Imagine the feeling of accomplishment as you effortlessly tackle grime and dirt, knowing that you’re using safe, effective, and budget-friendly methods.
But don’t just take our word for it! We urge you to try these DIY cleaning hacks for yourself. Start with one or two that pique your interest and see the difference they can make. We’re confident that you’ll be amazed by the results.
And most importantly, we want to hear about your experiences! Share your successes, your challenges, and any variations you’ve discovered in the comments below. Let’s create a community of cleaning enthusiasts who are passionate about sharing tips and tricks for a cleaner, healthier home. Your insights could be invaluable to others who are just starting their DIY cleaning journey. So, grab your vinegar, baking soda, and essential oils, and get ready to experience the transformative power of these amazing house cleaning hacks! We can’t wait to hear your stories!
Frequently Asked Questions (FAQs)
Q: Are these DIY cleaning hacks safe for all surfaces?
A: While most of these hacks are generally safe, it’s always a good idea to test them on an inconspicuous area first, especially on delicate surfaces like wood, marble, or granite. For example, vinegar, while a fantastic cleaner, can be acidic and may damage certain types of stone. Similarly, abrasive cleaners like baking soda should be used with caution on easily scratched surfaces. Always read the labels of your surfaces and appliances and follow the manufacturer’s recommendations. When in doubt, err on the side of caution and use a gentler cleaning solution. Remember, prevention is key! Regularly wiping down surfaces can prevent the buildup of grime and dirt, making cleaning easier and less likely to require harsh chemicals.
Q: Can I use these cleaning hacks if I have allergies or sensitivities?
A: If you have allergies or sensitivities, it’s crucial to be mindful of the ingredients you’re using. While natural ingredients are generally considered safer than harsh chemicals, some people may still be allergic to them. For example, some essential oils can trigger allergic reactions in sensitive individuals. Always test a small amount of the cleaning solution on your skin before using it on a larger area. If you experience any irritation, discontinue use immediately. Consider wearing gloves and a mask while cleaning to minimize exposure to potential allergens. You can also customize the recipes to exclude any ingredients that you know you’re allergic to. For instance, if you’re allergic to citrus, you can substitute lemon juice with another acidic cleaner like white vinegar.
Q: How long will these DIY cleaning solutions last?
A: The shelf life of your DIY cleaning solutions will depend on the ingredients used. Solutions containing water are more prone to bacterial growth and should be used within a week or two. Solutions made with vinegar or alcohol tend to last longer, up to a month or two. To prolong the shelf life of your cleaning solutions, store them in airtight containers in a cool, dark place. Label each container with the date it was made so you can keep track of its freshness. If you notice any changes in color, odor, or consistency, discard the solution immediately. It’s always better to make smaller batches of cleaning solutions more frequently than to make a large batch that might go bad before you can use it all.
Q: Can I use these hacks to clean my entire house?
A: Absolutely! These house cleaning hacks are versatile enough to tackle a wide range of cleaning tasks throughout your home. From cleaning your kitchen countertops and appliances to scrubbing your bathroom tiles and fixtures, these DIY solutions can handle it all. You can even use them to clean your floors, windows, and furniture. However, it’s important to choose the right cleaning solution for each specific surface. For example, a solution that’s safe for cleaning glass might not be suitable for cleaning wood. Always test the solution on an inconspicuous area first to ensure it doesn’t damage the surface. With a little experimentation and customization, you can create a complete DIY cleaning routine that will keep your entire house sparkling clean.
Q: What are some other variations or additions I can make to these cleaning hacks?
A: The possibilities are endless! You can add a few drops of your favorite essential oils to your cleaning solutions for a pleasant scent and added antibacterial properties. Tea tree oil, lavender oil, and lemon oil are all excellent choices. You can also add a tablespoon of borax to your cleaning solutions for extra cleaning power, especially for tackling tough stains and mildew. However, remember to handle borax with care and keep it out of reach of children and pets. For cleaning greasy surfaces, you can add a squirt of dish soap to your cleaning solution. And for polishing furniture, you can mix olive oil with lemon juice for a natural and effective polish. Don’t be afraid to experiment and find what works best for you! The key is to have fun and create cleaning solutions that are tailored to your specific needs and preferences.
Leave a Comment