

Easy cleaning tips for seniors – that’s exactly what we all need, right? Let’s face it, keeping our homes sparkling can become a bit more challenging as we embrace our golden years. But don’t worry, I’m here to share some fantastic DIY tricks and hacks that will make cleaning easier, safer, and even a little bit enjoyable!
Cleaning has always been an integral part of maintaining a healthy and comfortable living space. Historically, different cultures have developed unique cleaning methods using natural resources. Think of ancient Egyptians using natron (a naturally occurring salt mixture) for cleaning or Romans utilizing olive oil for polishing. These traditions highlight the enduring importance of cleanliness across generations.
But why are easy cleaning tips for seniors particularly important? As we age, mobility can decrease, and energy levels might fluctuate. Traditional cleaning methods can become strenuous and even pose safety risks. That’s where these DIY solutions come in! I’ll show you how to adapt cleaning routines, use readily available ingredients, and create a cleaning schedule that works with your body, not against it. Get ready to reclaim your sparkling home with these simple, effective, and senior-friendly cleaning hacks!
DIY Cleaning Hacks for Seniors: Making Life Easier and Brighter!
Hey everyone! As we get a little older, some tasks that used to be a breeze can become a bit more challenging. Cleaning is definitely one of those! But don’t worry, I’ve gathered some fantastic DIY cleaning hacks specifically designed to make cleaning easier and more manageable for seniors. These tips focus on simplicity, safety, and efficiency, so you can keep your home sparkling without straining yourself. Let’s dive in!
Essential Tools and Supplies
Before we get started, let’s make sure you have everything you need. Having the right tools can make a huge difference in how easy and safe these cleaning tasks are.
* Long-handled Duster: This is a lifesaver for reaching high places without climbing. Look for one with a bendable head.
* Lightweight Vacuum Cleaner: A cordless stick vacuum or a robot vacuum can be much easier to maneuver than a heavy upright model.
* Microfiber Cloths: These are super absorbent and great for dusting and wiping surfaces.
* Spray Bottles: For homemade cleaning solutions.
* Rubber Gloves: Protect your hands from harsh chemicals and hot water.
* Cleaning Caddy: Keep all your supplies organized and easy to carry from room to room.
* Ergonomic Cleaning Tools: Look for tools with comfortable grips and extended handles to reduce strain.
* Step Stool with Handrail: If you absolutely need to reach something high, use a sturdy step stool with a handrail for added safety.
* Baking Soda: A natural and effective cleaner and deodorizer.
* White Vinegar: Another natural powerhouse for cleaning and disinfecting.
* Lemon Juice: Great for cutting through grease and leaving a fresh scent.
* Dish Soap: A mild and versatile cleaner for many surfaces.
Hack 1: Sparkling Clean Showers and Tubs (Without the Scrubbing!)
Scrubbing the shower and tub can be really tough on your back and knees. This hack uses the power of vinegar and dish soap to loosen grime and soap scum, so you barely have to scrub at all!
Step-by-Step Instructions:
1. Mix Your Solution: In a spray bottle, combine equal parts white vinegar and dish soap. I usually go for about 1 cup of each.
2. Warm the Vinegar (Optional): For extra cleaning power, you can microwave the vinegar for about a minute before mixing it with the dish soap. Be careful, it will be hot!
3. Spray Generously: Spray the mixture all over the shower or tub, focusing on areas with heavy soap scum or mildew.
4. Let it Sit: Allow the solution to sit for at least 30 minutes, or even a few hours for really tough stains. The longer it sits, the less you’ll have to scrub.
5. Wipe and Rinse: After letting it sit, use a sponge or microfiber cloth to wipe down the surfaces. You’ll be amazed at how easily the grime comes off! Rinse thoroughly with warm water.
6. Preventative Measures: To keep your shower clean longer, squeegee the walls and door after each use. This will help prevent soap scum buildup.
Hack 2: Effortless Oven Cleaning
Oven cleaning is another one of those dreaded tasks. But with this simple baking soda paste, you can avoid harsh chemicals and hours of scrubbing.
Step-by-Step Instructions:
1. Remove Oven Racks: Take out the oven racks and soak them in hot, soapy water.
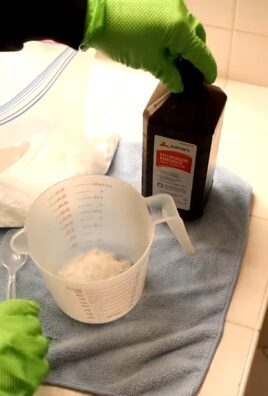
2. Make the Baking Soda Paste: In a bowl, mix 1/2 cup of baking soda with enough water to form a thick paste.
3. Apply the Paste: Spread the paste all over the inside of your oven, avoiding the heating elements. Be sure to coat the sides, bottom, and door.
4. Let it Sit Overnight: This is the key! Let the baking soda paste sit overnight (or for at least 12 hours). This gives it time to loosen the baked-on grime.
5. Wipe Away the Paste: The next day, use a damp sponge or cloth to wipe away the baking soda paste. You may need to use a little elbow grease for stubborn spots, but it should come off much easier than if you hadn’t used the paste.
6. Rinse Thoroughly: Rinse the oven with a clean, damp cloth to remove any remaining baking soda residue.
7. Clean the Racks: Scrub the oven racks with a brush or sponge to remove any remaining grime. Rinse them thoroughly and let them dry before putting them back in the oven.
Hack 3: Sparkling Clean Windows and Mirrors
Forget expensive window cleaners! This homemade solution works just as well and is much cheaper.
Step-by-Step Instructions:
1. Mix Your Solution: In a spray bottle, combine 1/4 cup of white vinegar, 2 cups of water, and a few drops of dish soap.
2. Spray and Wipe: Spray the solution onto your windows or mirrors.
3. Wipe with a Microfiber Cloth: Use a clean, dry microfiber cloth to wipe the surface. For streak-free results, use a back-and-forth motion.
4. Buff (Optional): For extra shine, you can buff the surface with a clean, dry cloth after wiping.
Hack 4: Deodorizing and Freshening Carpets
Carpets can trap odors and dirt, but this simple baking soda trick can freshen them up in no time.
Step-by-Step Instructions:
1. Sprinkle Baking Soda: Generously sprinkle baking soda all over your carpet.
2. Let it Sit: Allow the baking soda to sit for at least 30 minutes, or even longer for heavily soiled carpets. The longer it sits, the more odors it will absorb.
3. Vacuum Thoroughly: Vacuum the carpet thoroughly to remove all the baking soda.
Hack 5: Cleaning and Disinfecting Kitchen Counters
Keeping your kitchen counters clean and disinfected is essential for food safety. This simple vinegar solution is a safe and effective way to do it.
Step-by-Step Instructions:
1. Mix Your Solution: In a spray bottle, combine equal parts white vinegar and water.
2. Spray and Wipe: Spray the solution onto your kitchen counters.
3. Let it Sit: Allow the solution to sit for a few minutes to disinfect the surface.
4. Wipe Clean: Wipe the counters clean with a damp cloth.
Hack 6: Dusting Made Easy
Dusting can be a real pain, especially if you have allergies. Here are a few tips to make it easier:
* Use a Microfiber Duster: Microfiber dusters are great for trapping dust and preventing it from spreading.
* Dust from Top to Bottom: Start with high surfaces like ceiling fans and shelves, and work your way down to the floor. This will prevent dust from falling onto surfaces you’ve already cleaned.
* Dampen Your Cloth: Lightly dampen your microfiber cloth with water or a dusting spray to help trap dust.
* Use a Long-Handled Duster: A long-handled duster will allow you to reach high places without having to climb.
Hack 7: Cleaning Windowsills and Tracks
Windowsills and tracks can accumulate dirt, dust, and even mold. Here’s how to clean them easily:
Step-by-Step Instructions:
1. Vacuum First: Use a vacuum cleaner with a brush attachment to remove loose dirt and debris from the windowsill and track.
2. Make a Cleaning Paste: Mix baking soda with a little water to form a paste.
3. Apply the Paste: Apply the paste to the windowsill and track, focusing on areas with heavy dirt or mold.
4. Let it Sit: Allow the paste to sit for a few minutes to loosen the grime.
5. Scrub with a Brush: Use an old toothbrush or a small scrub brush to scrub the windowsill and track.
6. Wipe Clean: Wipe the surfaces clean with a damp cloth.
7. Dry Thoroughly: Dry the windowsill and track with a clean cloth to prevent mold growth.
Hack 8: Keeping Your Fridge Fresh
A clean fridge is a happy fridge! Here’s how to keep yours fresh and odor-free:
Step-by-Step Instructions:
1. Remove Everything: Take everything out of the fridge, including shelves and drawers.
2. Wash Shelves and Drawers: Wash the shelves and drawers with warm, soapy water. Rinse them thoroughly and let them dry.
3. Wipe Down the Interior: Wipe down the inside of the fridge with a solution of equal parts white vinegar and water.
Conclusion
So, there you have it! This simple yet incredibly effective DIY cleaning trick is more than just a shortcut; it’s a game-changer, especially for seniors looking for easy cleaning tips that don’t require strenuous effort or harsh chemicals. We understand that maintaining a clean and comfortable home is essential for well-being, but it shouldn’t come at the cost of your physical health or time. This method prioritizes both cleanliness and ease, making it a must-try for anyone seeking a more manageable cleaning routine.
The beauty of this DIY approach lies in its adaptability. Feel free to experiment with different essential oils to personalize the scent and add aromatherapy benefits to your cleaning routine. Lavender, eucalyptus, and lemon are all excellent choices known for their calming and invigorating properties, respectively. You can also adjust the ratio of ingredients to suit your specific needs and preferences. If you find the solution too strong, simply dilute it with more water. Conversely, if you need extra cleaning power, add a bit more vinegar or baking soda.
Beyond the basic recipe, consider these variations to tackle specific cleaning challenges:
* For stubborn stains: Create a paste of baking soda and water and apply it directly to the stain. Let it sit for a few minutes before scrubbing gently.
* For disinfecting surfaces: Add a few drops of tea tree oil to the solution. Tea tree oil is a natural antiseptic and can help kill germs and bacteria.
* For polishing furniture: Mix a small amount of olive oil with the solution to add shine and protect wood surfaces.
Remember, the goal is to create a cleaning solution that works best for you and your home. Don’t be afraid to experiment and find what you love.
We are confident that this DIY cleaning trick will simplify your cleaning routine and make your home a cleaner, healthier, and more enjoyable place to live. But don’t just take our word for it – we encourage you to try it out for yourself! We’re eager to hear about your experiences and any variations you discover. Share your tips, tricks, and photos in the comments section below. Let’s build a community of empowered cleaners who are making their lives easier, one DIY solution at a time. Your insights could be invaluable to others seeking easy cleaning tips. We believe in the power of shared knowledge and collective wisdom, so please don’t hesitate to contribute your unique perspective. Together, we can make cleaning less of a chore and more of a rewarding experience. So go ahead, give it a try, and let us know what you think! We can’t wait to hear from you.
Frequently Asked Questions (FAQ)
What makes this DIY cleaning trick particularly suitable for seniors?
This DIY cleaning trick is ideal for seniors because it emphasizes simplicity and ease of use. It eliminates the need for harsh chemicals and strenuous scrubbing, which can be physically demanding. The ingredients are readily available and affordable, making it a budget-friendly option. Furthermore, the customizable nature of the recipe allows seniors to tailor it to their specific needs and preferences, ensuring a comfortable and effective cleaning experience. The focus on natural ingredients also minimizes the risk of allergic reactions or sensitivities, which can be a concern for some seniors. It truly embodies easy cleaning tips.
Can I use this DIY cleaning solution on all surfaces?
While this DIY cleaning solution is generally safe for most surfaces, it’s always a good idea to test it on a small, inconspicuous area first, especially on delicate materials like wood or painted surfaces. Avoid using it on porous surfaces like unsealed grout, as it may cause discoloration. For surfaces that are particularly sensitive, such as marble or granite, consult the manufacturer’s recommendations before using any cleaning solution. When in doubt, err on the side of caution and use a gentler cleaning method.
How long will the DIY cleaning solution last?
The DIY cleaning solution is best used within a week or two. Since it doesn’t contain any preservatives, it may eventually spoil or lose its effectiveness. To prolong its shelf life, store it in a cool, dark place in an airtight container. You can also add a few drops of grapefruit seed extract, which is a natural preservative. If the solution develops an unusual odor or appearance, discard it and make a fresh batch. Making small batches ensures that you’re always using a fresh and effective cleaning solution.
What if I don’t have all the ingredients listed in the recipe?
The beauty of this DIY cleaning trick is its flexibility. If you don’t have all the ingredients on hand, you can make substitutions. For example, if you don’t have white vinegar, you can use lemon juice instead. If you don’t have baking soda, you can omit it altogether. The essential oils are optional, so you can leave them out if you don’t have any. The most important ingredients are water and a cleaning agent, such as vinegar or lemon juice. Feel free to experiment and find what works best for you.
Can I use this DIY cleaning solution to clean my bathroom?
Yes, this DIY cleaning solution is excellent for cleaning bathrooms. It can be used to clean sinks, toilets, showers, and bathtubs. The vinegar or lemon juice helps to remove soap scum and hard water stains, while the baking soda acts as a gentle abrasive. The essential oils can help to freshen the air and eliminate odors. However, be sure to test the solution on a small, inconspicuous area first, especially on delicate surfaces like marble or tile.
Is this DIY cleaning solution safe for pets and children?
This DIY cleaning solution is generally safe for pets and children, as it doesn’t contain any harsh chemicals. However, it’s still important to keep it out of their reach and prevent them from ingesting it. Essential oils can be toxic to pets if ingested in large quantities, so use them sparingly and avoid using them altogether if you have pets that are particularly sensitive. Always supervise children when they are helping with cleaning and teach them about the importance of safety.
How can I make this DIY cleaning solution more eco-friendly?
There are several ways to make this DIY cleaning solution even more eco-friendly. Use organic ingredients whenever possible. Choose essential oils that are sustainably sourced. Reuse and recycle your spray bottles. Avoid using disposable cleaning cloths and opt for reusable microfiber cloths instead. By making small changes, you can significantly reduce your environmental impact and create a healthier home for yourself and your family. Embracing easy cleaning tips that are also eco-friendly is a win-win.
What are some other easy cleaning tips for seniors?
Besides this DIY cleaning solution, there are many other easy cleaning tips that seniors can incorporate into their routines. Break down cleaning tasks into smaller, more manageable chunks. Use assistive devices, such as long-handled brushes and grabber tools, to reduce bending and reaching. Enlist the help of family members or hire a professional cleaning service if needed. Focus on maintaining a clean and clutter-free environment to prevent accidents and promote overall well-being. Remember, the goal is to make cleaning as easy and stress-free as possible.

Leave a Comment