

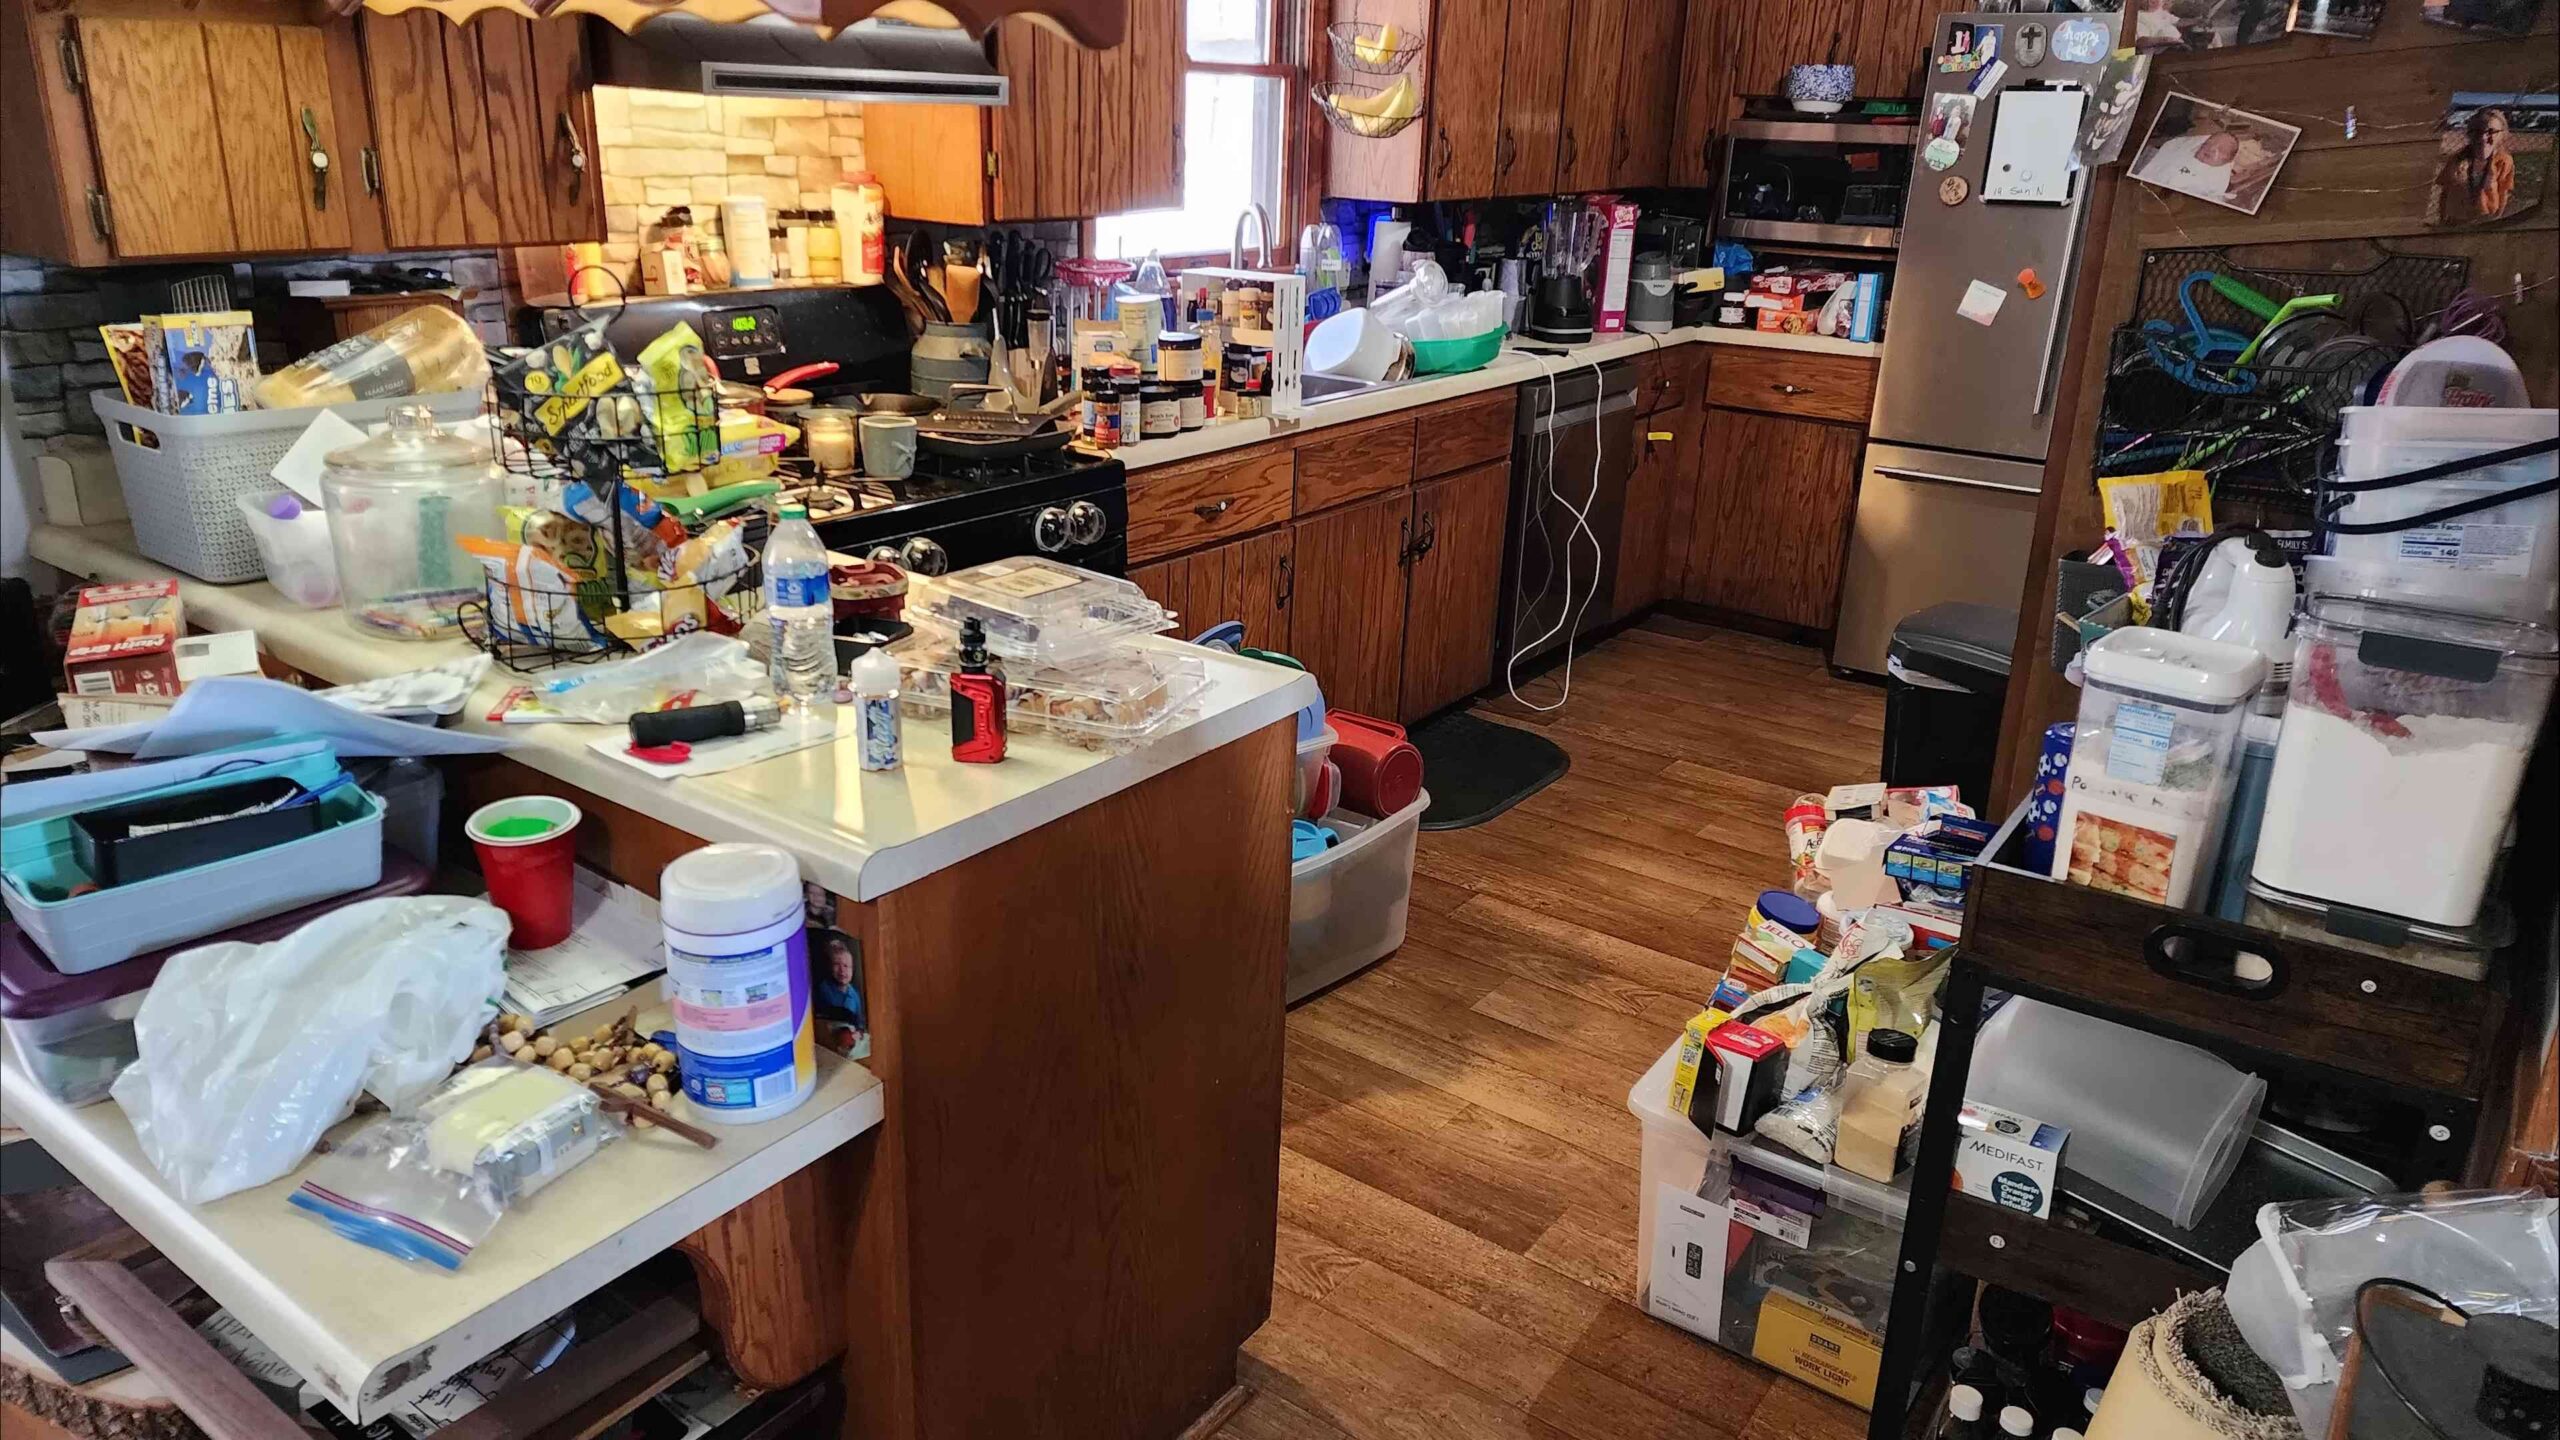
Deep Cleaning Hoarded Rooms: It’s a task that can feel utterly overwhelming, like staring into the abyss of clutter and chaos. But trust me, I understand. We’ve all been there, whether it’s a room that’s slowly accumulated “stuff” over time or a space that’s truly become a haven for hoarding tendencies. The good news? You don’t have to face this mountain alone.
Historically, the concept of decluttering and organizing has been linked to mental well-being across various cultures. From Feng Shui’s emphasis on energy flow to the minimalist movement’s focus on intentional living, the idea of a clean and organized space has always been tied to a clearer mind and a more peaceful life. But when clutter spirals into hoarding, the stakes are higher. It’s not just about aesthetics; it’s about safety, hygiene, and reclaiming your living space.
Why is deep cleaning hoarded rooms so crucial? Because beyond the surface mess, there can be hidden dangers like mold, pests, and fire hazards. More importantly, a clean and organized space can dramatically improve your mental health and overall quality of life. This DIY guide is designed to break down the daunting task of deep cleaning hoarded rooms into manageable steps, providing you with practical tips, effective strategies, and the motivation you need to transform a chaotic space into a sanctuary. I’m here to guide you through the process, offering support and encouragement every step of the way. Let’s get started!
DIY Guide: Tackling a Hoarded Room – From Chaos to Calm
Okay, let’s be honest. We’ve all been there, or know someone who has. A room that’s slowly morphed from a storage space into a… well, a mountain of stuff. Tackling a hoarded room can seem overwhelming, but trust me, with a plan and a little elbow grease, you can reclaim your space and your sanity. This isn’t just about cleaning; it’s about creating a healthier, more livable environment. I’m going to walk you through a step-by-step process that I’ve found incredibly helpful.
Phase 1: Preparation is Key
Before you even think about touching a single item, preparation is absolutely crucial. This isn’t a quick tidy-up; it’s a project.
- Mental Prep: This is the most important step. Acknowledge the scale of the task and commit to seeing it through. It’s okay to feel overwhelmed, but break it down into manageable chunks.
- Gather Your Supplies: You’ll need a lot more than just a duster. Think heavy-duty.
- Safety First: Hoarded rooms can harbor hidden dangers.
Supplies Checklist:
Here’s a comprehensive list of what you’ll need. Don’t skimp on quality; you’ll be relying on these tools heavily.
- Heavy-duty trash bags: Get the thickest ones you can find. You’ll need a lot.
- Sturdy boxes: For sorting and storing items you want to keep or donate.
- Cleaning supplies: All-purpose cleaner, disinfectant, glass cleaner, floor cleaner, mildew cleaner (if needed).
- Protective gear: Gloves (thick, durable ones), a mask (N95 or better to protect against dust and mold), eye protection (goggles or safety glasses).
- Tools: A sturdy broom, a mop, a vacuum cleaner (preferably with a HEPA filter), a dustpan, a scrub brush, a utility knife (for opening boxes), and maybe even a small shovel for moving heavy debris.
- First-aid kit: Just in case.
- Labels and markers: For clearly labeling boxes.
- Snacks and water: You’ll need to stay hydrated and energized.
- Music or a podcast: To keep you motivated.
Safety Precautions:
This is non-negotiable. Your health and safety are paramount.
- Wear protective gear: Always wear gloves, a mask, and eye protection. You never know what you might encounter.
- Ventilate the room: Open windows and doors to get fresh air circulating. If possible, use a fan to help with ventilation.
- Be aware of potential hazards: Watch out for sharp objects, broken glass, mold, pests (rodents, insects), and unstable stacks of items.
- Lift with your legs: Avoid back injuries by lifting heavy items properly.
- Take breaks: Don’t try to do everything at once. Regular breaks will help you stay focused and prevent burnout.
- Consider professional help: If the hoarding situation is severe or if you’re dealing with hazardous materials, don’t hesitate to call in professionals.
Phase 2: The Sorting Process – Conquer the Clutter
This is where the real work begins. The key is to be systematic and ruthless.
- Create Sorting Stations: Designate areas for different categories.
- One Item at a Time: Focus on each item individually.
- The Four-Box Method: This is your secret weapon.
Sorting Stations:
Set up designated areas for the following:
- Trash: Anything that’s broken, unusable, or beyond repair.
- Recycle: Paper, plastic, glass, and metal that can be recycled.
- Donate/Sell: Items that are in good condition but you no longer need or want.
- Keep: Items that you use regularly, have sentimental value, or are essential.
The Four-Box Method:
This is how you’ll categorize each item. Be honest with yourself!
- Trash: If it’s broken, stained, rotten, or completely useless, it goes straight into the trash bag. No second-guessing.
- Donate/Sell: If it’s in good condition and someone else could use it, put it in the donate/sell box. Clothes, furniture, books, and household items are good candidates.
- Keep: Only items that you truly need, use, or love should go in this box. Be realistic about what you actually use.
- Relocate: This is for items that belong in another room. Don’t put them back in the hoarded room! Place them in a temporary holding area to be put away later.
Step-by-Step Sorting Instructions:
Now, let’s get down to the nitty-gritty.
- Start with a small area: Don’t try to tackle the entire room at once. Choose a corner or a small section to begin with. This will make the task less daunting.
- Pick up one item at a time: Examine it carefully and ask yourself these questions:
- Have I used this in the past year?
- Do I need this?
- Do I love this?
- Is it in good condition?
- Make a decision: Based on your answers, place the item in the appropriate box (trash, donate/sell, keep, or relocate).
- Be ruthless: It’s easy to get attached to things, but remember your goal: to declutter and reclaim your space. If you’re on the fence about an item, err on the side of getting rid of it.
- Don’t get distracted: It’s tempting to start reminiscing about old memories or getting sidetracked by interesting items. Stay focused on the task at hand.
- Empty the trash and donate/sell boxes regularly: As the boxes fill up, take them out of the room to prevent clutter from accumulating.
- Repeat: Continue this process until you’ve sorted through every item in the room.
Phase 3: Deep Cleaning – Eradicating the Grime
Once you’ve removed the clutter, it’s time to give the room a thorough cleaning. This is where you’ll get rid of dust, dirt, mold, and other nasties that have accumulated over time.
- Dust Everything: Start from the top down.
- Clean Surfaces: Wipe down all surfaces with appropriate cleaners.
- Address Mold and Mildew: If present, tackle it safely and effectively.
- Clean the Floors: Vacuum, mop, or scrub as needed.
Step-by-Step Cleaning Instructions:
Let’s get this room sparkling!
- Dust the ceiling and walls: Use a long-handled duster or a vacuum cleaner with a brush attachment to remove dust and cobwebs from the ceiling and walls.
- Dust light fixtures and fans: Turn off the power before cleaning light fixtures and fans. Use a duster or a damp cloth to remove dust.
- Wipe down windows and mirrors: Use glass cleaner and a clean cloth to wipe down windows and mirrors.
- Clean window treatments: Wash or dry-clean curtains and blinds. Wipe down blinds with a damp cloth.
- Wipe down furniture: Use all-purpose cleaner and a clean cloth to wipe down furniture. Pay attention to surfaces that are frequently touched, such as doorknobs and light switches.
- Clean shelves and drawers: Remove everything from shelves and drawers and wipe them down with all-purpose cleaner.
- Address mold and mildew (if present): If you find mold or mildew, use a mold and mildew cleaner to kill it. Be sure to follow the instructions on the product label. Wear gloves and a mask when working with mold and mildew cleaners.
- Vacuum the floor: Vacuum the entire floor, paying attention to corners and edges. Use a vacuum cleaner with a HEPA filter to trap dust and allergens.
- Mop or scrub the floor: Depending on the type of flooring, mop or scrub the floor with an appropriate cleaner.
- Air out the room: Open windows and doors to air out the room and allow it to dry completely.
Conclusion
Tackling a deeply cluttered or hoarded room can feel incredibly overwhelming, but with the right approach and a few key DIY tricks, you can transform a space from chaotic to calming. We’ve explored strategies that go beyond simple tidying, focusing on deep cleaning, decluttering, and creating a system for long-term maintenance. The DIY solutions we’ve discussed aren’t just about saving money; they’re about empowering you to take control of your environment and create a healthier, more functional living space.
The must-try aspect of this approach lies in its holistic nature. It’s not just about removing items; it’s about understanding the underlying reasons for the clutter and addressing them head-on. By creating a structured plan, breaking down the task into manageable steps, and utilizing DIY cleaning solutions, you’re setting yourself up for success. Remember, this is a marathon, not a sprint. Be patient with yourself and celebrate small victories along the way.
Consider variations to the techniques we’ve discussed to suit your specific needs and preferences. For example, if you’re sensitive to strong smells, opt for essential oil-based cleaning solutions instead of harsh chemicals. Lavender, lemon, and tea tree oil are excellent choices for their antibacterial and deodorizing properties. You can also adapt the decluttering strategies to fit your personal style. If you’re a visual person, try taking “before” and “after” photos to track your progress and stay motivated. If you prefer a more hands-on approach, enlist the help of a friend or family member to provide support and accountability.
Another variation to consider is the “one in, one out” rule. For every new item you bring into the room, commit to removing one item. This helps prevent future clutter from accumulating and keeps the space manageable. You can also create designated zones within the room for specific activities, such as a reading nook, a workspace, or a storage area. This helps to organize your belongings and create a sense of order.
Ultimately, the success of deep cleaning hoarded rooms hinges on your commitment to change and your willingness to embrace new habits. It’s about creating a space that supports your well-being and allows you to thrive. Don’t be afraid to experiment with different techniques and find what works best for you.
We strongly encourage you to try these DIY tricks and share your experience with us. Your insights and feedback can help others who are facing similar challenges. Share your before-and-after photos, your favorite cleaning solutions, and your decluttering tips in the comments section below. Let’s create a community of support and inspiration to help each other transform our living spaces and our lives. Remember, the journey to a clutter-free home starts with a single step. Take that step today and experience the transformative power of a clean and organized environment. This DIY approach to deep cleaning is not just about aesthetics; it’s about creating a healthier, happier, and more functional living space for you and your loved ones.
Frequently Asked Questions (FAQ)
What is considered hoarding and how do I know if I need professional help?
Hoarding is a persistent difficulty discarding or parting with possessions because of a perceived need to save them. A hoarding disorder can significantly impair daily functioning and can create unsafe living conditions. Signs that you might need professional help include:
* Accumulation of items to the point where living spaces are unusable.
* Significant distress or impairment in social, occupational, or other important areas of functioning.
* Difficulty discarding items even when they have no apparent value.
* Anxiety or distress associated with the thought of discarding items.
* Unsanitary living conditions due to clutter and accumulation of items.
* Social isolation due to embarrassment or shame about the living conditions.
If you or someone you know is experiencing these symptoms, it’s important to seek professional help from a therapist, psychiatrist, or professional organizer specializing in hoarding disorder.
What are the best DIY cleaning solutions for tackling heavily soiled surfaces?
For heavily soiled surfaces, a combination of DIY solutions can be highly effective. Here are a few options:
* **Baking Soda Paste:** Mix baking soda with water to form a thick paste. Apply to stained or soiled surfaces, let it sit for a few minutes, and then scrub with a brush or sponge. Baking soda is a natural abrasive and deodorizer.
* **Vinegar and Water Solution:** Mix equal parts white vinegar and water in a spray bottle. This solution is effective for cleaning hard surfaces, removing mildew, and disinfecting.
* **Borax and Water Solution:** Mix 1/2 cup of borax with 1 gallon of hot water. This solution is effective for cleaning floors, walls, and other surfaces. Borax is a natural disinfectant and deodorizer.
* **Hydrogen Peroxide:** Hydrogen peroxide is a powerful disinfectant and stain remover. Use it with caution on delicate surfaces, as it can cause bleaching.
* **Dish Soap and Water:** A simple solution of dish soap and water can be effective for cleaning grease and grime.
Always test any cleaning solution in an inconspicuous area before applying it to the entire surface.
How do I deal with unpleasant odors in a hoarded room?
Unpleasant odors are a common problem in hoarded rooms. Here are some tips for dealing with them:
* **Ventilation:** Open windows and doors to air out the room. Use fans to circulate the air.
* **Baking Soda:** Place bowls of baking soda around the room to absorb odors. You can also sprinkle baking soda on carpets and upholstery, let it sit for a few hours, and then vacuum it up.
* **Vinegar:** Place bowls of white vinegar around the room to neutralize odors.
* **Essential Oils:** Use essential oil diffusers to freshen the air. Lavender, lemon, and tea tree oil are excellent choices for their antibacterial and deodorizing properties.
* **Activated Charcoal:** Activated charcoal is a powerful odor absorber. Place activated charcoal bags or filters around the room.
* **Ozone Generator:** In severe cases, an ozone generator may be necessary to eliminate odors. However, ozone generators should be used with caution, as they can be harmful to your health. Follow the manufacturer’s instructions carefully.
What safety precautions should I take when deep cleaning a hoarded room?
Safety is paramount when deep cleaning a hoarded room. Here are some precautions to take:
* **Wear Protective Gear:** Wear gloves, a mask, and eye protection to protect yourself from dust, mold, and other contaminants.
* **Ventilation:** Ensure adequate ventilation to avoid inhaling harmful fumes.
* **Avoid Mixing Chemicals:** Never mix different cleaning chemicals, as this can create dangerous fumes.
* **Be Aware of Hazards:** Be aware of potential hazards such as sharp objects, broken glass, and unstable piles of items.
* **Lift Properly:** Lift heavy objects carefully to avoid injury.
* **Take Breaks:** Take frequent breaks to avoid exhaustion.
* **Seek Help:** Don’t hesitate to ask for help from friends, family, or professional cleaners.
How do I prevent future clutter from accumulating?
Preventing future clutter is essential for maintaining a clean and organized space. Here are some tips:
* **Declutter Regularly:** Set aside time each week or month to declutter your home.
* **One In, One Out Rule:** For every new item you bring into your home, commit to removing one item.
* **Designated Storage Spaces:** Create designated storage spaces for your belongings.
* **Avoid Impulse Purchases:** Think carefully before buying new items. Do you really need them?
* **Donate or Sell Unwanted Items:** Donate or sell items that you no longer need or use.
* **Be Mindful of Your Spending Habits:** Be aware of your spending habits and avoid accumulating unnecessary items.
* **Seek Professional Help:** If you struggle with hoarding tendencies, seek professional help from a therapist or professional organizer.
What if I find hazardous materials or pests during the cleaning process?
If you encounter hazardous materials like asbestos, lead paint, or mold, it’s crucial to stop immediately and contact professionals trained in handling these substances. Similarly, if you discover a significant pest infestation (rodents, insects), contact a pest control service. Do not attempt to handle these issues yourself, as it can be dangerous to your health. Document the findings with photos and provide this information to the professionals you hire.

Leave a Comment