

Time-saving cleaning tricks are a game-changer, aren’t they? Let’s face it, nobody wants to spend their entire weekend scrubbing floors and dusting shelves. I know I certainly don’t! But what if I told you that you could reclaim your precious free time and still have a sparkling clean home?
The desire for efficient cleaning isn’t new. Throughout history, people have sought ways to lighten the burden of housework. From ancient Roman bathhouses with their elaborate cleaning systems to the invention of the vacuum cleaner in the early 20th century, the quest for quicker, easier cleaning methods has always been a priority. Think about it – even our grandmothers had their own secret cleaning hacks passed down through generations!
In today’s fast-paced world, these time-saving cleaning tricks are more essential than ever. We’re juggling work, family, hobbies, and social lives, leaving little room for hours of tedious chores. That’s why I’ve compiled a list of my favorite DIY cleaning hacks that will help you conquer the clutter and grime in record time. Get ready to discover simple solutions that will transform your cleaning routine and give you back the gift of time!

Time-Saving Cleaning Hacks That Will Change Your Life (Probably!)
Okay, let’s be honest, cleaning isn’t exactly anyone’s favorite pastime. But a clean home is a happy home, right? So, I’ve compiled some of my absolute favorite time-saving cleaning hacks that have seriously revolutionized my cleaning routine. Get ready to reclaim your weekends!
The Ultimate Guide to Speed Cleaning
Before we dive into the nitty-gritty, let’s establish some ground rules for efficient cleaning. These are the principles I live by (well, at least when I’m cleaning!).
* Declutter First: This is HUGE. You can’t effectively clean around clutter. Spend 10-15 minutes quickly tidying up before you even think about dusting or vacuuming. Put things back where they belong, toss out trash, and clear surfaces. Trust me, it makes a world of difference.
* Gather Your Supplies: Nothing is more frustrating than starting a task and realizing you’re missing a crucial tool. Assemble everything you need – cleaners, cloths, sponges, vacuum, etc. – in a caddy or bucket before you begin.
* Top-Down Approach: Always clean from top to bottom. Dust ceilings and light fixtures first, then work your way down to surfaces and floors. This prevents dust and debris from falling onto already cleaned areas.
* One Room at a Time: Focus on completing one room before moving on to the next. This prevents you from getting overwhelmed and ensures that you actually finish what you start.
* Multi-Task Like a Pro: While waiting for a cleaning solution to soak, tackle another quick task. For example, spray your shower cleaner and then wipe down the bathroom mirror while it sits.
* Don’t Procrastinate: Little and often is the key. Wipe up spills immediately, make your bed every morning, and do a quick tidy-up each evening. This prevents messes from accumulating and makes deep cleaning less daunting.
Hack 1: Microwave Cleaning Made Easy (No Scrubbing Required!)
Microwaves are notorious for splatters and stuck-on food. But fear not, this hack will have your microwave sparkling in minutes with minimal effort.
1. Prepare Your Cleaning Solution: Fill a microwave-safe bowl with 1 cup of water and 2 tablespoons of white vinegar. You can also add a few slices of lemon or lime for a fresh scent.
2. Microwave the Solution: Place the bowl in the microwave and heat on high for 5-7 minutes, or until the water boils and the window is steamy.
3. Let it Sit: Leave the bowl in the microwave for another 3-5 minutes. The steam will loosen the grime and make it easy to wipe away.
4. Wipe Clean: Carefully remove the bowl (it will be hot!). Use a clean cloth or sponge to wipe down the interior of the microwave. The splatters should come off easily.
5. Clean the Turntable: Remove the turntable and wash it with warm, soapy water. Rinse and dry thoroughly before replacing it.
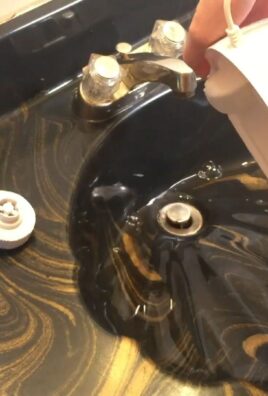
Hack 2: Streak-Free Shower Doors with a Secret Weapon
Shower doors can be a pain to keep clean, especially if you have hard water. But this simple hack will give you streak-free results every time.
1. Gather Your Supplies: You’ll need a spray bottle, white vinegar, dish soap, a microfiber cloth, and a squeegee.
2. Mix Your Cleaning Solution: In the spray bottle, combine equal parts white vinegar and dish soap. Shake gently to mix.
3. Spray the Shower Doors: Generously spray the cleaning solution onto the shower doors, making sure to cover all areas.
4. Let it Sit: Allow the solution to sit for 15-20 minutes to break down soap scum and hard water stains.
5. Scrub (If Necessary): If you have stubborn stains, use a non-abrasive sponge or scrub brush to gently scrub the shower doors.
6. Rinse Thoroughly: Rinse the shower doors with hot water, making sure to remove all traces of the cleaning solution.
7. Squeegee Dry: Use a squeegee to remove excess water from the shower doors. This will prevent water spots and streaks.
8. Wipe with Microfiber Cloth: For a final touch, wipe the shower doors with a clean, dry microfiber cloth to remove any remaining water spots or streaks.
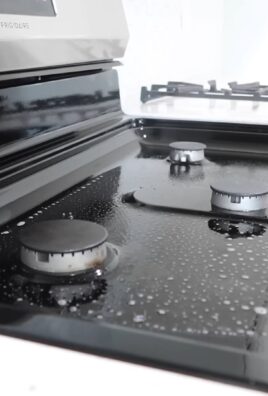
Hack 3: Sparkling Stainless Steel Appliances with Olive Oil
Stainless steel appliances look great, but they’re magnets for fingerprints and smudges. This simple hack will leave them looking shiny and new.
1. Gather Your Supplies: You’ll need a clean microfiber cloth, white vinegar, and olive oil.
2. Clean with Vinegar: Lightly dampen a microfiber cloth with white vinegar and wipe down the stainless steel appliances to remove any dirt, grime, or fingerprints.
3. Dry Thoroughly: Use a clean, dry microfiber cloth to dry the appliances completely.
4. Apply Olive Oil: Pour a small amount of olive oil onto a clean microfiber cloth.
5. Buff the Appliances: Gently buff the stainless steel appliances with the olive oil, following the grain of the metal.
6. Remove Excess Oil: Use a clean, dry microfiber cloth to remove any excess olive oil. Your appliances should now be sparkling and fingerprint-resistant!
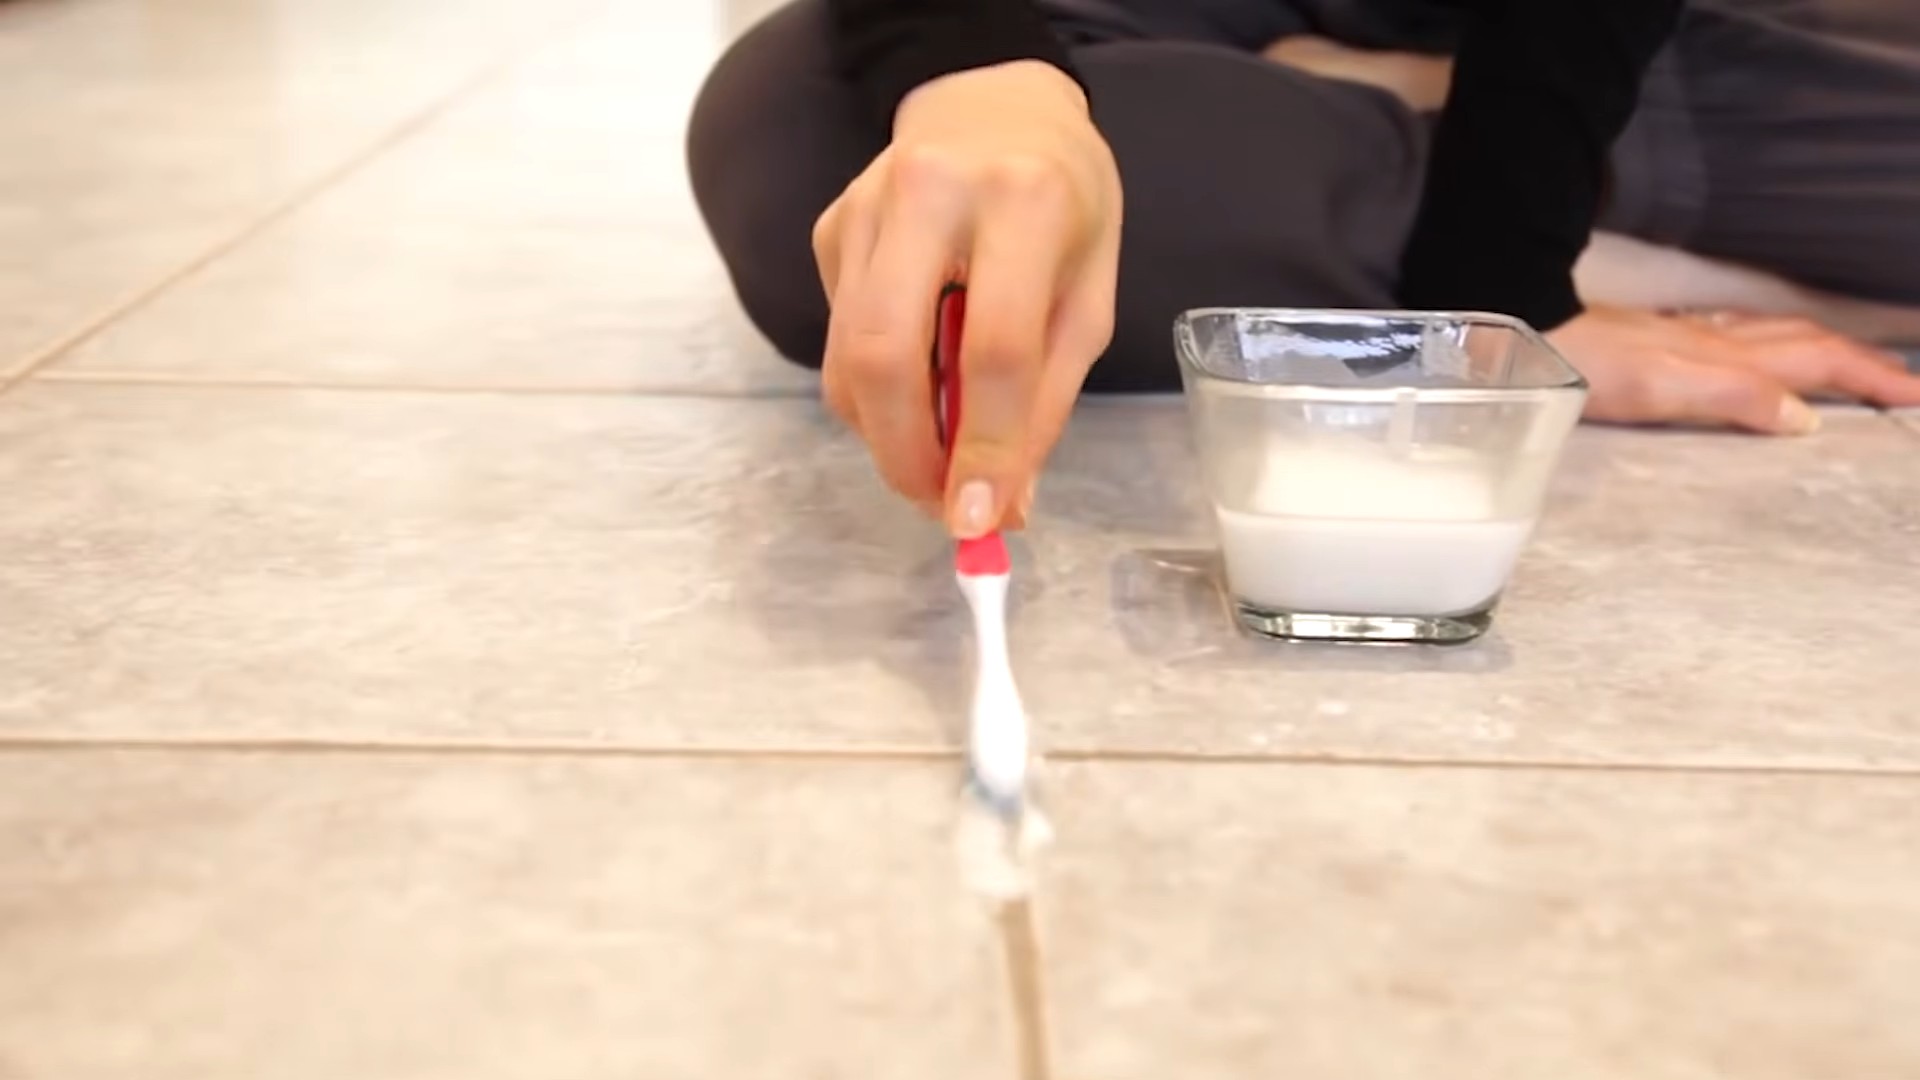
Hack 4: Deep Clean Your Grout with Baking Soda and Vinegar
Dirty grout can make even the cleanest tiles look dingy. This powerful combination will banish stains and restore your grout to its former glory.
1. Gather Your Supplies: You’ll need baking soda, white vinegar, a spray bottle, an old toothbrush or grout brush, and water.
2. Make a Baking Soda Paste: Mix baking soda with a small amount of water to form a thick paste.
3. Apply the Paste: Apply the baking soda paste to the grout lines, covering them completely.
4. Spray with Vinegar: Fill a spray bottle with white vinegar and spray it onto the baking soda paste. The mixture will fizz.
5. Let it Sit: Allow the mixture to sit for 5-10 minutes.
6. Scrub the Grout: Use an old toothbrush or grout brush to scrub the grout lines, removing dirt and stains.
7. Rinse Thoroughly: Rinse the grout with water, making sure to remove all traces of the baking soda and vinegar.
8. Dry with a Towel: Dry the grout with a clean towel.
Hack 5: Freshen Up Your Garbage Disposal with Citrus Peels
Garbage disposals can get smelly over time. This simple hack will freshen them up and eliminate odors.
1. Gather Your Supplies: You’ll need citrus peels (lemon, lime, orange, or grapefruit), ice cubes, and water.
2. Cut the Citrus Peels: Cut the citrus peels into small pieces that will easily fit down the garbage disposal.
3. Add Ice Cubes: Add a handful of ice cubes to the garbage disposal.
4. Turn on the Water: Turn on the cold water to a steady stream.
5. Turn on the Disposal: Turn on the garbage disposal and slowly feed the citrus peels into it.
6. Grind for 30 Seconds: Allow the disposal to grind the citrus peels and ice cubes for about 30 seconds. The ice helps to scrub the disposal blades, while the citrus peels release their natural oils to freshen the disposal.
7. Rinse Thoroughly: Turn off the disposal and continue running the cold water for a few seconds to rinse away any remaining debris.
Hack 6: Dusting Like a Pro with Old Socks
Forget expensive dusting cloths! Old socks are surprisingly effective dusters, and they’re free!
1. Gather Your Supplies: You’ll need a few clean, old socks (preferably cotton or microfiber).
2. Slip the Sock On: Simply slip the sock onto your hand, like a glove.
3. Dust Away: Use the sock-covered hand to dust surfaces, furniture, and other items. The sock will trap dust and prevent it from spreading.
4. Wash and Reuse: When the sock gets dirty, simply remove it and toss it in the washing machine. You can reuse it multiple times.
5. For Hard-to-Reach Areas: For dusting blinds or other hard-to-reach areas, try slipping the sock onto a pair of tongs or a ruler.
Hack 7: Speed Clean Your Blinds with Tongs and a Cloth
Cleaning blinds can be tedious, but this hack makes it much faster and easier.
1. Gather Your Supplies: You’ll need a pair of tongs, two microfiber cloths, and your favorite cleaning solution (optional).
2. Wrap the Tongs: Wrap a microfiber cloth around each arm of the
Conclusion
So, there you have it! These time-saving cleaning tricks aren’t just about making your life easier; they’re about reclaiming your precious time and energy. Imagine spending less time scrubbing and more time doing the things you truly enjoy. From the quick microwave cleaning hack to the effortless shower spray, these methods are designed to seamlessly integrate into your routine, transforming daunting chores into manageable tasks.
The beauty of these DIY solutions lies in their simplicity and accessibility. You likely already have most, if not all, of the ingredients needed right in your pantry or cleaning cabinet. No need for expensive, specialized products filled with harsh chemicals. These are eco-friendly, budget-friendly, and most importantly, effective ways to maintain a sparkling clean home.
But don’t just take our word for it. We encourage you to experiment and find what works best for you. For instance, if you’re tackling stubborn stovetop grease, try adding a bit of baking soda to your vinegar solution for extra scrubbing power. Or, if you prefer a different scent for your all-purpose cleaner, swap out the lemon essential oil for lavender or tea tree oil. The possibilities are endless!
These time-saving cleaning tricks are a game-changer for anyone looking to simplify their cleaning routine. They offer a practical and efficient way to keep your home clean and tidy without sacrificing your valuable time.
We’re confident that once you try these methods, you’ll wonder how you ever lived without them. They’re not just about cleaning; they’re about creating a more enjoyable and stress-free living environment.
Now, it’s your turn! Give these time-saving cleaning tricks a try and see the difference they can make in your life. We’re eager to hear about your experiences. Share your results, variations, and any other helpful tips you discover in the comments below. Let’s create a community of clean-living enthusiasts who are all about saving time and enjoying life to the fullest!
Frequently Asked Questions
Q: Are these cleaning tricks safe for all surfaces?
A: While most of these tricks are generally safe, it’s always a good idea to test them on an inconspicuous area first, especially on delicate surfaces like wood or natural stone. For example, vinegar, while a great cleaner, can be acidic and may damage certain types of stone countertops. Similarly, be cautious when using abrasive cleaners like baking soda on easily scratched surfaces. Always read the manufacturer’s instructions for your surfaces and appliances before applying any cleaning solution. When in doubt, err on the side of caution and use a gentler cleaning method.
Q: Can I use these cleaning tricks if I have allergies or sensitivities?
A: If you have allergies or sensitivities, it’s crucial to be mindful of the ingredients used in these DIY cleaning solutions. For example, if you’re allergic to citrus, avoid using lemon juice or lemon essential oil. Similarly, if you’re sensitive to vinegar, consider using a diluted solution or exploring alternative cleaning agents like baking soda or hydrogen peroxide. Always wear gloves when cleaning to protect your skin, and ensure proper ventilation to avoid inhaling any fumes. If you experience any adverse reactions, discontinue use immediately and consult with a healthcare professional. You can also look for hypoallergenic cleaning products or create your own using gentle, natural ingredients.
Q: How often should I use these cleaning tricks?
A: The frequency of using these cleaning tricks depends on your lifestyle, the size of your home, and your personal preferences. For high-traffic areas like the kitchen and bathroom, you may want to incorporate these tricks into your daily or weekly cleaning routine. For less frequently used areas, such as guest rooms or storage spaces, a monthly cleaning may suffice. The key is to establish a cleaning schedule that works for you and helps you maintain a clean and comfortable living environment without feeling overwhelmed. Remember, consistency is key! Even a few minutes of cleaning each day can make a big difference in the overall cleanliness of your home.
Q: What are some other variations I can try with these cleaning tricks?
A: The beauty of DIY cleaning solutions is that they’re highly customizable. Here are a few variations you can try:
* **Essential Oil Blends:** Experiment with different essential oil blends to create your own signature scent. For example, a combination of lavender and chamomile can create a calming and relaxing atmosphere, while a blend of peppermint and eucalyptus can provide an invigorating and refreshing scent.
* **Citrus Infusion:** Infuse your vinegar cleaner with citrus peels for a more potent and fragrant cleaning solution. Simply add orange, lemon, or grapefruit peels to a jar of vinegar and let it steep for a few weeks before straining and using.
* **Herbal Infusion:** Similarly, you can infuse your cleaning solutions with herbs like rosemary, thyme, or sage for added cleaning power and a natural fragrance.
* **Baking Soda Paste:** Create a thick paste of baking soda and water to tackle stubborn stains and grime on surfaces like ovens, stovetops, and grout.
* **Hydrogen Peroxide Spray:** Use a diluted hydrogen peroxide solution as a disinfectant spray for surfaces like countertops, cutting boards, and bathroom fixtures.
Q: Are these cleaning tricks environmentally friendly?
A: Yes, these cleaning tricks are generally more environmentally friendly than using conventional cleaning products. By using natural ingredients like vinegar, baking soda, and lemon juice, you’re reducing your reliance on harsh chemicals that can pollute the environment. Additionally, DIY cleaning solutions often require less packaging, which helps to reduce waste. However, it’s important to be mindful of the sourcing of your ingredients. Choose organic and sustainably sourced ingredients whenever possible to minimize your environmental impact. You can also consider using reusable spray bottles and cleaning cloths to further reduce waste.
Q: What if these cleaning tricks don’t work for me?
A: While these cleaning tricks are effective for many people, they may not work for everyone or every situation. If you’re not seeing the desired results, don’t be discouraged! Experiment with different variations, adjust the ratios of ingredients, or try a different cleaning method altogether. It’s also important to consider the specific type of dirt or stain you’re trying to remove. Some stains may require specialized cleaning products or professional cleaning services. Remember, cleaning is a process of trial and error, so don’t be afraid to experiment and find what works best for you. And most importantly, don’t give up! With a little persistence and creativity, you can achieve a clean and healthy home.
Q: How do I store these DIY cleaning solutions?
A: Proper storage is essential for maintaining the effectiveness and safety of your DIY cleaning solutions. Store them in airtight containers, preferably glass or BPA-free plastic, to prevent evaporation and contamination. Label each container clearly with the name of the solution and the date it was made. Keep your cleaning solutions out of reach of children and pets, and store them in a cool, dark place away from direct sunlight and heat. For solutions containing essential oils, use dark-colored bottles to protect the oils from degradation. Regularly check your cleaning solutions for any signs of spoilage, such as discoloration, odor, or separation. If you notice any of these signs, discard the solution and make a fresh batch.

Leave a Comment