

Bitter melon gardening tips are your ticket to cultivating this unique and nutritious vegetable right in your own backyard! Have you ever been intrigued by the knobbly, vibrant green skin and distinctive bitter taste of bitter melon, also known as karela? For centuries, this fascinating fruit has been a staple in Asian and African cuisines and traditional medicine, revered for its health benefits and culinary versatility. From stir-fries to curries, bitter melon adds a distinctive flavor profile that’s both intriguing and beneficial.
But let’s be honest, growing bitter melon can seem a little daunting. That’s where this DIY guide comes in! I’m going to share my tried-and-true bitter melon gardening tips and hacks to help you navigate the challenges and reap the rewards of a bountiful harvest. Imagine stepping outside your door to pick fresh, organic bitter melon, knowing exactly where it came from and how it was grown.
In today’s world, where we’re increasingly conscious of what we eat and where it comes from, growing your own food is more important than ever. Plus, with rising grocery prices, mastering these simple techniques can save you money while providing you with a healthy and delicious addition to your diet. So, grab your gardening gloves, and let’s dive into the world of bitter melon gardening! I’m excited to show you how easy and rewarding it can be.

Growing Bitter Melon: A DIY Guide to a Bountiful Harvest
Okay, let’s dive into the world of bitter melon! It’s a unique vegetable, and growing it yourself is super rewarding. I’m going to walk you through everything you need to know, from prepping the seeds to harvesting your own bitter bounty.
Choosing Your Bitter Melon Variety
First things first, let’s talk varieties. There are a few different types of bitter melon, and the best one for you will depend on your climate and personal preference.
* Chinese Bitter Melon: These are typically longer and lighter green, with smoother skin. They tend to be less bitter than other varieties.
* Indian Bitter Melon: These are smaller, darker green, and have a more bumpy, ridged skin. They’re known for their intense bitterness.
* Japanese Bitter Melon: This variety is usually medium-sized, with a slightly warty texture. The bitterness level is somewhere between the Chinese and Indian types.
I personally prefer the Chinese variety because it’s a bit milder, but feel free to experiment and find your favorite!
Preparing for Planting: Seed Germination
Bitter melon seeds have a tough outer shell, so we need to give them a little head start with germination. Here’s how I do it:
1. Scarification: Gently nick the seed coat with a nail file or sandpaper. Be careful not to damage the inner part of the seed! This helps water penetrate and speeds up germination.
2. Soaking: Soak the seeds in warm water for 24-48 hours. This further softens the seed coat and encourages sprouting. I usually change the water every 12 hours.
3. Paper Towel Method: Place the soaked seeds on a damp paper towel, fold it over, and put it in a plastic bag or container. Keep the paper towel moist, but not soaking wet.
4. Warmth: Place the bag or container in a warm location (around 80-85°F or 27-29°C). A heat mat can be helpful, but a warm windowsill works too.
5. Patience: Check the seeds daily. You should see sprouts emerging in 3-7 days. Once the sprouts are about ½ inch long, they’re ready to be planted.
Planting Your Bitter Melon
Now that your seeds have sprouted, it’s time to get them in the ground (or a container!).
1. Choosing the Right Location: Bitter melon loves sunshine! Choose a spot that gets at least 6-8 hours of direct sunlight per day. It also needs well-draining soil.
2. Soil Preparation: Amend your soil with compost or well-rotted manure to improve drainage and fertility. Bitter melon is a heavy feeder, so rich soil is key. I like to add a slow-release fertilizer at this stage as well.
3. Planting in the Ground: Dig a small hole, about 1 inch deep, for each seedling. Gently place the seedling in the hole, making sure the roots are spread out. Cover with soil and water gently. Space the plants about 2-3 feet apart.
4. Planting in Containers: If you’re growing in containers, choose pots that are at least 12 inches in diameter. Use a good quality potting mix and follow the same planting instructions as above.
5. Trellising: Bitter melon is a vine, so it needs something to climb on. Install a trellis, fence, or other support structure near your plants. This will help them grow vertically and produce more fruit. I’ve used everything from simple bamboo stakes to elaborate trellises, and they all work!
Caring for Your Bitter Melon Plants
Once your plants are in the ground, it’s important to provide them with the right care to ensure a healthy and productive harvest.
1. Watering: Water regularly, especially during hot, dry weather. Keep the soil consistently moist, but avoid overwatering, which can lead to root rot. I usually water deeply a couple of times a week, depending on the weather.
2. Fertilizing: Feed your plants every 2-3 weeks with a balanced fertilizer. You can also use a liquid seaweed fertilizer for an extra boost.
3. Weeding: Keep the area around your plants free of weeds. Weeds compete for nutrients and water, so it’s important to remove them regularly.
4. Pest Control: Bitter melon can be susceptible to pests like aphids, squash bugs, and cucumber beetles. Inspect your plants regularly and take action if you see any signs of infestation. I prefer to use organic pest control methods, such as insecticidal soap or neem oil.
5. Pruning: Pruning can help improve air circulation and encourage fruit production. Remove any yellowing or dead leaves, and trim back any overly aggressive vines.
Pollination: Helping Nature Along
Bitter melon has separate male and female flowers. The female flowers have a small fruit behind them, while the male flowers do not. Sometimes, pollination can be a challenge, especially if you don’t have many bees or other pollinators in your area.
1. Hand-Pollination: If you’re not seeing much fruit set, you can try hand-pollinating the flowers. Use a small paintbrush to collect pollen from the male flowers and transfer it to the female flowers. Do this in the morning, when the flowers are open.
2. Attracting Pollinators: Plant flowers that attract bees and other pollinators near your bitter melon plants. Some good choices include sunflowers, zinnias, and lavender.
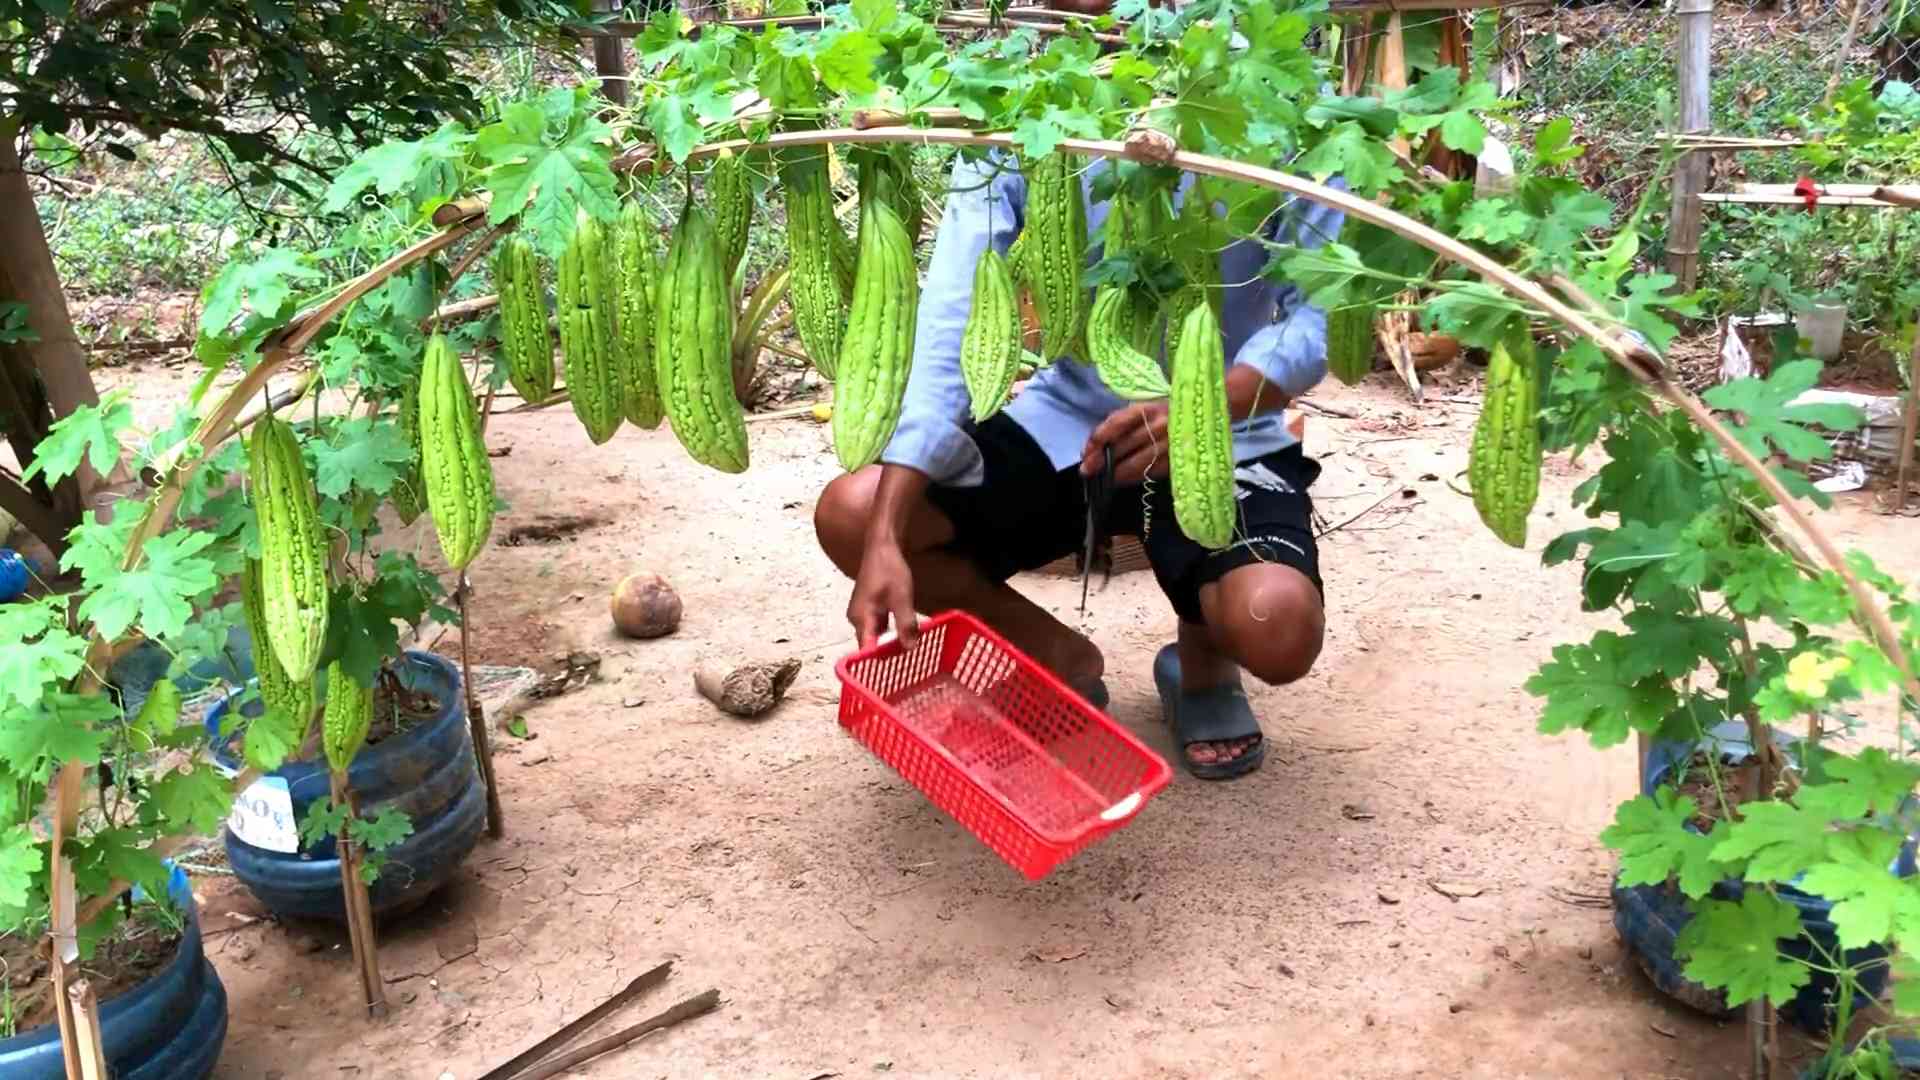
Harvesting Your Bitter Melon
The moment you’ve been waiting for! Harvesting your own bitter melon is so satisfying.
1. Timing: Bitter melon is typically ready to harvest about 2-3 months after planting. The fruit should be firm and have a slightly glossy appearance. The color will vary depending on the variety.
2. Harvesting Technique: Use a sharp knife or scissors to cut the fruit from the vine. Leave a small stem attached to the fruit.
3. Taste: The bitterness of the fruit increases as it ripens, so harvest it when it’s at the stage you prefer. Younger fruits are generally less bitter.
4. Storage: Store harvested bitter melon in the refrigerator for up to a week.
Troubleshooting Common Problems
Even with the best care, you might encounter some problems while growing bitter melon. Here are a few common issues and how to address them:
* Yellowing Leaves: This could be a sign of overwatering, nutrient deficiency, or pest infestation. Check the soil moisture, fertilize your plants, and inspect them for pests.
* Lack of Fruit Set: This could be due to poor pollination, lack of nutrients, or stress from heat or drought. Try hand-pollinating the flowers, fertilizing your plants, and providing them with adequate water.
* Root Rot: This is caused by overwatering and poor drainage. Make sure your soil is well-draining and avoid overwatering. If you suspect root rot, you can try transplanting your plants to a new location with better drainage.
* Pest Infestations: Regularly inspect your plants for pests and take action if you see any signs of infestation. Use organic pest control methods whenever possible.
Enjoying Your Harvest
Now that you’ve harvested your own bitter melon, it’s time to enjoy it! There are many ways to cook and eat bitter melon.
* Stir-Fries: Bitter melon is a popular ingredient in stir-fries. It pairs well with meat, vegetables, and tofu.
* Soups: Bitter melon can be added to soups for a unique flavor.
* Juices: Some people enjoy drinking bitter melon juice for its health benefits.
* Stuffed Bitter Melon: A classic dish where bitter melon is stuffed with a savory filling.
Before cooking, you can reduce the bitterness by soaking the sliced bitter melon in salted water for about 30 minutes.
Saving Seeds for Next Year
If you want to grow bitter melon again next year, you can save seeds from your harvest.
1. Choose a Ripe Fruit: Select a fully ripe fruit that is starting to turn yellow or orange.
2. Extract the Seeds: Cut open the fruit and scoop out the seeds.
3. Clean the Seeds: Rinse the seeds thoroughly to remove any pulp.
4. Dry the Seeds: Spread the seeds out on a paper towel and let them dry completely. This may take several days.
5. Store the Seeds: Store the dried seeds in an airtight container in a cool, dry place.
And there you have it! Everything you need to know to grow your own bitter melon. It might seem like a lot, but trust me, it’s totally doable. With a little patience and care, you’ll be enjoying your own homegrown bitter melon in no time. Happy gardening!
Conclusion
So, there you have it! Mastering the art of growing bitter melon doesn’t have to be a daunting task. By implementing these simple yet effective DIY tricks, you’re well on your way to harvesting a bountiful crop of this nutritious and unique vegetable right in your own backyard. We’ve covered everything from optimizing soil conditions and crafting the perfect support structures to warding off pests naturally and ensuring consistent watering. Remember, the key to success lies in understanding the specific needs of your bitter melon plants and adapting your approach accordingly.
Why is this a must-try? Because growing your own bitter melon allows you to control the entire process, from seed to table. You can ensure that your plants are free from harmful chemicals and pesticides, resulting in a healthier and more flavorful harvest. Plus, there’s an undeniable satisfaction that comes from nurturing a plant and watching it thrive under your care. It’s a rewarding experience that connects you to nature and provides you with a sustainable source of fresh produce.
But the journey doesn’t end here! Feel free to experiment with different variations to personalize your bitter melon gardening experience. For instance, try companion planting with basil or marigolds to deter pests and attract beneficial insects. You could also explore different trellising methods to find the one that best suits your garden space and aesthetic preferences. Consider using different types of organic fertilizers to boost growth and improve the overall health of your plants.
Don’t be afraid to get creative and tailor these techniques to your specific environment and resources. The beauty of gardening lies in its adaptability and the endless possibilities for experimentation.
We’ve provided you with the foundational knowledge and practical tips to embark on your bitter melon growing adventure. Now, it’s time to put these ideas into action and witness the magic unfold. We are confident that with a little patience, dedication, and these DIY tricks, you’ll be enjoying fresh, homegrown bitter melon in no time.
We wholeheartedly encourage you to try these DIY tricks for growing bitter melon. It’s a game-changer! And most importantly, we want to hear about your experiences! Share your successes, challenges, and any unique techniques you discover along the way. Let’s build a community of passionate bitter melon gardeners who can learn from each other and inspire others to embrace the joys of homegrown produce. Post your photos, tips, and stories in the comments section below. Let’s cultivate a thriving community of bitter melon enthusiasts! Happy gardening!
Frequently Asked Questions (FAQ)
What is the best time of year to plant bitter melon?
Bitter melon thrives in warm weather, so the ideal time to plant is during the late spring or early summer, after the last frost has passed. The soil temperature should be consistently above 65°F (18°C) for optimal germination and growth. If you live in a region with a short growing season, you can start seeds indoors 4-6 weeks before the last expected frost and transplant them outdoors once the weather warms up.
What kind of soil is best for growing bitter melon?
Bitter melon prefers well-draining soil that is rich in organic matter. A slightly acidic to neutral pH (between 6.0 and 7.0) is ideal. Before planting, amend the soil with compost, aged manure, or other organic materials to improve its fertility and drainage. Avoid heavy clay soils, as they can become waterlogged and hinder root development. If you have clay soil, consider growing bitter melon in raised beds or containers with a well-draining potting mix.
How much sunlight does bitter melon need?
Bitter melon requires at least 6-8 hours of direct sunlight per day to thrive. Choose a planting location that receives ample sunlight throughout the day. If you live in a particularly hot climate, some afternoon shade may be beneficial to prevent the plants from overheating. Insufficient sunlight can lead to stunted growth, reduced fruit production, and increased susceptibility to pests and diseases.
How often should I water bitter melon plants?
Bitter melon plants need consistent moisture, especially during hot and dry periods. Water deeply and regularly, aiming to keep the soil consistently moist but not waterlogged. The frequency of watering will depend on the weather conditions, soil type, and stage of plant growth. As a general rule, water when the top inch of soil feels dry to the touch. Avoid overhead watering, as it can promote fungal diseases. Instead, water at the base of the plants to keep the foliage dry.
What kind of support structure is best for bitter melon?
Bitter melon vines can grow quite long and heavy, so they require a sturdy support structure to climb on. A trellis, fence, or arbor are all excellent options. The support structure should be at least 6-8 feet tall to accommodate the plant’s growth. Ensure that the structure is strong enough to support the weight of the vines and fruits. You can also use string or wire to guide the vines up the support structure.
How do I prevent pests and diseases from affecting my bitter melon plants?
Regularly inspect your plants for signs of pests and diseases. Common pests that affect bitter melon include aphids, spider mites, and squash bugs. You can control these pests with insecticidal soap, neem oil, or by handpicking them off the plants. To prevent fungal diseases, ensure good air circulation around the plants and avoid overhead watering. You can also apply a fungicide if necessary. Companion planting with basil or marigolds can help deter pests and attract beneficial insects.
When is the best time to harvest bitter melon?
Bitter melon is typically harvested when the fruits are still green and firm, before they turn yellow or orange. The exact timing will depend on the variety and your personal preference. Generally, the fruits are ready to harvest about 8-12 weeks after planting. Use a sharp knife or pruning shears to cut the fruits from the vine, leaving a short stem attached. Harvesting regularly will encourage the plant to produce more fruits.
How can I reduce the bitterness of bitter melon?
Bitter melon is known for its distinctive bitter taste, but there are several ways to reduce its bitterness. One method is to soak the sliced bitter melon in salted water for about 30 minutes before cooking. This helps to draw out some of the bitter compounds. You can also blanch the bitter melon in boiling water for a few minutes before cooking. Another technique is to remove the white pith and seeds from the center of the fruit, as these are the most bitter parts. Cooking bitter melon with acidic ingredients like vinegar or lemon juice can also help to balance the bitterness.
Can I grow bitter melon in containers?
Yes, bitter melon can be successfully grown in containers, provided that you choose a large enough container and use a well-draining potting mix. A container that is at least 12 inches in diameter and 12 inches deep is recommended. Ensure that the container has drainage holes to prevent waterlogging. Provide a sturdy trellis or support structure for the vines to climb on. Water regularly and fertilize every 2-3 weeks with a balanced fertilizer. Container-grown bitter melon may require more frequent watering and fertilization than plants grown in the ground.
What are some common mistakes to avoid when growing bitter melon?
Some common mistakes to avoid when growing bitter melon include: planting too early in the season, using poorly draining soil, not providing adequate sunlight, overwatering or underwatering, neglecting to provide a support structure, and failing to protect the plants from pests and diseases. By avoiding these mistakes and following the tips outlined in this article, you can increase your chances of success and enjoy a bountiful harvest of homegrown bitter melon.

Leave a Comment