

Bottle Gourd Growing Tips: Unlock the secrets to cultivating your own thriving bottle gourds right in your backyard! Have you ever dreamed of harvesting these fascinating vegetables, known for their unique shapes and versatile uses? Well, dream no more! This DIY guide is packed with simple yet effective tricks and hacks that will transform your gardening experience, even if you’re a complete beginner.
The bottle gourd, also known as calabash, boasts a rich history, dating back thousands of years. Evidence suggests its cultivation in Africa and Asia long before the dawn of agriculture as we know it. Beyond its culinary applications, the bottle gourd has served as a container, musical instrument, and even a tool in various cultures. Isn’t that amazing?
But why should you embark on this bottle gourd growing adventure? In today’s world, where fresh, homegrown produce is increasingly valued, mastering bottle gourd growing tips allows you to enjoy delicious, organic vegetables while reducing your carbon footprint. Plus, it’s incredibly rewarding to nurture a plant from seed to harvest! I’m excited to share my favorite tips and tricks that will help you overcome common challenges and achieve a bountiful harvest. Let’s get started and turn your garden into a bottle gourd paradise!
Growing Bottle Gourds: A DIY Guide for a Bountiful Harvest
Alright, let’s dive into the wonderful world of growing bottle gourds! I’ve had some amazing success with these fascinating plants, and I’m excited to share my tips and tricks with you. Bottle gourds, also known as calabash gourds, are incredibly versatile – you can use them for everything from crafting beautiful bowls and birdhouses to, in some cultures, even using the young, tender gourds in cooking. So, grab your gardening gloves, and let’s get started!
Choosing the Right Variety and Preparing Your Seeds
Before we even think about planting, it’s crucial to pick the right bottle gourd variety for your needs and climate. There are tons of different shapes and sizes, from long and slender to round and bulbous. Consider what you want to use the gourds for when they’re mature.
* Variety Selection: Research different bottle gourd varieties. Some popular choices include ‘Long Bottle’, ‘Dudhi’, and ‘Birdhouse Gourd’. Look for varieties that are well-suited to your local climate and growing season.
* Seed Sourcing: Purchase seeds from a reputable source to ensure good germination rates and healthy plants.
* Seed Scarification (Optional but Recommended): Bottle gourd seeds have a tough outer shell. Gently scarifying them can improve germination. You can do this by lightly rubbing the seeds with sandpaper or nicking them with a knife. Be careful not to damage the inner seed!
* Seed Soaking: Soak the scarified seeds in lukewarm water for 24-48 hours before planting. This helps to soften the seed coat and kickstart the germination process.
Starting Your Bottle Gourd Seeds
You can either direct sow your bottle gourd seeds or start them indoors. I personally prefer starting them indoors, especially if you have a shorter growing season.
* Timing: Bottle gourds need a long growing season (around 90-120 days). Start seeds indoors about 4-6 weeks before the last expected frost.
* Potting Mix: Use a well-draining seed starting mix.
* Containers: Plant each seed in its own individual pot (about 3-4 inches in diameter). This prevents root disturbance when transplanting. Peat pots or biodegradable pots are great options.
* Planting Depth: Plant the seeds about 1 inch deep.
* Watering: Water gently after planting, ensuring the soil is moist but not waterlogged.
* Warmth: Bottle gourd seeds need warmth to germinate. Aim for a soil temperature of 70-80°F (21-27°C). You can use a heat mat to help maintain the temperature.
* Light: Once the seedlings emerge, provide them with plenty of light. A sunny windowsill or grow lights will work well.
* Hardening Off: Before transplanting your seedlings outdoors, you’ll need to harden them off. This involves gradually exposing them to outdoor conditions over a period of 7-10 days. Start by placing them in a sheltered spot for a few hours each day, gradually increasing the time and exposure to sunlight and wind.
Preparing the Garden Bed
Bottle gourds are vigorous growers and need plenty of space and rich soil. Proper bed preparation is key to a successful harvest.
* Sunlight: Choose a location that receives at least 6-8 hours of direct sunlight per day.
* Soil: Bottle gourds prefer well-drained, fertile soil with a pH of 6.0-7.0.
* Soil Amendment: Amend the soil with plenty of organic matter, such as compost, well-rotted manure, or leaf mold. This will improve drainage, fertility, and water retention.
* Spacing: Bottle gourds need plenty of space to spread. Space plants at least 3-4 feet apart. If you’re growing them on a trellis, you can space them closer together (about 2-3 feet).
* Trellising: Bottle gourds are vines and need support to grow properly. A sturdy trellis, fence, or arbor is essential. This not only saves space but also improves air circulation and reduces the risk of disease. I’ve found that a strong wooden trellis works best for me.
Transplanting Your Seedlings
Once the danger of frost has passed and your seedlings have been hardened off, it’s time to transplant them into the garden.
1. Choose a Cloudy Day: Transplanting on a cloudy day will help reduce stress on the seedlings.
2. Dig Holes: Dig holes that are slightly larger than the root balls of your seedlings.
3. Gently Remove Seedlings: Carefully remove the seedlings from their pots, being careful not to damage the roots. If you used peat pots, you can plant the entire pot directly into the ground.
4. Plant Seedlings: Place the seedlings in the holes and backfill with soil.
5. Water Thoroughly: Water the seedlings thoroughly after planting.
6. Mulch: Apply a layer of mulch around the plants to help retain moisture, suppress weeds, and regulate soil temperature. Straw, wood chips, or shredded leaves are good options.
Caring for Your Bottle Gourd Plants
Once your bottle gourd plants are established, they’ll need regular care to thrive.
* Watering: Water deeply and regularly, especially during hot, dry weather. Bottle gourds need consistent moisture to produce healthy fruits. Aim for about 1-2 inches of water per week.
* Fertilizing: Fertilize your bottle gourd plants every 2-3 weeks with a balanced fertilizer. You can also use a liquid seaweed fertilizer to provide essential nutrients.
* Pruning: Pruning can help improve air circulation and encourage fruit production. Remove any yellowing or diseased leaves. You can also pinch off the tips of the vines to encourage branching.
* Pollination: Bottle gourds have separate male and female flowers. Bees and other pollinators are essential for pollination. If you’re not seeing enough pollinators in your garden, you may need to hand-pollinate the flowers. To do this, use a small paintbrush to transfer pollen from the male flowers to the female flowers. The female flowers have a small gourd-like structure at the base of the flower.
* Pest and Disease Control: Keep an eye out for pests and diseases. Common pests include squash bugs, squash vine borers, and aphids. Common diseases include powdery mildew and downy mildew. Treat any problems promptly with appropriate organic pest control methods or fungicides. Neem oil is a great organic option for controlling many pests and diseases.
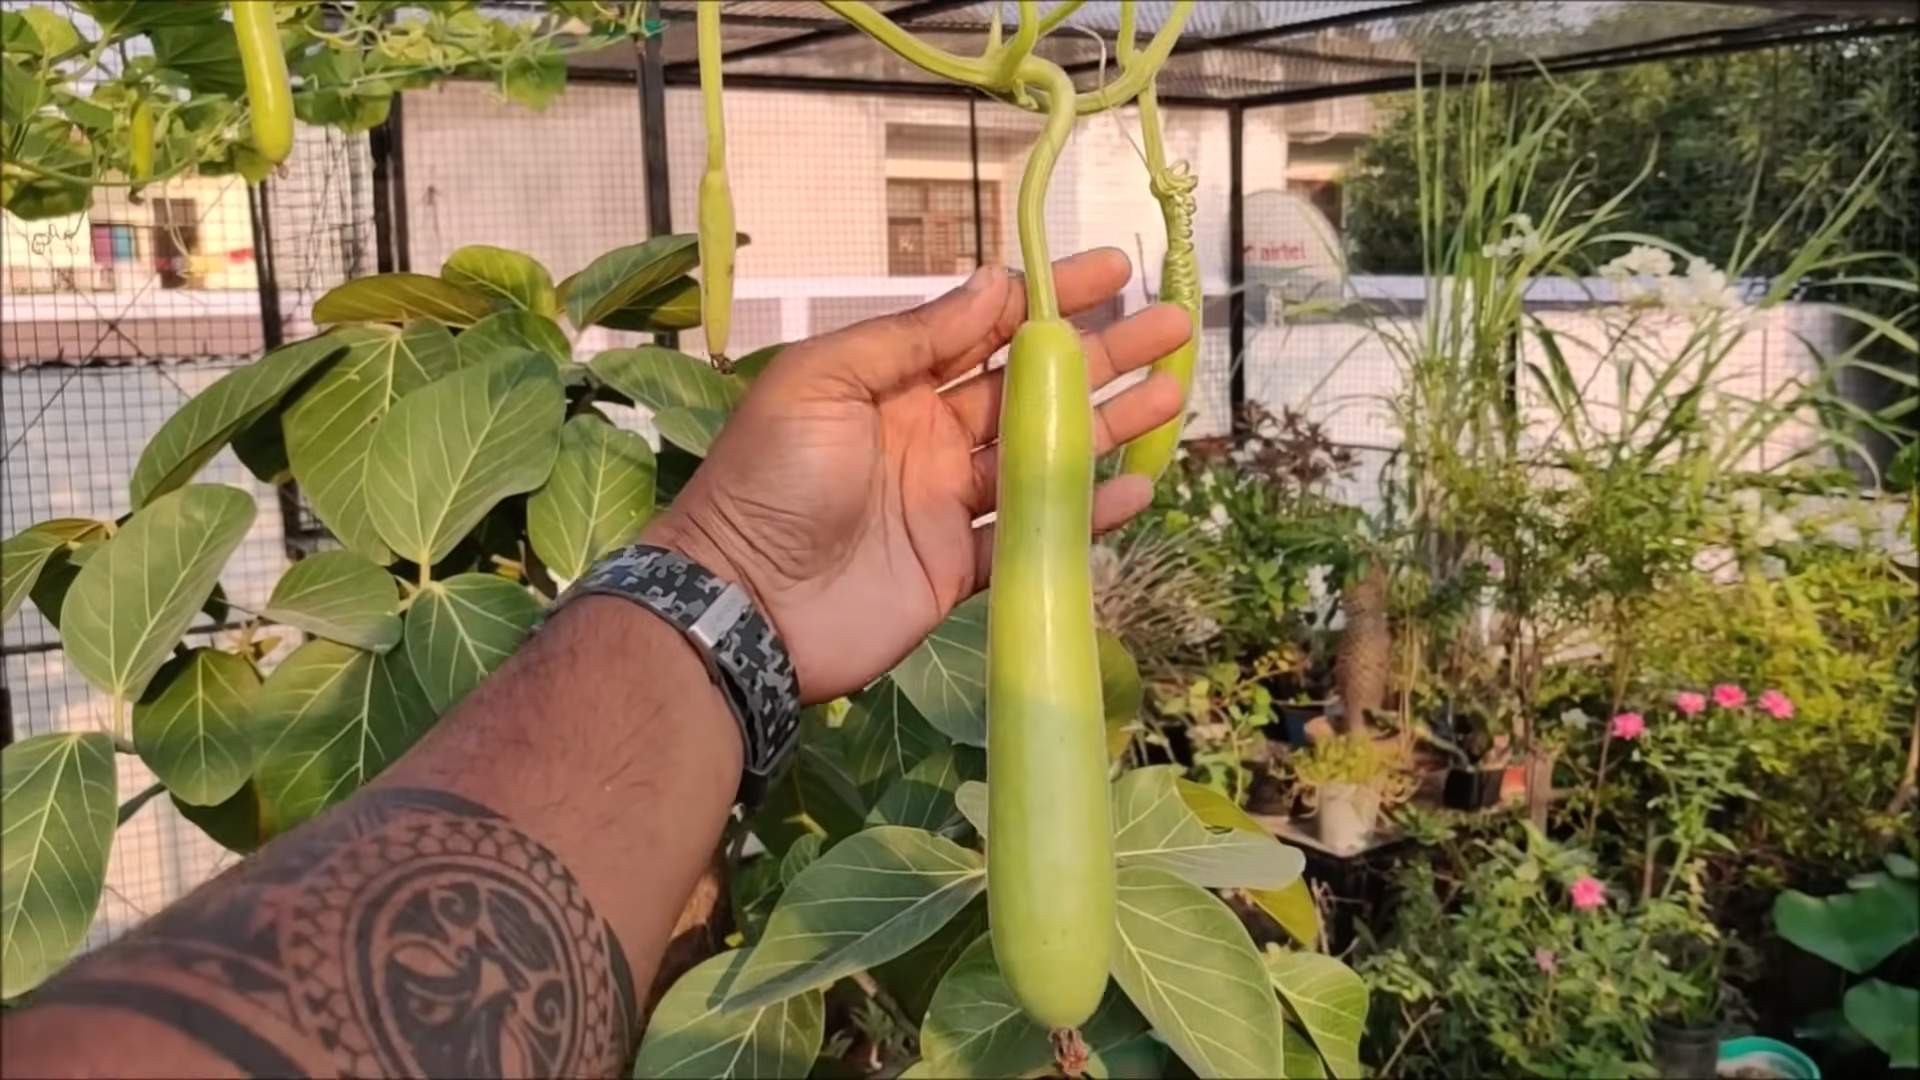
Harvesting Your Bottle Gourds
The timing of your harvest will depend on what you plan to use the gourds for.
* For Eating (Young Gourds): If you plan to eat the young gourds, harvest them when they are tender and about 6-8 inches long. The skin should be smooth and easily pierced with your fingernail.
* For Crafting (Mature Gourds): If you plan to use the gourds for crafting, let them mature on the vine until the stems turn brown and dry. The gourds should be hard and lightweight.
* Harvesting Technique: Use a sharp knife or pruning shears to cut the gourds from the vine, leaving a few inches of stem attached.
* Curing: After harvesting mature gourds, you’ll need to cure them. This involves drying them out completely to prevent rotting. Place the gourds in a well-ventilated area, such as a garage or shed, and allow them to dry for several weeks or even months. Turn them regularly to ensure even drying. The gourds are fully cured when they are lightweight and the seeds rattle inside.
Troubleshooting Common Problems
Even with the best care, you may encounter some problems when growing bottle gourds. Here are a few common issues and how to address them:
* Poor Germination: If your seeds aren’t germinating, make sure the soil is warm enough and that you’ve scarified and soaked the seeds properly.
* Yellowing Leaves: Yellowing leaves can be a sign of nutrient deficiency, overwatering, or disease. Check the soil drainage and fertilize if necessary.
* Lack of Fruit: Lack of fruit can be caused by poor pollination, insufficient sunlight, or nutrient deficiency. Hand-pollinate the flowers if necessary and ensure the plants are getting enough sunlight and fertilizer.
* Pest Infestations: Regularly inspect your plants for pests and treat any infestations promptly.
* Disease: Prevent disease by providing good air circulation, avoiding overhead watering, and using disease-resistant varieties.
Enjoying Your Harvest
Once you’ve harvested and cured your bottle gourds, the possibilities are endless! You can use them to create beautiful bowls, birdhouses, lamps, and other crafts. You can also use the young, tender gourds in cooking.
Growing bottle gourds can be a rewarding and fun experience. With a little bit of planning and care, you can enjoy a bountiful

Conclusion
So, there you have it! Mastering the art of growing bottle gourds doesn’t require a green thumb blessed by the gardening gods. It’s about understanding the plant’s needs, providing the right environment, and employing a few clever DIY tricks to boost its growth and productivity. This guide has armed you with the knowledge to tackle common challenges and unlock the potential of your bottle gourd plants.
Why is this DIY approach a must-try? Because it empowers you to take control of your garden’s success. Instead of relying solely on commercial fertilizers or hoping for the best, you’re actively creating a thriving environment tailored to the specific needs of bottle gourds. This translates to healthier plants, more abundant yields, and a deeper connection with the natural world. Plus, it’s incredibly satisfying to see the fruits (or rather, gourds!) of your labor flourish thanks to your own ingenuity.
But don’t stop there! The beauty of gardening lies in experimentation. Consider these variations to further personalize your bottle gourd growing journey:
* Vertical Gardening: Bottle gourds are natural climbers. Maximize space and create a stunning visual display by training them on trellises, fences, or even pergolas. This also improves air circulation and reduces the risk of fungal diseases.
* Companion Planting: Introduce beneficial companion plants like marigolds (to deter pests) or beans (to fix nitrogen in the soil) to create a symbiotic ecosystem around your bottle gourds.
* Seed Saving: Once you’ve harvested your bottle gourds, save the seeds for future planting. This allows you to cultivate varieties that are perfectly adapted to your local climate and soil conditions.
* Gourd Art: After harvesting and drying your bottle gourds, explore the world of gourd art! They can be transformed into beautiful bowls, lamps, birdhouses, and countless other decorative items.
Ultimately, the goal is to find what works best for you and your garden. Don’t be afraid to experiment, adapt, and learn from your experiences. The journey of growing bottle gourds is just as rewarding as the harvest itself.
We wholeheartedly encourage you to put these DIY tricks into practice and witness the difference they can make in your bottle gourd garden. Remember, consistent care and attention are key to success.
And now, we want to hear from you! Share your experiences, successes, and challenges in the comments below. What DIY tricks have you found particularly effective? What varieties of bottle gourds are you growing? Let’s create a community of bottle gourd enthusiasts and learn from each other. Your insights could inspire others to embark on their own gardening adventures. So, get your hands dirty, embrace the process, and enjoy the bounty of your bottle gourd harvest! Happy gardening! Growing bottle gourds can be a rewarding experience.
Frequently Asked Questions (FAQs)
What is the ideal soil pH for growing bottle gourds?
Bottle gourds thrive in slightly acidic to neutral soil, with a pH range of 6.0 to 7.0. You can test your soil pH using a home testing kit or by sending a sample to a local agricultural extension office. If your soil is too alkaline, you can amend it with sulfur or peat moss to lower the pH. If it’s too acidic, add lime to raise the pH.
How often should I water my bottle gourd plants?
Bottle gourds require consistent moisture, especially during hot and dry periods. Water deeply and regularly, aiming for about 1-2 inches of water per week. Check the soil moisture regularly by sticking your finger about an inch deep into the soil. If it feels dry, it’s time to water. Avoid overwatering, as this can lead to root rot. Drip irrigation is an excellent way to deliver water directly to the roots and minimize water loss.
What are some common pests and diseases that affect bottle gourds, and how can I control them?
Common pests include aphids, squash bugs, and vine borers. Diseases include powdery mildew and downy mildew. To control pests, you can use insecticidal soap, neem oil, or handpick them off the plants. For diseases, ensure good air circulation, avoid overhead watering, and apply fungicides if necessary. Crop rotation and using disease-resistant varieties can also help prevent problems.
How long does it take for bottle gourds to mature and be ready for harvest?
Bottle gourds typically take 90-120 days to mature from planting. The exact time depends on the variety, climate, and growing conditions. You’ll know they’re ready to harvest when the skin is hard and the stem begins to dry out. Tap the gourd; it should sound hollow.
Can I grow bottle gourds in containers?
Yes, you can grow bottle gourds in containers, but you’ll need a large container (at least 20 gallons) to accommodate their extensive root system. Use a well-draining potting mix and provide a sturdy trellis or support for the vines to climb. Container-grown bottle gourds may require more frequent watering and fertilization than those grown in the ground.
How do I dry bottle gourds for crafting purposes?
To dry bottle gourds, harvest them when they are fully mature and the stems are dry. Wash the gourds and allow them to air dry completely. Then, place them in a well-ventilated area, such as a shed or garage, away from direct sunlight. It can take several months for the gourds to dry completely. You’ll know they’re dry when they are lightweight and the seeds rattle inside.
What are some tips for improving pollination in bottle gourds?
Bottle gourds have separate male and female flowers. Pollination is essential for fruit development. To improve pollination, you can hand-pollinate the flowers by transferring pollen from the male flowers to the female flowers using a small brush. You can also attract pollinators to your garden by planting flowers that attract bees and other beneficial insects. Ensure the plants receive adequate sunlight and water, as stress can reduce pollination.
How can I prevent my bottle gourds from rotting on the vine?
Rotting on the vine can be caused by several factors, including poor air circulation, fungal diseases, and insect damage. To prevent this, provide adequate spacing between plants to improve air circulation. Avoid overhead watering and apply fungicides if necessary. Inspect the gourds regularly for signs of insect damage and take appropriate action. Ensure the plants have well-draining soil to prevent root rot, which can weaken the plant and make it more susceptible to disease.
What kind of fertilizer should I use for bottle gourd plants?
Bottle gourds benefit from a balanced fertilizer with a higher phosphorus content to promote flowering and fruiting. A 10-20-10 fertilizer is a good option. Apply fertilizer according to the package instructions, typically every 2-3 weeks during the growing season. You can also amend the soil with compost or other organic matter to provide a slow-release source of nutrients. Avoid over-fertilizing, as this can lead to excessive foliage growth at the expense of fruit production.
Are there any specific bottle gourd varieties that are easier to grow for beginners?
Some bottle gourd varieties are known for being more vigorous and easier to grow, making them a good choice for beginners. Look for varieties that are disease-resistant and well-suited to your local climate. Local nurseries or agricultural extension offices can provide recommendations for the best varieties to grow in your area. Some popular and relatively easy-to-grow varieties include ‘Dipper’, ‘Birdhouse’, and ‘Bushel’.
Leave a Comment