

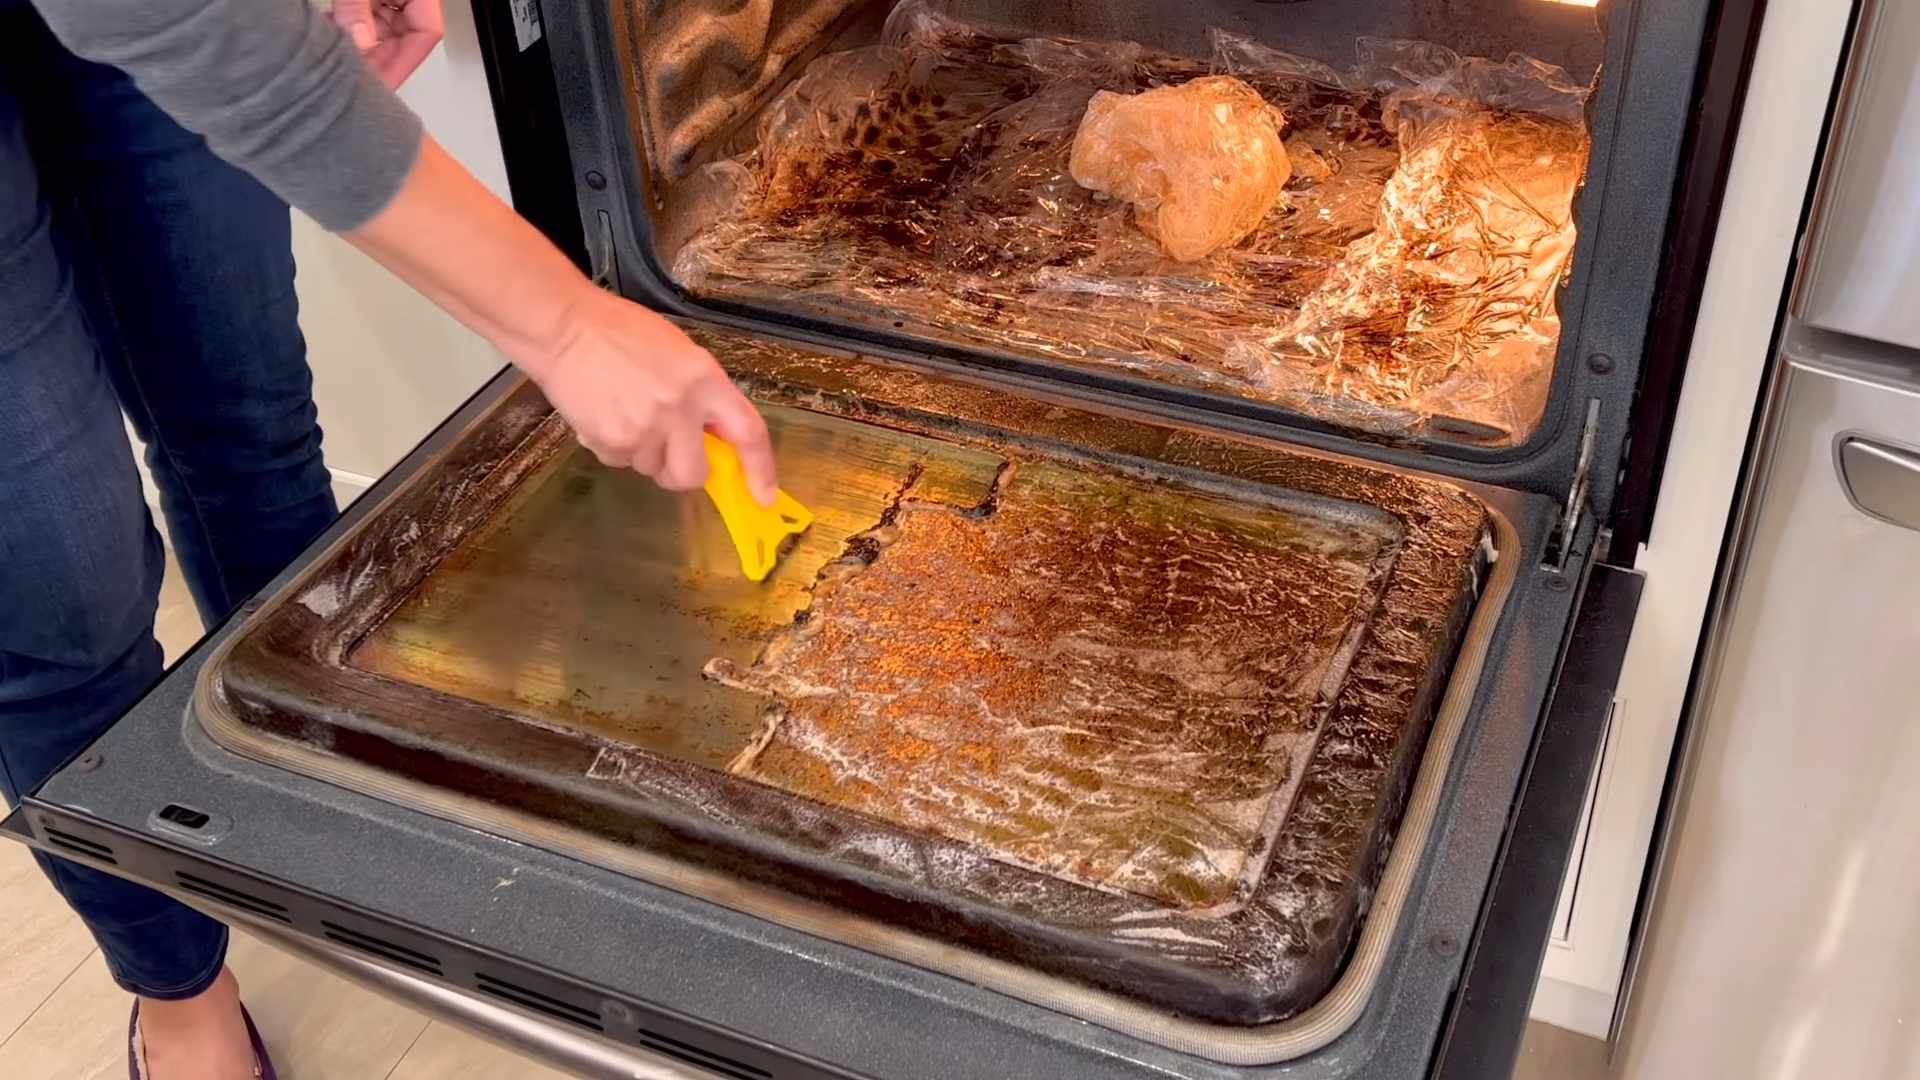
Clean Dirty Oven: Is your oven looking less like a culinary haven and more like a charcoal pit? Don’t despair! I know the feeling. We’ve all been there, staring into the abyss of baked-on grease and wondering if a professional cleaning service is the only solution. But before you reach for the phone, let me tell you a secret: you can achieve a sparkling clean oven with some simple DIY tricks and a little elbow grease.
For generations, keeping a clean oven was a point of pride, reflecting a well-maintained home and a dedication to wholesome cooking. In the past, resourceful homemakers relied on natural ingredients like baking soda and vinegar – methods that are just as effective today! These time-tested techniques are not only budget-friendly but also avoid harsh chemicals that can linger and affect the taste of your food.
Let’s face it, a dirty oven isn’t just unsightly; it can impact your cooking. Burnt food particles can smoke, affecting the flavor of your dishes and even posing a fire hazard. Plus, who wants to bake cookies in an oven that smells like last week’s lasagna? That’s why learning how to clean dirty oven effectively is essential for any home cook. In this article, I’m going to share my favorite DIY oven cleaning hacks that will have your oven looking brand new in no time. Get ready to say goodbye to grime and hello to delicious, perfectly cooked meals!
DIY Oven Cleaning: The Ultimate Guide to a Sparkling Clean Oven
Okay, let’s face it, cleaning the oven is probably on everyone’s list of least favorite chores. But a clean oven not only looks better, it also cooks more efficiently and can even improve the taste of your food! So, let’s dive into a super effective, mostly natural, DIY oven cleaning method that will leave your oven sparkling. I promise, it’s easier than you think!
What You’ll Need: The Arsenal of Clean
Before we get started, let’s gather our supplies. This is a mostly natural cleaning solution, so you won’t need harsh chemicals.
* Baking Soda: The star of the show! Baking soda is a mild alkali that helps dissolve grease and grime.
* White Vinegar: Our acidic powerhouse! Vinegar reacts with baking soda to create a fizzing action that helps lift stubborn stains.
* Water: For mixing and rinsing.
* Spray Bottle: To apply the vinegar solution.
* Spatula or Scraper: For removing large chunks of baked-on food.
* Rubber Gloves: To protect your hands.
* Old Rags or Sponges: For wiping and scrubbing.
* Bowl: For mixing the baking soda paste.
* Old Toothbrush: For scrubbing tight corners and crevices.
* Trash Bags or Newspaper: To protect your floor.
* Optional: Lemon essential oil (for a fresh scent!)
Phase 1: Prep Work – Getting Ready to Clean
Before we unleash the cleaning power, we need to prep the oven. This involves removing the racks and scraping away any loose debris.
1. Unplug the Oven: Safety first! Make sure your oven is completely unplugged from the power outlet. This is crucial to avoid any electrical accidents.
2. Remove the Oven Racks: Take out all the oven racks, pizza stones, or any other removable items. We’ll clean these separately.
3. Protect Your Floor: Lay down trash bags or newspaper around the base of the oven to catch any drips or spills. Trust me, this will save you a lot of cleanup later.
4. Scrape Away Loose Debris: Use a spatula or scraper to gently remove any large chunks of baked-on food from the bottom and sides of the oven. Be careful not to scratch the oven surface.
Phase 2: The Baking Soda Paste – Our Cleaning Weapon
Now, let’s create our magic cleaning paste! This is where the baking soda comes into play.
1. Mix the Paste: In a bowl, combine 1/2 cup of baking soda with enough water to form a thick, spreadable paste. The consistency should be similar to frosting. If you want to add a fresh scent, you can add a few drops of lemon essential oil.
2. Coat the Oven: Using your hands (with gloves on, of course!), spread the baking soda paste evenly over all the interior surfaces of the oven, avoiding the heating elements. Pay special attention to areas with heavy grease or baked-on food.
3. Let it Sit: This is the most important part! Let the baking soda paste sit for at least 12 hours, or even better, overnight. The longer it sits, the more time it has to break down the grime. I usually do this before I go to bed so it can work its magic while I sleep.
Phase 3: Cleaning the Racks – Giving Them Some Love
While the baking soda is working its magic inside the oven, let’s tackle those greasy racks.
1. Soak the Racks: Fill your bathtub or a large utility sink with hot water and add about 1/2 cup of dish soap. Submerge the oven racks in the soapy water and let them soak for at least 30 minutes. This will help loosen the grease and grime.
2. Scrub the Racks: After soaking, use a scrub brush or sponge to scrub the racks thoroughly. For stubborn spots, you can use a paste of baking soda and water.
3. Rinse and Dry: Rinse the racks with clean water and dry them completely before putting them back in the oven.
Phase 4: The Vinegar Power – Activating the Fizz
After the baking soda has had its time to work, it’s time to unleash the power of vinegar!
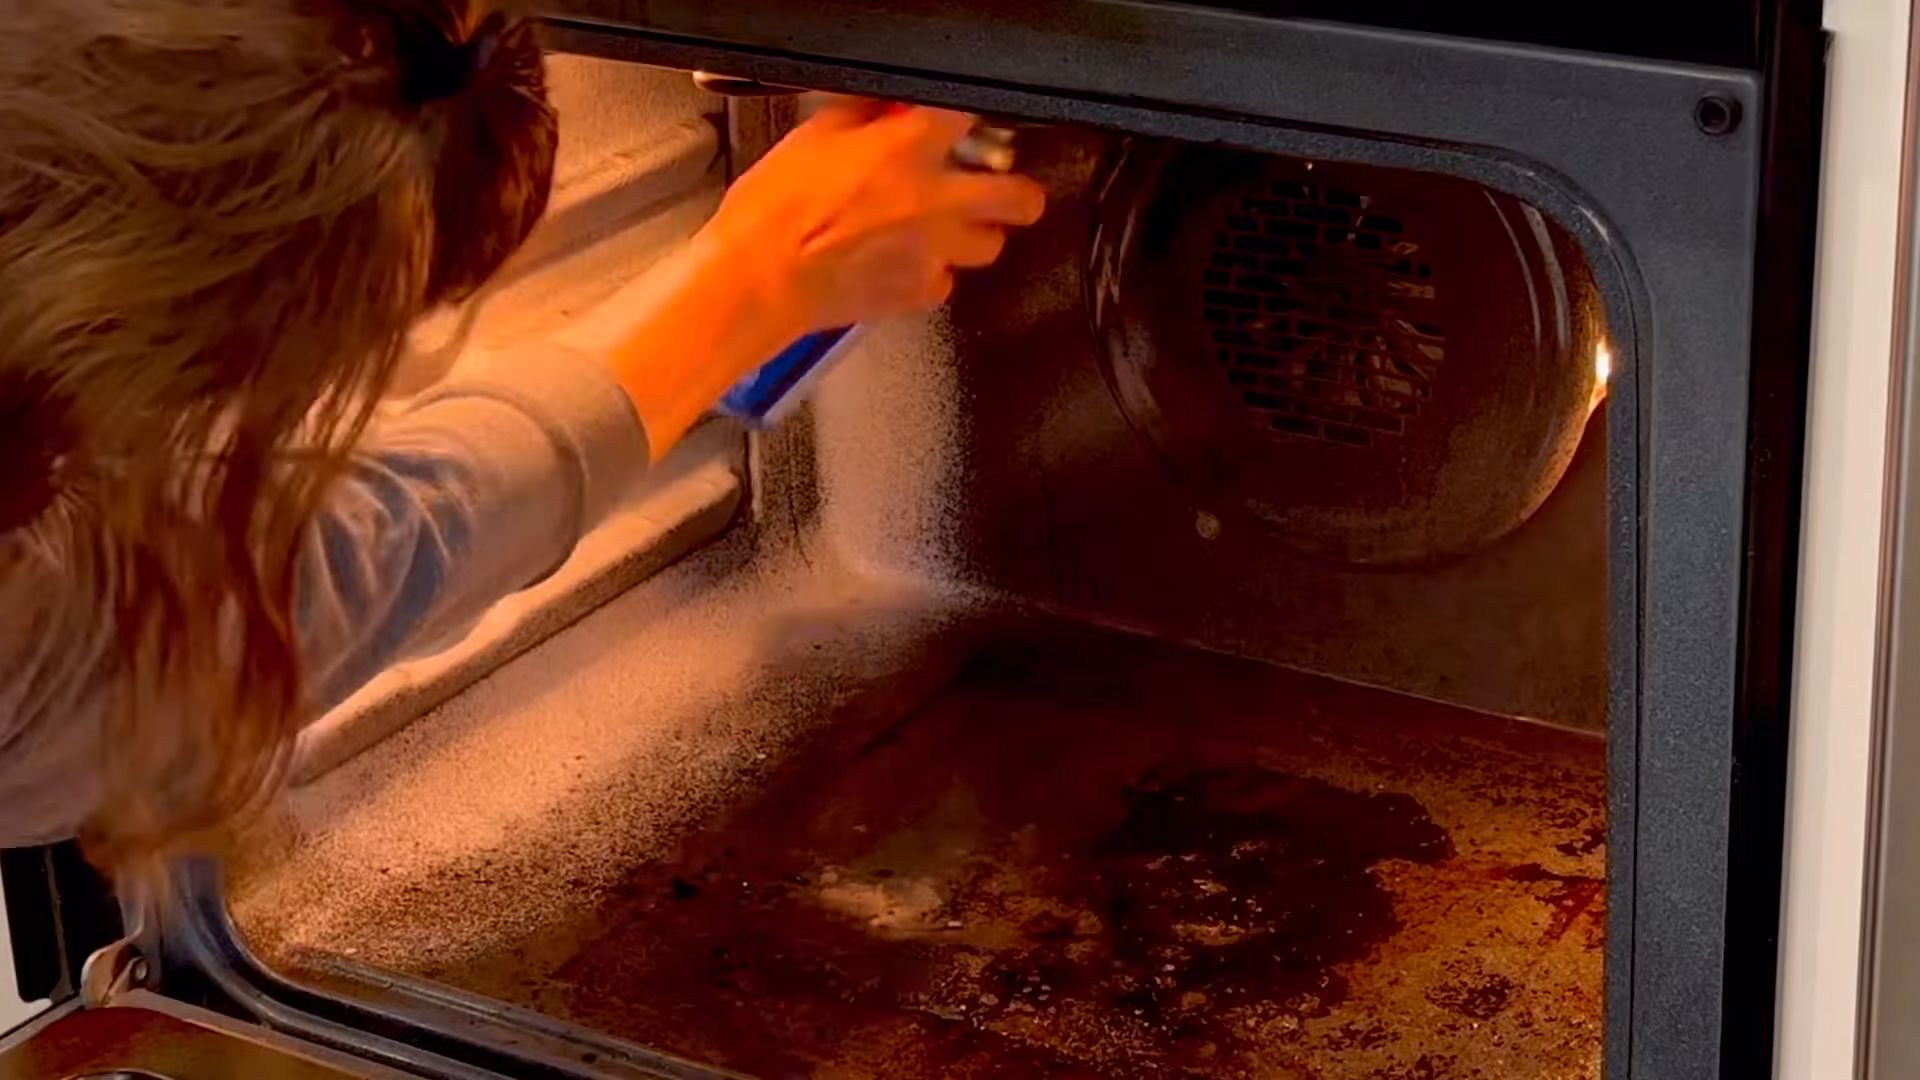
1. Prepare the Vinegar Solution: Fill a spray bottle with white vinegar. You can dilute it with a little water if you prefer, but I usually use it straight.
2. Spray the Vinegar: Spray the vinegar liberally over the baking soda paste inside the oven. You’ll notice a fizzing reaction as the vinegar reacts with the baking soda. This is a good thing! It means the cleaning process is working.
3. Let it Fizz: Let the vinegar and baking soda fizz for a few minutes. This will help loosen any remaining grime.
Phase 5: The Final Scrub – Bringing Back the Shine
Now it’s time to get down and dirty and scrub away the remaining residue.
1. Wipe Away the Paste: Using a damp rag or sponge, wipe away the baking soda and vinegar mixture. You may need to use a little elbow grease for stubborn spots. An old toothbrush can be helpful for cleaning tight corners and crevices.
2. Rinse Thoroughly: Rinse the oven interior with clean water to remove any remaining residue. You may need to wipe it down several times to ensure all the baking soda and vinegar are gone.
3. Dry the Oven: Use a clean, dry rag to dry the oven interior completely. This will prevent any water spots from forming.
Phase 6: Reassemble and Admire – The Grand Finale
Almost there! Now it’s time to put everything back together and admire your sparkling clean oven.
1. Replace the Racks: Put the clean oven racks back into the oven.
2. Plug in the Oven: Plug the oven back into the power outlet.
3. Optional: Heat the Oven: To ensure the oven is completely dry and to eliminate any lingering odors, you can turn it on to a low temperature (around 200 degrees Fahrenheit) for about 15-20 minutes. Keep an eye on it and make sure nothing is smoking.
4. Admire Your Work: Step back and admire your sparkling clean oven! You did it!
Tips and Tricks for a Super Clean Oven
* Regular Cleaning: To prevent your oven from getting too dirty, try to wipe it down after each use. This will prevent grease and food from building up.
* Oven Liners: Consider using oven liners to catch drips and spills. This will make cleanup much easier.
* Self-Cleaning Ovens: If you have a self-cleaning oven, you can use that feature occasionally. However, be aware that the self-cleaning cycle can produce strong odors and high temperatures.
* Stubborn Stains: For really stubborn stains, you can try making a paste of baking soda, salt, and water. Apply the paste to the stain and let it sit for a few hours before scrubbing.
* Ventilation: Make sure to ventilate your kitchen well while cleaning the oven. Open windows and turn on the exhaust fan.
* Safety First: Always wear rubber gloves to protect your hands from the cleaning solutions.
Dealing with Burnt-On Food: Advanced Techniques
Sometimes, you’ll encounter areas with seriously burnt-on food that just won’t budge with the standard baking soda and vinegar method. Don’t despair! Here are a few advanced techniques to try:
1. Baking Soda and Salt Paste: As mentioned earlier, a paste of baking soda, salt, and water can be surprisingly effective. The salt acts as a mild abrasive, helping to scrub away stubborn residue. Mix equal parts baking soda and salt with enough water to form a thick paste. Apply it to the burnt-on areas, let it sit for several hours (or even overnight), and then scrub vigorously.
2. Ammonia (Use with Extreme Caution!): This is a more aggressive method and should be used with extreme caution. Ammonia fumes can be irritating and even harmful, so ensure you have excellent ventilation and wear a mask and gloves. Place a bowl of ammonia in the oven overnight. The fumes will help loosen the burnt-on food. The next day, remove the bowl, open the windows, and thoroughly wipe down the oven with a damp cloth. Important: Never mix ammonia with bleach or any other cleaning products, as this can create toxic fumes.
3. Commercial Oven Cleaners (Use as a Last Resort): If all else fails, you can resort to commercial oven cleaners. However, these products often contain harsh chemicals, so use them sparingly and follow the instructions carefully. Wear gloves and eye protection, and ensure you have adequate ventilation.
Maintaining Your Clean Oven: Prevention is Key
The best way to keep your oven clean is to prevent it from getting too dirty in the first place. Here are a few tips for maintaining a clean oven:
* Wipe
Conclusion
So, there you have it! A simple, effective, and surprisingly satisfying way to clean your dirty oven using ingredients you likely already have in your pantry. Forget harsh chemicals, expensive oven cleaners, and hours of scrubbing. This DIY method is not only budget-friendly but also environmentally conscious, leaving your oven sparkling clean without the lingering fumes.
Why is this a must-try? Because it works! It tackles baked-on grease, stubborn stains, and that overall grimy build-up that plagues even the most diligent home cooks. Imagine opening your oven to a gleaming interior, ready to bake your next culinary masterpiece. The difference is truly remarkable, and the sense of accomplishment is undeniable.
But the beauty of this DIY trick lies in its adaptability. Feel free to experiment with variations to suit your specific needs and preferences. For instance, if you have a particularly stubborn stain, you can create a paste of baking soda and water and let it sit on the affected area overnight before scrubbing. You can also add a few drops of your favorite essential oil, like lemon or lavender, to the water and vinegar mixture for a fresh, clean scent. If you prefer a more abrasive scrub, consider using a pumice stone (carefully!) on the toughest baked-on messes. Remember to always test any new cleaning method in an inconspicuous area first.
This method is also fantastic for maintaining a clean oven. Incorporate it into your regular cleaning routine, perhaps once a month, to prevent build-up and keep your oven looking its best. A little preventative maintenance goes a long way!
We’re confident that once you try this DIY oven cleaning trick, you’ll be amazed by the results. It’s a game-changer for anyone who wants a clean oven without the hassle and expense of traditional methods.
Now, it’s your turn! We encourage you to give this DIY oven cleaning method a try. We’re eager to hear about your experiences. Did it work as well for you as it did for us? Did you try any variations? What were your results? Share your tips, tricks, and before-and-after photos in the comments below. Let’s create a community of sparkling clean ovens! We can’t wait to see your success stories and learn from your experiences. Happy cleaning!
Frequently Asked Questions (FAQ)
Q: Is this DIY oven cleaning method safe for all types of ovens?
A: Generally, yes, this method is safe for most ovens, including self-cleaning ovens (although you should still avoid using the self-cleaning function after using this method until all residue is removed). However, it’s always a good idea to consult your oven’s manual for specific cleaning recommendations. If you have a particularly delicate or antique oven, test the cleaning solution in an inconspicuous area first to ensure it doesn’t damage the finish. Avoid using abrasive scrubbers on delicate surfaces.
Q: How often should I clean my oven using this method?
A: The frequency depends on how often you use your oven and how messy it gets. For regular use, cleaning your oven every 1-3 months is a good guideline. If you frequently bake or cook messy dishes, you might want to clean it more often. If you only use your oven occasionally, you can clean it less frequently. The key is to prevent excessive build-up, which makes cleaning much harder.
Q: What if I have a self-cleaning oven? Should I still use this method?
A: While self-cleaning ovens are convenient, they can also produce unpleasant odors and consume a lot of energy. This DIY method is a great alternative for those who want to avoid the self-cleaning cycle. You can use this method to spot-clean spills and splatters as they happen, preventing the need for a full self-cleaning cycle. If you do use the self-cleaning function, wait until all residue from the DIY cleaning method is completely gone.
Q: Can I use this method to clean the oven door glass?
A: Yes, this method works well for cleaning the oven door glass. The baking soda paste helps to loosen baked-on grease and grime, making it easier to wipe away. For particularly stubborn stains, you can let the paste sit on the glass for a longer period of time before scrubbing. Be careful not to scratch the glass with abrasive scrubbers.
Q: What if I don’t have baking soda? Can I use something else?
A: Baking soda is a key ingredient in this method because of its mild abrasive properties and its ability to neutralize odors. While there isn’t a perfect substitute, you could try using cream of tartar mixed with water to form a paste. However, baking soda is generally more effective.
Q: The baking soda paste is hard to spread. What can I do?
A: If the baking soda paste is too thick, add a little more water, one teaspoon at a time, until you reach a spreadable consistency. You want it to be thick enough to adhere to the oven surfaces but not so thick that it’s difficult to apply.
Q: How long should I leave the baking soda paste on the oven surfaces?
A: Ideally, you should leave the baking soda paste on the oven surfaces for at least 12 hours, or even overnight. This allows the baking soda to penetrate and loosen the baked-on grease and grime. If you’re short on time, you can leave it on for a minimum of 2-3 hours, but the longer, the better.
Q: What kind of scrubber should I use?
A: For most oven surfaces, a non-scratch scouring pad or a sponge with a slightly abrasive side works well. Avoid using steel wool or other highly abrasive scrubbers, as they can scratch the oven’s finish. For particularly stubborn stains, you can try using a plastic scraper or a pumice stone (carefully!).
Q: How do I remove the baking soda residue after scrubbing?
A: After scrubbing, use a damp cloth or sponge to wipe away the baking soda residue. You may need to rinse the cloth or sponge frequently to remove all the residue. For hard-to-reach areas, you can use a spray bottle filled with water to rinse away the residue.
Q: My oven still smells like vinegar after cleaning. How can I get rid of the smell?
A: The vinegar smell should dissipate quickly. To help speed up the process, you can leave the oven door open for a few hours after cleaning. You can also place a bowl of baking soda inside the oven to absorb any lingering odors.
Q: Can I use this method to clean my oven racks?
A: Yes, this method is effective for cleaning oven racks. You can soak the racks in a solution of hot water and baking soda, or you can apply the baking soda paste directly to the racks and let it sit for a few hours before scrubbing. Rinse the racks thoroughly with water after scrubbing.
Q: What if I have a really, really dirty oven?
A: If your oven is extremely dirty, you may need to repeat the cleaning process. You can also try using a stronger cleaning solution, such as a mixture of baking soda, vinegar, and dish soap. However, always test any new cleaning solution in an inconspicuous area first. For extremely stubborn stains, consider using a commercial oven cleaner, but be sure to follow the manufacturer’s instructions carefully and wear appropriate safety gear.
Q: Is this method safe for pets and children?
A: Yes, this method is generally safe for pets and children, as it uses natural ingredients. However, it’s always a good idea to keep pets and children away from the oven while you’re cleaning it. Make sure to rinse the oven thoroughly after cleaning to remove any baking soda residue.
Q: Can I use essential oils in this cleaning method?
A: Yes, you can add a few drops of your favorite essential oil to the water and vinegar mixture for a fresh, clean scent. Lemon, lavender, and tea tree oil are all good choices. However, be sure to use essential oils sparingly, as they can be irritating to some people.
Q: What are some other tips for keeping my oven clean?
A: To prevent build-up, wipe up spills and splatters as soon as they happen. Use oven liners or baking sheets to catch drips and spills. Avoid using the self-cleaning function too often, as it can damage your oven. And, of course, incorporate this DIY oven cleaning method into your regular cleaning routine!

Leave a Comment