

Clean greasy kitchen cabinets – just the thought can send shivers down your spine, right? I get it! We’ve all been there, staring at those sticky, grimy surfaces, wondering how on earth they got so bad and, more importantly, how to tackle the mess. But fear not, my friend, because I’m here to share some game-changing DIY tricks that will have your cabinets sparkling in no time!
For generations, keeping a clean and tidy kitchen has been a cornerstone of a well-maintained home. Think about it – our grandmothers and great-grandmothers didn’t have fancy cleaning products, yet their kitchens often gleamed. They relied on simple, natural ingredients and clever techniques passed down through the years. These time-tested methods are just as relevant today, offering effective and eco-friendly solutions for even the toughest grease buildup.
Let’s face it, greasy kitchen cabinets are more than just an eyesore. They can attract dust and grime, creating a breeding ground for bacteria. Plus, that sticky residue can make it difficult to open and close doors and drawers. Nobody wants that! That’s why learning how to clean greasy kitchen cabinets effectively is so important. Not only will it improve the overall look and feel of your kitchen, but it will also create a healthier and more hygienic environment for you and your family. So, ditch the harsh chemicals and get ready to discover some amazing DIY hacks that will transform your kitchen cabinets from greasy to gleaming!
DIY Guide: Reviving Your Greasy Kitchen Cabinets
Okay, let’s face it, kitchen cabinets are magnets for grease, grime, and all sorts of sticky messes. It’s just a fact of life when you’re cooking up a storm. But don’t despair! You don’t need to hire a professional or replace your cabinets to get them looking sparkling clean again. I’m going to walk you through a simple, effective DIY method that will have your cabinets looking brand new in no time.
What You’ll Need: The Arsenal of Clean
Before we dive in, let’s gather our supplies. Having everything ready will make the process much smoother. Here’s what I recommend:
* Baking Soda: This is our secret weapon! It’s a gentle abrasive that’s perfect for cutting through grease without damaging your cabinet finish.
* Dish Soap: A good quality dish soap will help break down the grease and lift it away.
* White Vinegar: Vinegar is a natural degreaser and disinfectant. Plus, it’s super affordable!
* Warm Water: Essential for creating our cleaning solutions.
* Spray Bottle: For easy application of our vinegar solution.
* Microfiber Cloths: These are gentle on your cabinets and won’t leave behind lint. You’ll want several!
* Soft-Bristled Brush (Optional): An old toothbrush or a small scrub brush can be helpful for getting into tight corners and crevices.
* Sponge: For applying the baking soda paste.
* Rubber Gloves: Protect your hands from the cleaning solutions.
* Old Towels: To protect your countertops and floors from drips.
* Bucket or Bowl: For mixing our cleaning solutions.
* Safety Glasses (Optional): If you’re sensitive to cleaning solutions, these can be helpful.
Step-by-Step Cleaning Process: Let’s Get Scrubbing!
Now that we have everything we need, let’s get started! I’ve broken down the process into easy-to-follow steps.
1. Prepare the Area: Lay down old towels on your countertops and floors to protect them from drips and spills. This will save you from having to clean up even more later!
2. Empty the Cabinets (If Needed): If your cabinets are particularly grimy, it’s a good idea to empty them out. This will give you more room to work and prevent any cleaning solutions from getting inside.
3. Dust the Cabinets: Before we start with the wet cleaning, use a dry microfiber cloth to dust the cabinets. This will remove any loose dirt and debris, making the cleaning process more effective.
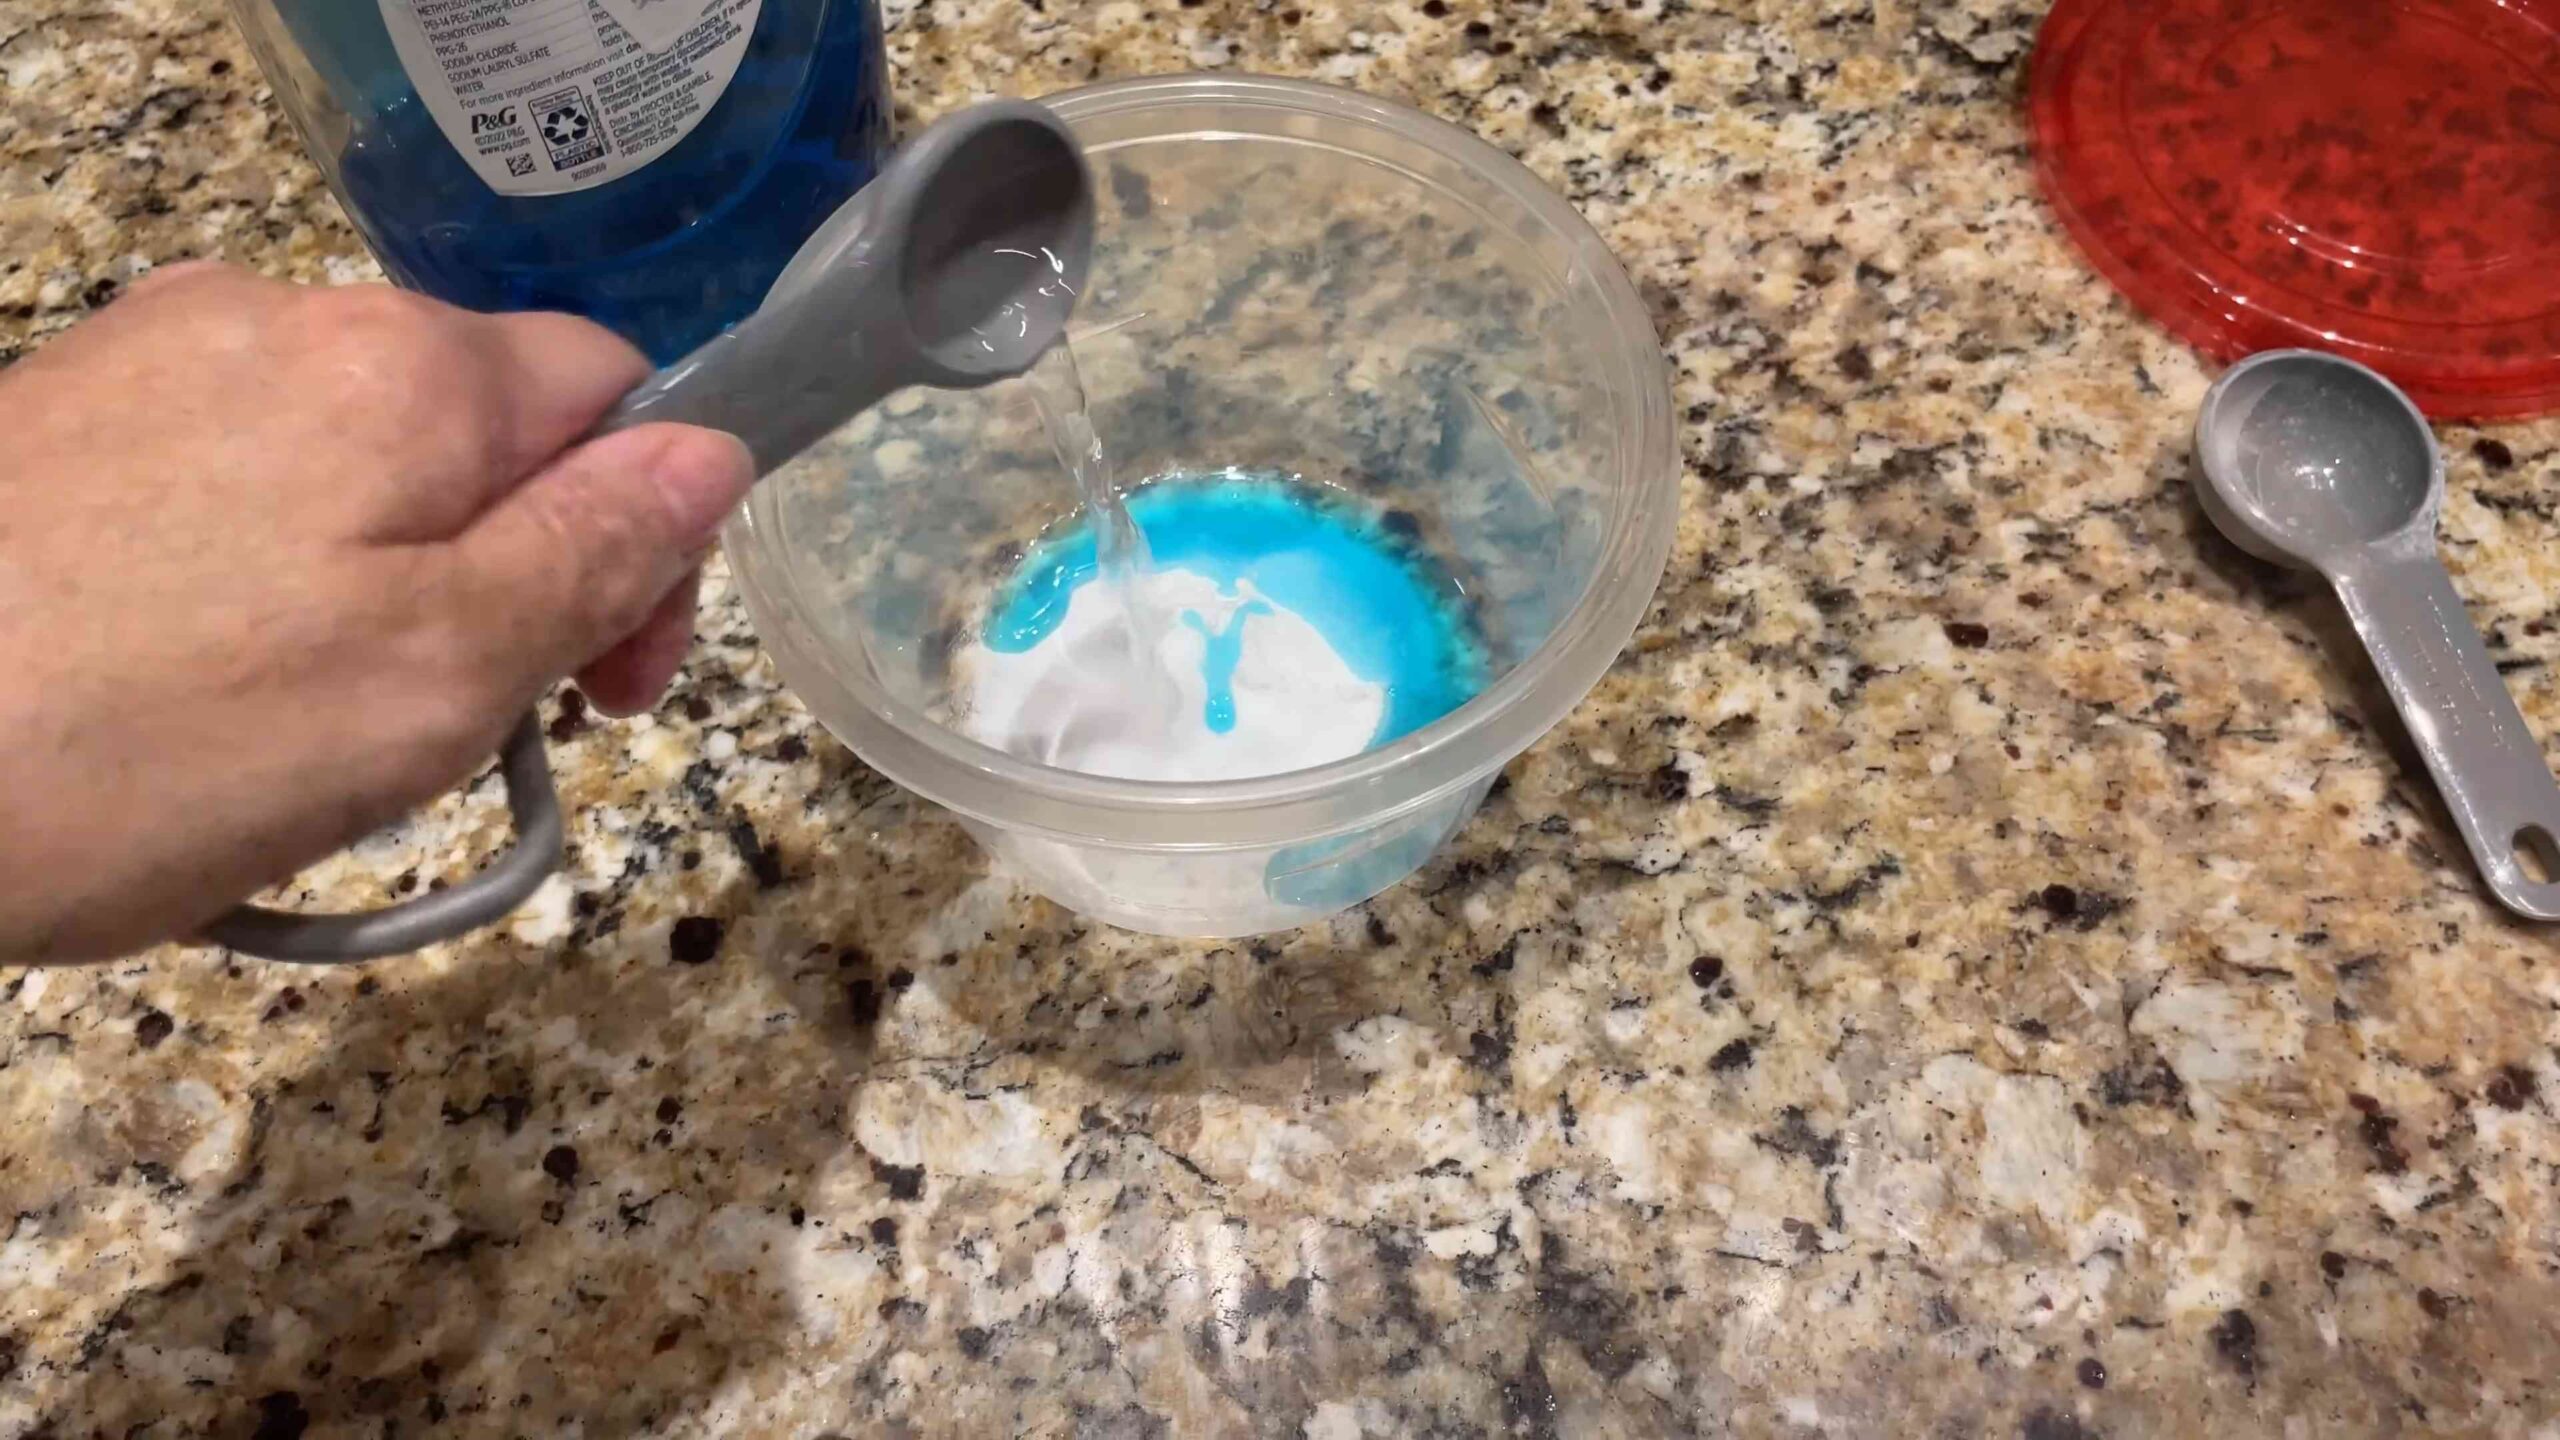
4. Mix the Vinegar Solution: In your spray bottle, mix equal parts white vinegar and warm water. This will be our go-to solution for general cleaning and degreasing.
5. Spray and Wipe: Spray the vinegar solution onto a section of your cabinets. Let it sit for a minute or two to loosen the grease, then wipe it clean with a microfiber cloth. Be sure to wring out the cloth frequently to avoid spreading the grease around.
6. Tackle Stubborn Grease with Baking Soda Paste: For those really tough, stuck-on grease spots, we’ll use our baking soda paste. In a small bowl, mix baking soda with a little bit of water to form a thick paste.
7. Apply the Baking Soda Paste: Apply the baking soda paste to the greasy areas using a sponge or your fingers. Gently rub the paste into the grease, using circular motions. Let it sit for a few minutes to work its magic.
8. Scrub Gently (If Needed): If the grease is still stubborn, use a soft-bristled brush to gently scrub the area. Be careful not to scrub too hard, as this could damage the cabinet finish.
9. Rinse with a Damp Cloth: Use a clean, damp microfiber cloth to rinse away the baking soda paste. Make sure to remove all traces of the paste, as it can leave a white residue if left to dry.
10. Dry the Cabinets: Use a clean, dry microfiber cloth to dry the cabinets thoroughly. This will prevent water spots and help to restore the shine.
11. Clean Hardware Separately: Don’t forget about the cabinet hardware! Remove the knobs and pulls and soak them in a solution of warm water and dish soap. Use a soft-bristled brush to scrub away any grime, then rinse them with clean water and dry them thoroughly before reattaching them.
12. Repeat as Needed: Depending on how greasy your cabinets are, you may need to repeat the cleaning process a few times. Don’t be discouraged if it takes a little elbow grease!
Dealing with Different Cabinet Finishes: A Word of Caution
It’s important to be aware of the type of finish on your cabinets before you start cleaning. Different finishes require different care.
* Painted Cabinets: Painted cabinets are generally durable, but they can be susceptible to scratching. Be gentle when scrubbing and avoid using abrasive cleaners.
* Laminate Cabinets: Laminate cabinets are relatively easy to clean, but they can be damaged by excessive moisture. Be sure to wring out your cloths thoroughly and avoid letting water sit on the surface.
* Wood Cabinets: Wood cabinets require the most care. Avoid using harsh chemicals or abrasive cleaners, as these can damage the finish. It’s also important to dry wood cabinets thoroughly to prevent warping.
* Glass-Fronted Cabinets: For glass-fronted cabinets, use a glass cleaner to clean the glass panels. Be careful not to get any cleaner on the wood frame.
Extra Tips and Tricks for Sparkling Cabinets
Here are a few extra tips and tricks that I’ve learned over the years to keep your cabinets looking their best:
* Preventative Measures: The best way to keep your cabinets clean is to prevent them from getting greasy in the first place. Use your range hood when cooking to vent steam and grease away from your cabinets.
* Wipe Up Spills Immediately: Don’t let spills sit on your cabinets. Wipe them up as soon as they happen to prevent them from staining or becoming sticky.
* Regular Cleaning: Make it a habit to wipe down your cabinets regularly, even if they don’t look dirty. This will prevent grease and grime from building up and make cleaning much easier in the long run. A quick wipe down once a week can make a huge difference!
* Lemon Oil Polish: After cleaning your wood cabinets, consider applying a lemon oil polish. This will help to protect the finish and give them a beautiful shine.
* Magic Erasers: For scuff marks and other stubborn stains, a magic eraser can be a lifesaver. Just be careful not to scrub too hard, as they can be abrasive. Test in an inconspicuous area first.
* Toothpicks for Crevices: Use toothpicks to get into those hard-to-reach crevices around the cabinet doors and drawers. They’re perfect for dislodging stubborn dirt and grime.
* Consider a Degreaser: If you’re dealing with extremely greasy cabinets, you might consider using a commercial degreaser. Be sure to follow the manufacturer’s instructions carefully and test it in an inconspicuous area first. I personally prefer the natural methods, but sometimes a degreaser is necessary.
* Ventilation is Key: Make sure your kitchen is well-ventilated while you’re cleaning. Open windows and turn on your range hood to help dissipate any fumes from the cleaning solutions.
* Patience is a Virtue: Cleaning greasy kitchen cabinets can be a time-consuming process, so be patient and don’t get discouraged. The results will be worth it!
Maintaining Your Clean Cabinets: The Long Game
Once you’ve gone through the effort of cleaning your cabinets, you’ll want to keep them looking their best. Here’s how I maintain mine:
* Weekly Wipe-Down: I make it a habit to wipe down my cabinets with a damp microfiber cloth once a week. This helps to remove any dust, spills, or splatters before they have a chance to build up.
* Spot Cleaning: As soon as I notice a spill or stain, I clean it up immediately. This prevents it from becoming a bigger problem later on.
* Deep Cleaning (Every Few Months): Every few months, I give my cabinets a more thorough cleaning using the method I described above. This helps to keep them looking fresh and clean.
* Consider Cabinet Liners: To protect the inside of your cabinets from spills and stains, consider using cabinet liners. These are easy to install and can be a lifesaver if you accidentally spill something inside.
* Proper Ventilation: As I mentioned before, proper ventilation is key to preventing grease from building up on your cabinets. Use your range hood when cooking and open windows to let fresh air circulate.
By following these tips, you can keep your kitchen cabinets looking sparkling clean for years

Conclusion
So, there you have it! A simple, effective, and budget-friendly way to tackle those stubborn, greasy kitchen cabinets. We’ve walked you through the process, highlighting the ease and accessibility of using common household ingredients to achieve professional-level cleaning results. But why is this DIY trick a must-try? Because it empowers you to take control of your kitchen’s cleanliness without relying on harsh chemicals or expensive cleaning services. It’s about creating a healthier, happier home environment, one sparkling cabinet at a time.
This method isn’t just about removing grease; it’s about restoring the beauty of your kitchen. Imagine the satisfaction of seeing your cabinets gleam, reflecting light and making your entire kitchen feel brighter and more inviting. It’s a small change that can make a big difference in your overall sense of well-being. Plus, you’ll be saving money and reducing your environmental impact by using natural cleaning solutions.
This DIY method for cleaning greasy kitchen cabinets is a game-changer. It’s not just a cleaning hack; it’s a sustainable and effective solution for maintaining a spotless kitchen.
Looking for variations? Absolutely! For extra stubborn grease, consider adding a few drops of essential oils like lemon or orange to your cleaning solution. These oils not only boost the cleaning power but also leave a refreshing citrus scent. If you have painted cabinets, test the solution in an inconspicuous area first to ensure it doesn’t damage the finish. For laminate cabinets, a slightly diluted solution is often best to prevent any potential water damage. You can also experiment with different ratios of baking soda and vinegar to find the perfect balance for your specific type of grease and cabinet material. Remember, a little experimentation can go a long way in perfecting your cleaning routine.
Another variation involves using a microfiber cloth instead of a regular sponge. Microfiber cloths are excellent at trapping grease and dirt, and they’re also gentle on your cabinets’ surfaces. You can also use an old toothbrush to scrub those hard-to-reach areas around handles and hinges.
We encourage you to try this DIY trick and see the amazing results for yourself. Don’t just take our word for it; experience the satisfaction of transforming your greasy kitchen cabinets into sparkling clean surfaces. And once you’ve tried it, we’d love to hear about your experience! Share your before-and-after photos, your tips and tricks, and any variations you’ve discovered in the comments below. Let’s build a community of clean kitchen enthusiasts! Your feedback will not only help others but also inspire us to continue sharing valuable cleaning solutions. Let us know what worked best for you, what challenges you faced, and any creative solutions you came up with. Together, we can conquer even the greasiest of kitchen cabinets!
FAQ
What kind of baking soda should I use?
You can use regular baking soda, the kind you find in the baking aisle of your grocery store. There’s no need for any special type of baking soda for this cleaning method. Just make sure it’s fresh and hasn’t expired for optimal cleaning power. Expired baking soda may not be as effective at absorbing grease and odors.
Can I use this method on all types of kitchen cabinets?
While this method is generally safe and effective, it’s always best to test it in an inconspicuous area first, especially if you have painted, lacquered, or antique cabinets. Some finishes may be more sensitive to cleaning solutions. For laminate cabinets, use a slightly diluted solution to prevent water damage. If you’re unsure about the type of finish on your cabinets, consult the manufacturer’s instructions or a professional cleaner.
How often should I clean my kitchen cabinets?
The frequency of cleaning depends on how often you cook and the amount of grease that accumulates. As a general rule, wiping down your cabinets with a damp cloth weekly can help prevent grease buildup. A more thorough cleaning with the baking soda and vinegar solution is recommended every 1-3 months, or as needed. If you notice a significant amount of grease or grime, it’s time for a deep clean.
What if the grease is really stubborn and doesn’t come off easily?
For extremely stubborn grease, you can try a few things. First, let the baking soda paste sit on the grease for a longer period, up to 30 minutes. You can also try adding a few drops of dish soap to the paste for extra cleaning power. Another option is to use a scrub brush with soft bristles to gently scrub the grease away. Be careful not to scrub too hard, as this could damage the cabinet finish. If all else fails, you may need to repeat the cleaning process a few times.
Can I use this method on other surfaces in my kitchen?
Yes, this method can be used on other greasy surfaces in your kitchen, such as backsplashes, stovetops, and range hoods. However, always test the solution in an inconspicuous area first to ensure it doesn’t damage the surface. For stovetops, be sure to remove any loose debris before cleaning. For range hoods, you may need to disassemble them to clean them thoroughly.
What if I don’t have vinegar? Can I use something else?
If you don’t have vinegar, you can try using lemon juice as a substitute. Lemon juice has similar cleaning properties to vinegar and can also help to cut through grease. You can also try using a mixture of baking soda and water to create a paste. However, vinegar is generally more effective at dissolving grease and grime.
How do I prevent grease from building up on my kitchen cabinets in the first place?
Prevention is key to keeping your kitchen cabinets clean. Here are a few tips to prevent grease buildup:
* Use your range hood or exhaust fan when cooking to vent steam and grease.
* Wipe down your cabinets regularly with a damp cloth to remove any splatters or spills.
* Avoid frying foods too often, as this can create a lot of grease.
* Store cooking oils and sprays away from your cabinets to prevent them from splattering.
* Consider using a splatter screen when frying foods to contain the grease.
Is this method safe for the environment?
Yes, this method is much safer for the environment than using harsh chemical cleaners. Baking soda and vinegar are both natural and biodegradable, so they won’t pollute the environment. By using this DIY cleaning solution, you’re reducing your reliance on chemical products and contributing to a healthier planet.
How do I dispose of the used cleaning solution?
The used cleaning solution can be safely disposed of down the drain. Baking soda and vinegar are both safe for plumbing systems and won’t cause any damage. Simply rinse the sink with water after disposing of the solution.
My cabinets are made of wood. Will this damage them?
Wood cabinets can be cleaned with this method, but it’s crucial to use a gentle approach. Avoid excessive moisture, as wood can warp or swell if it gets too wet. Use a slightly damp cloth rather than a soaking wet one, and dry the cabinets thoroughly after cleaning. As always, test the solution in an inconspicuous area first to ensure it doesn’t damage the finish. For wood cabinets with a delicate finish, consider using a specialized wood cleaner instead.


Leave a Comment