

Clean Kitchen Sink Naturally: Is your kitchen sink looking less than sparkling? Let’s face it, the kitchen sink is a workhorse, constantly battling food scraps, grease, and grime. It’s no wonder it can quickly become a breeding ground for unpleasant odors and stubborn stains. But before you reach for harsh chemicals, I’m here to tell you there’s a better way!
For generations, resourceful homemakers have relied on natural ingredients to keep their homes clean and fresh. Think about it – our grandmothers didn’t have access to the array of commercial cleaners we do today, yet their kitchens were often spotless! They understood the power of simple, readily available ingredients like baking soda, vinegar, and lemon. These aren’t just old wives’ tales; they’re time-tested solutions that are effective, eco-friendly, and gentle on your wallet.
In this DIY guide, I’m going to share some of my favorite secrets to clean kitchen sink naturally, using items you probably already have in your pantry. You’ll learn how to banish odors, remove stubborn stains, and keep your sink sparkling without resorting to harsh chemicals that can harm your health and the environment. Ready to transform your sink from drab to fab? Let’s get started!
DIY Natural Kitchen Sink Cleaning Powerhouse
Hey there, fellow DIY enthusiasts! I’m so excited to share my go-to method for keeping my kitchen sink sparkling clean and fresh, all without harsh chemicals. I’ve tried countless commercial cleaners, and honestly, nothing beats the effectiveness and peace of mind that comes with using natural ingredients. This method is not only budget-friendly but also incredibly effective at tackling grease, grime, and those pesky lingering odors. Let’s dive in!
What You’ll Need: Your Natural Cleaning Arsenal
Before we get started, let’s gather our supplies. The beauty of this method is that you probably already have most of these items in your pantry!
* Baking Soda: This is our gentle abrasive and deodorizer. It’s a true cleaning workhorse!
* White Vinegar: The acid in vinegar helps to break down grease and grime. Plus, it’s a natural disinfectant.
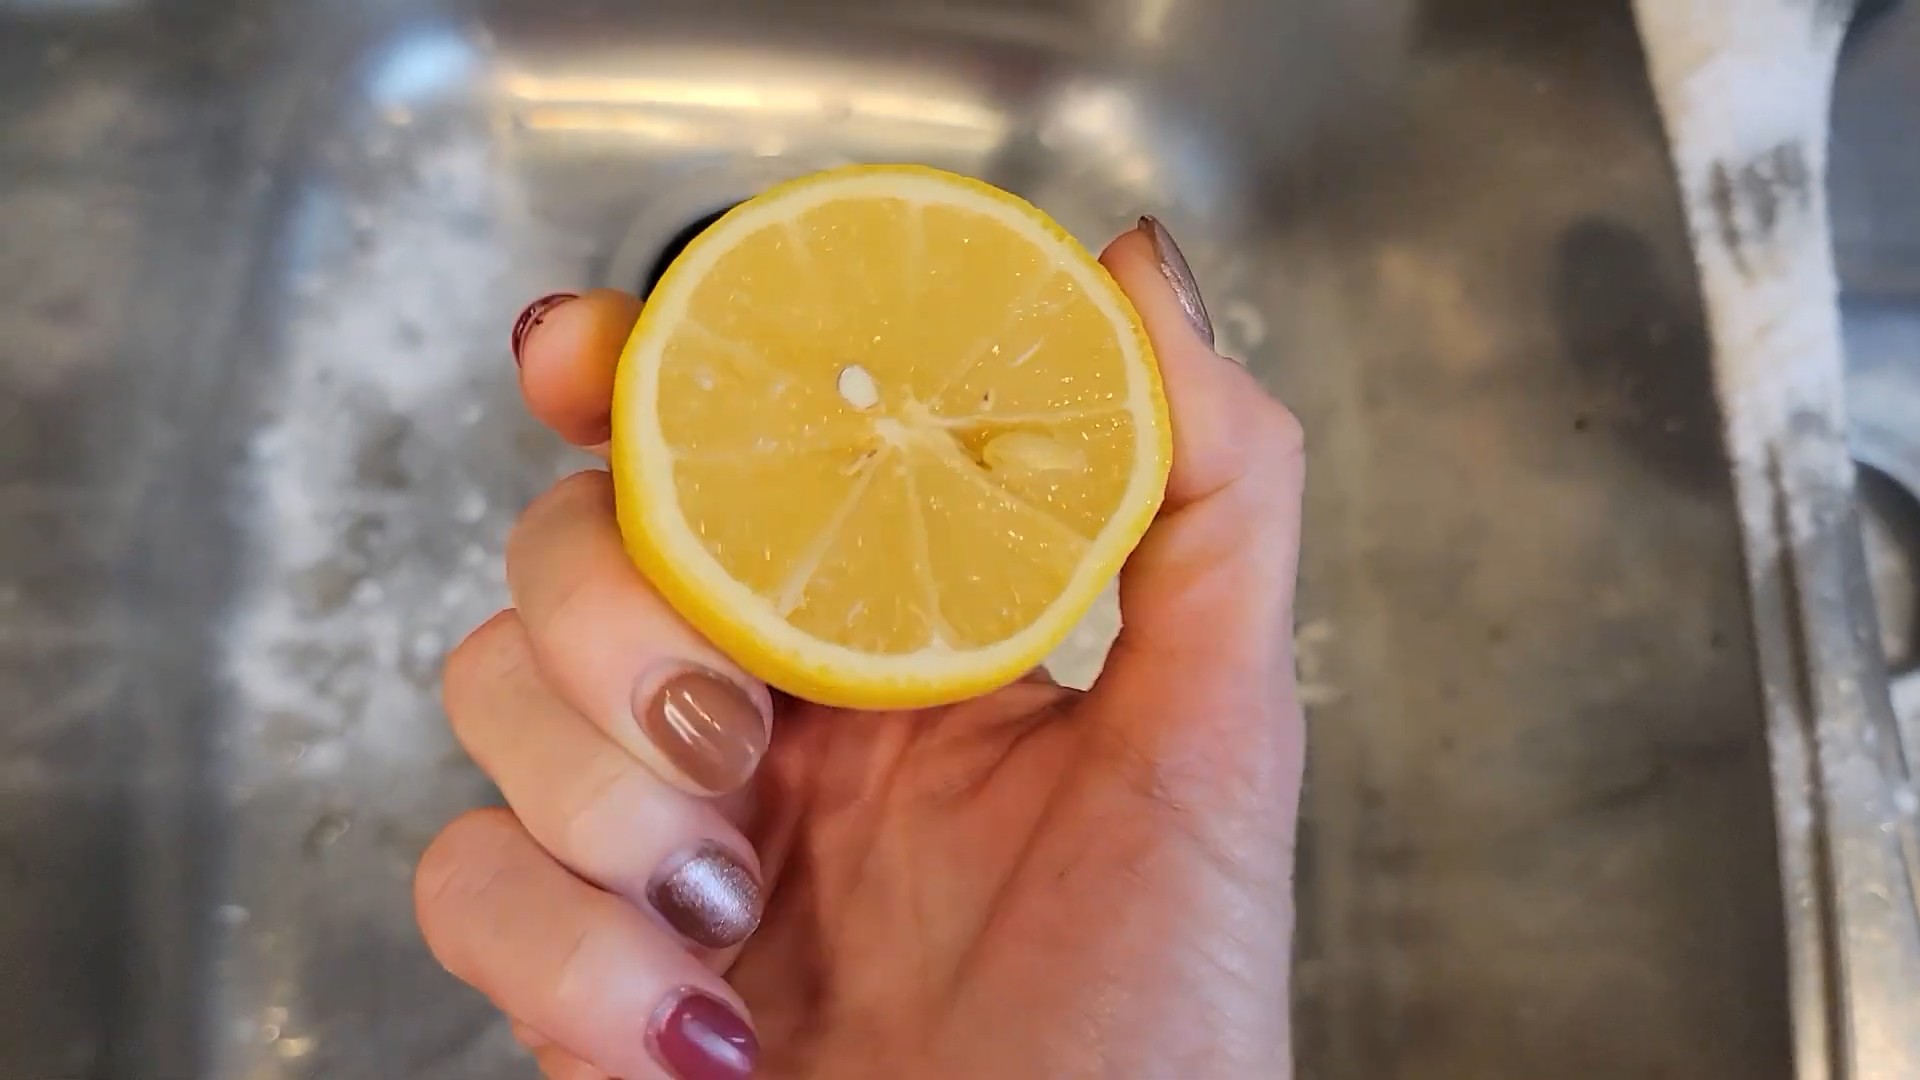
* Lemon (Optional): For extra cleaning power and a fresh, citrusy scent.
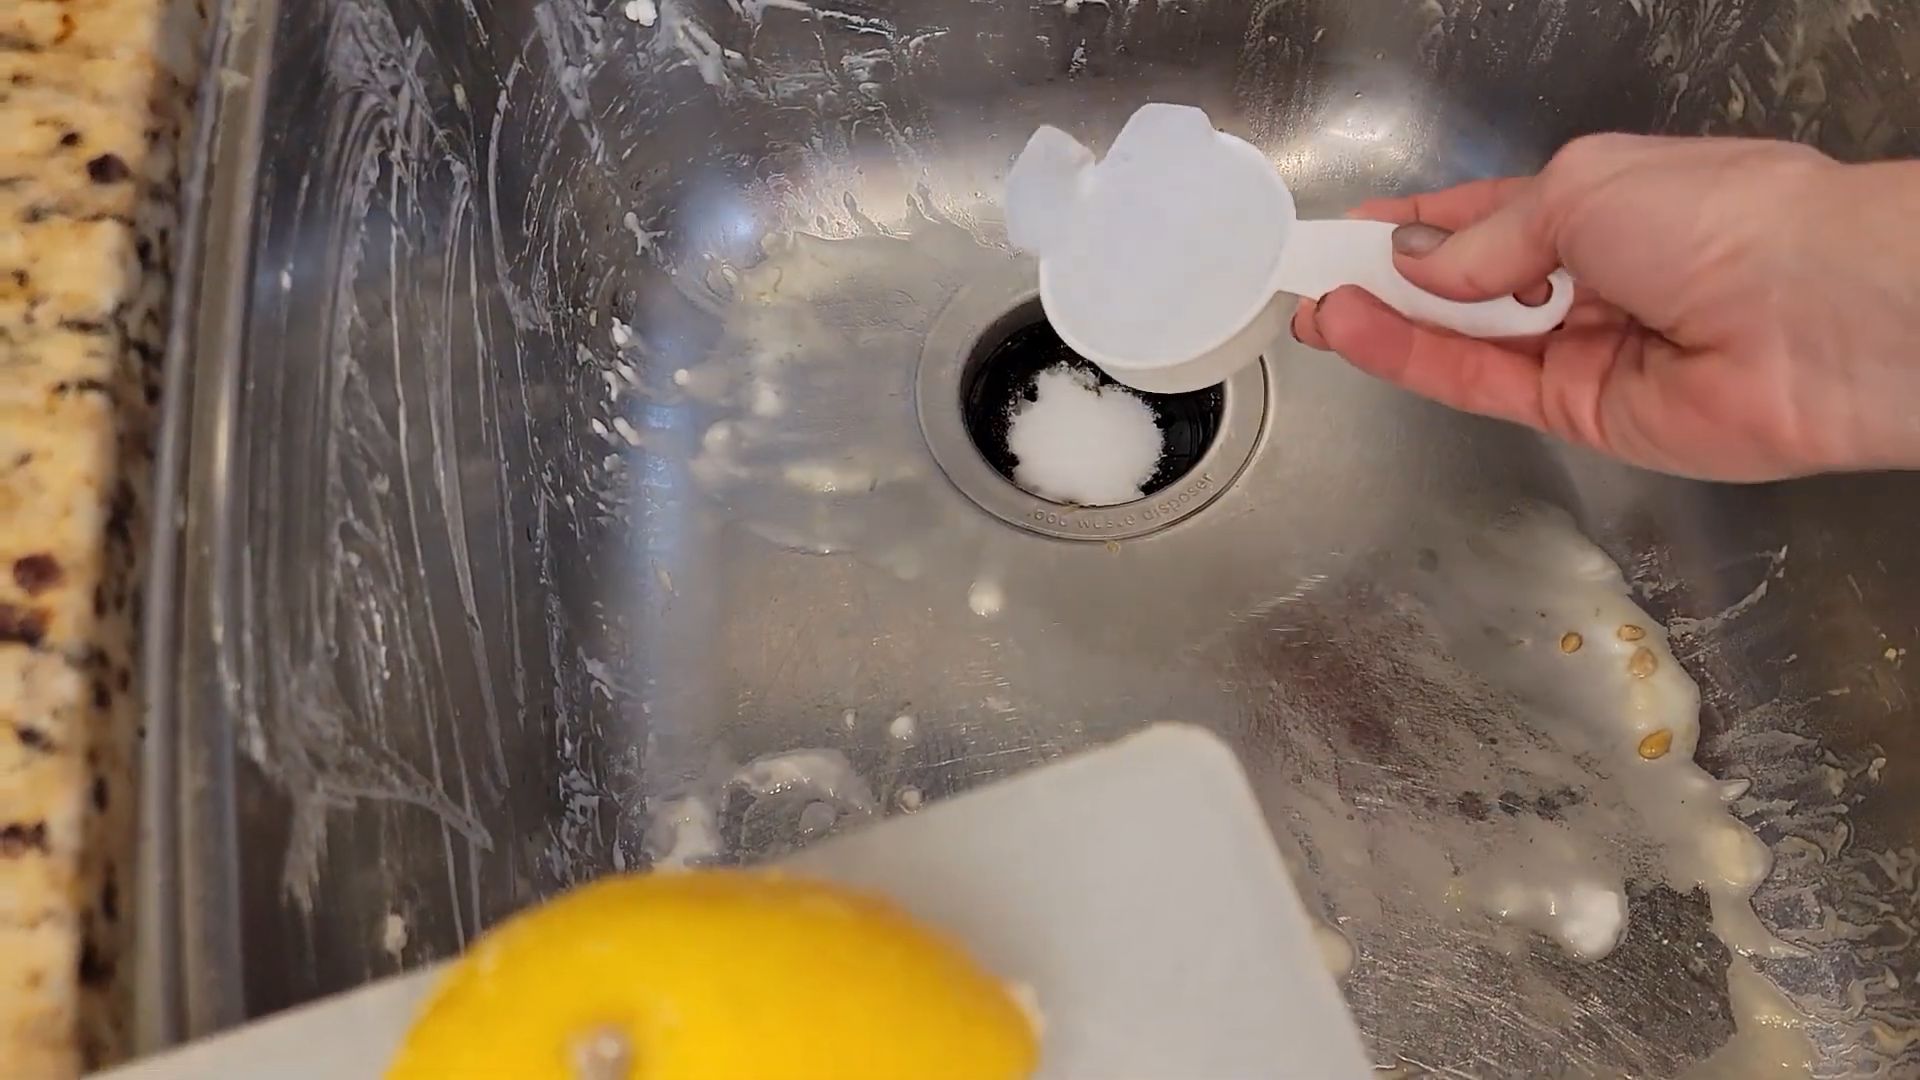
* Salt (Optional): Another gentle abrasive that can help scrub away stubborn stains.
* Dish Soap (Natural): A small amount of dish soap helps to cut through grease. I prefer using a natural, plant-based option.
* Boiling Water: This helps to flush out the drain and dissolve grease buildup. Be careful when handling boiling water!
* Old Toothbrush: Perfect for scrubbing those hard-to-reach areas around the drain and faucet.
* Cleaning Cloth or Sponge: For wiping down the sink.
* Rubber Gloves (Optional): To protect your hands, especially if you have sensitive skin.
Step-by-Step Guide: Transforming Your Sink
Now that we have everything we need, let’s get down to the nitty-gritty! I promise, it’s easier than you think.
1. Clear the Sink: Start by removing any dishes, sponges, or other items from the sink. We want a clean slate to work with.
2. Rinse the Sink: Give the sink a quick rinse with warm water to remove any loose debris.
3. Baking Soda Power: Generously sprinkle baking soda all over the sink, paying special attention to areas with stains or grime. Don’t be shy – the more, the merrier! I usually use about half a cup.
4. Vinegar Time: Now, slowly pour white vinegar over the baking soda. You’ll notice a fizzing reaction – that’s a good thing! It means the baking soda and vinegar are working together to break down dirt and grime.
5. Let it Fizz: Allow the baking soda and vinegar mixture to fizz and sit for about 5-10 minutes. This gives it time to loosen any stubborn buildup.
6. Scrub-a-Dub-Dub: Using your old toothbrush, scrub the sink thoroughly, focusing on the drain, faucet, and any areas with stains or grime. The baking soda acts as a gentle abrasive, helping to lift away dirt.
7. Rinse Again: Rinse the sink thoroughly with warm water to remove the baking soda and vinegar mixture.
8. Dish Soap Boost: Squirt a small amount of natural dish soap onto your cleaning cloth or sponge and wipe down the entire sink. This will help to remove any remaining grease and leave your sink sparkling clean.
9. Final Rinse: Rinse the sink one last time with warm water to remove any soap residue.
10. Boiling Water Flush: Carefully pour a kettle of boiling water down the drain. This will help to flush out any remaining grease and debris, preventing clogs. Be extremely careful when handling boiling water to avoid burns.
11. Lemon Freshness (Optional): If you want to add a fresh, citrusy scent, cut a lemon in half and rub it all over the sink. The lemon juice will also help to disinfect and brighten the sink.
12. Dry It Off: Finally, dry the sink with a clean cloth to prevent water spots.
Tackling Stubborn Stains: Level Up Your Cleaning Game
Sometimes, you might encounter stubborn stains that require a little extra elbow grease. Don’t worry, I’ve got you covered!
* For Hard Water Stains: If you have hard water, you might notice white, chalky stains on your sink. To remove these, soak a paper towel in white vinegar and place it over the stain for about 30 minutes. Then, scrub with a toothbrush and rinse.
* For Rust Stains: Rust stains can be tricky to remove. Try making a paste of baking soda and lemon juice and applying it to the stain. Let it sit for about an hour, then scrub and rinse.
* For Food Stains: For stubborn food stains, try sprinkling salt on the stain and scrubbing with a damp sponge. The salt acts as a gentle abrasive to lift away the stain.
Maintaining a Sparkling Sink: Prevention is Key
The best way to keep your sink clean is to prevent it from getting too dirty in the first place. Here are a few tips to help you maintain a sparkling sink:
* Rinse After Use: After each use, rinse the sink with warm water to remove any food particles or debris.
* Wipe Down Regularly: Wipe down the sink with a damp cloth or sponge after each use to prevent buildup.
* Avoid Harsh Chemicals: Harsh chemicals can damage your sink and are not necessary for effective cleaning. Stick to natural cleaning methods whenever possible.
* Use a Drain Strainer: A drain strainer will catch food particles and prevent them from clogging your drain.
* Regular Deep Cleaning: Deep clean your sink at least once a week using the method described above.
Dealing with a Smelly Drain: Banishing Bad Odors
A smelly drain can be a real nuisance. Here’s how to get rid of those unpleasant odors naturally:
1. Baking Soda and Vinegar Flush: Pour one cup of baking soda down the drain, followed by one cup of white vinegar. Let it fizz for about 30 minutes, then flush with boiling water.
2. Lemon Peel Power: Grind up lemon peels in your garbage disposal (if you have one) to freshen the drain and eliminate odors.
3. Boiling Water Flush: Regularly flush your drain with boiling water to prevent grease buildup and odors.
4. Check for Clogs: If the odor persists, you may have a clog in your drain. Try using a drain snake or plunger to remove the clog.
Choosing the Right Materials: Sink-Specific Considerations
The type of sink you have can influence the best cleaning approach. Here’s a quick guide:
* Stainless Steel Sinks: These are generally durable and easy to clean. Avoid using abrasive cleaners that can scratch the surface.
* Porcelain Sinks: These can be prone to staining. Use gentle cleaners and avoid harsh abrasives.
* Composite Sinks: These are durable and stain-resistant. Use a mild dish soap and water for regular cleaning.
* Copper Sinks: These require special care to maintain their patina. Use a copper cleaner specifically designed for sinks.
Why I Love This Method: The Benefits of Natural Cleaning
I’m a huge advocate for natural cleaning for so many reasons!
* It’s Safe: No harsh chemicals means it’s safer for you, your family, and the environment.
* It’s Affordable: Baking soda and vinegar are incredibly inexpensive compared to commercial cleaners.
* It’s Effective: This method really works! It tackles grease, grime, and odors effectively.
* It’s Customizable: You can adjust the ingredients and methods to suit your specific needs and preferences.
* It’s Eco-Friendly: Natural cleaning reduces your reliance on harmful chemicals that can pollute the environment.
So, there you have it! My comprehensive guide to cleaning your kitchen sink naturally. I hope you found this helpful. Give it a try, and let me know how it works for you! Happy cleaning!
Conclusion
So, there you have it! A simple, effective, and eco-friendly way to clean your kitchen sink naturally, banishing grime and odors without harsh chemicals. This isn’t just about cleaning; it’s about creating a healthier home environment for you and your family. The satisfaction of knowing you’re using safe, readily available ingredients to achieve sparkling results is truly rewarding.
Why is this DIY trick a must-try? Because it’s a game-changer. It’s cost-effective, using ingredients you likely already have in your pantry. It’s environmentally responsible, reducing your reliance on potentially harmful commercial cleaners. And most importantly, it works! You’ll be amazed at how effectively baking soda, vinegar, and lemon (or your preferred essential oil) can cut through grease, eliminate stains, and leave your sink smelling fresh and clean.
But don’t stop there! Feel free to experiment and personalize this method to suit your specific needs and preferences. For instance, if you have particularly stubborn stains, try making a paste of baking soda and water and letting it sit on the affected area for a longer period before scrubbing. You could also add a few drops of tea tree oil to your cleaning solution for its antibacterial properties. If you prefer a different scent, swap out the lemon essential oil for lavender, eucalyptus, or peppermint. The possibilities are endless!
Consider using a soft-bristled brush or an old toothbrush to get into those hard-to-reach corners and crevices around the drain and faucet. For stainless steel sinks, always scrub in the direction of the grain to avoid scratching. And remember to rinse thoroughly with warm water after each step to remove any residue.
We’re confident that once you try this natural cleaning method, you’ll never go back to harsh chemical cleaners again. It’s a simple, sustainable, and satisfying way to keep your kitchen sink sparkling clean and your home healthy.
Now, we want to hear from you! Give this DIY trick a try and let us know how it works for you. Share your experiences, variations, and any tips you discover along the way in the comments below. We’re excited to learn from your experiences and build a community of natural cleaning enthusiasts! What are you waiting for? Go ahead and give your kitchen sink the natural cleaning it deserves!
Frequently Asked Questions
1. Is baking soda and vinegar really safe to use together? I’ve heard they neutralize each other.
Yes, baking soda and vinegar are generally safe to use together for cleaning, but it’s important to understand what happens when they mix. When baking soda (a base) and vinegar (an acid) combine, they react to produce carbon dioxide gas, water, and sodium acetate. The fizzing action of the carbon dioxide can help loosen dirt and grime, making it easier to scrub away.
While it’s true that the reaction neutralizes some of the cleaning power of both substances, the initial fizzing action is still beneficial. For this DIY sink cleaning method, we’re not relying solely on the chemical reaction for cleaning. The baking soda acts as a mild abrasive, and the vinegar helps to dissolve mineral deposits and cut through grease. The combination, along with the scrubbing action, is what makes this method effective.
However, avoid mixing large quantities of baking soda and vinegar in a closed container, as the pressure from the carbon dioxide gas could cause it to explode. When cleaning your sink, apply the baking soda first, then pour the vinegar over it. This allows the reaction to occur directly on the surface you’re cleaning.
2. Can I use this method on all types of kitchen sinks?
This DIY cleaning method is generally safe for most types of kitchen sinks, including stainless steel, porcelain, and ceramic. However, it’s always a good idea to test it in an inconspicuous area first, especially if you have a more delicate or unusual sink material.
For stainless steel sinks, be sure to scrub in the direction of the grain to avoid scratching. For porcelain sinks, avoid using abrasive scrub brushes or scouring pads, as they can scratch the surface. If you have a composite sink, check the manufacturer’s recommendations for cleaning, as some materials may be sensitive to acidic cleaners like vinegar.
If you have a copper sink, avoid using vinegar, as it can damage the finish. Instead, opt for a mild soap and water solution.
3. How often should I clean my kitchen sink using this method?
The frequency with which you clean your kitchen sink will depend on how often you use it and how dirty it gets. As a general guideline, cleaning your sink once or twice a week is a good starting point. If you cook frequently or notice that your sink gets dirty quickly, you may need to clean it more often.
You can also use this method for spot cleaning as needed. For example, if you spill something in the sink, clean it up immediately with baking soda and vinegar to prevent stains from setting.
4. What if my sink has a really bad odor? Will this method get rid of it?
Yes, this DIY cleaning method can be very effective at eliminating sink odors. The baking soda helps to absorb odors, while the vinegar helps to kill bacteria that can cause bad smells. The lemon juice or essential oil adds a fresh, clean scent.
If your sink has a particularly strong odor, you can try pouring a cup of baking soda down the drain, followed by a cup of vinegar. Let it fizz for 30 minutes, then flush with hot water. This can help to clear out any buildup in the drain that may be causing the odor.
You can also try placing a few lemon peels down the garbage disposal and running it with cold water. This can help to freshen the disposal and eliminate any lingering odors.
5. Can I use this method to clean my garbage disposal as well?
Yes, this method can be adapted to clean your garbage disposal. After cleaning the sink, pour any remaining baking soda and vinegar mixture down the disposal. Let it sit for about 15-20 minutes to loosen any food particles and debris. Then, turn on the cold water and run the disposal for a minute or two to flush everything out.
To further clean and deodorize your garbage disposal, you can also freeze vinegar into ice cubes and grind them in the disposal. The ice helps to scrub the blades, while the vinegar helps to kill bacteria and eliminate odors.
Avoid putting certain items down the garbage disposal, such as grease, bones, coffee grounds, and fibrous vegetables, as they can clog the drain and damage the disposal.
6. What other natural cleaning agents can I use in place of vinegar or lemon?
If you’re looking for alternatives to vinegar or lemon, there are several other natural cleaning agents you can use.
* **Hydrogen peroxide:** Hydrogen peroxide is a natural disinfectant that can be used to kill bacteria and remove stains. Use a 3% solution and apply it to the sink surface. Let it sit for a few minutes, then rinse with water.
* **Borax:** Borax is a natural mineral that can be used as a cleaning agent, disinfectant, and deodorizer. Mix it with water to form a paste and apply it to the sink surface. Scrub gently, then rinse with water.
* **Castile soap:** Castile soap is a gentle, all-natural soap that can be used for a variety of cleaning purposes. Dilute it with water and use it to wash the sink surface.
* **Essential oils:** In addition to lemon essential oil, you can use other essential oils like tea tree, lavender, eucalyptus, or peppermint for their antibacterial and antifungal properties. Add a few drops to your cleaning solution for a fresh, clean scent.
Remember to always test any new cleaning agent in an inconspicuous area first to ensure that it doesn’t damage the sink surface.
7. Is this method safe for septic systems?
Yes, this DIY cleaning method is generally safe for septic systems. The ingredients used – baking soda, vinegar, and lemon juice – are all natural and biodegradable, and they won’t harm the beneficial bacteria in your septic tank.
However, it’s important to avoid pouring large quantities of any cleaning agent down the drain at once, as this could disrupt the balance of the septic system. When cleaning your sink, use moderate amounts of baking soda and vinegar, and flush with plenty of water.
If you have any concerns about the safety of this method for your septic system, consult with a septic system professional.


Leave a Comment