

Clean Sterling Silver with Baking Soda: Are your cherished sterling silver pieces losing their luster? Don’t despair! I’m here to share a simple, yet incredibly effective DIY trick that will restore their shine using a common household ingredient: baking soda. For generations, silver has been a symbol of elegance and refinement, adorning our tables and cherished as heirlooms. But, like all beautiful things, it requires a little care to maintain its brilliance.
The tarnish that dulls your silver isn’t dirt; it’s a chemical reaction with sulfur in the air. While professional cleaning services exist, they can be costly and time-consuming. That’s where this DIY hack comes in! I’ll show you how to clean sterling silver with baking soda, saving you money and giving you the satisfaction of restoring your silver’s beauty yourself. This method is gentle, readily accessible, and surprisingly powerful.
Imagine effortlessly removing years of tarnish and revealing the gleaming silver beneath. No harsh chemicals, no expensive trips to the jeweler – just a simple, effective solution using baking soda. Ready to learn how? Let’s get started and bring back the sparkle to your treasured silver!
DIY: Sparkling Sterling Silver with Baking Soda – A Gentle Cleaning Guide
Hey there, fellow DIY enthusiasts! Are you tired of looking at your tarnished sterling silver jewelry, cutlery, or decorative items? I know I was! Those beautiful pieces can lose their luster over time, but don’t despair. You don’t need harsh chemicals or expensive cleaners to bring back their shine. I’m going to show you a simple, effective, and surprisingly gentle method using baking soda – something you probably already have in your pantry!
This method is perfect for removing light to moderate tarnish. For heavily tarnished items, you might need to repeat the process or consider a professional cleaning. But for most of us, this baking soda trick will work wonders!
What You’ll Need:
Before we dive in, let’s gather our supplies. This is a pretty low-key project, so you won’t need much:
* Baking soda (the star of the show!)
* Aluminum foil
* A heatproof bowl or container (glass or ceramic works best)
* Boiling water
* Soft cloth or polishing cloth
* Tongs or a utensil for handling hot items (optional, but recommended)
* Dish soap (optional, for pre-cleaning)
Understanding the Science (Just a Little Bit!)
Okay, I promise I won’t bore you with a full chemistry lesson, but it’s helpful to understand *why* this works. Tarnish on silver is primarily silver sulfide, formed when silver reacts with sulfur compounds in the air. The baking soda and aluminum foil create a chemical reaction called an electrochemical reaction. The aluminum is more reactive than silver, so it attracts the sulfur from the silver sulfide, effectively reversing the tarnishing process. Pretty cool, right?
Step-by-Step Instructions:
Alright, let’s get started! Here’s the breakdown of how to clean your sterling silver with baking soda:
1. Prepare Your Silver: If your silver is particularly dirty or greasy, give it a quick wash with mild dish soap and warm water. This will remove any surface grime that might interfere with the cleaning process. Rinse thoroughly and pat dry. This step is optional, but I find it helps.
2. Line the Bowl with Aluminum Foil: Cut a piece of aluminum foil large enough to line the bottom and sides of your heatproof bowl or container. Make sure the shiny side of the foil is facing up, as this is the side that will be in contact with the silver. The foil needs to make contact with the silver for the reaction to work.
3. Add Baking Soda: Pour about 1-2 tablespoons of baking soda into the bowl. The amount you need will depend on the size of your bowl and the amount of silver you’re cleaning. A good rule of thumb is to use enough baking soda to create a noticeable layer in the water.
4. Pour in Boiling Water: Carefully pour boiling water into the bowl, enough to completely submerge the silver items you’re cleaning. Be extremely cautious when handling boiling water to avoid burns.
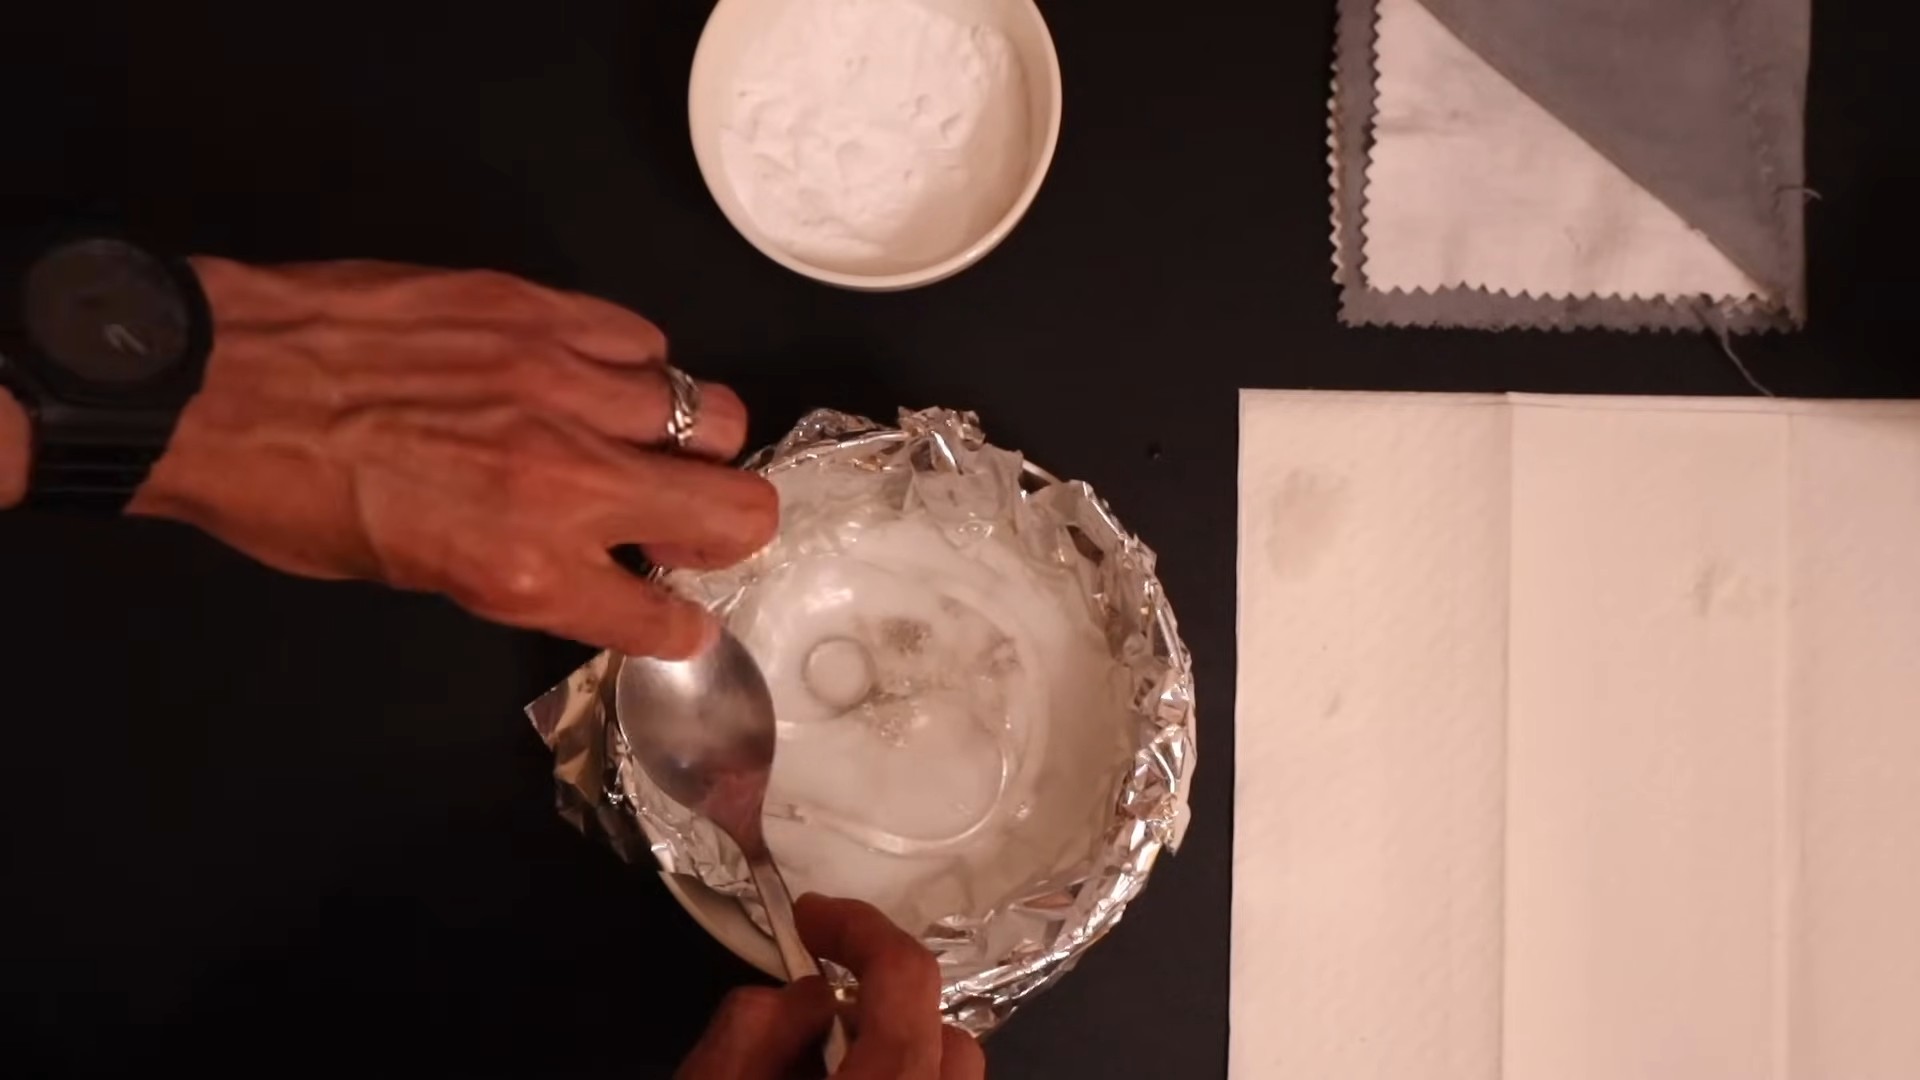
5. Submerge the Silver: Gently place your silver items into the bowl, making sure they are touching the aluminum foil. This is crucial for the electrochemical reaction to occur. Use tongs or a utensil to avoid burning yourself.
6. Observe the Magic: Now, this is the fun part! Watch as the tarnish starts to disappear. You should see bubbles forming around the silver as the sulfur is transferred to the aluminum foil. The amount of time it takes will depend on the severity of the tarnish. Light tarnish might disappear in just a few minutes, while heavier tarnish could take up to 30 minutes.
7. Check and Rotate: After a few minutes, check the silver. If the tarnish is still present, rotate the items to ensure all surfaces are in contact with the aluminum foil. You might also need to add more baking soda if the solution seems to be losing its effectiveness.
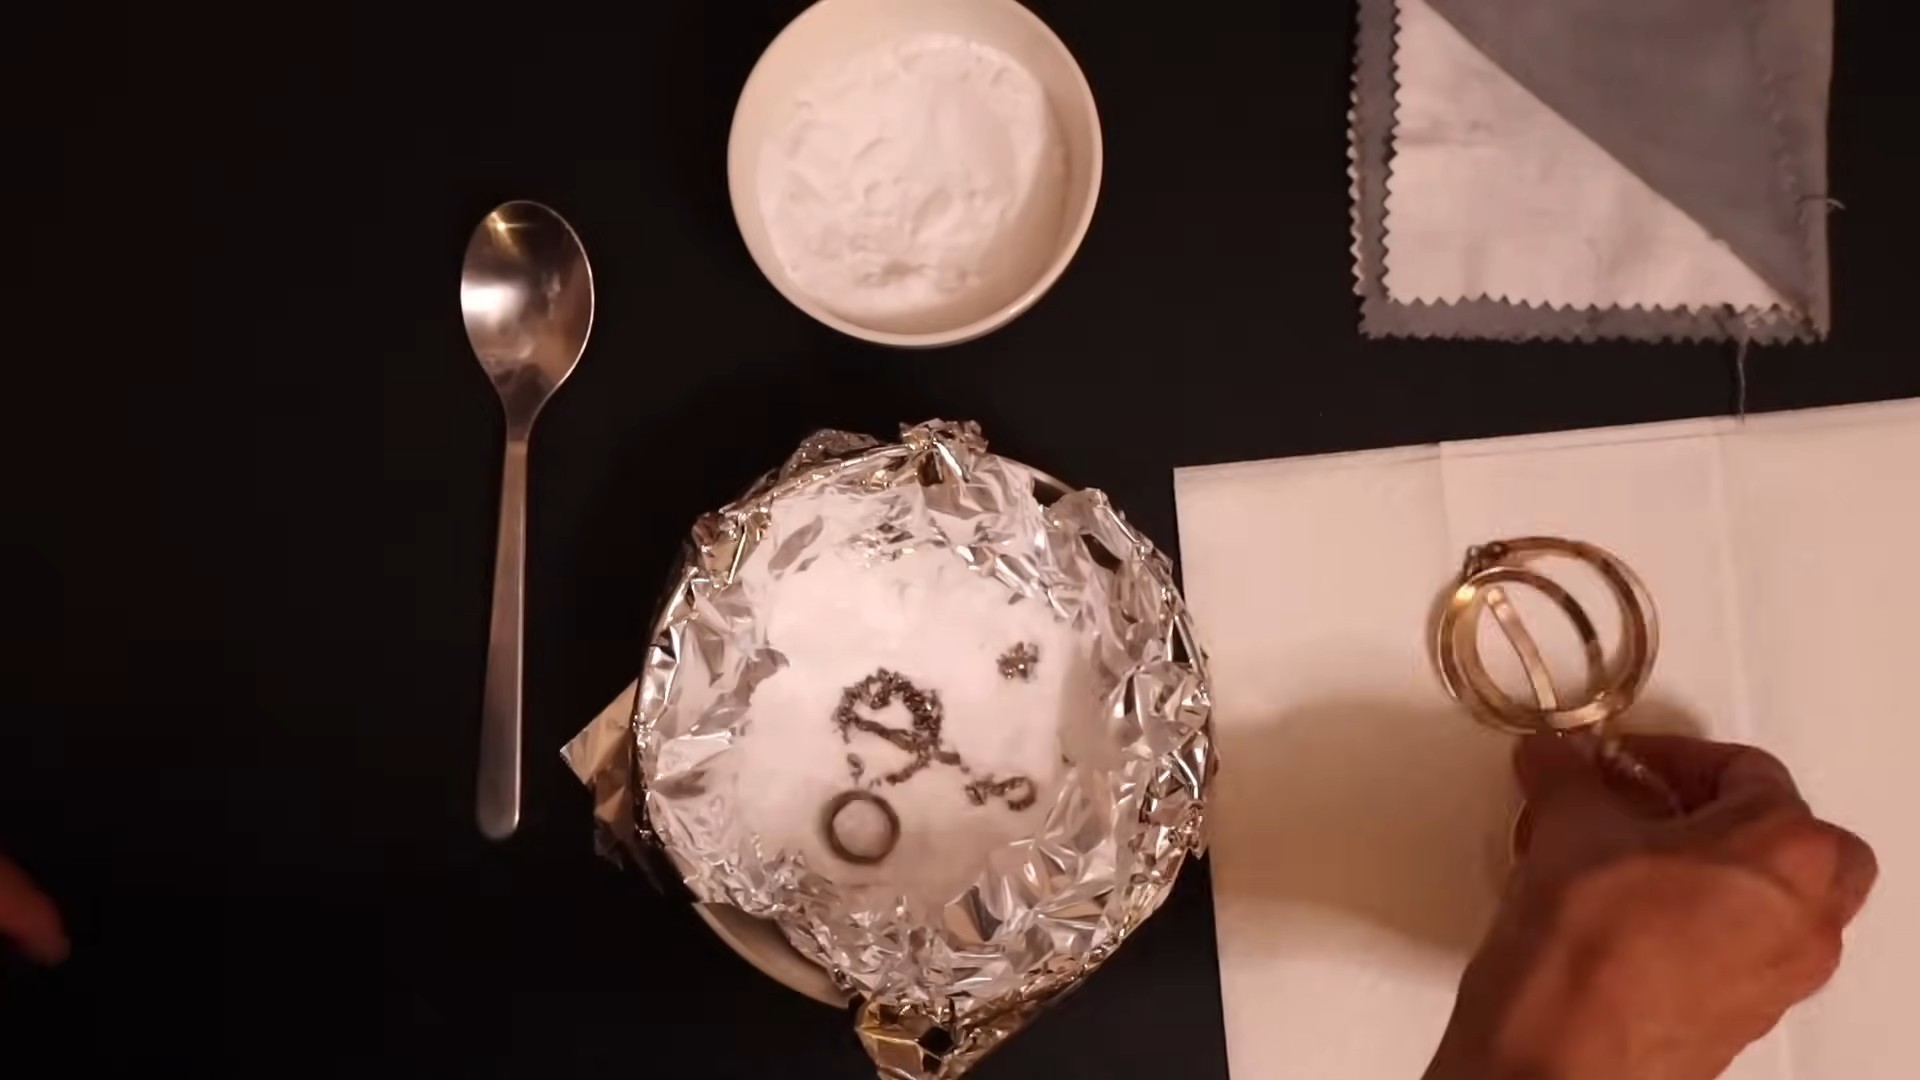
8. Remove and Rinse: Once the tarnish is gone (or significantly reduced), carefully remove the silver items from the bowl using tongs or a utensil. Rinse them thoroughly under warm running water to remove any remaining baking soda residue.
9. Dry and Polish: Pat the silver dry with a soft cloth. For an extra shine, use a silver polishing cloth to buff the surface. This will remove any water spots and bring out the brilliance of the silver.
Dealing with Stubborn Tarnish
Sometimes, the tarnish is just too stubborn for a single treatment. Don’t worry, here are a few tips for tackling those tougher spots:
* Repeat the Process: If the tarnish is still visible after the first treatment, simply repeat the process. You might need to use fresh aluminum foil and baking soda for the best results.
* Increase the Baking Soda Concentration: For particularly stubborn tarnish, try increasing the amount of baking soda you use. Just be careful not to use too much, as it could potentially damage delicate items.
* Use a Soft Brush: For intricate designs or hard-to-reach areas, use a soft-bristled brush (like an old toothbrush) to gently scrub away the tarnish while the silver is submerged in the baking soda solution. Be very gentle to avoid scratching the silver.
* Consider a Silver Polish: If the baking soda method isn’t working, you might need to resort to a commercial silver polish. However, always test the polish on a small, inconspicuous area first to ensure it doesn’t damage the silver. Follow the manufacturer’s instructions carefully.
Important Considerations and Precautions:
Before you start cleaning all your silver, keep these points in mind:
* Not for All Metals: This method is generally safe for sterling silver, but it’s not suitable for all metals. Avoid using it on plated silver, as it can damage the plating. Also, be cautious when cleaning items with gemstones or other delicate materials, as the baking soda solution could potentially harm them.
* Avoid Abrasive Scrubbing: Never use abrasive cleaners or scrub brushes on silver, as they can scratch the surface.
* Handle Boiling Water with Care: Boiling water can cause serious burns. Always use caution when handling it and keep it away from children and pets.
* Ventilation: While the fumes from this process are generally mild, it’s always a good idea to work in a well-ventilated area.
* Disposal: The used baking soda solution can be safely poured down the drain.
Maintaining Your Sparkling Silver:
Now that you’ve got your silver shining like new, here are a few tips to help keep it that way:
* Store Silver Properly: Store your silver in airtight containers or tarnish-resistant bags to minimize exposure to air and sulfur compounds.
* Use Anti-Tarnish Strips: Place anti-tarnish strips in your silver storage containers. These strips absorb sulfur compounds and help prevent tarnish.
* Regular Cleaning: Wipe your silver items with a soft cloth after each use to remove fingerprints and other surface contaminants.
* Avoid Contact with Certain Substances: Certain substances, such as rubber, wool, and some foods, can accelerate tarnishing. Avoid storing silver near these materials.
Troubleshooting:
* Why isn’t the tarnish disappearing? Make sure the silver is in direct contact with the aluminum foil. Also, ensure the water is hot enough and that you’re using enough baking soda.
* The silver is turning a strange color. This is rare, but it can happen if the silver is heavily tarnished or if the solution is too concentrated. Rinse the silver immediately and repeat the process with a weaker solution.
* The aluminum foil is turning black. This is normal! It means the aluminum is doing its job and attracting the sulfur from the silver.
Final Thoughts
I hope this guide has helped you rediscover the beauty of your sterling silver! This baking soda method is a simple, affordable, and effective way to remove tarnish and keep your silver looking its best. Remember to be patient, follow the instructions carefully, and enjoy the process. Happy cleaning!
Conclusion
So, there you have it! A simple, effective, and surprisingly gentle way to restore the shine to your sterling silver using the power of baking soda. Forget harsh chemicals and expensive silver polishes filled with questionable ingredients. This DIY trick, using readily available baking soda, offers a safe and economical alternative that delivers impressive results.
Why is this a must-try? Because it’s more than just cleaning; it’s about preserving the beauty and longevity of your cherished silver pieces. Whether it’s your grandmother’s silverware, a treasured necklace, or a collection of antique spoons, this method allows you to maintain their luster without the risk of scratching or damaging the delicate surface. The gentle action of the baking soda lifts away tarnish, revealing the radiant silver beneath.
But the beauty of this DIY approach lies in its adaptability. Feel free to experiment with variations to suit your specific needs. For heavily tarnished items, you might consider increasing the amount of baking soda or extending the soaking time. If you’re dealing with intricate designs, a soft-bristled toothbrush can be your best friend, gently working the baking soda paste into those hard-to-reach areas. You can also add a small amount of salt to the baking soda paste to boost its cleaning power. Remember to always test a small, inconspicuous area first to ensure compatibility, especially with antique or delicate pieces.
Consider adding a few drops of lemon juice to the baking soda paste for an extra boost of cleaning power. The acidity of the lemon juice can help to dissolve stubborn tarnish. However, be cautious when using lemon juice on silver with gemstones or other delicate embellishments, as it may damage them.
Another variation involves using aluminum foil instead of a baking dish. Line a bowl with aluminum foil, shiny side up, and then follow the same steps as above. The aluminum foil acts as a sacrificial metal, attracting the tarnish away from the silver.
Ultimately, the best way to discover the perfect method for your silver is to experiment and observe the results. The key is to be patient and gentle, allowing the baking soda to work its magic.
We wholeheartedly encourage you to try this DIY trick for cleaning your sterling silver. It’s a rewarding experience that not only restores the beauty of your silver but also connects you to a time-honored tradition of home remedies. Once you’ve witnessed the transformation, we’d love to hear about your experience! Share your before-and-after photos, tips, and variations in the comments below. Let’s create a community of silver enthusiasts who are passionate about preserving the beauty of their treasured possessions using natural and effective methods. Don’t be shy – your insights could help others discover the joy of cleaning sterling silver with baking soda!
Frequently Asked Questions (FAQs)
Q: What exactly is tarnish, and why does it form on sterling silver?
A: Tarnish is a layer of corrosion that forms on the surface of silver and other metals. It’s primarily caused by a chemical reaction between the silver and sulfur-containing compounds in the air. These compounds can come from various sources, including pollution, certain foods (like eggs and onions), and even some fabrics. The sulfur reacts with the silver to form silver sulfide, which appears as a dark, dull coating. Sterling silver, being an alloy containing mostly silver but also some other metals like copper, is particularly susceptible to tarnishing because the copper also reacts with sulfur.
Q: Is cleaning sterling silver with baking soda safe for all types of silver items?
A: Generally, yes, cleaning sterling silver with baking soda is a safe and gentle method for most types of silver items. However, there are a few exceptions to consider. Items with delicate gemstones, pearls, or other sensitive embellishments should be treated with extra caution. The baking soda paste could potentially scratch or damage these materials. It’s always best to test the method on a small, inconspicuous area first to ensure compatibility. For antique or heavily tarnished items, it’s also wise to proceed with caution and avoid excessive scrubbing. If you’re unsure about the suitability of this method for a particular item, consult a professional jeweler or silver restorer.
Q: How often should I clean my sterling silver with baking soda?
A: The frequency of cleaning depends on several factors, including the environment in which the silver is stored and how often it’s used. If you live in an area with high humidity or air pollution, your silver may tarnish more quickly. Similarly, if you frequently use your silverware, it will likely require more frequent cleaning. As a general guideline, cleaning your sterling silver every few months should be sufficient to maintain its shine. However, if you notice significant tarnishing, you can clean it more often. Regular cleaning not only keeps your silver looking its best but also helps to prevent the buildup of heavy tarnish, which can be more difficult to remove.
Q: Can I use this method on silver-plated items?
A: While the baking soda method is generally safe for sterling silver, it’s important to exercise caution when using it on silver-plated items. Silver plating is a thin layer of silver applied over a base metal, and excessive scrubbing or harsh cleaning agents can potentially wear away the plating. If you choose to use the baking soda method on silver-plated items, use a very gentle touch and avoid prolonged soaking. It’s also a good idea to test the method on a small, inconspicuous area first to ensure that it doesn’t damage the plating. For silver-plated items, milder cleaning solutions specifically designed for silver plate may be a safer option.
Q: What’s the best way to store my sterling silver to prevent tarnishing?
A: Proper storage is crucial for preventing tarnish and keeping your sterling silver looking its best. Here are a few tips:
* Store in a cool, dry place: Avoid storing silver in humid environments, as moisture accelerates tarnishing.
* Use airtight containers: Store silver in airtight bags or containers to minimize exposure to air and pollutants.
* Wrap in tarnish-resistant cloth: Special tarnish-resistant cloths are available that absorb sulfur compounds and help prevent tarnishing.
* Add anti-tarnish strips: Anti-tarnish strips contain chemicals that absorb sulfur and other pollutants, helping to protect your silver.
* Avoid storing with rubber or wool: Rubber and wool can contain sulfur compounds that can accelerate tarnishing.
Q: What if the tarnish is really stubborn and doesn’t come off easily?
A: If you’re dealing with stubborn tarnish, there are a few things you can try:
* Increase the concentration of baking soda: Use a higher ratio of baking soda to water to create a more potent cleaning paste.
* Extend the soaking time: Allow the silver to soak in the baking soda solution for a longer period of time, up to several hours.
* Use a soft-bristled toothbrush: Gently scrub the tarnished areas with a soft-bristled toothbrush to help loosen the tarnish.
* Add a small amount of salt: Adding a small amount of salt to the baking soda paste can boost its cleaning power.
* Consider a commercial silver polish: If all else fails, you may need to resort to a commercial silver polish. However, choose a gentle polish specifically designed for sterling silver and follow the manufacturer’s instructions carefully.
Q: Can I use this method to clean other metals besides sterling silver?
A: While this method is primarily designed for cleaning sterling silver, it may also be effective on other metals, such as gold and copper. However, it’s important to exercise caution and test the method on a small, inconspicuous area first to ensure compatibility. Some metals may be more sensitive to baking soda than others. For example, baking soda can potentially damage the finish on some types of plated metals. If you’re unsure about the suitability of this method for a particular metal, consult a professional jeweler or metal restorer.
Q: Is it okay to use baking soda on silver jewelry with delicate stones?
A: It’s generally not recommended to use baking soda directly on silver jewelry with delicate stones. The baking soda paste can be abrasive and may scratch or damage the surface of the stones. Additionally, some stones are porous and can absorb the baking soda solution, which can alter their color or appearance. If you need to clean silver jewelry with delicate stones, it’s best to use a mild soap and water solution and a soft cloth. Gently wipe the jewelry to remove any dirt or grime, and then rinse thoroughly with clean water. You can also consult a professional jeweler for advice on cleaning delicate jewelry.

Leave a Comment