

DIY Bottle Glasses: Ever looked at a discarded glass bottle and thought, “There has to be something cool I can do with that?” I know I have! Instead of tossing them into the recycling bin (though recycling is great!), why not transform them into stylish and unique drinking glasses? This isn’t just a fun craft project; it’s a fantastic way to add a personal touch to your home and impress your guests.
The art of repurposing glass has been around for centuries, with resourceful individuals finding creative ways to give new life to discarded materials. From ancient Roman glassblowing techniques to modern-day upcycling movements, the desire to transform something old into something new is deeply ingrained in our culture.
Let’s be honest, store-bought glassware can be expensive and often lacks character. With this simple DIY bottle glasses trick, you can create a set of personalized glasses that reflect your individual style. Plus, it’s an eco-friendly way to reduce waste and contribute to a more sustainable lifestyle. Who wouldn’t want to sip their favorite beverage from a glass they crafted themselves? So, grab those empty bottles, and let’s get started on this exciting DIY adventure!
DIY Bottle Glasses: Turn Trash into Treasure!
Hey there, fellow DIY enthusiasts! Ever looked at a pile of empty wine bottles and thought, “There has to be a better use for these than just recycling?” Well, you’re in luck! Today, I’m going to walk you through the surprisingly simple process of transforming those discarded bottles into stylish and unique drinking glasses. It’s a fun project, a great conversation starter, and a fantastic way to reduce waste. Let’s get started!
What You’ll Need: The Essential Toolkit
Before we dive in, let’s gather our supplies. Safety is paramount, so make sure you have everything on hand before you begin.
* Empty Glass Bottles: Wine bottles, beer bottles, even some liquor bottles work great. Just make sure they’re clean and dry. Different colors and shapes will give you a variety of glasses.
* Glass Cutting Tool: This is the heart of the operation. You have a few options here:
* Glass Cutting Oil: Essential for lubricating the cutting wheel and ensuring a clean score.
* Bottle Cutting Jig: These are available online and make scoring the bottle much easier and more consistent. They hold the bottle securely and guide the cutting tool.
* Glass Cutting Wheel (Handheld): A more budget-friendly option, but requires a steadier hand.
* Safety Glasses: Absolutely crucial! Glass shards can fly, so protect your eyes.
* Gloves: Protect your hands from cuts and the cold/hot water.
* Sandpaper (Various Grits): We’ll need coarse (around 120 grit), medium (around 220 grit), and fine (around 400 grit) sandpaper to smooth the edges of the glass.
* Water: We’ll be using hot and cold water to separate the bottle.
* Large Pot or Sink: To submerge the bottle in water.
* Ice Cubes: For the cold water bath.
* Towel: To protect your work surface and dry the glass.
* Optional:
* Heat Gun or Candle: Some people find these helpful for encouraging the separation of the glass.
* Polishing Compound: For an extra-smooth, professional finish.
* Cork Coasters: To glue to the bottom of your glasses for added stability and protection.
Scoring the Bottle: The Key to a Clean Break
This is arguably the most important step. A clean, even score will make the separation process much easier.
1. Prepare Your Bottle: Make sure your bottle is clean and dry. Remove any labels. Soaking the bottle in warm, soapy water can help loosen stubborn labels.
2. Set Up Your Cutting Jig (If Using): Adjust the jig to the desired height for your glass. This will determine how tall your finished glass will be.
3. Apply Cutting Oil: Lightly lubricate the cutting wheel with glass cutting oil. This will help it glide smoothly and create a clean score.
4. Score the Bottle:
* Using a Jig: Place the bottle in the jig and gently press the cutting wheel against the glass. Rotate the bottle slowly and steadily, maintaining even pressure. Aim for a single, continuous score line. Avoid going over the same line multiple times, as this can weaken the glass and lead to a jagged break.
* Using a Handheld Cutter: Hold the cutter firmly and press the cutting wheel against the glass. Rotate the bottle slowly and steadily, maintaining even pressure. Again, aim for a single, continuous score line. This method requires a very steady hand.
5. Inspect the Score: Carefully examine the score line. It should be a thin, even line all the way around the bottle. If there are any gaps or inconsistencies, you may need to re-score the bottle (but try to avoid overlapping the score line).
Separating the Bottle: Hot and Cold Shock
This is where the magic happens! The rapid temperature change will cause the glass to separate along the score line.
1. Prepare Your Water Baths: Fill a large pot or sink with very hot water (not boiling, but as hot as you can comfortably handle). Fill another container with ice water.
2. Submerge in Hot Water: Carefully submerge the scored bottle in the hot water, making sure the score line is completely submerged. Rotate the bottle slowly.
3. Submerge in Cold Water: After about 30-60 seconds in the hot water, quickly transfer the bottle to the ice water. Again, make sure the score line is completely submerged and rotate the bottle slowly.
4. Repeat the Process: Continue alternating between the hot and cold water baths, rotating the bottle each time. You should hear a cracking sound as the glass begins to separate.
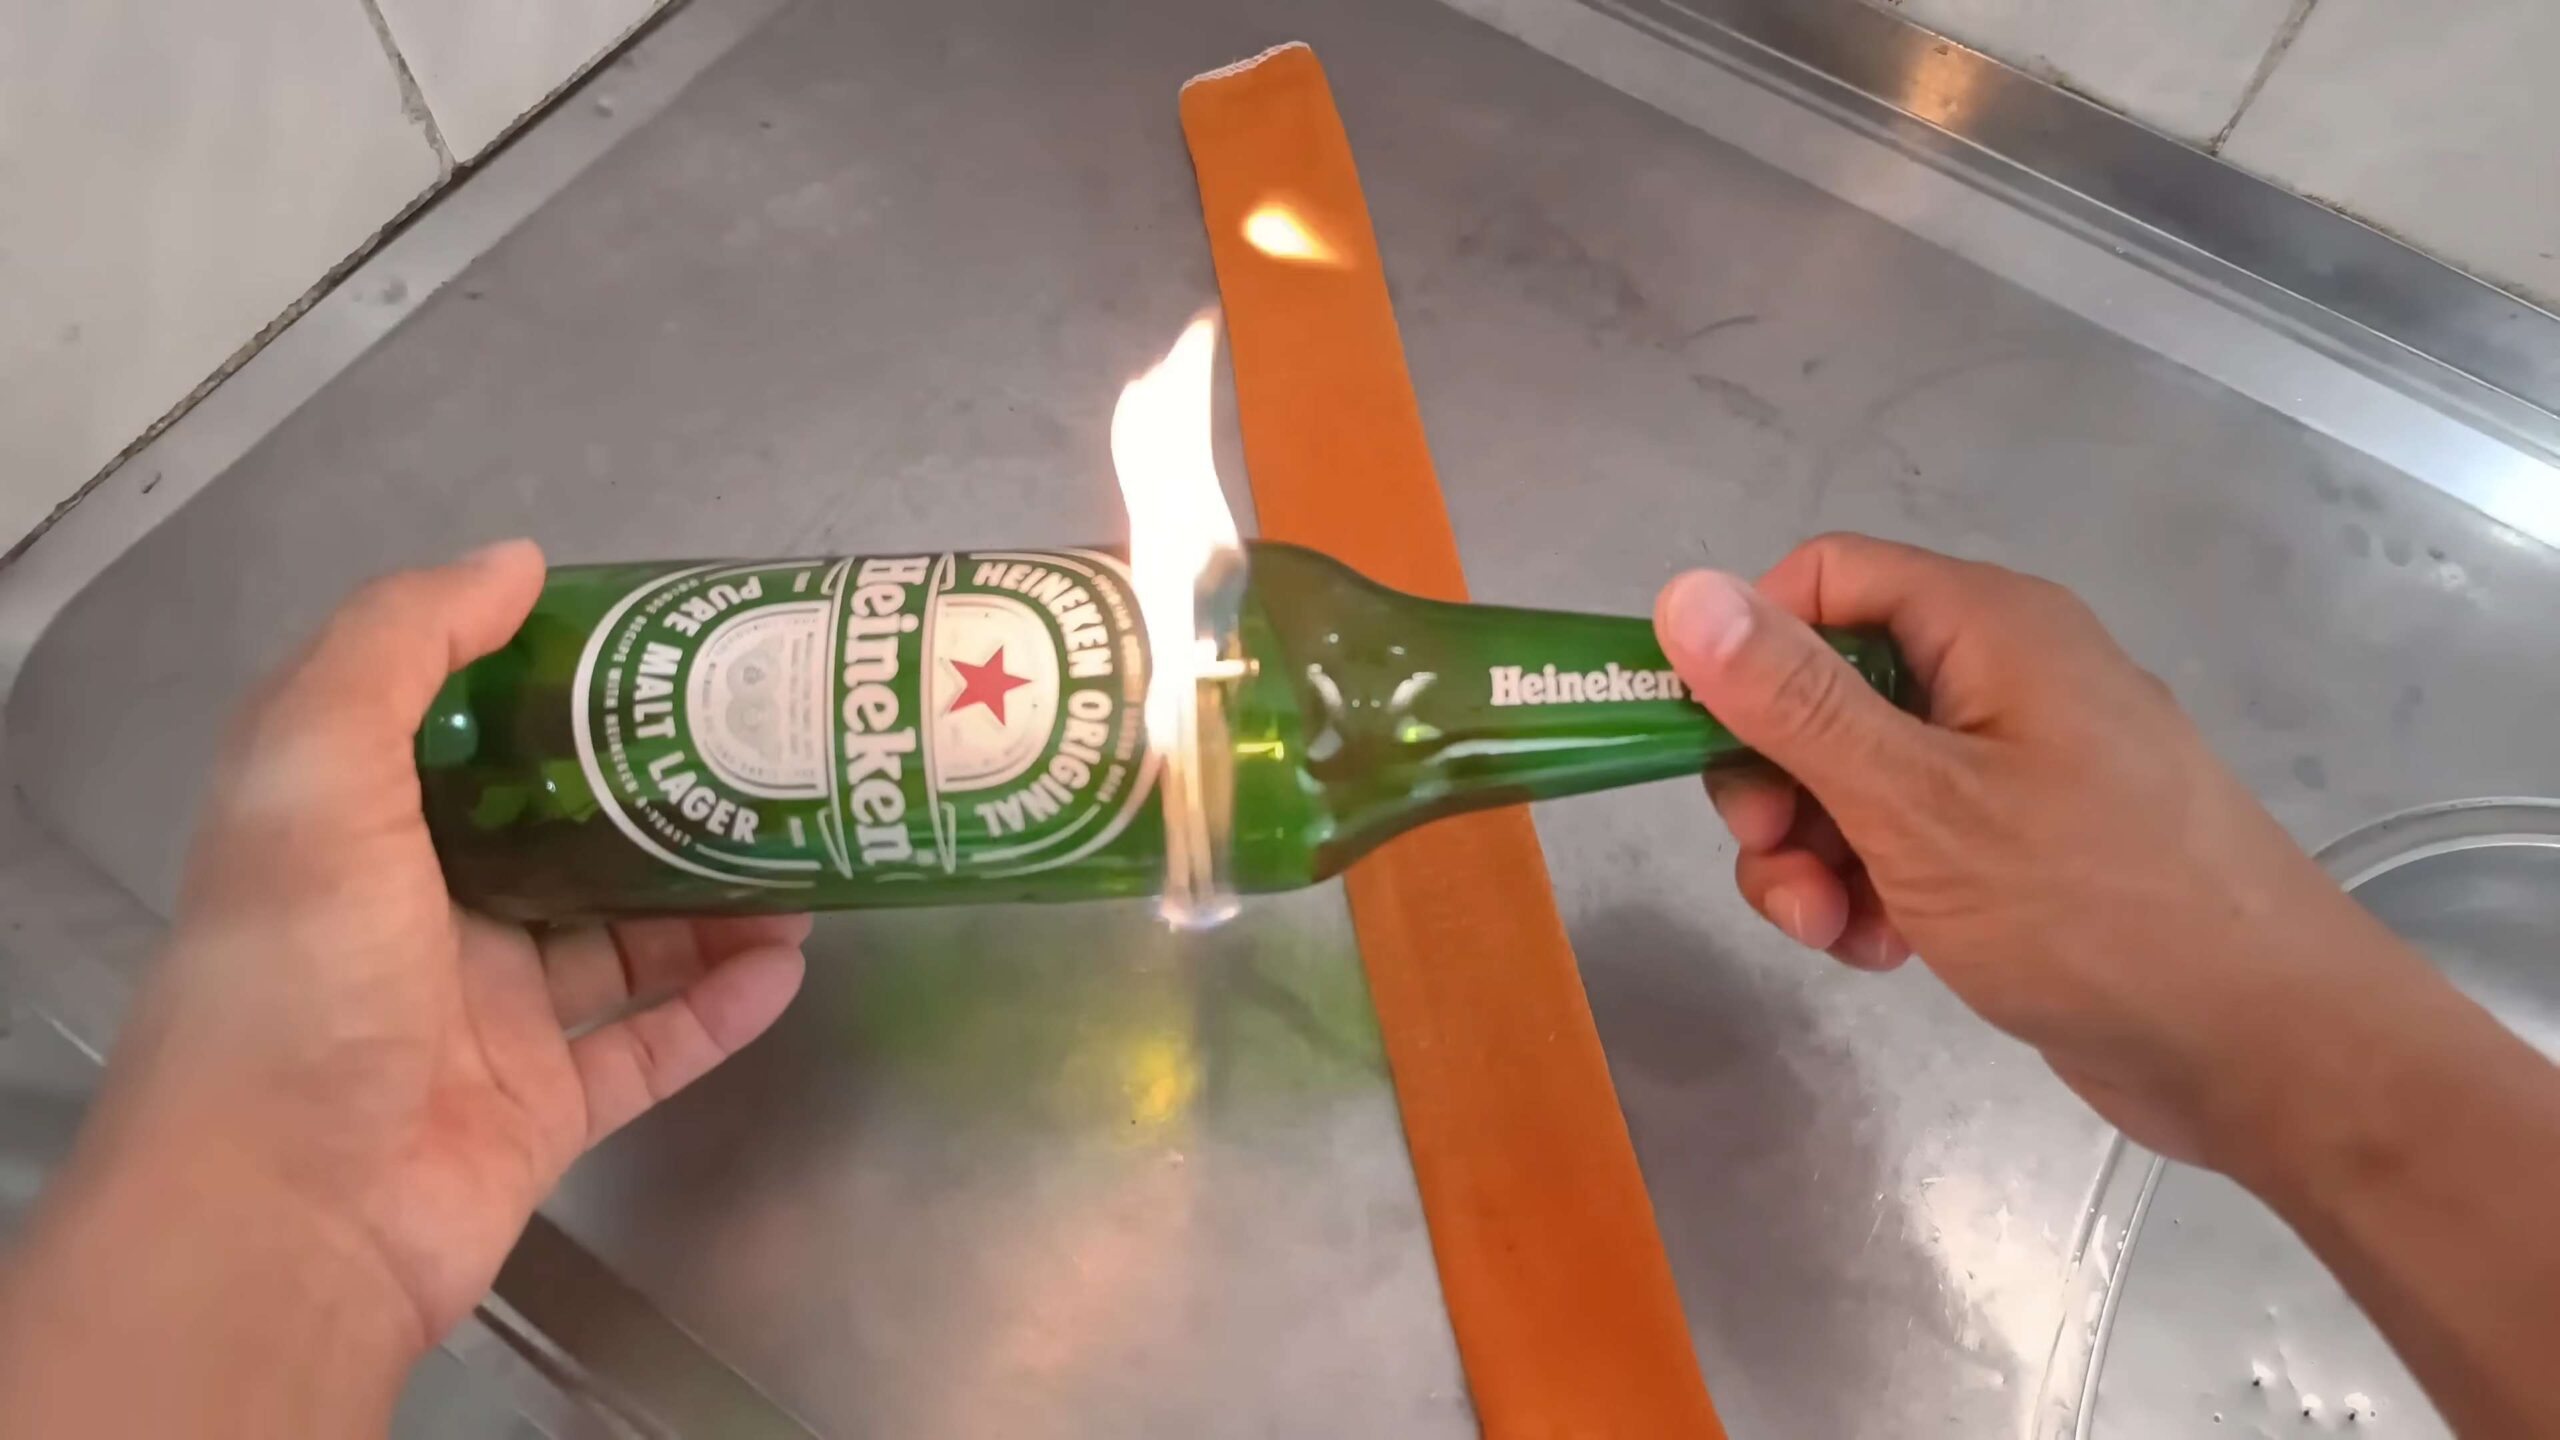
5. Encourage Separation (Optional): If the bottle isn’t separating after a few cycles, you can try using a heat gun or candle to apply heat directly to the score line before submerging it in cold water. Be very careful when using heat, and always wear gloves and safety glasses.
6. Separate the Bottle: Eventually, the bottle should separate cleanly along the score line. If it doesn’t separate completely, you can gently tap the bottle on a hard surface (while wearing gloves and safety glasses) to encourage it to break.
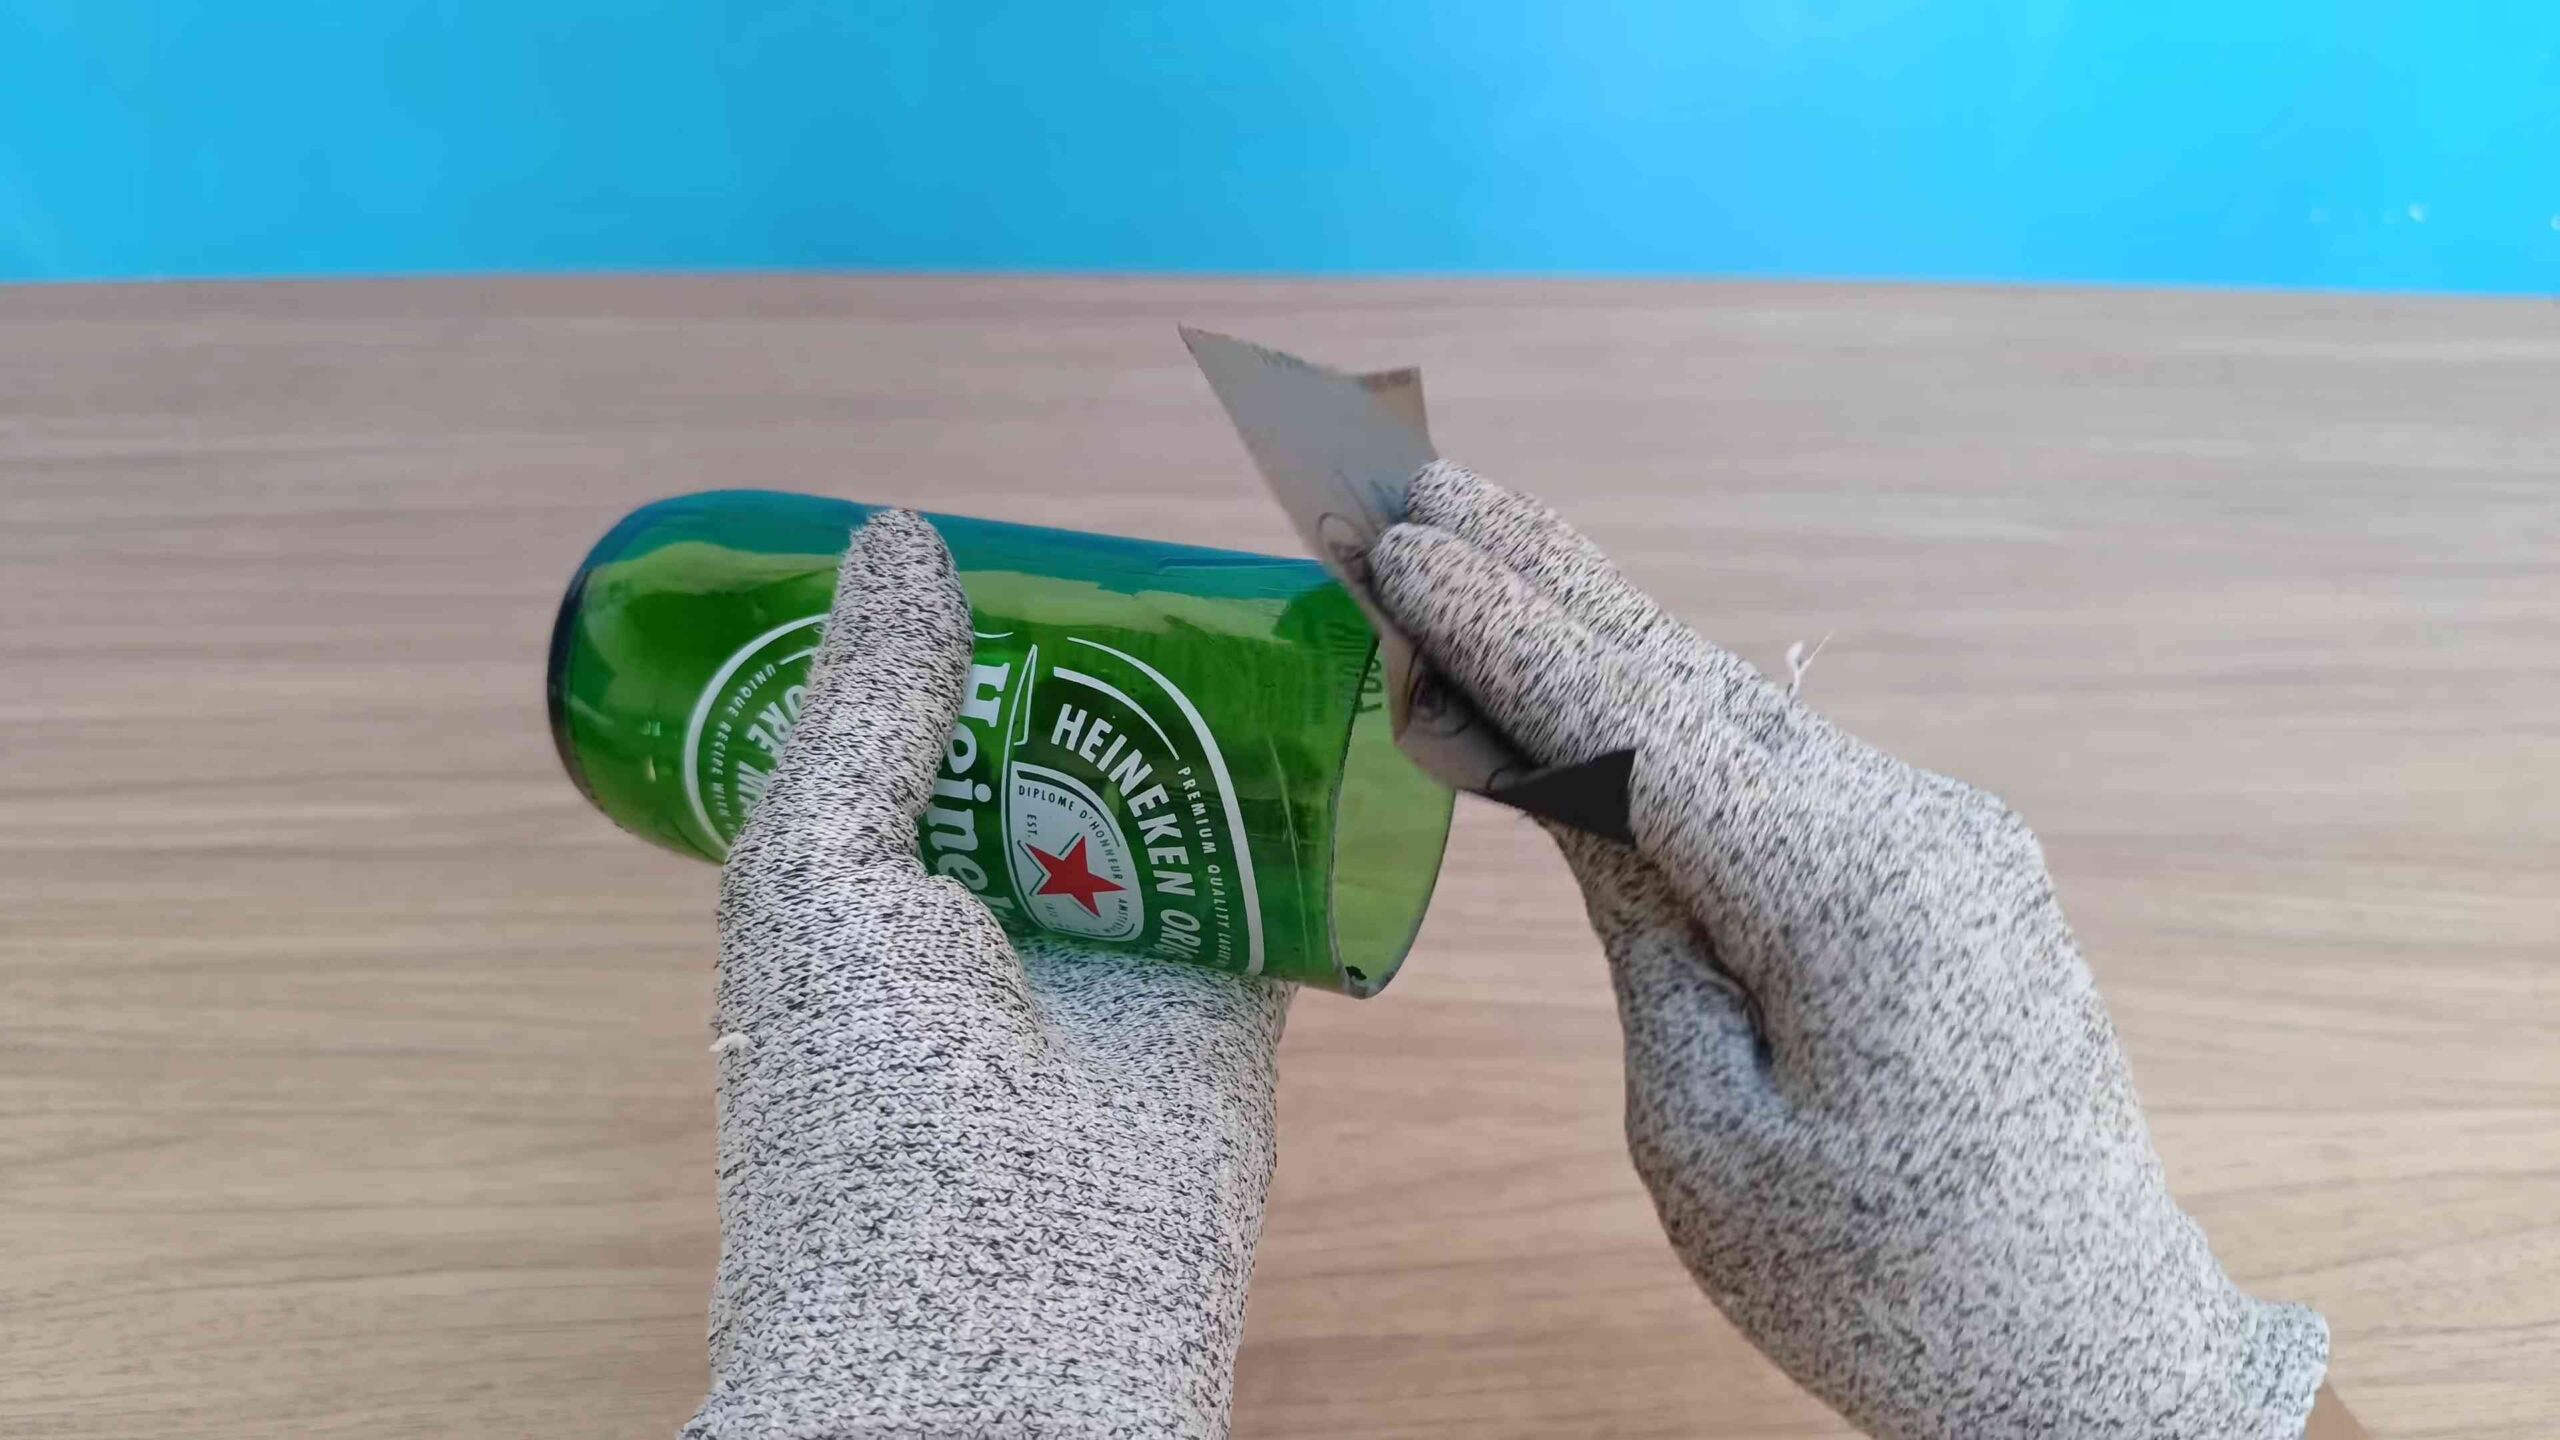
Smoothing the Edges: From Sharp to Safe
Now that you have your glass, it’s time to smooth the edges to make them safe to drink from. This is a crucial step, so don’t skip it!
1. Initial Sanding (Coarse Grit): Start with the coarse sandpaper (120 grit). Wet the sandpaper and the edge of the glass. Sand the edge of the glass in a circular motion, applying even pressure. This will remove any sharp edges and begin to round them off.
2. Medium Grit Sanding: Switch to the medium grit sandpaper (220 grit). Wet the sandpaper and the edge of the glass. Continue sanding in a circular motion, refining the shape of the edge.
3. Fine Grit Sanding: Finally, switch to the fine grit sandpaper (400 grit). Wet the sandpaper and the edge of the glass. Continue sanding in a circular motion, creating a smooth, polished edge.
4. Inspect the Edge: Carefully inspect the edge of the glass. It should be smooth and free of any sharp edges or imperfections. If you find any rough spots, continue sanding with the fine grit sandpaper.
5. Polishing (Optional): For an extra-smooth, professional finish, you can use a polishing compound and a soft cloth to polish the edge of the glass.
Finishing Touches: Adding Your Personal Flair
Now that your glass is smooth and safe, you can add some finishing touches to personalize it.
1. Cleaning: Wash your new glass thoroughly with soap and water.
2. Cork Coasters (Optional): Glue cork coasters to the bottom of your glasses for added stability and protection. This will also prevent them from scratching your furniture.
3. Decoration (Optional): You can decorate your glasses with paint, etching, or other embellishments. Get creative and make them your own!
Important Safety Tips: A Must-Read!
Working with glass can be dangerous, so please keep these safety tips in mind:
* Always wear safety glasses and gloves.
* Work in a well-ventilated area.
* Be careful when handling hot water and sharp objects.
* Dispose of glass shards properly.
* If you’re not comfortable with any of these steps, don’t hesitate to ask for help.
And there you have it! You’ve successfully transformed an empty bottle into a stylish and unique drinking glass. Enjoy your new creation, and remember to always drink responsibly! This project is not only fun but also a great way to reduce waste and add a personal touch to your home. Happy crafting!
Conclusion
So, there you have it! Transforming ordinary glass bottles into stylish and functional drinking glasses is not only incredibly satisfying but also a fantastic way to reduce waste and add a personal touch to your home. This DIY bottle glasses project is more than just a craft; it’s a statement about sustainability and creativity.
Why is this a must-try? Firstly, it’s budget-friendly. Instead of throwing away empty bottles, you’re repurposing them into something useful and beautiful. Secondly, it’s customizable. You have complete control over the size, shape, and even the finish of your glasses. Want a set of elegant wine glasses? Use wine bottles. Prefer something more rustic? Beer bottles will do the trick. The possibilities are endless!
But the benefits extend beyond just aesthetics and cost. By engaging in this DIY project, you’re actively participating in reducing landfill waste and promoting a more sustainable lifestyle. Imagine the satisfaction of serving drinks to your guests in glasses you crafted yourself. It’s a conversation starter, a testament to your resourcefulness, and a unique addition to your home decor.
Looking for variations? Consider etching designs onto the glass for a personalized touch. You can use stencils and etching cream to create intricate patterns or simply freehand your own designs. Another option is to paint the base of the glasses with glass paint for a pop of color. For a more sophisticated look, try adding a gold or silver rim using a specialized glass paint pen. You could even experiment with different cutting techniques to create glasses with unique shapes and angles. Remember to always prioritize safety when working with glass.
Don’t be intimidated by the process. With the right tools and a little patience, anyone can create stunning DIY bottle glasses. The key is to take your time, follow the instructions carefully, and prioritize safety. And remember, even if your first attempt isn’t perfect, that’s okay! It’s all part of the learning process. Each glass you create will be a unique reflection of your creativity and effort.
We wholeheartedly encourage you to give this DIY project a try. It’s a rewarding experience that combines creativity, sustainability, and practicality. Once you’ve created your own set of DIY bottle glasses, we’d love to hear about your experience! Share your photos and tips on social media using #DIYBottleGlasses and inspire others to join the movement. Let’s transform our trash into treasure, one glass at a time! We are confident that you will enjoy the process and the end result. So grab those empty bottles, gather your tools, and get ready to unleash your inner artist. You might just surprise yourself with what you can create!
Frequently Asked Questions (FAQ)
What types of bottles are best for making DIY bottle glasses?
The best types of bottles for making DIY bottle glasses are those with smooth, even surfaces and minimal imperfections. Wine bottles, beer bottles, and some types of soda bottles work well. Avoid bottles with heavily textured surfaces or those that are unusually thin, as they may be more prone to cracking during the cutting process. Also, consider the size and shape of the bottle based on the type of glass you want to create. Taller bottles are suitable for highball glasses, while shorter, wider bottles are better for tumblers. Clear glass is generally easier to work with and allows for more creative customization options, but colored glass can also add a unique aesthetic.
Is it safe to drink from DIY bottle glasses?
Yes, it is generally safe to drink from DIY bottle glasses, but only if you take the necessary precautions to ensure that the edges are smooth and free of any sharp points. The most important step is to properly sand and polish the cut edge of the glass to eliminate any potential hazards. Use progressively finer grits of sandpaper, starting with a coarse grit to remove any large imperfections and finishing with a very fine grit to create a smooth, rounded edge. You can also use a glass polishing compound for an extra layer of safety and smoothness. If you are unsure about the safety of your finished glasses, it’s best to err on the side of caution and use them for decorative purposes only. Always inspect your glasses regularly for any chips or cracks, and discard them if you find any damage.
What tools do I need to make DIY bottle glasses?
The essential tools for making DIY bottle glasses include a glass bottle cutter, sandpaper (various grits), safety glasses, gloves, and a source of hot and cold water. A glass bottle cutter is used to score a line around the bottle where you want to make the cut. Sandpaper is used to smooth and polish the cut edge of the glass. Safety glasses and gloves are crucial for protecting your eyes and hands from glass shards. The hot and cold water are used to create thermal shock, which helps to separate the bottle along the scored line. Optional tools include a glass polishing compound, a power sander (for faster sanding), and stencils or etching cream for adding decorative designs.
How do I prevent the glass from shattering during the cutting process?
To prevent the glass from shattering during the cutting process, it’s important to apply even pressure when scoring the bottle with the glass cutter. Avoid pressing too hard, as this can weaken the glass and increase the risk of shattering. When applying the hot and cold water, alternate between the two gradually, allowing the glass to adjust to the temperature changes. Avoid sudden, drastic temperature changes, as this can also cause the glass to shatter. If you notice any cracks forming in the glass, stop the process immediately and discard the bottle. It’s also a good idea to practice on a few scrap bottles before attempting to cut a bottle that you want to use for your final project.
How can I add decorative designs to my DIY bottle glasses?
There are several ways to add decorative designs to your DIY bottle glasses. One popular method is to use etching cream and stencils. Simply apply the stencil to the glass, apply the etching cream according to the manufacturer’s instructions, and then rinse off the cream to reveal the etched design. Another option is to use glass paint to create colorful patterns or designs. You can use paintbrushes, sponges, or even stencils to apply the paint. For a more permanent design, bake the glasses in the oven according to the paint manufacturer’s instructions. You can also use glass markers to draw intricate designs directly onto the glass. Remember to clean the glass thoroughly before applying any decorative elements.
How do I clean my DIY bottle glasses?
Cleaning your DIY bottle glasses is similar to cleaning regular glassware. Hand washing is generally recommended, especially if you have added any decorative elements that may be sensitive to high temperatures or harsh chemicals. Use warm, soapy water and a soft sponge or cloth to gently clean the glasses. Avoid using abrasive cleaners or scouring pads, as these can scratch the glass. If you choose to wash your glasses in the dishwasher, place them on the top rack and use a gentle cycle. Be sure to inspect your glasses regularly for any chips or cracks, and discard them if you find any damage.
What if I don’t have a glass bottle cutter? Are there alternative methods?
While a glass bottle cutter is the most reliable and precise tool for cutting bottles, there are alternative methods you can try if you don’t have one. One method involves using a string soaked in flammable liquid (like acetone or rubbing alcohol), tying it around the bottle where you want to cut it, lighting the string on fire, and then quickly plunging the bottle into cold water. This creates thermal shock, which can cause the bottle to break along the string line. However, this method is less precise and more prone to shattering, so it’s important to exercise extreme caution. Another alternative is to use a tile saw with a diamond blade, but this requires specialized equipment and experience. For best results and safety, investing in a glass bottle cutter is highly recommended.
Leave a Comment