

DIY Broken Cup Key Holder: Transform Trash into Treasure!
Have you ever accidentally shattered a beloved teacup, leaving you heartbroken and wondering what to do with the pieces? Don’t toss it! I’m here to show you how to breathe new life into those fragments and create a charming and functional DIY broken cup key holder. This isn’t just about recycling; it’s about turning a mishap into a unique piece of art for your home.
The art of repurposing broken items has roots stretching back centuries. In Japanese culture, the practice of Kintsugi celebrates imperfections by repairing broken pottery with gold, highlighting the cracks as part of the object’s history. While we won’t be using gold (unless you’re feeling fancy!), we’ll be embracing a similar philosophy: transforming something broken into something beautiful and useful.
Let’s face it, keys have a knack for disappearing! How many times have you frantically searched for them just as you’re about to leave the house? A dedicated key holder solves this daily dilemma, keeping your keys organized and easily accessible. But why settle for a boring, store-bought key holder when you can create a personalized one that tells a story? This DIY broken cup key holder is not only practical but also adds a touch of whimsy and personality to your entryway. Plus, it’s a fantastic conversation starter! So, gather your broken cup pieces, and let’s get crafting!
Turn a Broken Cup into a Charming Key Holder
Okay, so you’ve got a chipped or cracked teacup that’s too pretty to toss, right? I totally get it! Instead of letting it gather dust in the back of a cabinet, let’s give it a new life as a super cute and functional key holder. This DIY project is surprisingly easy, and it adds a touch of vintage charm to your entryway. Plus, it’s a great way to upcycle!
Materials You’ll Need:
* A broken teacup (handle intact is a plus!)
* A small saucer (matching the teacup is ideal, but contrasting can be fun too!)
* Strong adhesive (epoxy or construction adhesive works best)
* Drill with appropriate drill bits (for ceramic/tile and wood, depending on your wall)
* Screws and wall anchors (if needed, depending on your wall type)
* Small hooks (cup hooks or decorative hooks – choose your style!)
* Pencil or marker
* Ruler or measuring tape
* Safety glasses
* Gloves (optional, but recommended for working with adhesive)
* Sandpaper (optional, for smoothing any rough edges)
* Hammer (if using wall anchors)
Choosing Your Teacup and Saucer:
The beauty of this project is that you can customize it to your own taste. I personally love using vintage teacups with floral patterns, but anything goes! Just make sure the teacup isn’t *completely* shattered – you need a decent portion of it intact to hold the hooks. The saucer should be slightly larger than the base of the teacup for stability.
Step-by-Step Instructions:
Phase 1: Preparing the Teacup and Saucer
1. Clean the Teacup and Saucer: Start by thoroughly cleaning both the teacup and saucer with soap and water. Make sure they are completely dry before moving on. This will help the adhesive bond properly. I like to use a degreasing dish soap to remove any lingering oils or residue.
2. Sand Rough Edges (Optional): If your teacup has any sharp or jagged edges from the break, gently sand them down with fine-grit sandpaper. This will prevent any accidental cuts later on. Be careful not to apply too much pressure, as you don’t want to further damage the teacup.
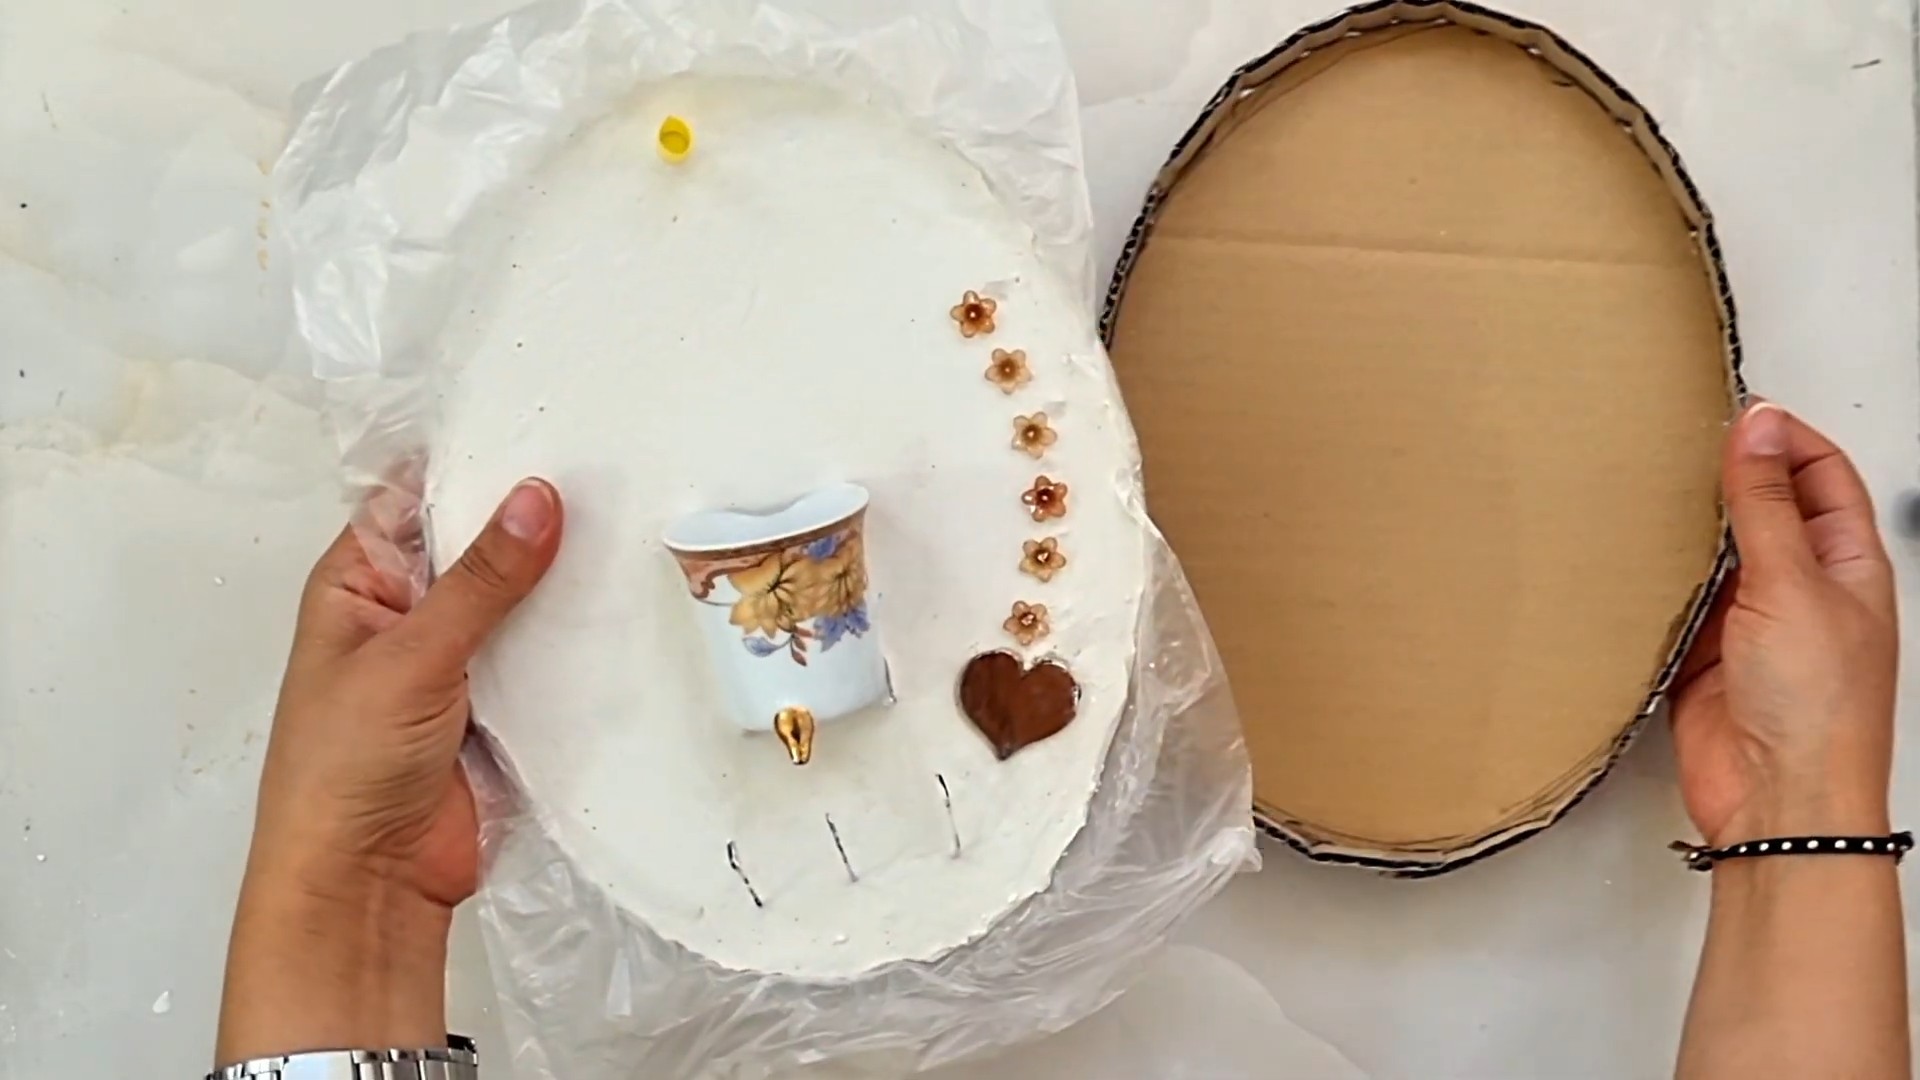
3. Dry Fit the Teacup to the Saucer: Before applying any adhesive, position the teacup on the saucer to see how it looks and feels. Experiment with different angles until you find a placement you like. I usually center the teacup, but you can offset it for a more whimsical look.
Phase 2: Adhering the Teacup to the Saucer
1. Apply Adhesive: Now comes the sticky part! Put on your gloves (if using) and carefully apply a generous amount of adhesive to the bottom of the teacup where it will meet the saucer. Make sure to cover the entire surface area for a strong bond. I prefer using epoxy because it’s super strong and durable, but construction adhesive works well too. Just follow the manufacturer’s instructions for application.
2. Position and Secure: Carefully place the teacup onto the saucer in your desired position. Press down firmly for a few seconds to ensure good contact.
3. Support and Cure: To ensure the teacup stays in place while the adhesive cures, you can use masking tape to secure it to the saucer. Wrap the tape around the teacup and saucer, applying gentle pressure. Let the adhesive cure completely according to the manufacturer’s instructions. This usually takes at least 24 hours, but it’s always best to err on the side of caution. I know it’s tempting to peek, but resist the urge to move it until it’s fully cured!
Phase 3: Adding the Hooks
1. Mark Hook Placement: Once the adhesive is fully cured, it’s time to add the hooks. Decide how many hooks you want and where you want to place them on the teacup. Use a pencil or marker to mark the spots where you’ll be attaching the hooks. Consider the size of your keys and how much space you’ll need between each hook.
2. Pre-Drill Pilot Holes (If Necessary): Depending on the type of hooks you’re using and the material of your teacup, you may need to pre-drill pilot holes. This is especially important if you’re using ceramic or porcelain, as drilling directly into it can cause it to crack. Use a drill bit specifically designed for ceramic or tile, and drill slowly and carefully. If you’re using self-tapping hooks, you may be able to skip this step.
3. Attach the Hooks: Now, carefully screw the hooks into the teacup at the marked locations. If you pre-drilled pilot holes, this should be relatively easy. If you’re using self-tapping hooks, apply gentle pressure and turn the hook until it’s securely in place. Be careful not to overtighten the hooks, as this could damage the teacup.
Phase 4: Mounting the Key Holder to the Wall
1. Determine Mounting Location: Choose a spot near your entryway where you want to hang your new key holder. Consider the height and accessibility. I usually hang mine at eye level for easy access.
2. Mark Mounting Holes: Hold the key holder against the wall and mark the locations for the mounting holes. You can either drill directly through the saucer (if it’s thin enough) or use a separate mounting bracket. If you’re drilling through the saucer, use a drill bit specifically designed for ceramic or tile.
3. Drill Pilot Holes in the Wall: Using a drill bit appropriate for your wall type (drywall, plaster, wood, etc.), drill pilot holes at the marked locations. If you’re drilling into drywall or plaster, you’ll need to use wall anchors to provide extra support.
4. Insert Wall Anchors (If Necessary): If you’re using wall anchors, insert them into the pilot holes according to the manufacturer’s instructions. This usually involves tapping them in with a hammer until they’re flush with the wall.
5. Mount the Key Holder: Align the mounting holes in the saucer (or mounting bracket) with the pilot holes in the wall. Insert screws through the saucer (or bracket) and into the wall anchors (or directly into the wall if you’re not using anchors). Tighten the screws until the key holder is securely mounted to the wall. Don’t overtighten, as this could crack the saucer or damage the wall.
Tips and Tricks:
* Reinforce the Bond: For extra security, you can add a bead of clear silicone caulk around the base of the teacup where it meets the saucer. This will help prevent water from seeping in and weakening the adhesive.
* Customize Your Hooks: Get creative with your hook choices! You can use vintage-style cup hooks, decorative knobs, or even repurposed hardware.
* Add a Backing: If you’re worried about the saucer scratching your wall, you can attach a piece of felt or cork to the back of it.
* Consider the Weight: Be mindful of the weight of your keys and choose hooks and mounting hardware that can support the load.
* Safety First: Always wear safety glasses when drilling and sanding. And be careful when working with sharp objects and adhesives.
Alternative Mounting Methods:
* Command Strips: If you don’t want to drill holes in your wall, you can use heavy-duty Command Strips to mount the key holder. Just make sure to choose strips that are rated for the weight of your key holder and keys.
* Picture Hanging Hooks: You can also use picture hanging hooks to hang the key holder. Simply attach a D-ring or wire to the back of the saucer and hang it on the hook.
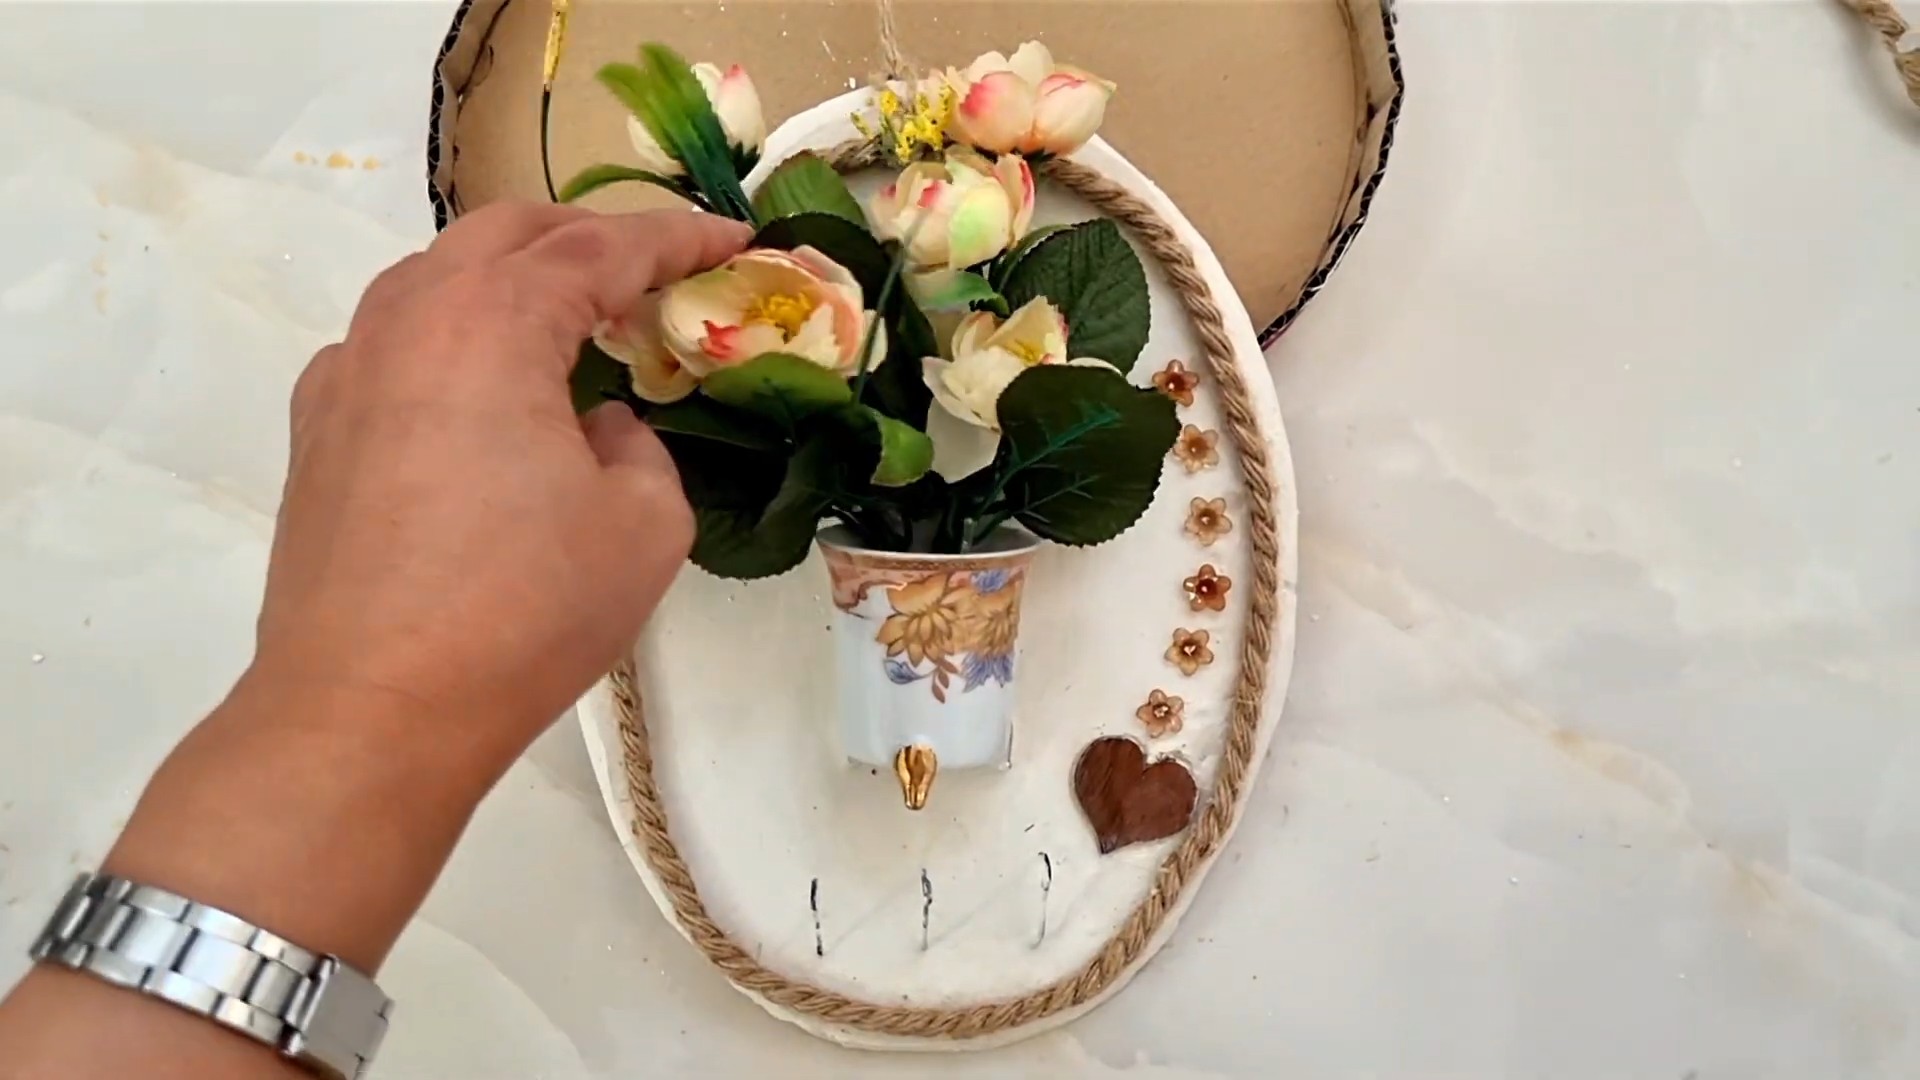
Enjoy Your New Key Holder!
And there you have it! A charming and unique key holder made from a broken teacup. I love how this project gives new life to something that would otherwise be discarded. Plus, it’s a great conversation starter! Now you’ll never have to search for your keys again. Happy crafting!
Conclusion
So, there you have it! Transforming a broken cup into a charming and functional key holder is not just a clever way to recycle; it’s a statement piece that adds personality and a touch of whimsy to your entryway. This DIY broken cup key holder project is more than just a craft; it’s an exercise in resourcefulness, creativity, and adding a personal touch to your home decor.
Why is this a must-try? Because it’s incredibly simple, budget-friendly, and yields surprisingly beautiful results. Instead of tossing that chipped or cracked teacup into the trash, you’re giving it a new lease on life, transforming it from a discarded item into a conversation starter. Think about the satisfaction of knowing you created something unique and useful from something that would have otherwise been wasted. That feeling alone makes this project worthwhile.
But the beauty of this DIY project lies in its versatility. Feel free to experiment with different types of cups. Vintage teacups, mismatched mugs, even small bowls can be repurposed using this method. Consider painting the cup with acrylic paints to match your existing decor or adding embellishments like beads, glitter, or decoupage for an extra touch of flair. For a more rustic look, you could even use a chipped enamel mug.
Another variation involves the type of mounting hardware you use. While we suggested hooks, you could also use small knobs or even decorative nails, depending on the style you’re aiming for. If you’re feeling particularly ambitious, you could create a small wooden backing board to mount the cup onto, providing a more stable and visually appealing base. This allows you to add further decorative elements, such as stencils, paint washes, or even small shelves for holding mail or other small items.
Don’t be afraid to get creative with the placement of your key holder. While the entryway is a classic choice, consider placing one in your kitchen for holding oven mitts or dish towels, or in your bathroom for hanging jewelry or small toiletries. The possibilities are truly endless.
We wholeheartedly encourage you to give this DIY project a try. It’s a fantastic way to unleash your inner artist, reduce waste, and add a touch of personality to your home. And most importantly, we want to hear about your experience! Share your creations with us on social media using #DIYCupKeyHolder. We can’t wait to see the unique and imaginative ways you transform your broken cups into beautiful and functional key holders. Let’s inspire each other to embrace creativity and sustainability, one broken cup at a time! Remember, the best DIY projects are those that reflect your individual style and personality. So, grab that broken cup, gather your supplies, and let your imagination run wild! You might be surprised at what you can create.
Frequently Asked Questions (FAQ)
What kind of glue is best for attaching the cup to the wall?
For securely attaching the cup to the wall, we highly recommend using a strong adhesive like epoxy or a construction adhesive specifically designed for bonding dissimilar materials (like ceramic to wood or drywall). Make sure the adhesive is waterproof and heat-resistant for long-lasting durability. Follow the manufacturer’s instructions carefully, and allow ample drying time before hanging anything on the key holder. Avoid using hot glue, as it may not provide a strong enough bond and could melt under warmer conditions. Consider using a combination of adhesive and screws for added security, especially if you plan to hang heavier items.
How do I prevent the cup from breaking further during the process?
Handle the broken cup with extreme care to prevent further damage. Wear gloves to protect your hands from sharp edges. Before starting, clean the broken edges with a damp cloth to remove any loose debris. When applying adhesive, avoid putting excessive pressure on the fragile areas. If the cup is severely cracked, consider reinforcing it with masking tape or painter’s tape before applying the adhesive. Work on a soft surface, like a towel or a padded mat, to cushion the cup and prevent it from sliding or bumping against hard surfaces.
What if I don’t have a broken cup? Can I intentionally break one?
While the purpose of this DIY project is to repurpose broken items, you can certainly use a cup that isn’t already broken. However, we strongly advise against intentionally breaking a perfectly good cup. Instead, consider purchasing a slightly damaged or inexpensive cup from a thrift store or a discount retailer. This way, you’re still giving a discarded item a new purpose without creating unnecessary waste. If you do decide to break a cup, do so with extreme caution. Wrap the cup in a thick towel and use a hammer to gently tap it until it cracks. Wear safety glasses and gloves to protect yourself from flying shards.
Can I use this method for other types of broken ceramics?
Absolutely! This method can be adapted for various types of broken ceramics, such as plates, bowls, or even decorative figurines. The key is to choose a piece that has a relatively flat surface for mounting and that is sturdy enough to hold the weight of the items you plan to hang. You may need to adjust the type of adhesive and mounting hardware depending on the size and weight of the ceramic piece. For larger or heavier items, consider using multiple mounting points for added stability.
How do I clean the key holder once it’s mounted?
To clean your DIY broken cup key holder, simply wipe it down with a damp cloth. Avoid using harsh chemicals or abrasive cleaners, as they could damage the finish or the adhesive. For stubborn stains, you can use a mild soap and water solution. Be sure to dry the key holder thoroughly after cleaning to prevent water spots or mildew growth. Regularly dusting the key holder will also help to keep it looking its best.
What are some other creative uses for broken cups?
Besides key holders, broken cups can be repurposed in numerous creative ways. You can use the shards to create mosaic art, embellish picture frames, or decorate flower pots. Smaller pieces can be incorporated into jewelry, such as pendants or earrings. You can also use broken cups as planters for succulents or small herbs. The possibilities are truly endless, limited only by your imagination. Search online for “broken china crafts” or “repurposing broken ceramics” for even more inspiration.
How do I ensure the key holder is securely mounted to the wall?
Proper wall mounting is crucial for the safety and functionality of your key holder. Before you begin, determine the type of wall you’re working with (drywall, plaster, wood, etc.). For drywall, use drywall anchors to provide a secure hold for the screws. For plaster walls, use plaster screws or anchors. For wood walls, you can screw directly into the studs. Make sure the screws are long enough to penetrate the wall deeply enough to provide adequate support. Use a level to ensure the key holder is mounted straight. If you’re unsure about the best mounting method for your wall type, consult a hardware store professional.
Is this project suitable for children?
This project involves working with broken glass and strong adhesives, so it’s not recommended for young children. Older children can participate with close adult supervision, but they should be instructed on the proper safety precautions. Always wear gloves and safety glasses when handling broken glass, and ensure that the work area is well-ventilated when using adhesives. Consider having children focus on the decorating aspect of the project, such as painting or embellishing the cup, while an adult handles the more hazardous tasks.
Leave a Comment