

DIY Canvas Art: Unleash your inner artist and transform your living space with stunning, personalized masterpieces! Have you ever looked at a blank canvas and felt a surge of creative energy, only to be intimidated by the thought of expensive art supplies or complicated techniques? I know I have! But fear not, because this guide is packed with easy and affordable DIY canvas art ideas that anyone can create, regardless of their artistic background.
The desire to decorate our homes with unique and meaningful art is as old as civilization itself. From ancient cave paintings to Renaissance frescoes, humans have always sought to express themselves through visual mediums. While the tools and styles have evolved, the fundamental need to personalize our surroundings remains constant. In today’s world, where mass-produced items often dominate, DIY canvas art offers a refreshing opportunity to create something truly one-of-a-kind.
Why should you dive into the world of DIY canvas art? Because it’s not just about filling empty wall space; it’s about expressing your personality, adding a touch of warmth and character to your home, and even saving money! Let’s face it, original artwork can be incredibly expensive. But with a little creativity and these simple DIY tricks, you can achieve gallery-worthy results without breaking the bank. Plus, creating your own art is incredibly therapeutic and rewarding. So, grab your brushes, gather your supplies, and let’s embark on a colorful journey of self-expression!
DIY Canvas Art: Unleash Your Inner Artist (Even if You Think You Don’t Have One!)
Okay, let’s be honest. Sometimes those blank canvases staring back at you can be intimidating. But trust me, creating your own canvas art is way easier (and more fun!) than you might think. I’m going to walk you through a few different techniques that are perfect for beginners, and even if you consider yourself an artist, you might find some new inspiration here! We’ll cover everything from abstract painting to using stencils, so you’re sure to find something that sparks your creativity.
Materials You’ll Need
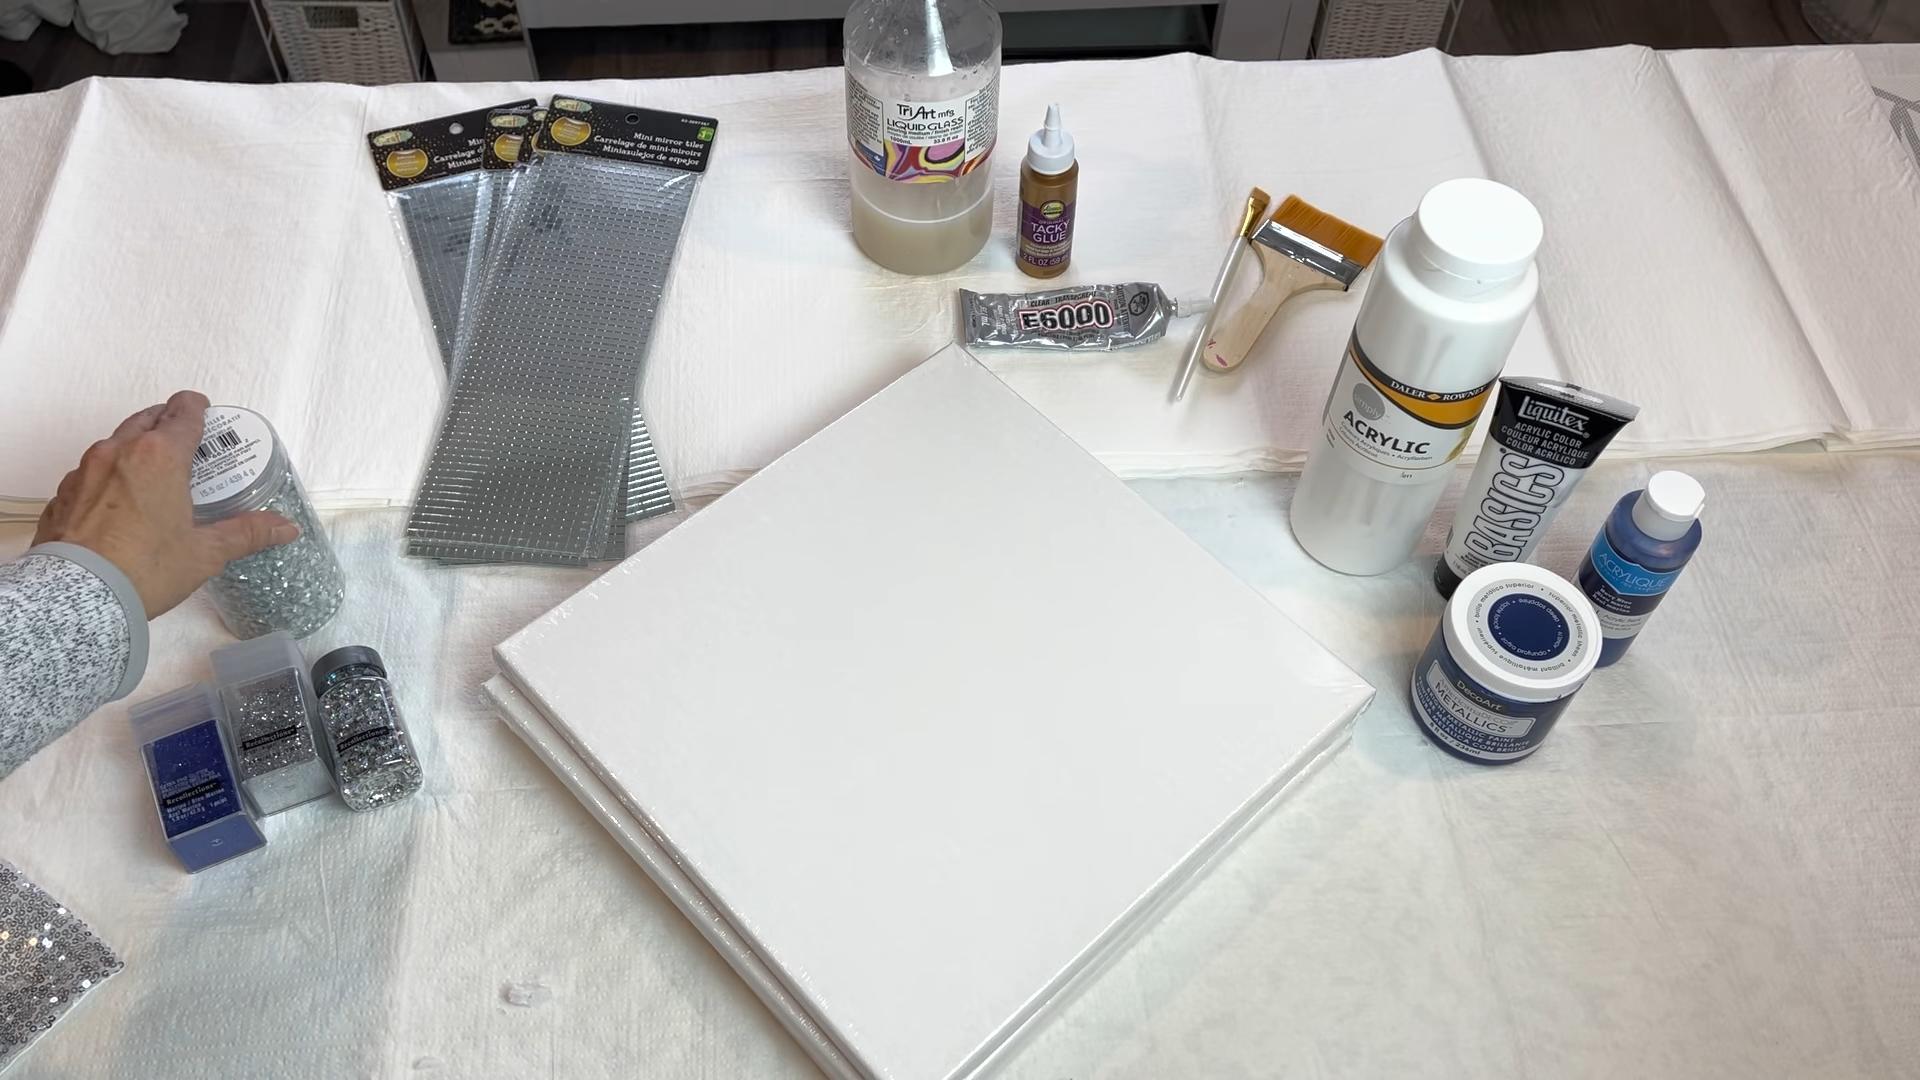
Before we dive in, let’s gather our supplies. The beauty of DIY canvas art is that you can often use materials you already have around the house. Here’s a general list, but feel free to adapt it based on the technique you choose:
* Canvas: Obviously! Choose the size that suits your space and the design you have in mind. Pre-primed canvases are the easiest to work with.
* Acrylic Paints: These are versatile, affordable, and dry quickly. A basic set of colors is a great starting point.
* Paintbrushes: A variety of sizes and shapes will come in handy. Flat brushes are good for covering large areas, while round brushes are better for details.
* Palette: A palette is where you’ll mix your paints. You can use a disposable paper palette, a plastic plate, or even a piece of cardboard.
* Water Container: For rinsing your brushes.
* Paper Towels or Rags: For wiping up spills and cleaning your brushes.
* Masking Tape: Essential for creating clean lines and geometric designs.
* Stencils (Optional): If you want to incorporate specific shapes or patterns. You can buy stencils or make your own!
* Palette Knife (Optional): For creating textured effects.
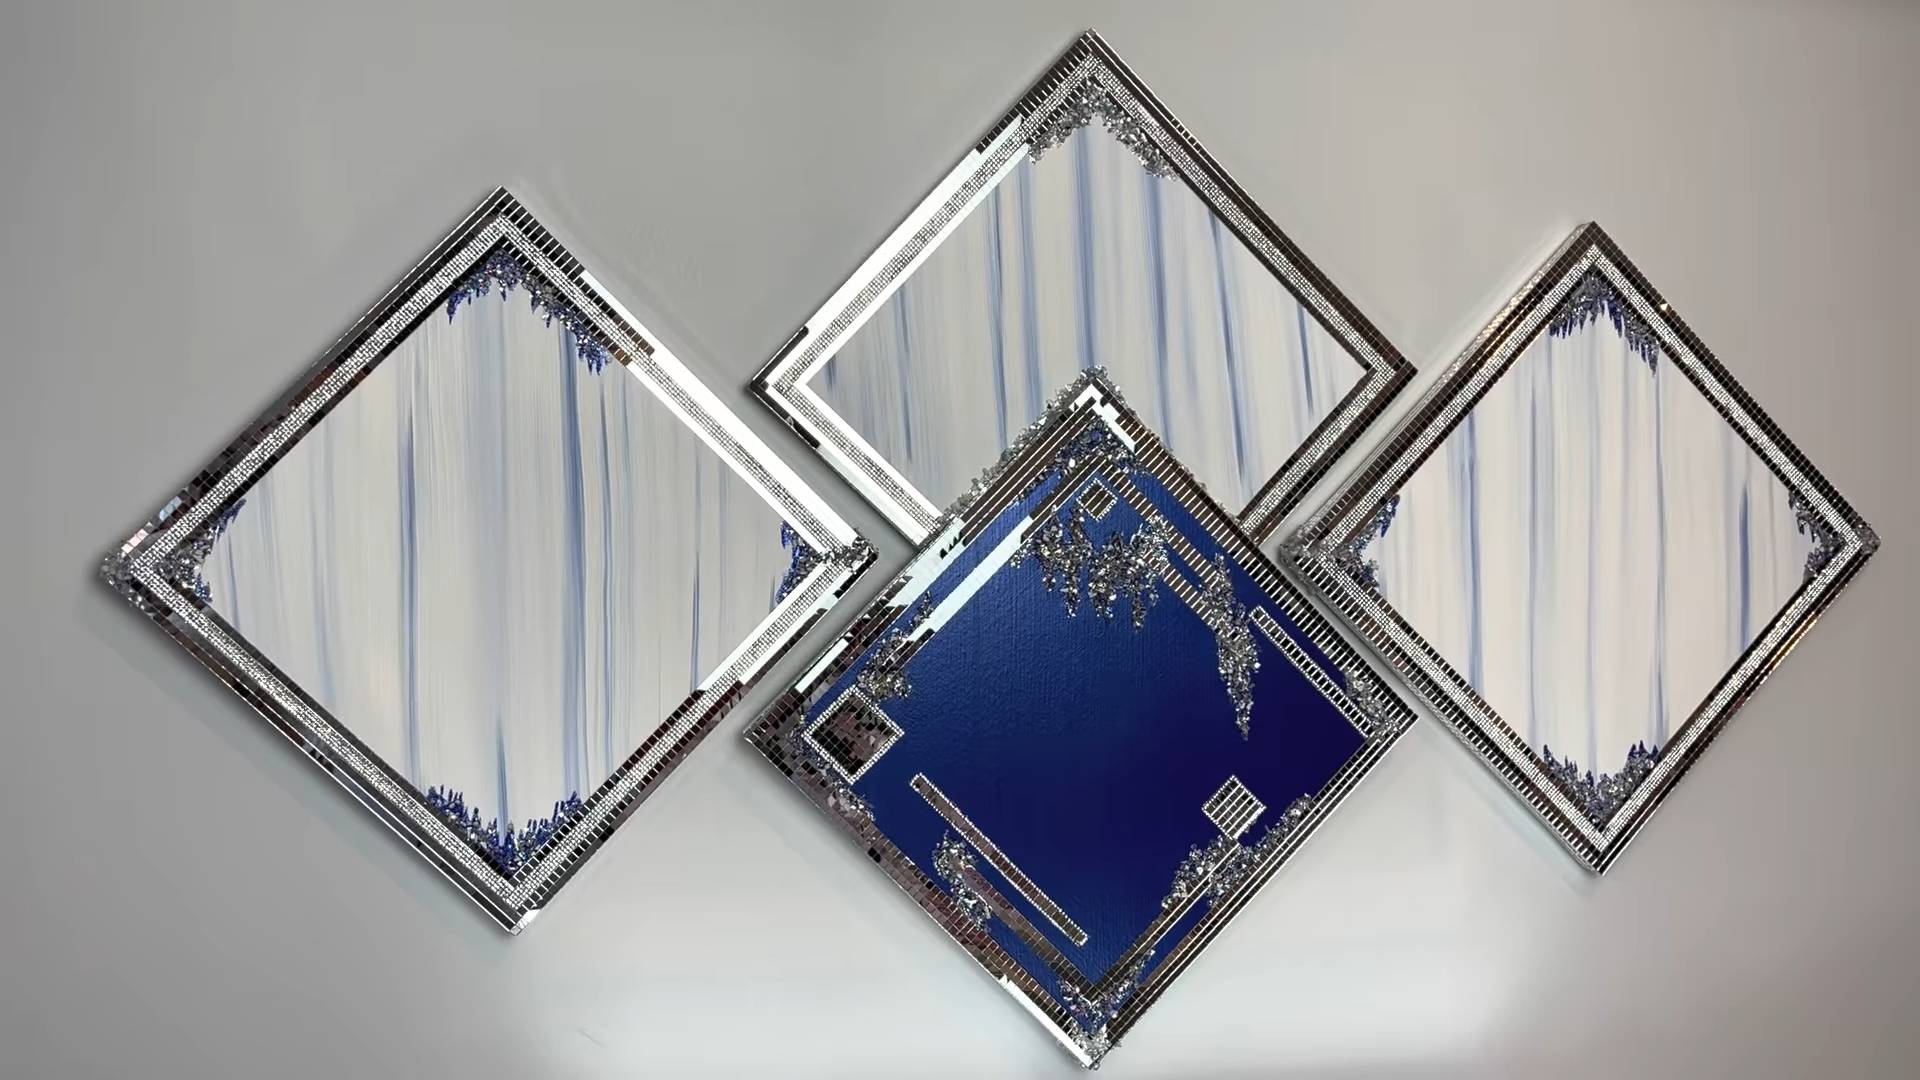
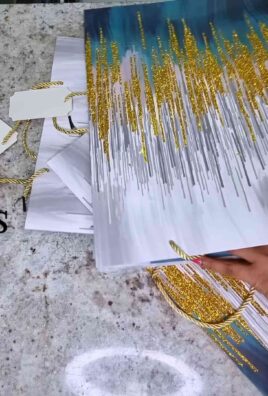
* Glitter, Beads, or Other Embellishments (Optional): To add some extra sparkle and dimension.
* Sealant (Optional): To protect your finished artwork.
Technique 1: Abstract Acrylic Pouring
Acrylic pouring is a super fun and unpredictable technique that’s perfect for creating abstract art. The results are always unique, and it’s a great way to experiment with color.
Step-by-Step Instructions:
1. Prepare Your Workspace: This can get messy, so cover your work surface with newspaper or a plastic drop cloth. Trust me, you’ll thank me later!
2. Prepare Your Paints: This is the most important part! You need to thin your acrylic paints with a pouring medium. There are many pouring mediums available at craft stores, or you can use a mixture of PVA glue and water (about a 1:1 ratio). The consistency should be similar to warm honey. I usually prepare several small cups of paint, each with a different color.
3. Layer Your Paints in a Cup: In a separate cup, layer your thinned paints. You can pour them in any order you like, but I usually start with the darkest color and end with the lightest. Don’t stir!
4. Pour Onto the Canvas: Now for the fun part! Place your canvas on a raised surface (like a few small cups) to allow the paint to drip off the edges. Slowly and steadily pour the layered paint from the cup onto the canvas. You can pour it in one spot, or move the cup around to create different patterns.
5. Tilt and Manipulate the Canvas: Once you’ve poured all the paint, tilt the canvas in different directions to spread the paint and create interesting effects. You can also use a straw to blow air onto the paint and create cells (small, circular patterns).
6. Torch (Optional): If you want to encourage more cells to form, you can quickly pass a torch (like a kitchen torch) over the surface of the paint. Be careful not to hold the torch too close or for too long, as this can burn the paint.
7. Let it Dry: This is the hardest part! Acrylic pouring can take several days to dry completely. Be patient and resist the urge to touch it. Once it’s dry, you can add a sealant if you want to protect the surface.
Technique 2: Geometric Painting with Masking Tape
This technique is perfect for creating clean, modern designs. It’s also a great way to practice your painting skills and experiment with color combinations.
Step-by-Step Instructions:
1. Plan Your Design: Before you start taping, sketch out your design on a piece of paper. This will help you visualize the finished product and avoid mistakes. Think about the shapes you want to create and the colors you want to use.
2. Apply Masking Tape: Use masking tape to create the geometric shapes on your canvas. Make sure the tape is firmly adhered to the canvas to prevent paint from bleeding underneath. You can use different widths of tape to create different effects.
3. Paint the Sections: Use acrylic paints to fill in the sections created by the masking tape. You can use one color for each section, or blend colors together to create gradients. Apply several thin coats of paint, allowing each coat to dry completely before applying the next.
4. Remove the Masking Tape: Once the paint is completely dry, carefully remove the masking tape. Pull the tape away from the painted areas at a 45-degree angle to avoid chipping the paint.
5. Touch Up (If Necessary): If there are any areas where the paint has bled under the tape, you can touch them up with a small brush and the corresponding paint color.
6. Seal (Optional): Once you’re happy with the finished product, you can apply a sealant to protect the surface.
Technique 3: Stencil Art
Stencils are a fantastic way to add intricate designs and patterns to your canvas art. You can buy pre-made stencils or create your own using cardstock or acetate.
Step-by-Step Instructions:
1. Choose Your Stencil: Select a stencil that complements your overall design. There are tons of options available, from floral patterns to geometric shapes to lettering.
2. Secure the Stencil: Position the stencil on your canvas and secure it with masking tape or stencil adhesive. This will prevent the stencil from moving while you’re painting.
3. Apply the Paint: Use a stencil brush or a sponge to apply the paint to the stencil. Use a dabbing motion rather than a brushing motion to prevent the paint from bleeding under the stencil. Apply several thin coats of paint, allowing each coat to dry slightly before applying the next.
4. Remove the Stencil: Once the paint is dry, carefully remove the stencil. Lift the stencil straight up to avoid smudging the paint.
5. Repeat (If Desired): You can repeat the stenciling process to create a repeating pattern or to add multiple layers of design.
6. Add Details (Optional): Once the stenciled design is dry, you can add details with a fine-tipped brush or a paint marker.
7. Seal (Optional): Apply a sealant to protect your finished artwork.
Technique 4: Textured Canvas Art with Palette Knife
This technique is all about adding dimension and visual interest to your canvas. Using a palette knife allows you to create thick, textured strokes that really stand out.
Step-by-Step Instructions:
1. Choose Your Colors: Select a palette of colors that you want to work with. You can use a single color for a monochromatic look, or combine multiple colors for a more vibrant effect.
2. Apply Paint to the Canvas: Use a palette knife to apply thick dabs of paint to the canvas. You can apply the paint in a random pattern, or create a more structured design.
3. Create Texture: Use the palette knife to create texture in the paint. You can drag the knife across the surface of the paint to create ridges, or use the edge of the knife to create small peaks and valleys.
4. Blend Colors (Optional): If you’re using multiple colors, you can blend them together on the canvas with the palette knife.
5. Add Details (Optional): Once the textured base is dry, you can add details with a fine-tipped brush or a paint marker.
6. Let it Dry: Allow the paint to dry completely. This may take several days, depending on the thickness of the paint.
7. Seal (Optional): Apply a sealant to protect your finished artwork.
Tips and Tricks for Success
* Don’t be afraid to experiment! The best way to learn is to try new things and see what works for you.
* Use high-quality materials. While you don’t need to break the bank, investing in good-quality paints and brushes will make a big difference in the final result.
* Practice makes perfect. The more you paint, the better you
Conclusion
So, there you have it! Creating your own DIY canvas art isn’t just a fun afternoon project; it’s a gateway to expressing your unique style and adding a personal touch to your home decor. Forget those generic, mass-produced prints – with a little creativity and our simple techniques, you can craft stunning pieces that truly reflect your personality and taste.
Why is this DIY canvas art trick a must-try? Because it’s incredibly versatile, budget-friendly, and empowering. You’re not limited by what’s available in stores; you’re the artist, the designer, the curator of your own gallery. Imagine the satisfaction of hanging a piece of art that you created with your own hands, a conversation starter that tells a story about your creativity and resourcefulness.
Beyond the basic techniques we’ve covered, the possibilities are endless. Experiment with different textures by adding fabric scraps, dried flowers, or even sand to your paint. Try creating abstract art using palette knives or sponges for unique effects. For a more polished look, consider adding a layer of resin to your finished canvas for a glossy, professional finish. You could even personalize your art further by incorporating meaningful quotes, song lyrics, or family photos.
Don’t be afraid to get messy and embrace the imperfections. Remember, art is subjective, and the beauty of DIY lies in its unique character. This isn’t about replicating a masterpiece; it’s about creating something that speaks to you and brings joy to your space.
We wholeheartedly encourage you to give this DIY canvas art project a try. Gather your supplies, unleash your inner artist, and transform those blank canvases into stunning works of art. And most importantly, don’t forget to share your creations with us! We’d love to see your unique interpretations and inspire others to embark on their own artistic journeys. Tag us in your social media posts or leave a comment below – we can’t wait to see what you come up with! Let’s fill the world with beautiful, handmade art, one canvas at a time. This is more than just a craft; it’s an investment in your creativity and a beautiful addition to your home.
Frequently Asked Questions (FAQ)
What kind of canvas should I use for DIY canvas art?
The best type of canvas depends on the medium you plan to use. For acrylic paints, a standard cotton canvas is a great choice and is readily available in various sizes and thicknesses. If you’re planning on using oil paints, a canvas that has been pre-primed with an oil-based primer is recommended. For mixed media projects, a heavier-weight canvas or even a wood panel might be more suitable to support the added texture and weight. Consider the size of the canvas as well. Smaller canvases are perfect for practicing techniques or creating smaller, more intimate pieces, while larger canvases make a bolder statement. Don’t be afraid to experiment with different canvas types to find what works best for your style and the materials you’re using.
What kind of paint is best for DIY canvas art?
Acrylic paint is generally considered the best option for beginners due to its versatility, affordability, and ease of use. It dries quickly, is water-based (making cleanup easy), and can be used on a variety of surfaces. Oil paints offer richer colors and a longer drying time, allowing for more blending and manipulation, but they require solvents for cleanup and can be more expensive. Watercolor paints can also be used on canvas, but they require a special primer to prevent the paint from soaking into the canvas. Consider your skill level, budget, and desired aesthetic when choosing your paint.
How do I prepare my canvas before painting?
Most canvases come pre-primed, which means they have a layer of gesso applied to create a smooth, even surface for painting. However, if you’re using an unprimed canvas or want to add an extra layer of protection, you can apply gesso yourself. Gesso helps the paint adhere to the canvas better and prevents it from soaking into the fibers. Apply one or two thin coats of gesso using a wide brush, allowing each coat to dry completely before applying the next. Lightly sand the surface with fine-grit sandpaper after the final coat of gesso for an even smoother finish.
How do I protect my finished DIY canvas art?
Once your painting is completely dry, you can protect it with a varnish or sealant. Varnish protects the paint from dust, dirt, and UV damage, and it can also enhance the colors and add a glossy or matte finish. Choose a varnish that is specifically designed for acrylic or oil paints, depending on the medium you used. Apply the varnish in thin, even coats using a soft brush, following the manufacturer’s instructions. Allow the varnish to dry completely before handling or displaying your artwork.
Can I use other materials besides paint for DIY canvas art?
Absolutely! One of the great things about DIY canvas art is that you can use a wide variety of materials to create unique and interesting textures and effects. Consider incorporating fabric scraps, paper collage, dried flowers, beads, buttons, or even found objects into your artwork. You can also use texture paste or modeling paste to create raised surfaces and three-dimensional effects. Experiment with different materials and techniques to find what you enjoy and what best expresses your artistic vision.
How do I hang my DIY canvas art?
There are several ways to hang your DIY canvas art, depending on the size and weight of the canvas. For smaller canvases, you can use sawtooth hangers or D-rings attached to the back of the frame. For larger canvases, you may need to use heavier-duty hardware, such as wire or picture hooks. Make sure to use appropriate wall anchors if you’re hanging your artwork on drywall. You can also lean your canvas art against a wall or display it on an easel for a more casual look.
What if I make a mistake while painting?
Don’t worry, mistakes happen! If you’re using acrylic paint, you can often wipe away mistakes with a damp cloth while the paint is still wet. If the paint has already dried, you can try sanding it down or painting over it with a fresh layer of gesso or paint. With oil paints, you can use a solvent to remove the paint or blend it into the surrounding area. Remember, mistakes can often lead to unexpected discoveries and creative solutions, so don’t be afraid to embrace them.
Where can I find inspiration for my DIY canvas art?
Inspiration is everywhere! Look to nature, architecture, fashion, and other forms of art for ideas. Browse art books, magazines, and websites for inspiration. Visit art museums and galleries to see the work of other artists. Experiment with different techniques and styles to find what resonates with you. And most importantly, don’t be afraid to let your own imagination and creativity guide you.
How can I make my DIY canvas art look more professional?
While the beauty of DIY lies in its unique character, there are a few things you can do to make your canvas art look more polished. Pay attention to the details, such as clean edges and even brushstrokes. Use high-quality materials and tools. Consider framing your finished artwork to give it a more professional look. And most importantly, practice and experiment to develop your skills and refine your style.
Is DIY canvas art a good way to decorate on a budget?
Absolutely! DIY canvas art is a fantastic way to decorate your home on a budget. You can often find inexpensive canvases and paints at craft stores or online. You can also repurpose old materials, such as fabric scraps, paper, and found objects, to create unique and interesting artwork. By creating your own art, you can save money and add a personal touch to your home decor.
Leave a Comment