

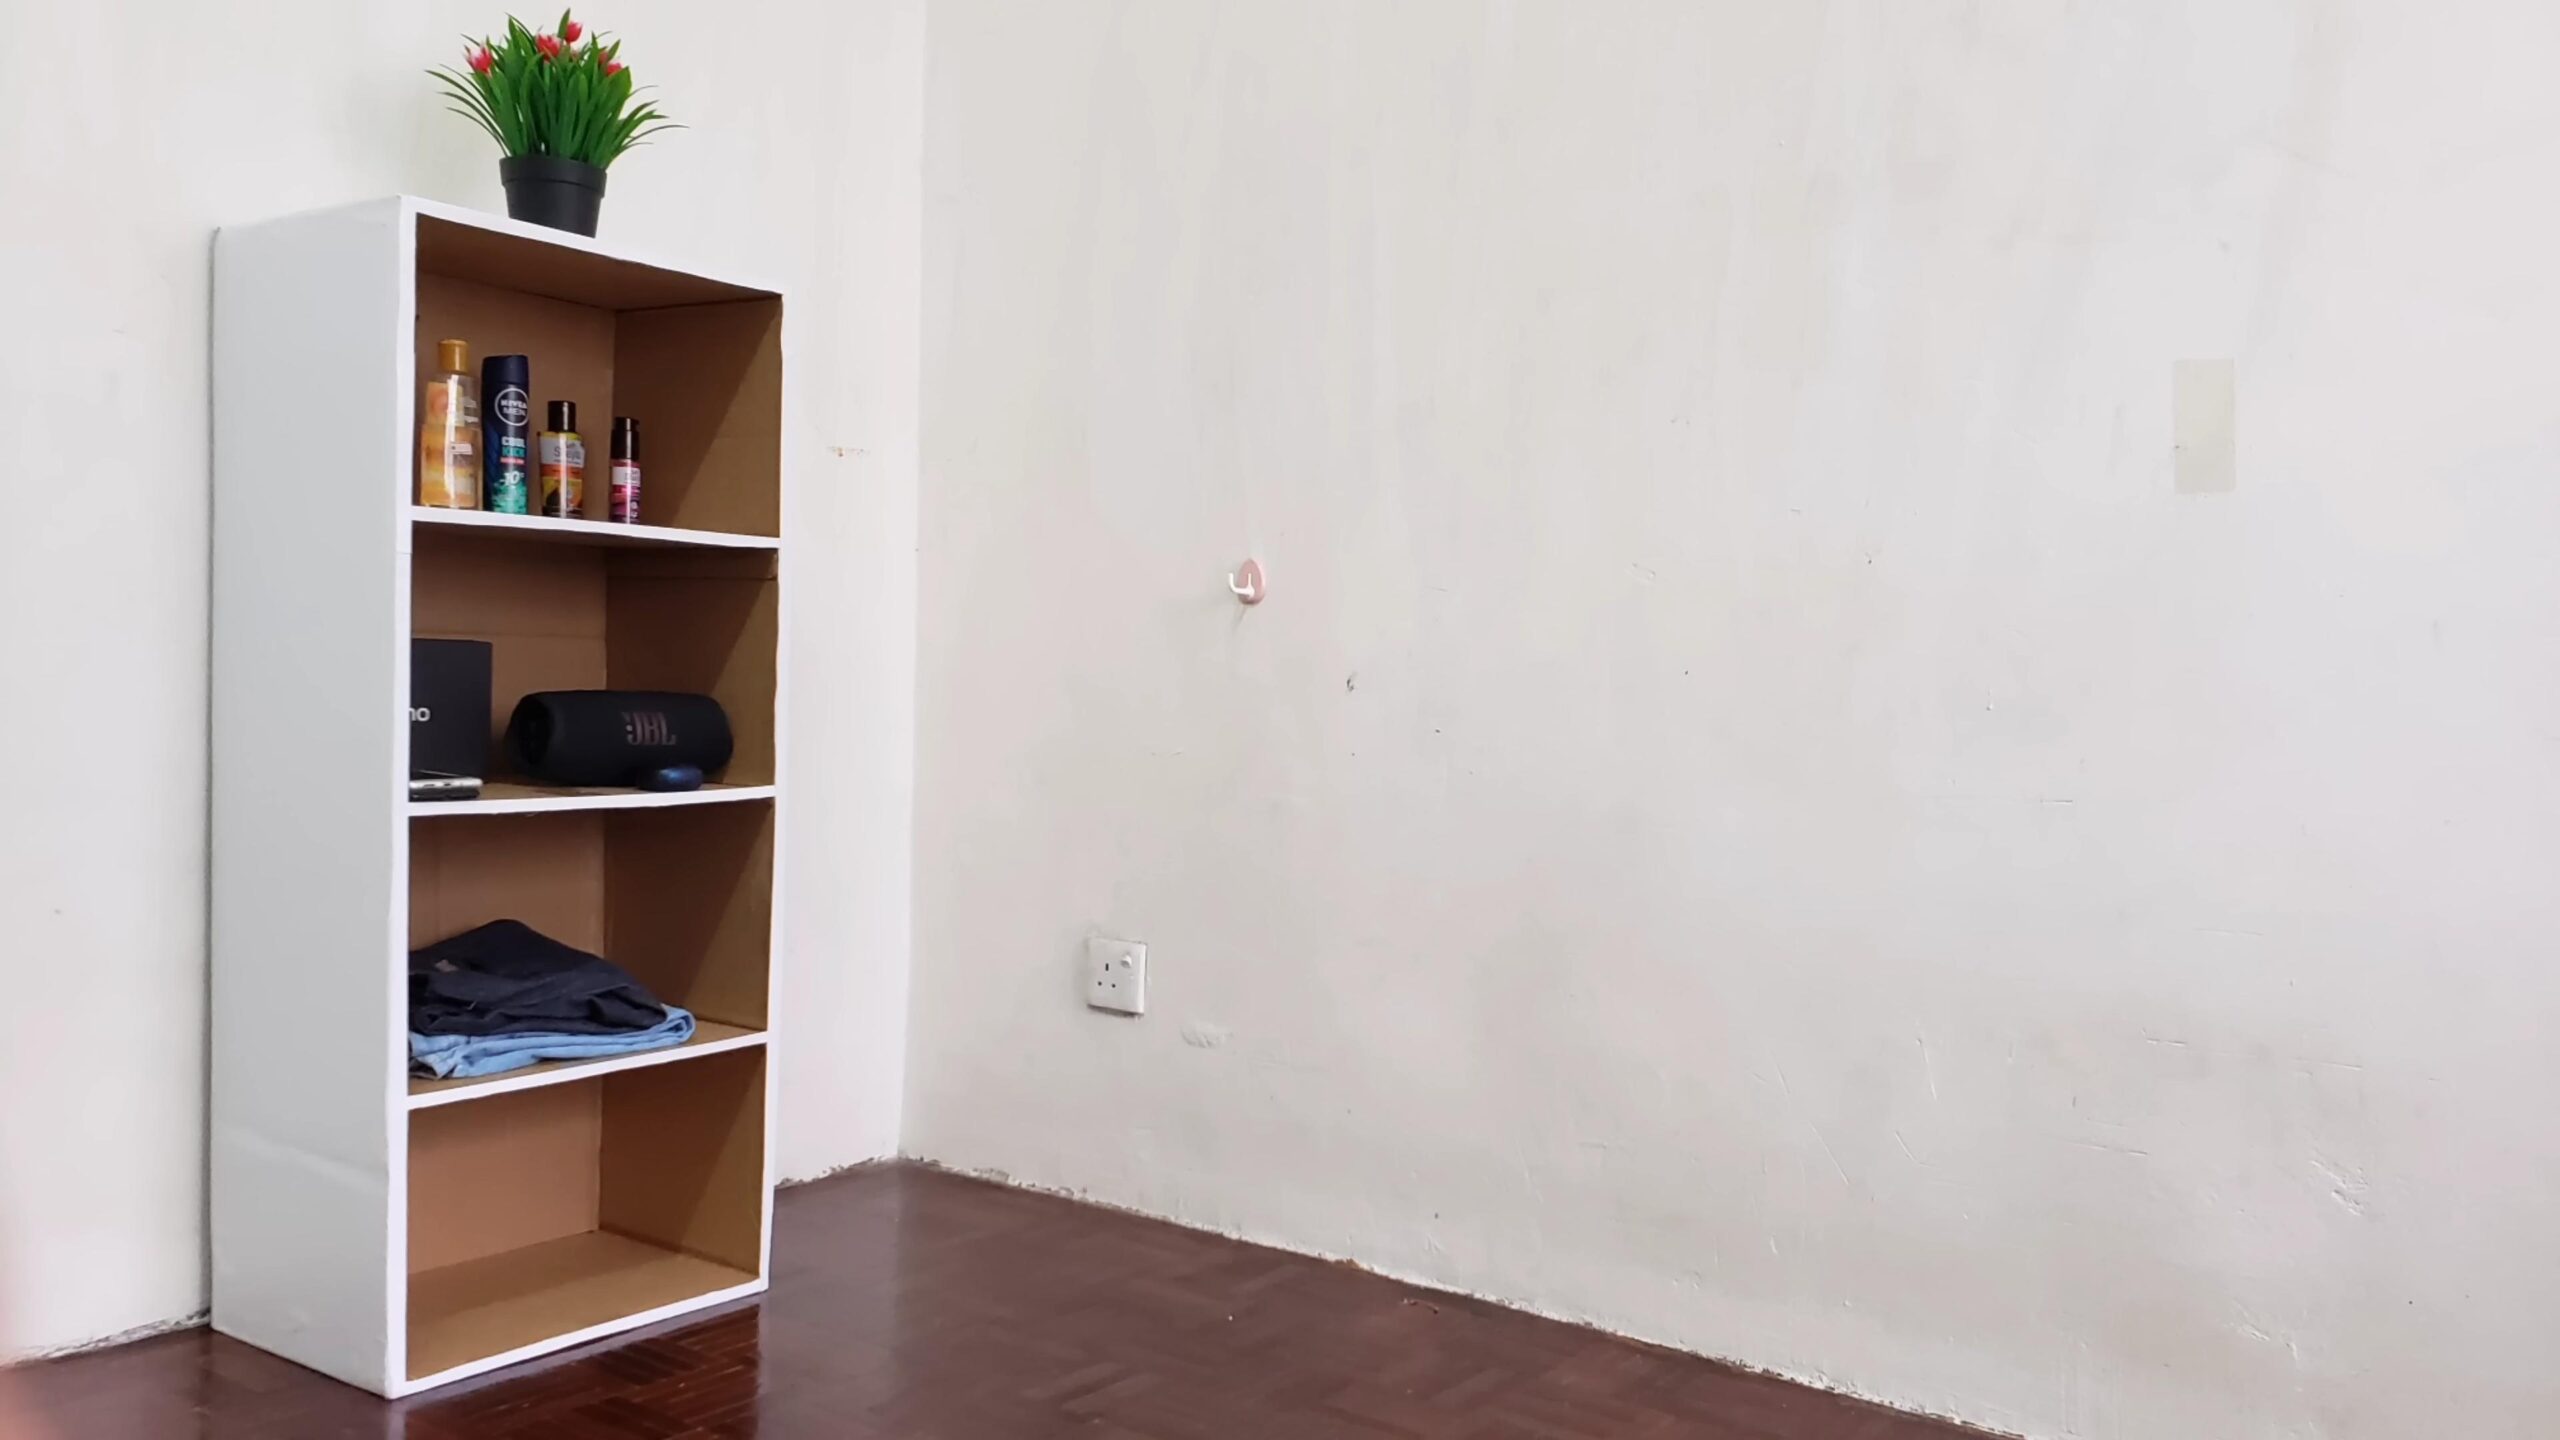
DIY Cardboard Wardrobe: Tired of clothes overflowing from your closet or simply lacking storage space? I totally get it! We’ve all been there, staring at a mountain of clothes with nowhere to put them. But what if I told you that you could create a functional and surprisingly stylish wardrobe using something you probably already have lying around – cardboard?
Cardboard, often relegated to the recycling bin, has a rich history of resourceful reuse. From humble beginnings as packaging material, it has evolved into a versatile medium for art, furniture, and even architecture! Think about the ingenuity of repurposing something so readily available into something so practical.
In today’s world, where sustainability and budget-friendly solutions are more important than ever, learning DIY Cardboard Wardrobe hacks is a game-changer. Not only does it save you money on expensive furniture, but it also reduces waste and allows you to customize your storage to perfectly fit your needs. Plus, it’s a fun and rewarding project that you can tackle on your own or with the whole family. So, ditch the clutter and embrace the creativity – let’s build a wardrobe that’s as unique as you are!
DIY Cardboard Wardrobe: Build Your Own Sustainable Closet!
Hey there, fellow DIY enthusiasts! Are you short on closet space? Maybe you’re a student living in a dorm, or perhaps you’re just looking for a budget-friendly and eco-conscious storage solution. Well, look no further! I’m going to guide you through building your very own cardboard wardrobe. It’s surprisingly sturdy, customizable, and a fantastic way to repurpose those cardboard boxes that are probably cluttering up your garage. Let’s get started!
What You’ll Need
Before we dive in, let’s gather our supplies. This is crucial for a smooth and efficient building process.
* Cardboard Boxes: This is the star of the show! You’ll need several large, sturdy cardboard boxes. Think appliance boxes (refrigerator, washer/dryer), or large moving boxes. The more uniform in size, the better, but don’t worry if they’re slightly different – we can adjust. Aim for at least 4-6 boxes for a decent-sized wardrobe.
* Measuring Tape: Accuracy is key! A measuring tape will help you ensure everything is aligned and properly sized.
* Utility Knife or Box Cutter: A sharp utility knife is essential for cutting the cardboard cleanly and safely. Make sure you have a fresh blade!
* Metal Ruler or Straight Edge: This will guide your cuts and ensure they’re straight and precise.
* Cutting Mat or Scrap Cardboard: Protect your work surface! A cutting mat or a large piece of scrap cardboard will prevent you from damaging your floor or table.
* Packing Tape: Lots and lots of packing tape! This is what will hold everything together. Choose a strong, wide tape for maximum durability.
* Hot Glue Gun and Glue Sticks (Optional but Recommended): Hot glue provides extra reinforcement and helps to create a more secure bond between the cardboard pieces.
* Pencil or Marker: For marking measurements and guidelines.
* Clamps (Optional): Clamps can be helpful for holding pieces together while the glue dries or while you’re taping.
* Wooden Dowels or Metal Rod (Optional): For creating a hanging rod inside the wardrobe.
* Paint, Wrapping Paper, or Fabric (Optional): For decorating and personalizing your wardrobe.
* Sandpaper (Optional): For smoothing out any rough edges on the cardboard.
* Safety Glasses: Protect your eyes from flying debris when cutting.
* Gloves: Protect your hands from cuts and glue.
Planning Your Wardrobe Design
Before you start cutting, take some time to plan out the design of your wardrobe. Consider these factors:
* Size: How much space do you have available? Measure the area where you plan to place the wardrobe.
* Storage Needs: What type of clothing will you be storing? Do you need hanging space, shelves, or drawers?
* Configuration: How many sections will your wardrobe have? Will it be a single unit or multiple units joined together?
* Aesthetics: How do you want your wardrobe to look? Will you paint it, wrap it in paper, or leave it plain?
Sketch out a rough design on paper, noting the dimensions of each section. This will help you visualize the finished product and avoid mistakes.
Building the Wardrobe: Step-by-Step
Okay, let’s get our hands dirty! Follow these steps to construct your cardboard wardrobe:
1. Prepare the Boxes: Flatten all your cardboard boxes. Remove any staples or tape that might be in the way. Inspect the boxes for any damage. If a box is significantly damaged, set it aside for smaller components or reinforcement.
2. Create the Base Units: We’ll start by creating the main structural units of the wardrobe. I usually make two or three of these, depending on the overall width I want.
* Take one of your largest boxes.
* Using your measuring tape and marker, measure and mark the desired height of your base unit. Remember to consider the height of your clothes when deciding on the height.
* Using your utility knife and metal ruler, carefully cut the box to the desired height. Make sure your cuts are straight and clean.
* Now, fold the flaps of the box inward to create a closed top and bottom. Secure the flaps with plenty of packing tape. Overlap the tape generously for added strength. You can also use hot glue along the edges of the flaps for extra reinforcement.
* Repeat this process for each base unit you want to create.
3. Connect the Base Units: Now, let’s join the base units together to form the main body of the wardrobe.
* Stand the base units side by side.
* Apply a generous amount of packing tape along the seams where the units meet. Tape both the inside and outside of the seams for maximum strength.
* For added stability, you can also use hot glue along the seams. Apply a bead of hot glue and then quickly press the units together. Hold them in place until the glue cools and sets. Clamps can be helpful here.
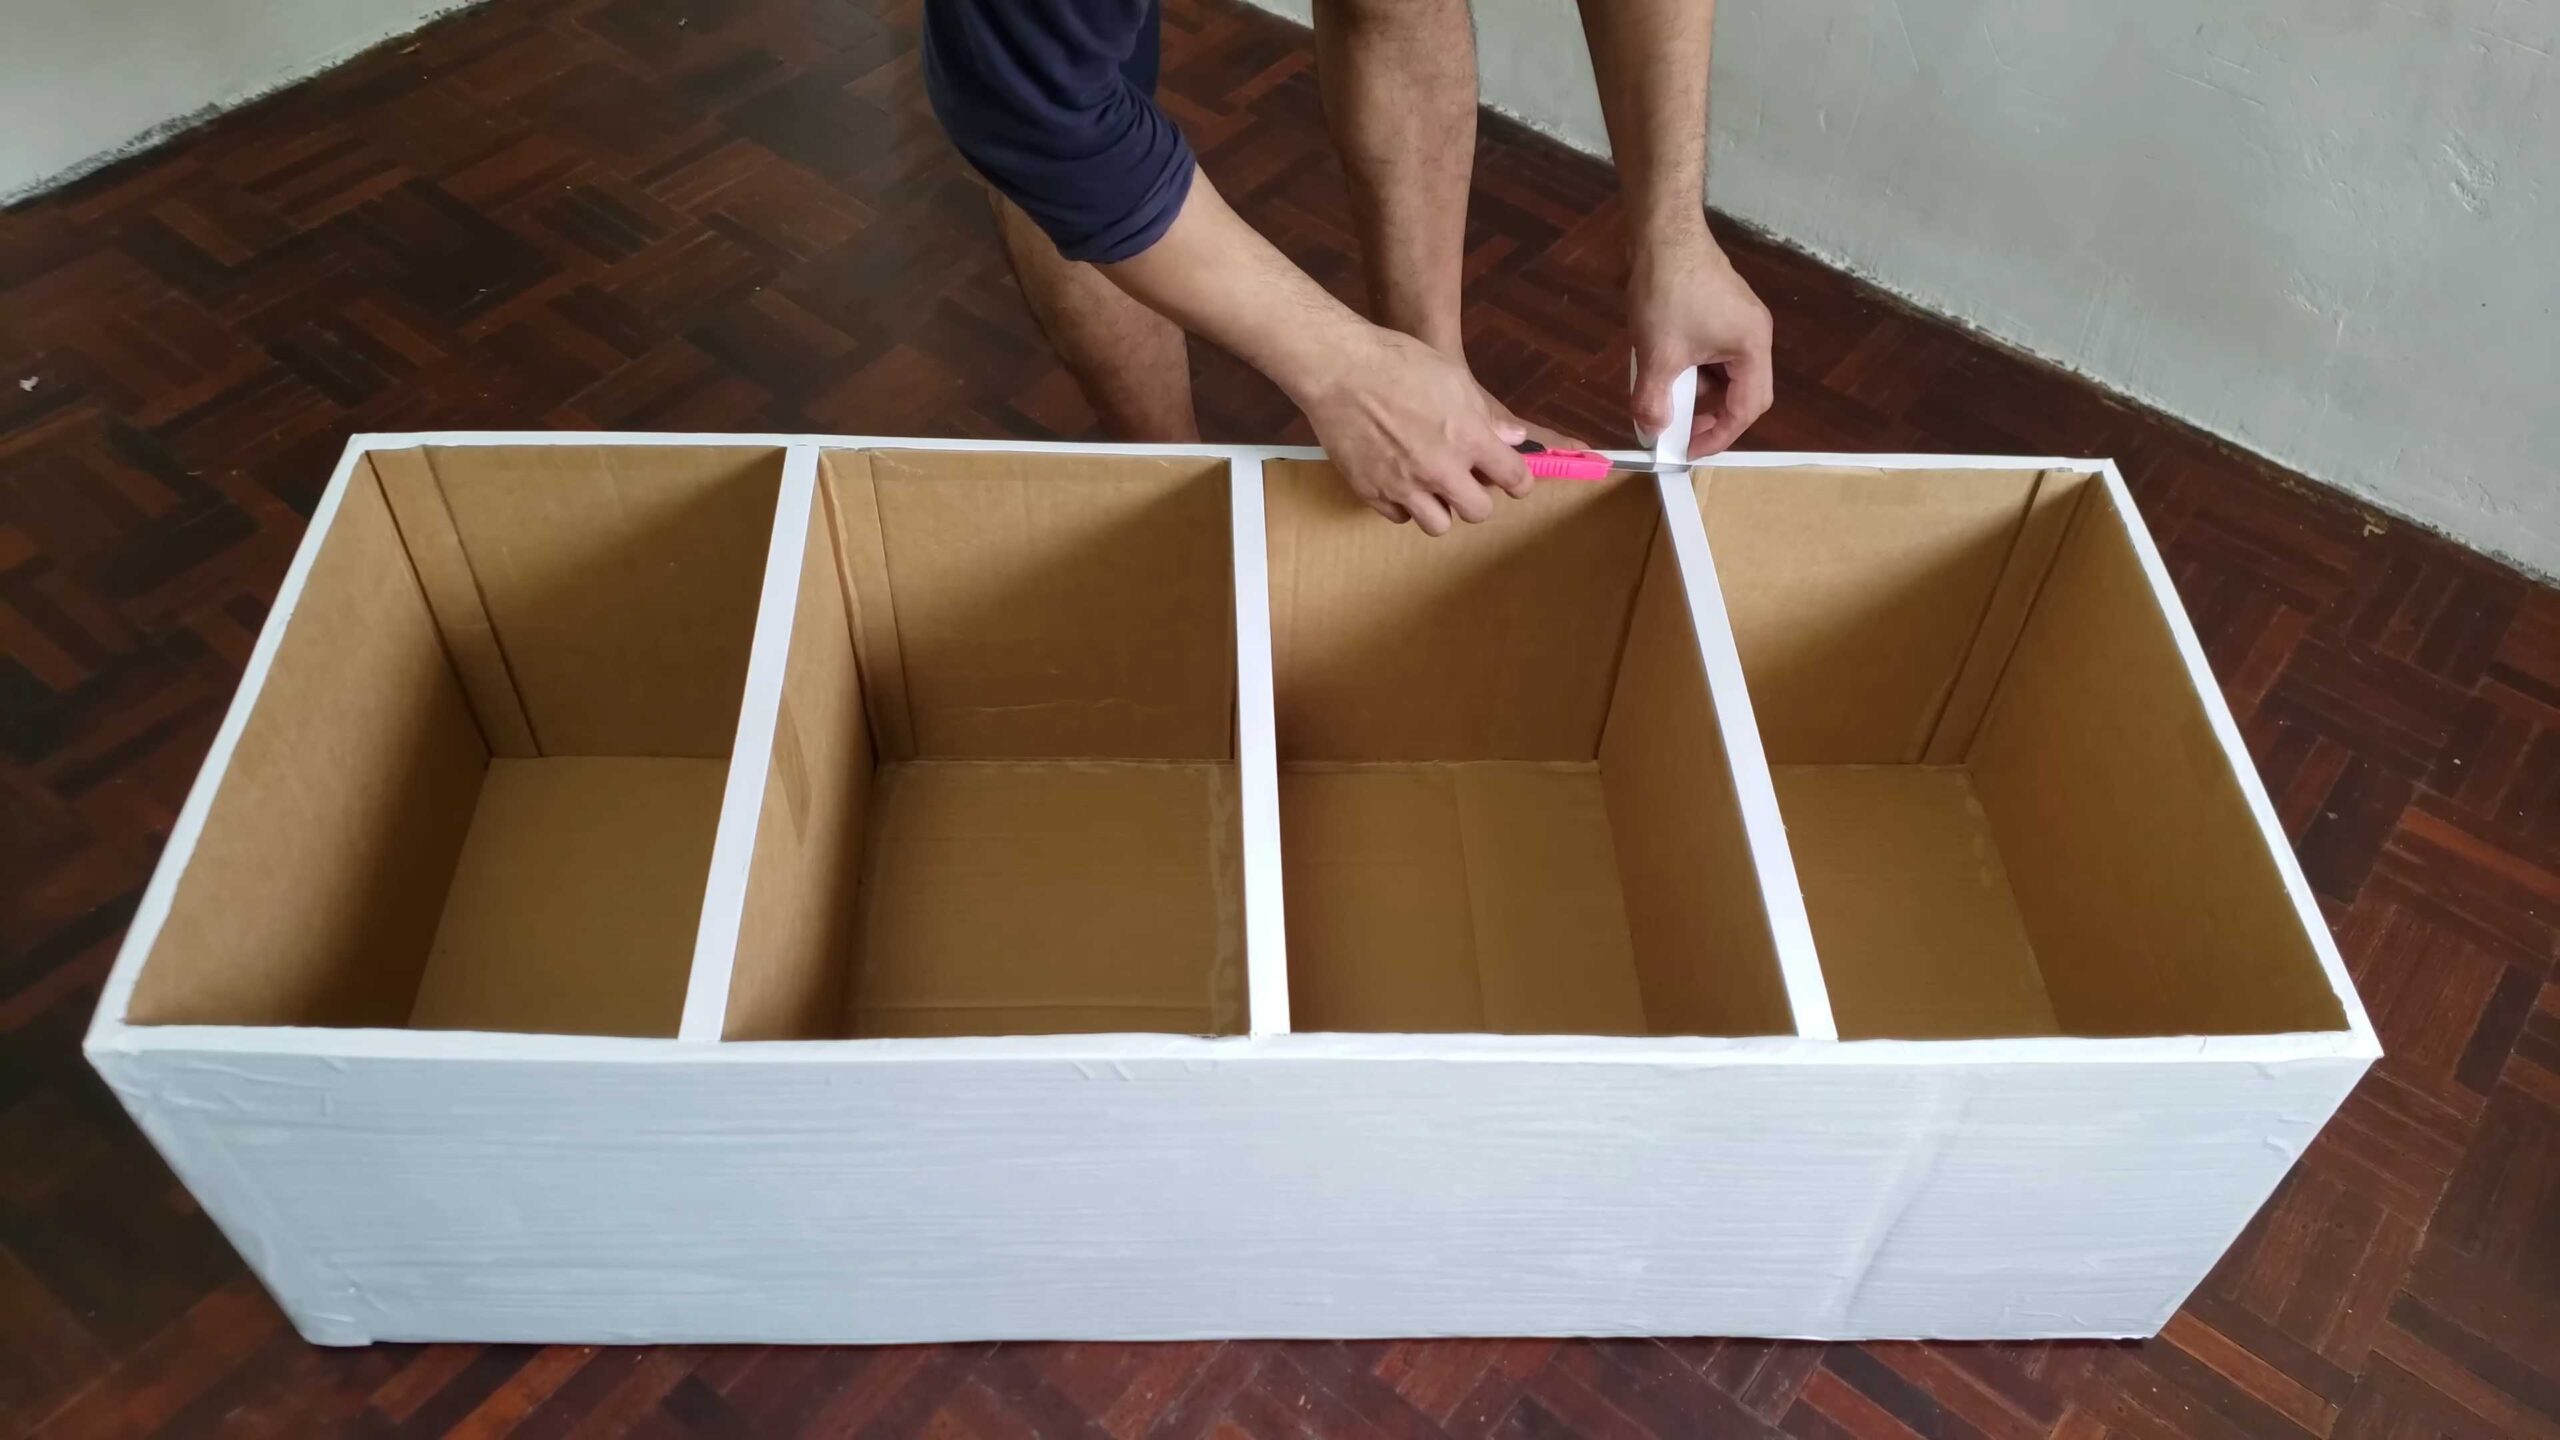
4. Create Shelves (Optional): If you want shelves in your wardrobe, follow these steps:
* Measure the width and depth of the inside of your base unit.
* Cut pieces of cardboard to these dimensions. You can use multiple layers of cardboard glued together for extra strength.
* Decide where you want to place the shelves. Mark the shelf positions on the inside walls of the base unit.
* Cut small strips of cardboard to use as shelf supports. Glue or tape these strips to the inside walls of the base unit at the marked shelf positions.
* Slide the shelves onto the supports. Secure them with tape or glue.
5. Create a Hanging Rod (Optional): If you want a hanging rod, follow these steps:
* Measure the width of the inside of your base unit.
* Cut a wooden dowel or metal rod to this length.
* Decide where you want to place the hanging rod. Mark the rod positions on the inside walls of the base unit.
* Cut small pieces of cardboard to use as rod supports. These supports should be strong enough to hold the weight of your clothes.
* Glue or tape the supports to the inside walls of the base unit at the marked rod positions.
* Place the hanging rod onto the supports. Secure it with tape or glue.
6. Create Doors (Optional): Doors can help to keep your clothes dust-free and out of sight.
* Measure the height and width of the front opening of your wardrobe.
* Cut pieces of cardboard slightly larger than these dimensions. This will allow for some overlap.
* Attach hinges to the doors and to the wardrobe frame. You can use packing tape to create makeshift hinges, or you can purchase small metal hinges from a hardware store.
* Install a latch or magnetic closure to keep the doors closed.
7. Reinforce the Structure: To make your wardrobe even sturdier, reinforce the corners and edges with extra layers of cardboard and tape. Pay special attention to the areas that will bear the most weight.
8. Finishing Touches: Now for the fun part – decorating!
* Sanding (Optional): If there are any rough edges on the cardboard, lightly sand them down with sandpaper.
* Painting: Paint the wardrobe with your favorite colors. Use multiple coats for a smooth, even finish.
* Wrapping Paper or Fabric: Cover the wardrobe with wrapping paper or fabric. Use glue or tape to secure the material to the cardboard.
* Personalize: Add your own personal touches, such as stencils, stickers, or decorative trim.
Tips and Tricks for a Sturdy Cardboard Wardrobe
* Use Strong Boxes: The sturdier the boxes, the sturdier the wardrobe. Look for boxes made from double-walled cardboard.
* Reinforce the Corners: The corners are the weakest points of the wardrobe. Reinforce them with extra layers of cardboard and tape.
* Use Plenty of Tape: Don’t be stingy with the tape! Use plenty of tape to secure all the seams and joints.
* Use Hot Glue for Extra Strength: Hot glue provides a stronger bond than tape alone. Use it to reinforce the seams and joints.
* Distribute Weight Evenly: Avoid placing heavy items on one side of the wardrobe. Distribute the weight evenly to prevent it from tipping over.
* Consider Adding a Back Panel: A back panel will add extra stability to the wardrobe. Cut a piece of cardboard to the size of the back of the wardrobe and attach it with tape or glue.
* Protect from Moisture: Cardboard is susceptible to moisture damage. Keep your wardrobe away from damp areas. You can also apply a sealant to protect it from moisture.
* Test the Stability: Before you start loading up your wardrobe with clothes
Conclusion
So, there you have it! Creating your own DIY cardboard wardrobe isn’t just a fun project; it’s a practical, budget-friendly, and surprisingly stylish solution to your storage woes. We’ve walked you through the process, highlighting the key steps and offering tips to ensure your success. But why should you actually dedicate your time and effort to this seemingly unconventional endeavor?
The answer lies in the unparalleled flexibility and customization this project offers. Unlike pre-fabricated wardrobes, a DIY cardboard wardrobe can be tailored precisely to your specific needs and available space. Got an awkward corner that’s begging for a storage solution? No problem! Need extra-tall compartments for your collection of dresses? Easily done! The possibilities are truly endless.
Beyond the customization aspect, consider the environmental benefits. By repurposing cardboard boxes, you’re actively participating in reducing waste and giving these materials a new lease on life. It’s a sustainable choice that aligns with a growing desire to live more consciously. Plus, the cost savings are significant. Compared to purchasing a new wardrobe, the materials for this project are either free (if you have boxes on hand) or incredibly inexpensive.
But the real magic of this DIY project lies in its transformative power. It’s not just about building a wardrobe; it’s about unleashing your creativity and problem-solving skills. It’s about taking something ordinary – cardboard – and turning it into something extraordinary and functional. The satisfaction of stepping back and admiring your handiwork is truly rewarding.
Don’t be afraid to experiment with variations! Consider adding fabric lining to the inside of your wardrobe for a more polished look. You could also paint the exterior with vibrant colors or use decorative paper to create a unique design. Add cardboard drawers for smaller items, or even incorporate a hanging rod for clothes that need to be wrinkle-free. Think about adding wheels to the bottom for easy mobility. The only limit is your imagination!
We understand that the idea of building a wardrobe from cardboard might seem daunting at first. But we encourage you to embrace the challenge. Break down the project into smaller, manageable steps, and don’t be afraid to ask for help if you need it. The end result will be a functional and stylish storage solution that you can be proud of.
So, grab your cardboard boxes, gather your tools, and get ready to embark on this exciting DIY adventure. We’re confident that you’ll be amazed at what you can create. And most importantly, we want to hear about your experience! Share your photos, tips, and variations with us in the comments below. Let’s inspire each other to create beautiful and sustainable storage solutions, one cardboard wardrobe at a time. Let us know what you think of this DIY cardboard wardrobe project!
Frequently Asked Questions (FAQ)
Is a cardboard wardrobe really sturdy enough to hold clothes?
Yes, absolutely! The sturdiness of your DIY cardboard wardrobe depends on a few key factors: the quality of the cardboard you use, the construction techniques you employ, and the weight distribution of your items. Opt for double-walled cardboard boxes whenever possible, as they offer significantly greater strength and durability. Reinforce the corners and edges of your wardrobe with packing tape or duct tape to prevent them from collapsing under pressure. When loading your wardrobe, distribute the weight evenly to avoid putting excessive stress on any one area. For heavier items, consider adding extra support, such as cardboard dividers or wooden dowels. With proper construction and weight management, your cardboard wardrobe can easily hold a substantial amount of clothing.
What kind of cardboard is best for building a wardrobe?
As mentioned above, double-walled cardboard is the ideal choice for building a sturdy and reliable wardrobe. This type of cardboard consists of two layers of corrugated cardboard sandwiched between three layers of linerboard, providing superior strength and resistance to bending or crushing. If double-walled cardboard is not readily available, you can use single-walled cardboard, but be sure to reinforce it with extra layers of tape or cardboard strips. Avoid using cardboard that is damp, damaged, or excessively thin, as it will not provide adequate support. Look for boxes that are clean and free of any stains or odors. Appliance boxes, moving boxes, and furniture boxes are generally good options, as they are typically made from sturdy cardboard.
How can I make my cardboard wardrobe look more aesthetically pleasing?
There are numerous ways to enhance the appearance of your DIY cardboard wardrobe and make it blend seamlessly with your existing décor. One simple option is to paint the exterior of the wardrobe with your favorite colors. Use acrylic paint or spray paint for best results, and apply multiple coats for a smooth and even finish. Alternatively, you can cover the wardrobe with decorative paper, fabric, or wallpaper. This allows you to create a custom design that perfectly complements your personal style. Consider adding decorative trim, such as ribbon, lace, or wooden molding, to the edges of the wardrobe for a more polished look. You can also add knobs or pulls to the doors or drawers to enhance their functionality and visual appeal. Don’t be afraid to get creative and experiment with different materials and techniques to create a truly unique and eye-catching wardrobe.
How do I prevent my cardboard wardrobe from collapsing?
Preventing your cardboard wardrobe from collapsing requires careful planning and execution. Start by selecting high-quality cardboard and reinforcing all the seams and edges with strong packing tape or duct tape. Pay particular attention to the corners, as these are the most vulnerable points. Consider adding internal supports, such as cardboard dividers or wooden dowels, to provide extra stability. Distribute the weight of your items evenly throughout the wardrobe to avoid putting excessive stress on any one area. Avoid overloading the wardrobe with heavy items, and be mindful of the weight capacity of the cardboard. If you notice any signs of weakness or instability, reinforce the affected area immediately. Regularly inspect your wardrobe for any damage or wear and tear, and make repairs as needed.
Can I add shelves and drawers to my cardboard wardrobe?
Absolutely! Adding shelves and drawers to your cardboard wardrobe is a great way to maximize its storage capacity and organization. To create shelves, simply cut pieces of cardboard to the desired size and shape, and attach them to the inside of the wardrobe using tape or glue. Reinforce the shelves with cardboard supports or wooden dowels to prevent them from sagging under the weight of your items. For drawers, you can construct cardboard boxes and slide them into openings in the wardrobe. Consider adding cardboard handles or pulls to the drawers for easy access. You can also line the drawers with fabric or decorative paper to protect your items and enhance their appearance.
How long will a DIY cardboard wardrobe last?
The lifespan of your DIY cardboard wardrobe depends on several factors, including the quality of the cardboard, the construction techniques you use, the weight of the items you store, and the environmental conditions. With proper construction and maintenance, a well-built cardboard wardrobe can last for several months or even years. To extend the lifespan of your wardrobe, avoid exposing it to moisture, extreme temperatures, or direct sunlight. Regularly inspect it for any damage or wear and tear, and make repairs as needed. Consider applying a sealant or varnish to the exterior of the wardrobe to protect it from moisture and wear.
What tools do I need to build a cardboard wardrobe?
The tools you’ll need to build a cardboard wardrobe are relatively simple and readily available. Essential tools include a utility knife or box cutter for cutting the cardboard, a ruler or measuring tape for accurate measurements, packing tape or duct tape for securing the pieces together, and a marker or pen for marking measurements and guidelines. You may also find it helpful to have a cutting mat to protect your work surface, a hot glue gun for attaching smaller pieces, and a level to ensure that your wardrobe is straight and stable.
Is a cardboard wardrobe environmentally friendly?
Yes, building a cardboard wardrobe is an environmentally friendly choice. By repurposing cardboard boxes, you’re reducing waste and giving these materials a new lease on life. Cardboard is a recyclable material, so even when your wardrobe eventually reaches the end of its lifespan, you can recycle it and contribute to a circular economy. Compared to purchasing a new wardrobe made from virgin materials, building a cardboard wardrobe has a significantly lower environmental impact. It’s a sustainable and responsible way to furnish your home and reduce your carbon footprint.
Leave a Comment