

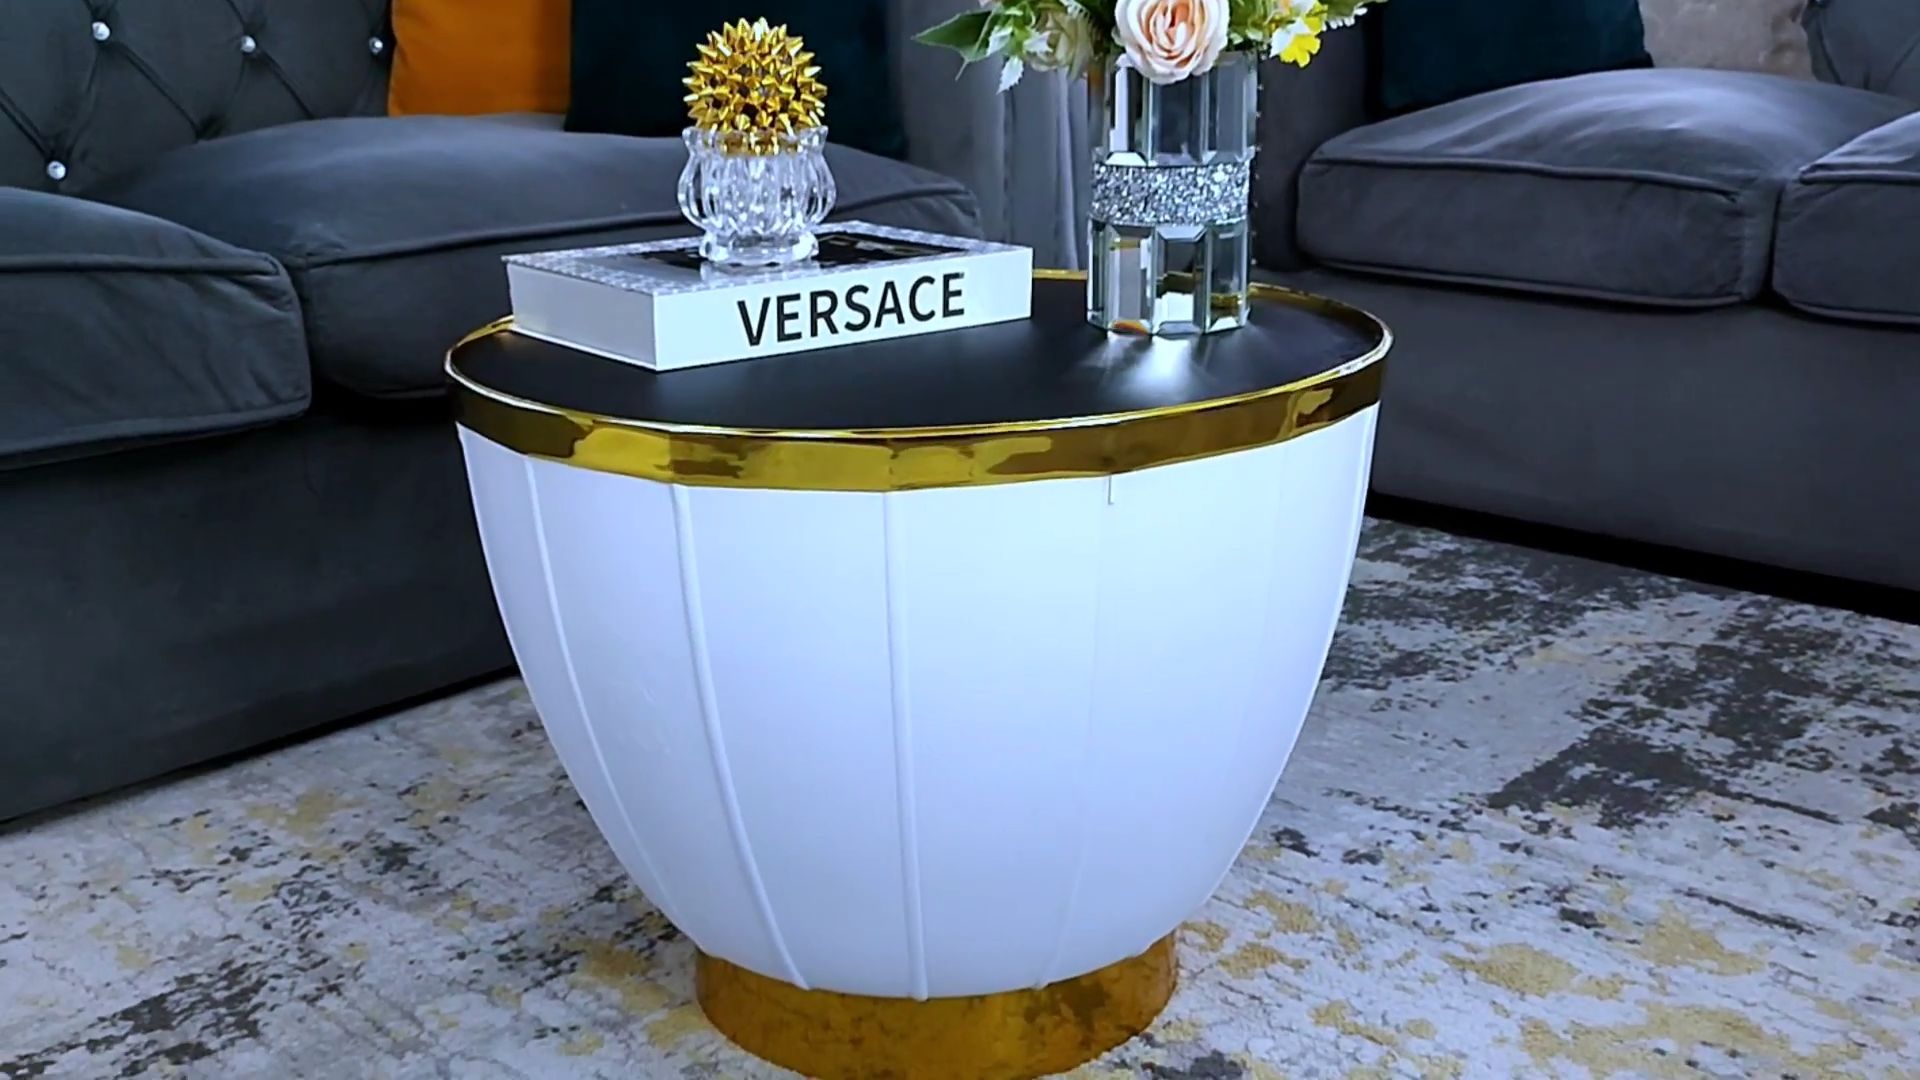
DIY Coffee Table from Wash Basin: Tired of the same old, boring coffee tables? I know I was! That’s why I decided to embark on a fun and surprisingly easy DIY project that not only adds a unique touch to my living room but also repurposes something that would otherwise end up in a landfill. We’re talking about transforming an old wash basin into a stunning, one-of-a-kind coffee table!
Repurposing materials has a rich history, dating back to times when resources were scarce and creativity was essential. Think of the resourceful pioneers who turned discarded items into functional tools and furniture. While we might not be facing the same level of necessity, the spirit of ingenuity and sustainability lives on. Plus, let’s be honest, there’s a certain satisfaction in creating something beautiful and functional from something unexpected.
Why should you try this DIY coffee table from wash basin trick? Well, for starters, it’s a fantastic way to express your personal style and add a conversation piece to your home. It’s also incredibly budget-friendly compared to buying a new coffee table. But most importantly, it’s a step towards a more sustainable lifestyle by giving a new life to an object that would otherwise be discarded. So, grab that old wash basin, and let’s get crafting! I’m excited to show you how easy and rewarding this project can be.
DIY Chic Coffee Table from an Upcycled Wash Basin
Okay, let’s get our hands dirty and transform an old wash basin into a stunning, one-of-a-kind coffee table! This project is surprisingly simple, budget-friendly, and a fantastic way to add a touch of quirky elegance to your living room. I’ll walk you through every step, so don’t worry if you’re not a seasoned DIYer.
What You’ll Need:
* An old wash basin (ceramic, porcelain, or even metal will work!)
* Table legs (you can buy these online, at hardware stores, or even repurpose them from an old table)
* Wood for the table base (a circular or square piece, depending on your basin’s shape)
* Screws (appropriate size for attaching the legs to the wood base and the base to the basin)
* Wood glue (for extra stability)
* Sandpaper (various grits, from coarse to fine)
* Primer (if you plan to paint the basin or wood)
* Paint (your choice of color and finish)
* Sealer (to protect the paint)
* Drill with various drill bits
* Screwdriver
* Measuring tape
* Pencil
* Safety glasses
* Dust mask
* Clamps (optional, but helpful)
* Drop cloth or newspaper (to protect your work surface)
* Optional: Decorative elements (stencils, mosaic tiles, etc.)
Choosing Your Wash Basin and Legs
The most important part is finding the right wash basin! Flea markets, antique stores, and even your own garage are great places to start. Consider the size and shape of your living room when choosing a basin. A smaller basin is perfect for a cozy space, while a larger one can make a bold statement in a bigger room.
For the legs, think about the overall style you’re going for. Sleek metal legs will give your coffee table a modern look, while ornate wooden legs will add a touch of vintage charm. You can even find hairpin legs for a mid-century modern vibe. The height of the legs will determine the height of your coffee table, so measure your existing furniture to get an idea of what works best.
Preparing the Wash Basin
Before we start assembling, we need to prep the wash basin. This step is crucial for ensuring a smooth and durable finish.
1. Clean the Basin Thoroughly: Use soap and water to remove any dirt, grime, or residue from the basin. If there are stubborn stains, try using a mild abrasive cleaner. Rinse well and let it dry completely.
2. Sand the Surface: Use coarse-grit sandpaper to lightly sand the entire surface of the basin. This will help the primer and paint adhere better. If there are any chips or cracks, you can fill them with epoxy filler and sand them smooth. Switch to medium-grit sandpaper and then fine-grit sandpaper for a smooth finish.
3. Prime the Basin (Optional): If you plan to paint the basin, applying a primer is highly recommended. Primer creates a uniform surface and helps the paint adhere better, resulting in a more durable and professional-looking finish. Apply a thin, even coat of primer and let it dry completely according to the manufacturer’s instructions.
4. Paint the Basin (Optional): Once the primer is dry, you can paint the basin in your desired color. Use a high-quality paint that is suitable for the material of your basin (e.g., ceramic paint for ceramic basins). Apply several thin coats of paint, allowing each coat to dry completely before applying the next. This will prevent drips and ensure a smooth, even finish.
5. Seal the Paint (Optional): To protect the paint from scratches and wear, apply a clear sealer. This will also make the basin easier to clean. Choose a sealer that is compatible with your paint and follow the manufacturer’s instructions.
Creating the Table Base
The table base is what will connect the legs to the wash basin. It needs to be sturdy and properly sized to support the weight of the basin.
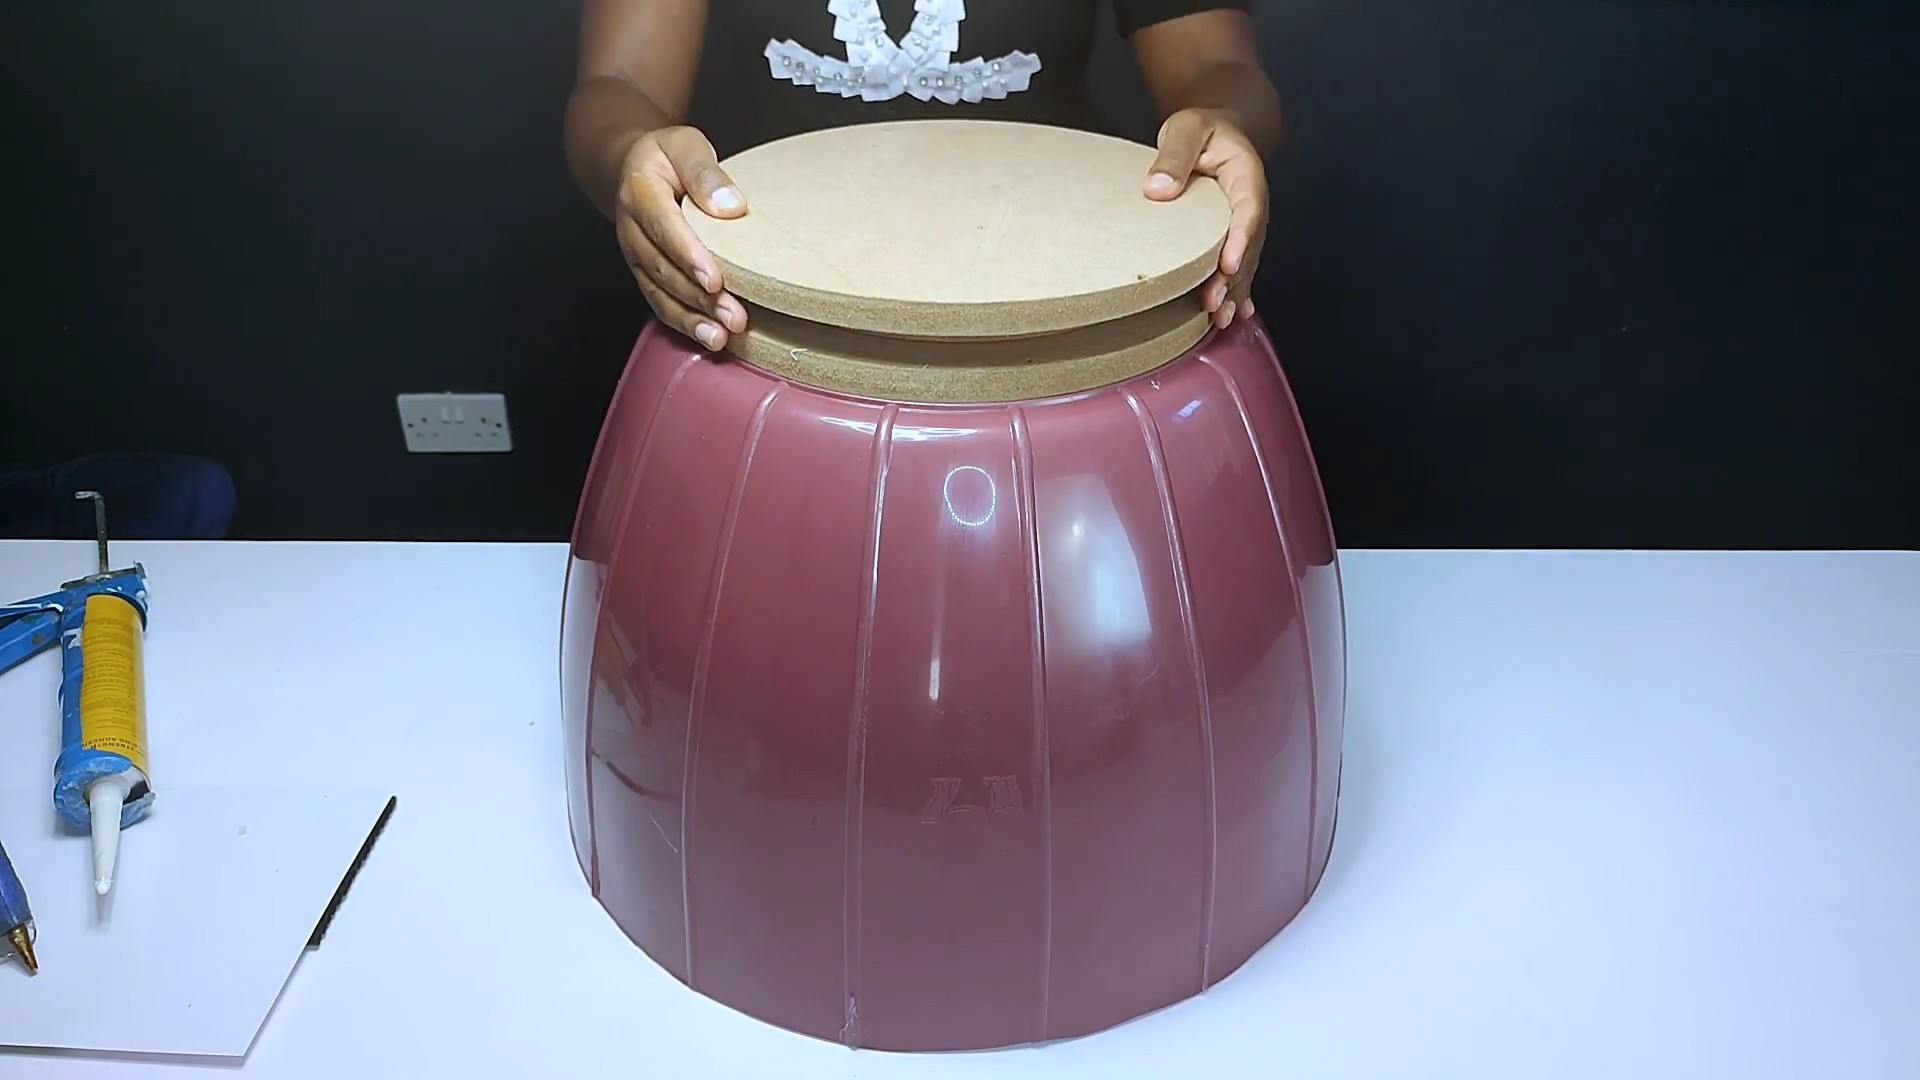
1. Measure the Basin’s Opening: Use a measuring tape to measure the diameter or width of the opening at the bottom of the wash basin. This will help you determine the size of the wood base.
2. Cut the Wood Base: Cut a piece of wood to the desired size and shape. You can use a circular saw or jigsaw to cut the wood. If you’re not comfortable cutting wood yourself, you can have it cut at a hardware store. The base should be slightly smaller than the opening of the basin so it sits nicely inside.
3. Sand the Wood Base: Sand the edges and surface of the wood base to remove any splinters or rough spots. This will also help the paint or stain adhere better.
4. Prime and Paint or Stain the Wood Base (Optional): If you want to paint or stain the wood base to match the basin or your decor, apply a primer first and then paint or stain it in your desired color. Let it dry completely.
5. Attach the Legs: Position the legs on the underside of the wood base, spacing them evenly around the perimeter. Use a pencil to mark the location of the screw holes. Drill pilot holes at the marked locations to prevent the wood from splitting. Apply wood glue to the legs where they will contact the wood base. Screw the legs into place using the appropriate size screws.
Assembling the Coffee Table
Now for the exciting part – putting everything together!
1. Position the Wood Base Inside the Basin: Carefully place the wood base with the attached legs inside the wash basin. Make sure the legs are facing downwards and the wood base is sitting securely inside the basin.
2. Secure the Base to the Basin: This is where things can get a little tricky, depending on the shape of your basin. The goal is to securely attach the wood base to the basin without damaging either.
* Option 1 (Drilling): If your basin is made of a material that can be drilled (like ceramic or porcelain), you can carefully drill pilot holes through the basin and into the wood base. Use a drill bit that is specifically designed for drilling through ceramic or porcelain. Be very careful not to apply too much pressure, as this could crack the basin. Once you have drilled the pilot holes, you can screw the base to the basin using the appropriate size screws.
* Option 2 (Adhesive): If you’re not comfortable drilling, you can use a strong adhesive to attach the base to the basin. Apply a generous amount of adhesive to the top of the wood base where it will contact the basin. Carefully position the base inside the basin and press down firmly. Use clamps to hold the base in place while the adhesive dries completely according to the manufacturer’s instructions. This method is best for lighter basins.
* Option 3 (Silicone Caulk): Another option is to use silicone caulk. Apply a bead of silicone caulk around the perimeter of the wood base where it will contact the basin. This will create a strong and waterproof seal. Carefully position the base inside the basin and press down firmly. Let the caulk dry completely according to the manufacturer’s instructions. This method is good for preventing wobbling and adding stability.
3. Let it Dry: If you used adhesive or caulk, allow it to dry completely before using the coffee table. This will ensure a strong and secure bond.
Finishing Touches and Decorating (Optional)
Once your coffee table is assembled, you can add some finishing touches to personalize it.
* Add Decorative Elements: Consider adding decorative elements to the basin, such as stencils, mosaic tiles, or decoupage. This is a great way to add your own personal style to the coffee table.
* Protect the Surface: To protect the surface of the coffee table from scratches and spills, you can apply a clear coat of polyurethane or varnish.
* Add a Glass Top: For a more polished look, you can add a custom-cut glass top to the coffee table. This will also make it easier to clean.
* Style it Up: Arrange your favorite books, magazines, and decorative objects on the coffee table to create a stylish and inviting focal point in your living room.
Tips and Tricks
* Safety First: Always wear safety glasses and a dust mask when sanding or drilling.
* Measure Twice, Cut Once: Double-check your measurements before cutting any wood.
* Use the Right Tools: Using the right tools will make the project easier and safer.
* Don’t Rush: Take your time and enjoy the process.
* Get Creative: Don’t be afraid to experiment with different colors, finishes, and decorative elements.
* Repurpose, Reuse, Recycle: This project is all about upcycling, so look for ways to repurpose materials you already have.
Troubleshooting
* Wobbly Table: If your coffee table is wobbly, check to make sure the legs are securely attached and evenly spaced. You can also add shims under the legs to level the table
Conclusion
So, there you have it! Transforming an old wash basin into a stunning and unique DIY coffee table is not just a project; it’s a statement. It’s a statement about your creativity, your commitment to sustainability, and your appreciation for one-of-a-kind pieces that tell a story. This project breathes new life into something discarded, turning what was once destined for the landfill into a functional and beautiful centerpiece for your living room.
Why is this DIY coffee table a must-try? Because it’s more than just furniture; it’s an experience. It’s the satisfaction of creating something with your own hands, the joy of repurposing materials, and the pride of owning a conversation starter that no one else has. It’s a chance to showcase your personal style and add a touch of eclectic charm to your home. Plus, let’s be honest, it’s incredibly budget-friendly compared to buying a brand-new, mass-produced coffee table.
But the beauty of this project lies in its adaptability. Feel free to experiment with different basin styles – a vintage porcelain basin will lend a classic, farmhouse feel, while a sleek, modern basin will create a more contemporary aesthetic. Consider painting the basin a bold color to make a real statement, or leave it as is for a more rustic look. The legs can also be customized to suit your taste. Opt for hairpin legs for a mid-century modern vibe, sturdy wooden legs for a more traditional feel, or even industrial-style metal legs for an edgy, urban look. You could even add a glass top for a smoother surface and extra protection.
Don’t be afraid to get creative with the interior of the basin as well. You could fill it with decorative stones, succulents, or even fairy lights to add a touch of whimsy. Imagine the warm glow emanating from within your coffee table on a cozy evening!
This DIY coffee table project is a fantastic way to express your individuality and create a truly unique piece of furniture.
We understand that embarking on a DIY project can sometimes feel daunting, but trust us, this one is surprisingly simple and rewarding. With a little bit of effort and creativity, you can transform an old wash basin into a stunning coffee table that will be the envy of all your guests.
So, what are you waiting for? Gather your materials, unleash your inner DIY enthusiast, and get started on your own wash basin coffee table today! We’re confident that you’ll love the results.
And most importantly, we want to see your creations! Share your finished coffee tables with us on social media using #DIYWashBasinCoffeeTable. We can’t wait to see your unique interpretations and be inspired by your creativity. Let’s build a community of DIY enthusiasts who are passionate about repurposing, creating, and sharing their amazing projects.
FAQ
What kind of wash basin is best for this project?
The best type of wash basin depends on the aesthetic you’re aiming for. Vintage porcelain basins offer a classic, farmhouse look, while modern ceramic basins provide a sleek, contemporary feel. Consider the size and shape of the basin as well. A larger basin will result in a larger coffee table, while a smaller basin will create a more compact piece. Also, inspect the basin for any cracks or damage before starting the project. Minor imperfections can add character, but significant damage may compromise the stability of the finished table.
Where can I find a suitable wash basin?
There are several places to find wash basins for this project. Check your local salvage yards, architectural salvage stores, and antique shops for vintage options. You can also find used basins on online marketplaces like Craigslist, Facebook Marketplace, and eBay. Don’t forget to ask friends and family if they have any old basins they’re looking to get rid of. Sometimes, the best finds are right under your nose!
What type of legs should I use for the coffee table?
The choice of legs depends on your personal style and the overall aesthetic you’re trying to achieve. Hairpin legs are a popular choice for a mid-century modern look. Wooden legs offer a more traditional feel, while metal legs provide an industrial vibe. Consider the height of the legs as well. A taller set of legs will result in a higher coffee table, while a shorter set will create a lower, more modern look. You can find legs at most hardware stores or online retailers specializing in furniture legs.
How do I attach the legs to the wash basin?
The best method for attaching the legs will depend on the material of the basin and the type of legs you’re using. For porcelain or ceramic basins, epoxy adhesive is a strong and reliable option. Make sure to clean the surfaces thoroughly before applying the adhesive. For metal basins, you may be able to weld the legs directly to the basin. Alternatively, you can use bolts and nuts to secure the legs to a metal plate that is then attached to the basin with adhesive. Always follow the manufacturer’s instructions for the adhesive or welding equipment you’re using.
Is it necessary to seal the wash basin?
Sealing the wash basin is recommended, especially if it’s made of porous material like concrete or unglazed ceramic. Sealing will help protect the basin from stains and water damage. You can use a sealant specifically designed for the material of your basin. Apply the sealant according to the manufacturer’s instructions, and allow it to dry completely before using the coffee table.
What if my wash basin has a drain hole?
If your wash basin has a drain hole, you have a few options. You can plug the hole with a rubber stopper or a decorative cap. Alternatively, you can use the hole to run electrical cords for lighting or other accessories. If you choose to use the hole for electrical cords, make sure to use appropriate safety measures and consult with a qualified electrician if needed.
Can I add a glass top to the coffee table?
Yes, adding a glass top is a great way to create a smoother surface and protect the wash basin. Measure the diameter of the basin and order a custom-cut glass top from a local glass shop. You can use clear silicone adhesive to secure the glass top to the basin.
How do I clean and maintain the coffee table?
The cleaning and maintenance of your coffee table will depend on the material of the wash basin and the type of finish you’ve applied. For porcelain or ceramic basins, you can use a mild soap and water solution. Avoid using abrasive cleaners, as they can scratch the surface. For metal basins, you can use a metal cleaner to remove any rust or tarnish. If you’ve applied a sealant, follow the manufacturer’s instructions for cleaning and maintenance.
Is this project suitable for beginners?
Yes, this project is suitable for beginners with basic DIY skills. The most challenging part of the project is attaching the legs to the wash basin, but with the right tools and materials, it’s a manageable task. If you’re unsure about any part of the project, don’t hesitate to ask for help from a friend or family member who has experience with DIY projects.
How much will this project cost?
The cost of this project will vary depending on the materials you use and where you source them. If you already have a wash basin and some of the necessary tools, the cost will be significantly lower. You can expect to spend anywhere from $50 to $200 on this project, depending on your choices. However, even at the higher end of that range, it’s still a much more affordable option than buying a brand-new coffee table.

Leave a Comment