

DIY fruit crate closet: Tired of staring at that overflowing pile of clothes, wishing for a magical organization solution? I get it! We’ve all been there. But what if I told you that the answer to your closet chaos might be hiding in plain sight – or, more accurately, in a stack of humble fruit crates?
Believe it or not, repurposing fruit crates for storage isn’t a new trend. For generations, resourceful folks have been transforming these sturdy wooden containers into everything from bookshelves to coffee tables. Think of it as a nod to the “make do and mend” spirit of the past, updated for the modern, eco-conscious home.
But why a DIY fruit crate closet? Well, beyond the undeniable charm and rustic aesthetic, it’s a budget-friendly and incredibly customizable solution. Let’s face it, traditional closet systems can be expensive and often lack personality. This DIY project allows you to create a storage space that perfectly fits your needs and reflects your unique style. Plus, it’s a fantastic way to give discarded materials a new lease on life, contributing to a more sustainable lifestyle. So, ditch the clutter and embrace the creativity! Let’s dive into the wonderful world of DIY fruit crate closets and transform your space, one crate at a time.
DIY Fruit Crate Closet: Rustic Charm Meets Organized Storage
Okay, so you’re tired of your clothes overflowing, but you’re not exactly thrilled with the idea of a boring, mass-produced closet system? I get it! I was in the same boat. That’s when I stumbled upon the idea of using fruit crates to build a unique and totally customizable closet. It’s surprisingly easy, budget-friendly, and adds a fantastic rustic touch to any room. Let me walk you through how I built mine!
Materials You’ll Need:
Before we dive in, let’s gather our supplies. This is crucial for a smooth building process.
* Fruit Crates: The star of the show! Decide how many you need based on your space and storage requirements. I used a mix of different sizes for visual interest, but consistency works too. Look for sturdy crates – you don’t want them collapsing under the weight of your clothes. You can often find them at farmers’ markets, antique stores, or even online.
* Sandpaper: Medium and fine grit. We’re going for rustic, not splintery!
* Wood Stain or Paint: Choose a color that complements your room’s decor. I went with a weathered gray stain for a farmhouse vibe.
* Paintbrushes or Rags: For applying the stain or paint. Rags work great for stains, giving you more control.
* Wood Screws: Different lengths depending on the thickness of your crate wood. Err on the side of caution and get a variety.
* Drill with Drill Bits: You’ll need a drill bit slightly smaller than your wood screws for pilot holes, and possibly a larger one for countersinking the screws.
* Measuring Tape: Essential for planning your layout and ensuring everything is level.
* Level: Absolutely crucial for a stable and visually appealing closet.
* Safety Glasses: Protect those peepers!
* Work Gloves: To keep your hands clean and splinter-free.
* Optional: Wood Glue: For extra stability, especially if you’re stacking crates high.
* Optional: Backing Material (Plywood, Fabric, or Chicken Wire): To enclose the back of your closet and prevent items from falling out.
* Optional: Shelf Liners: To protect your clothes and add a touch of personalization.
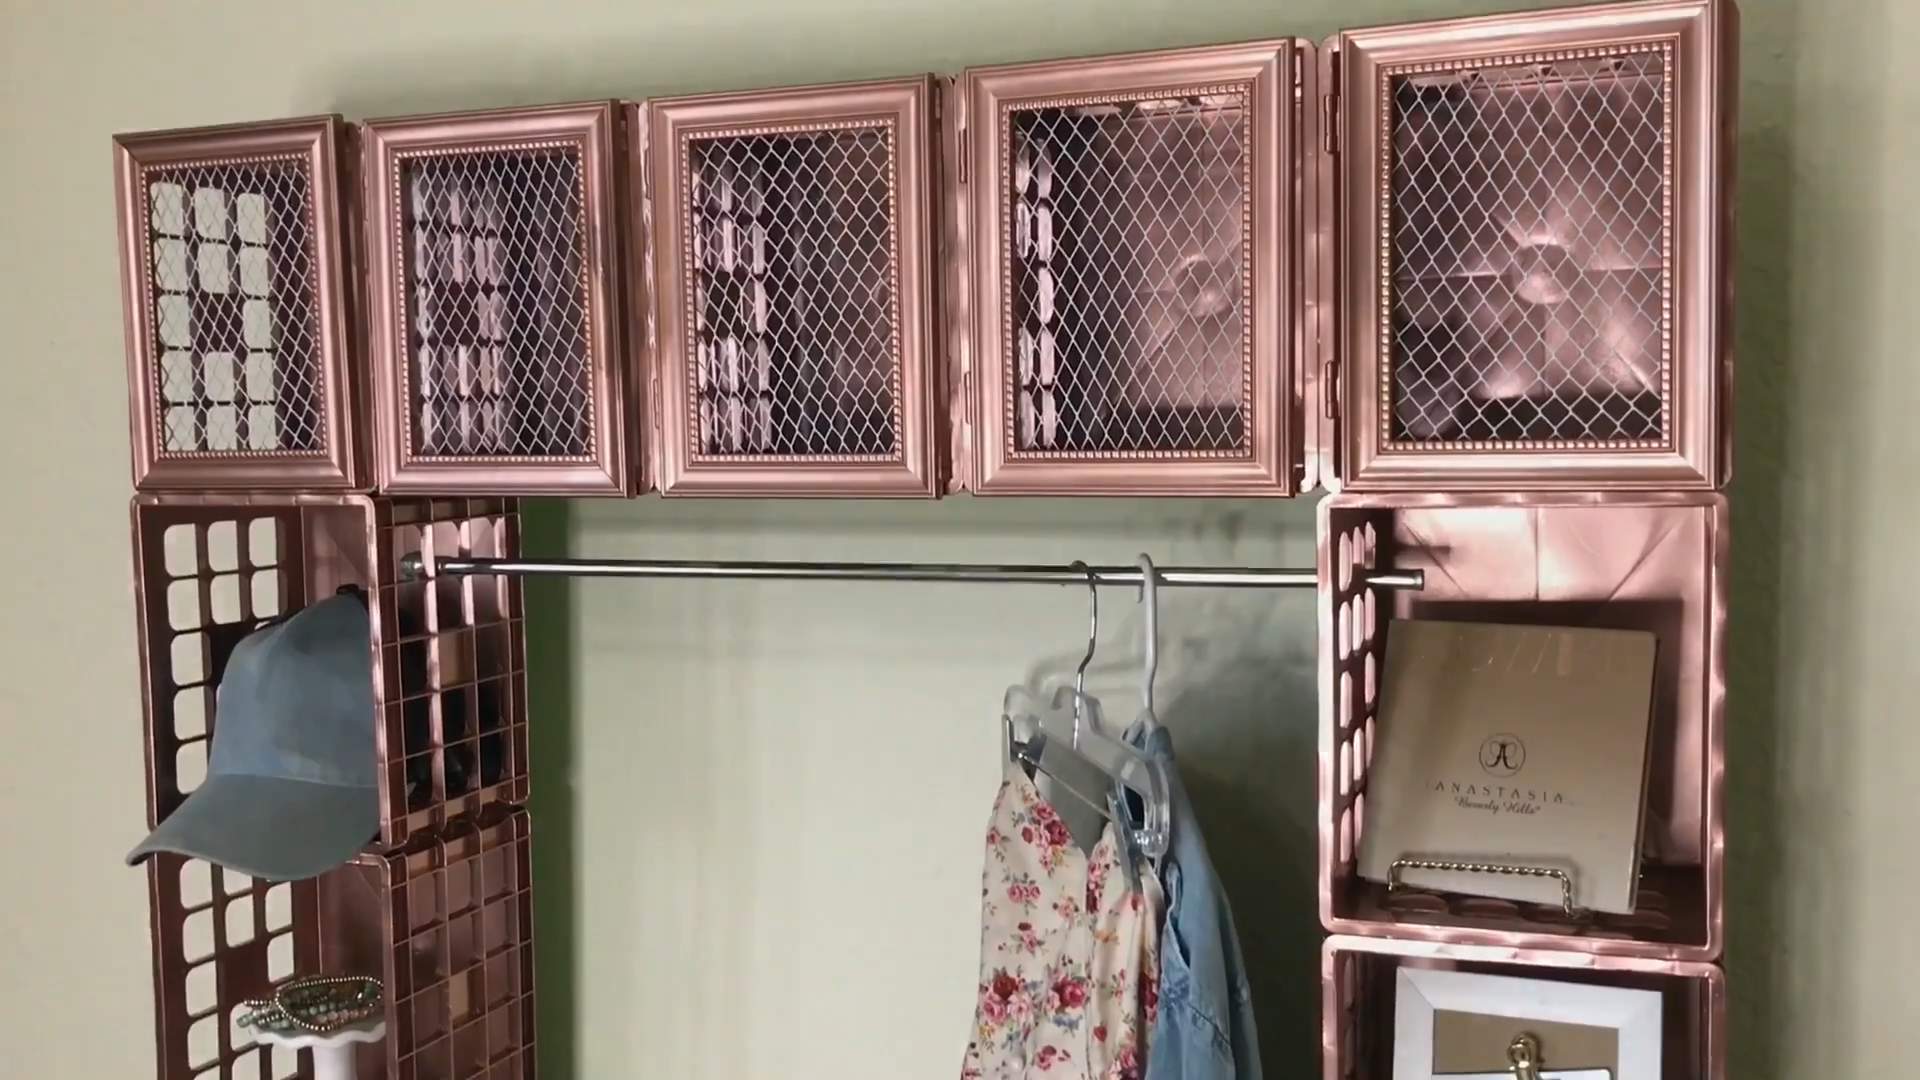
* Optional: Closet Rod and Brackets: If you want to incorporate hanging space.
* Optional: Casters (Wheels): To make your closet mobile.
Preparing the Crates: Sanding and Staining
This is where we transform those rough crates into something beautiful!
1. Inspect the Crates: Before you even think about sanding, give each crate a thorough inspection. Look for any loose nails, staples, or splinters. Remove or hammer down anything that could be a hazard.
2. Sanding Time: Start with the medium-grit sandpaper to smooth out any rough edges and surfaces. Pay special attention to the corners and edges. Once you’ve removed the major imperfections, switch to the fine-grit sandpaper for a super-smooth finish. Remember to sand with the grain of the wood.
3. Dust Removal: After sanding, wipe down each crate with a damp cloth to remove all the sanding dust. This is important for proper stain or paint adhesion. Let the crates dry completely before moving on to the next step.
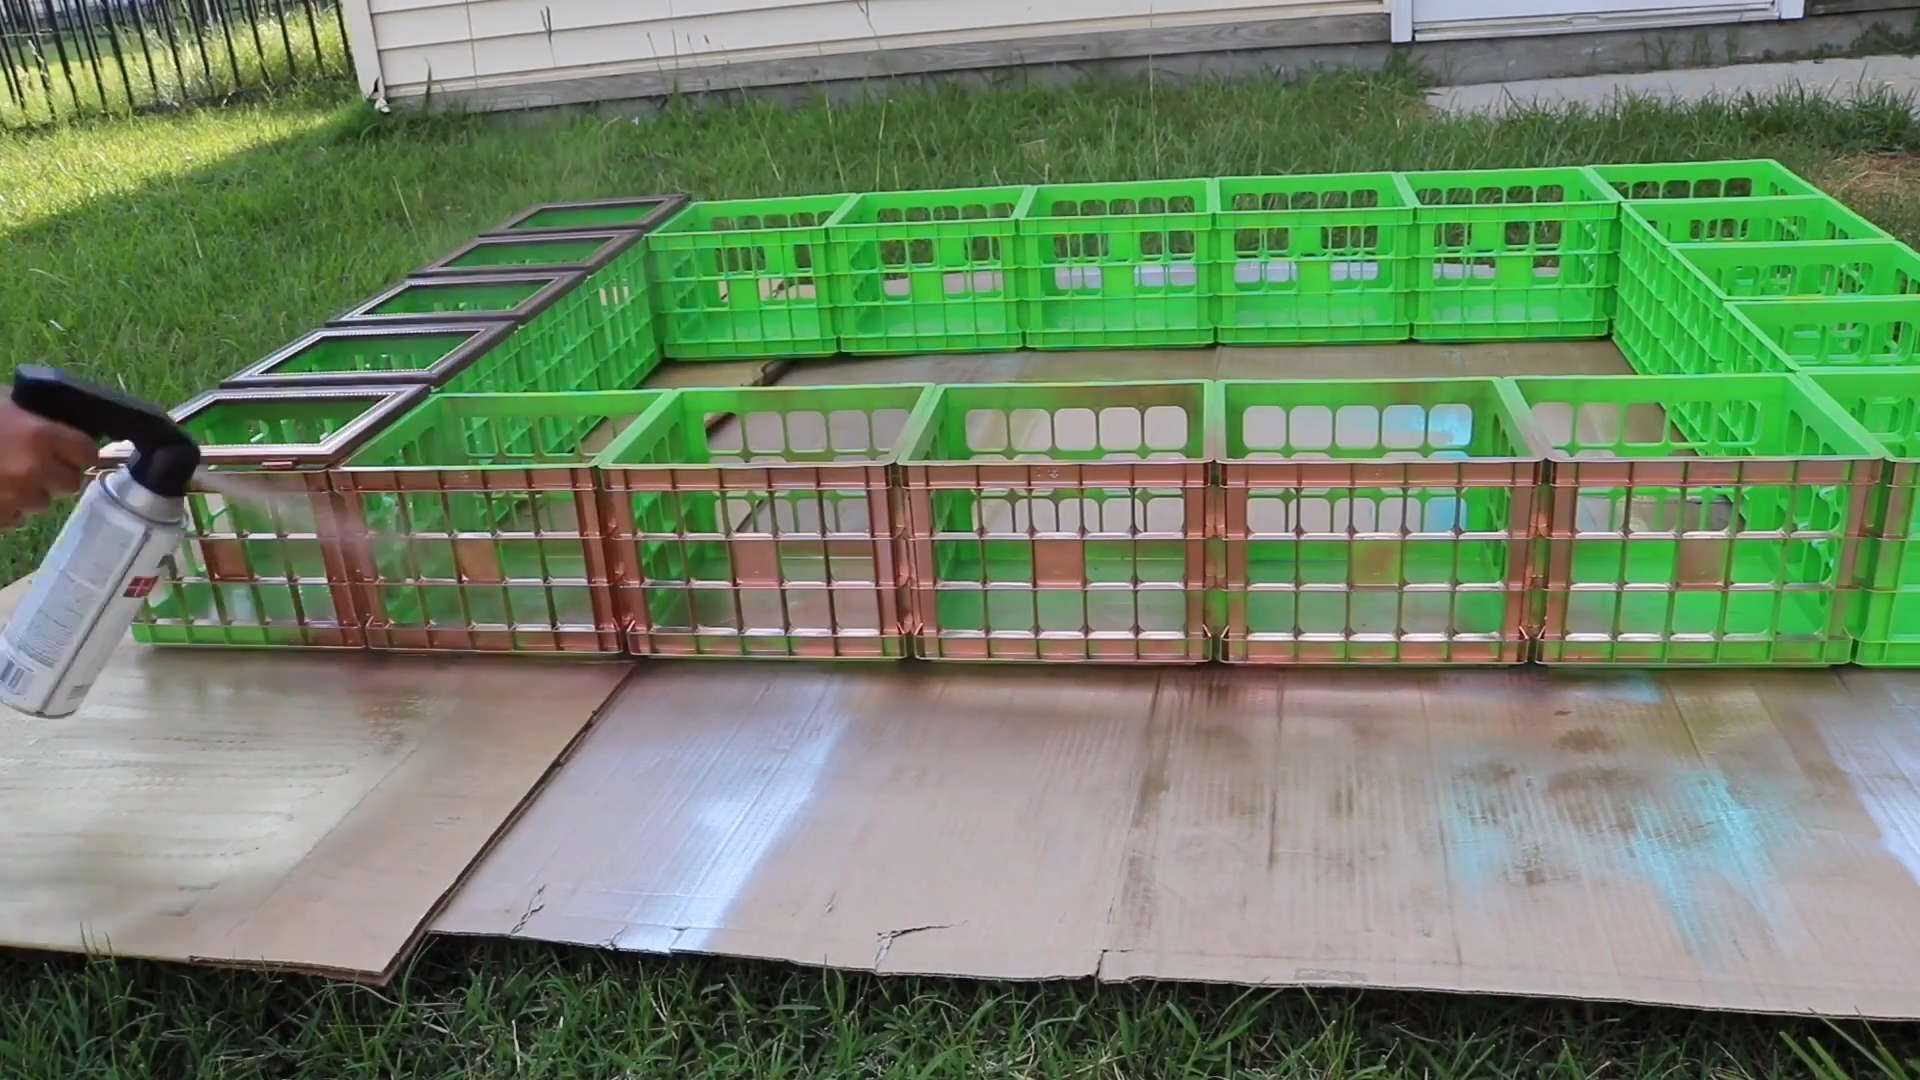
4. Staining or Painting: Now for the fun part! If you’re using stain, apply it evenly with a rag or brush, following the manufacturer’s instructions. I like to work in small sections, wiping off the excess stain as I go. This allows me to control the color intensity. If you’re using paint, apply a primer first for better adhesion and coverage. Then, apply two coats of paint, allowing each coat to dry completely before applying the next.
5. Drying Time: Let the stained or painted crates dry completely before handling them. This usually takes at least 24 hours, depending on the product you’re using and the humidity.
Assembling Your Fruit Crate Closet: The Fun Part!
Now that your crates are prepped and pretty, it’s time to build your closet!
1. Plan Your Layout: Before you start screwing things together, take some time to plan your layout. Consider the size of your space, the amount of storage you need, and the overall look you’re going for. I sketched out a few different layouts on paper before settling on one. Think about incorporating different crate orientations (vertical and horizontal) for visual interest.
2. Start with the Base: Begin by assembling the base of your closet. If you’re using casters, attach them to the bottom of the crates that will form the base. Make sure the casters are securely attached and can support the weight of the closet.
3. Secure the Crates: Now, start attaching the crates to each other using wood screws. Pre-drill pilot holes to prevent the wood from splitting. Apply wood glue to the joining surfaces for extra stability. Use a level to ensure that each crate is aligned properly before screwing it in place.
4. Stacking and Securing: If you’re stacking crates, make sure they are securely attached to each other. Use longer screws for added strength. Again, pre-drilling pilot holes is essential. Consider staggering the crates for a more dynamic look.
5. Adding a Backing (Optional): If you want to enclose the back of your closet, you can attach a piece of plywood, fabric, or even chicken wire. Measure the dimensions of the back of the closet and cut the backing material to size. Attach it to the crates using staples, nails, or screws.
6. Installing a Closet Rod (Optional): If you want to incorporate hanging space, install a closet rod and brackets. Measure the width of the section where you want to hang clothes and cut the closet rod to size. Attach the brackets to the crates using screws, making sure they are level and securely mounted.
7. Finishing Touches: Add any finishing touches, such as shelf liners, decorative hardware, or lighting. Step back and admire your handiwork!
Adding Personal Touches and Customizations
This is where you can really make your fruit crate closet your own!
* Shelf Liners: Add shelf liners to protect your clothes and add a pop of color or pattern. You can use contact paper, fabric, or even decorative paper.
* Decorative Hardware: Replace the existing hardware on the crates with decorative knobs, pulls, or handles. This can instantly elevate the look of your closet.
* Lighting: Add lighting to your closet to make it easier to see your clothes and accessories. You can use battery-operated LED lights, string lights, or even a small lamp.
* Baskets and Bins: Use baskets and bins to organize smaller items, such as socks, underwear, and accessories. This will help keep your closet tidy and clutter-free.
* Labels: Label your shelves and bins to make it easy to find what you’re looking for. You can use chalkboard labels, adhesive labels, or even handwritten labels.
* Fabric Panels: Attach fabric panels to the front of some of the crates to create a more enclosed and private storage space. This is a great way to hide items that you don’t want on display.
* Plants: Add a few small plants to your closet to bring some life and freshness to the space. Choose plants that thrive in low-light conditions.
* Mirrors: Attach a mirror to the inside of one of the crate doors to create a convenient dressing area.
Tips and Tricks for a Successful Fruit Crate Closet
* Source Quality Crates: The sturdier the crates, the longer your closet will last. Don’t be afraid to ask around for the best sources.
* Don’t Skip the Sanding: Trust me, your clothes (and your skin!) will thank you.
* Plan, Plan, Plan: A well-thought-out layout is key to a functional and aesthetically pleasing closet.
* Use a Level: Seriously, this is non-negotiable. A level closet is a happy closet.
* Don’t Be Afraid to Experiment: This is your project! Get creative and have fun with it.
* Consider Wall Anchors: If you’re building a tall closet, consider anchoring it to the wall for added stability, especially if you have kids or pets.
* Think About Weight Distribution: Place heavier items on the bottom shelves to prevent the closet from becoming top-heavy.
* Regularly Declutter: Even the most organized closet can become cluttered over time. Take some time every few months to declutter and get rid of items you no longer need.
Building a fruit crate closet is a rewarding DIY project that adds character and functionality to your space. With a little planning and effort, you can create a unique and stylish storage solution that you’ll love for years to come. Happy
Conclusion
So, there you have it! Transforming humble fruit crates into a stylish and functional closet is not just a budget-friendly solution; it’s a statement. It’s a statement about creativity, resourcefulness, and a commitment to sustainable living. Forget those generic, mass-produced storage solutions that lack personality. This DIY fruit crate closet allows you to create a storage space that is uniquely yours, reflecting your individual style and needs.
Why is this DIY trick a must-try? Because it offers a multitude of benefits that extend far beyond mere storage. It’s about:
* Saving Money: Let’s face it, closet systems can be expensive. Fruit crates, especially if you can source them second-hand or from local markets, are a fraction of the cost.
* Customization: You have complete control over the size, configuration, and aesthetic of your closet. Need more hanging space? Add a rod. Want to display your favorite shoes? Leave some crates open. The possibilities are endless.
* Sustainability: Reusing and repurposing materials is a fantastic way to reduce your environmental impact. Give those discarded fruit crates a new lease on life and contribute to a more sustainable lifestyle.
* Adding Character: A fruit crate closet adds a rustic, charming, and unique touch to any room. It’s a conversation starter and a reflection of your personality.
* Easy Assembly: You don’t need to be a master carpenter to build this closet. With basic tools and a little bit of elbow grease, you can have a functional and stylish storage solution in no time.
Ready to take your DIY fruit crate closet to the next level? Here are a few suggestions and variations to inspire you:
* Paint or Stain: Transform the look of your crates with paint or stain. Choose colors that complement your existing décor or create a bold statement with contrasting hues.
* Add Fabric Backing: For a more polished look, consider adding fabric backing to the crates. This will also prevent small items from falling through the gaps.
* Incorporate Shelves: Cut pieces of wood to fit inside the crates and create shelves for folded clothes, accessories, or decorative items.
* Add Wheels: Make your closet mobile by attaching wheels to the bottom crates. This is especially useful for small spaces where you need to be able to move the closet around.
* Mix and Match: Combine fruit crates with other storage elements, such as baskets, bins, or hanging organizers, to create a truly customized closet system.
* Labeling: Use labels to organize your items and make it easy to find what you’re looking for. Chalkboard labels, printed labels, or even handwritten tags can add a personal touch.
* Lighting: Consider adding LED strip lights inside the crates to illuminate your clothes and accessories. This will not only make it easier to find things but also add a touch of elegance to your closet.
Don’t be afraid to experiment and get creative! The beauty of this DIY project is that it’s completely customizable to your needs and preferences.
We encourage you to try this DIY fruit crate closet project and share your experience with us. We’d love to see your creations and hear about your tips and tricks. Share your photos and stories on social media using #DIYFruitCrateCloset. Let’s inspire each other to create beautiful and sustainable storage solutions! This is more than just a closet; it’s a testament to the power of DIY and the beauty of repurposing. So, grab some fruit crates, unleash your creativity, and transform your space today!
Frequently Asked Questions (FAQ)
Q: Where can I find fruit crates?
A: Fruit crates can be sourced from a variety of places. Your best bet is to check with local farmers markets, grocery stores (ask if they have any they are discarding), and produce distributors. You can also find them online through classifieds websites like Craigslist or Facebook Marketplace. Sometimes, you can even find them at flea markets or antique stores. Consider asking friends or neighbors who might have access to them as well. Remember to inspect the crates for any damage or pests before bringing them home.
Q: What kind of fruit crates are best for this project?
A: The best fruit crates for this project are sturdy and in good condition. Look for crates made of solid wood, rather than flimsy cardboard. Avoid crates that are heavily damaged, cracked, or infested with pests. The size and shape of the crates will depend on your personal preferences and the amount of storage space you need. Standard-sized fruit crates are typically around 12-16 inches wide, 18-24 inches long, and 10-12 inches deep.
Q: Do I need to treat the fruit crates before using them?
A: Yes, it’s a good idea to treat the fruit crates before using them, especially if they are used or have been stored outdoors. Start by cleaning the crates thoroughly with soap and water to remove any dirt, debris, or residue. Allow them to dry completely. If you’re concerned about pests, you can spray them with a non-toxic insecticide. You may also want to sand the crates to smooth out any rough edges or splinters. Finally, consider applying a sealant or varnish to protect the wood and prevent it from absorbing moisture.
Q: How do I assemble the fruit crate closet?
A: Assembling the fruit crate closet is relatively simple. Start by arranging the crates in the desired configuration. You can stack them vertically, horizontally, or a combination of both. Once you’re happy with the arrangement, secure the crates together using screws, nails, or wood glue. For added stability, you can attach the closet to the wall using brackets or anchors. If you’re adding shelves or other features, now is the time to install them.
Q: What tools do I need for this project?
A: The tools you’ll need for this project will depend on the specific design and features you’re incorporating. However, some basic tools that are commonly used include:
* A saw (for cutting wood for shelves or other features)
* A drill (for screwing the crates together and attaching hardware)
* A screwdriver (for tightening screws)
* A hammer (for nailing the crates together)
* Sandpaper (for smoothing out rough edges)
* A measuring tape (for measuring and planning the layout)
* A level (for ensuring the closet is level)
* Safety glasses (for protecting your eyes)
* Gloves (for protecting your hands)
Q: How much weight can a fruit crate closet hold?
A: The amount of weight a fruit crate closet can hold will depend on the strength of the crates and how they are assembled. Generally, solid wood fruit crates can hold a significant amount of weight, especially if they are properly secured together. However, it’s important to distribute the weight evenly and avoid overloading any one crate. If you’re planning to store heavy items in the closet, consider reinforcing the crates with additional supports or using thicker wood.
Q: Can I paint or stain the fruit crates?
A: Absolutely! Painting or staining the fruit crates is a great way to customize the look of your closet and match it to your existing décor. Before painting or staining, make sure to sand the crates to smooth out any rough edges and apply a primer to help the paint or stain adhere properly. Choose a paint or stain that is appropriate for wood and follow the manufacturer’s instructions. You can also use stencils or other decorative techniques to add a personal touch.
Q: How can I make the closet more stable?
A: There are several ways to make the fruit crate closet more stable. First, make sure to use sturdy crates that are in good condition. Second, secure the crates together tightly using screws, nails, or wood glue. Third, attach the closet to the wall using brackets or anchors. Fourth, distribute the weight evenly throughout the closet. Finally, consider adding additional supports, such as wooden legs or a base, to provide extra stability.
Q: How do I clean and maintain the fruit crate closet?
A: Cleaning and maintaining the fruit crate closet is relatively easy. Simply wipe down the crates with a damp cloth to remove any dust or dirt. For stubborn stains, you can use a mild soap and water solution. Avoid using harsh chemicals or abrasive cleaners, as they can damage the wood. Regularly inspect the closet for any signs of damage or wear and tear and make any necessary repairs.


Leave a Comment