

DIY lavender sachets: More than just a fragrant pouch, these little bundles of joy are a testament to the power of nature’s simplicity and a touch of your own creativity! Have you ever wondered how to keep moths away from your favorite wool sweater, or longed for a more natural way to freshen up your drawers? Well, you’re in the right place.
The use of lavender for its aromatic and therapeutic properties dates back centuries, with evidence suggesting its use in ancient Egypt and Rome for perfumes, medicines, and even embalming. Imagine, a scent so cherished it crossed continents and time periods! Today, we’re bringing that ancient wisdom into our modern homes with a fun and easy DIY project.
Let’s be honest, who wants to rely on harsh chemicals and artificial fragrances to keep their homes smelling fresh? Not me! That’s why I’m so excited to share this simple yet effective trick. DIY lavender sachets are a fantastic, all-natural alternative to commercial air fresheners and moth repellents. Plus, they make adorable gifts! In this article, I’ll guide you through the process of creating your own lavender sachets, so you can enjoy the calming scent of lavender and protect your belongings, all while embracing a more sustainable lifestyle. Get ready to unleash your inner crafter and fill your home with the sweet, soothing aroma of lavender!
DIY Lavender Sachets: A Beginner’s Guide to Fragrant Bliss
Hey there, fellow crafters! Ever wanted to fill your drawers, closets, or even your car with the soothing scent of lavender? Well, you’re in the right place! I’m going to walk you through creating your own lavender sachets. It’s a super easy and rewarding project, perfect for beginners and seasoned DIYers alike. Plus, they make fantastic handmade gifts!
What You’ll Need: Your Lavender Sachet Supply List
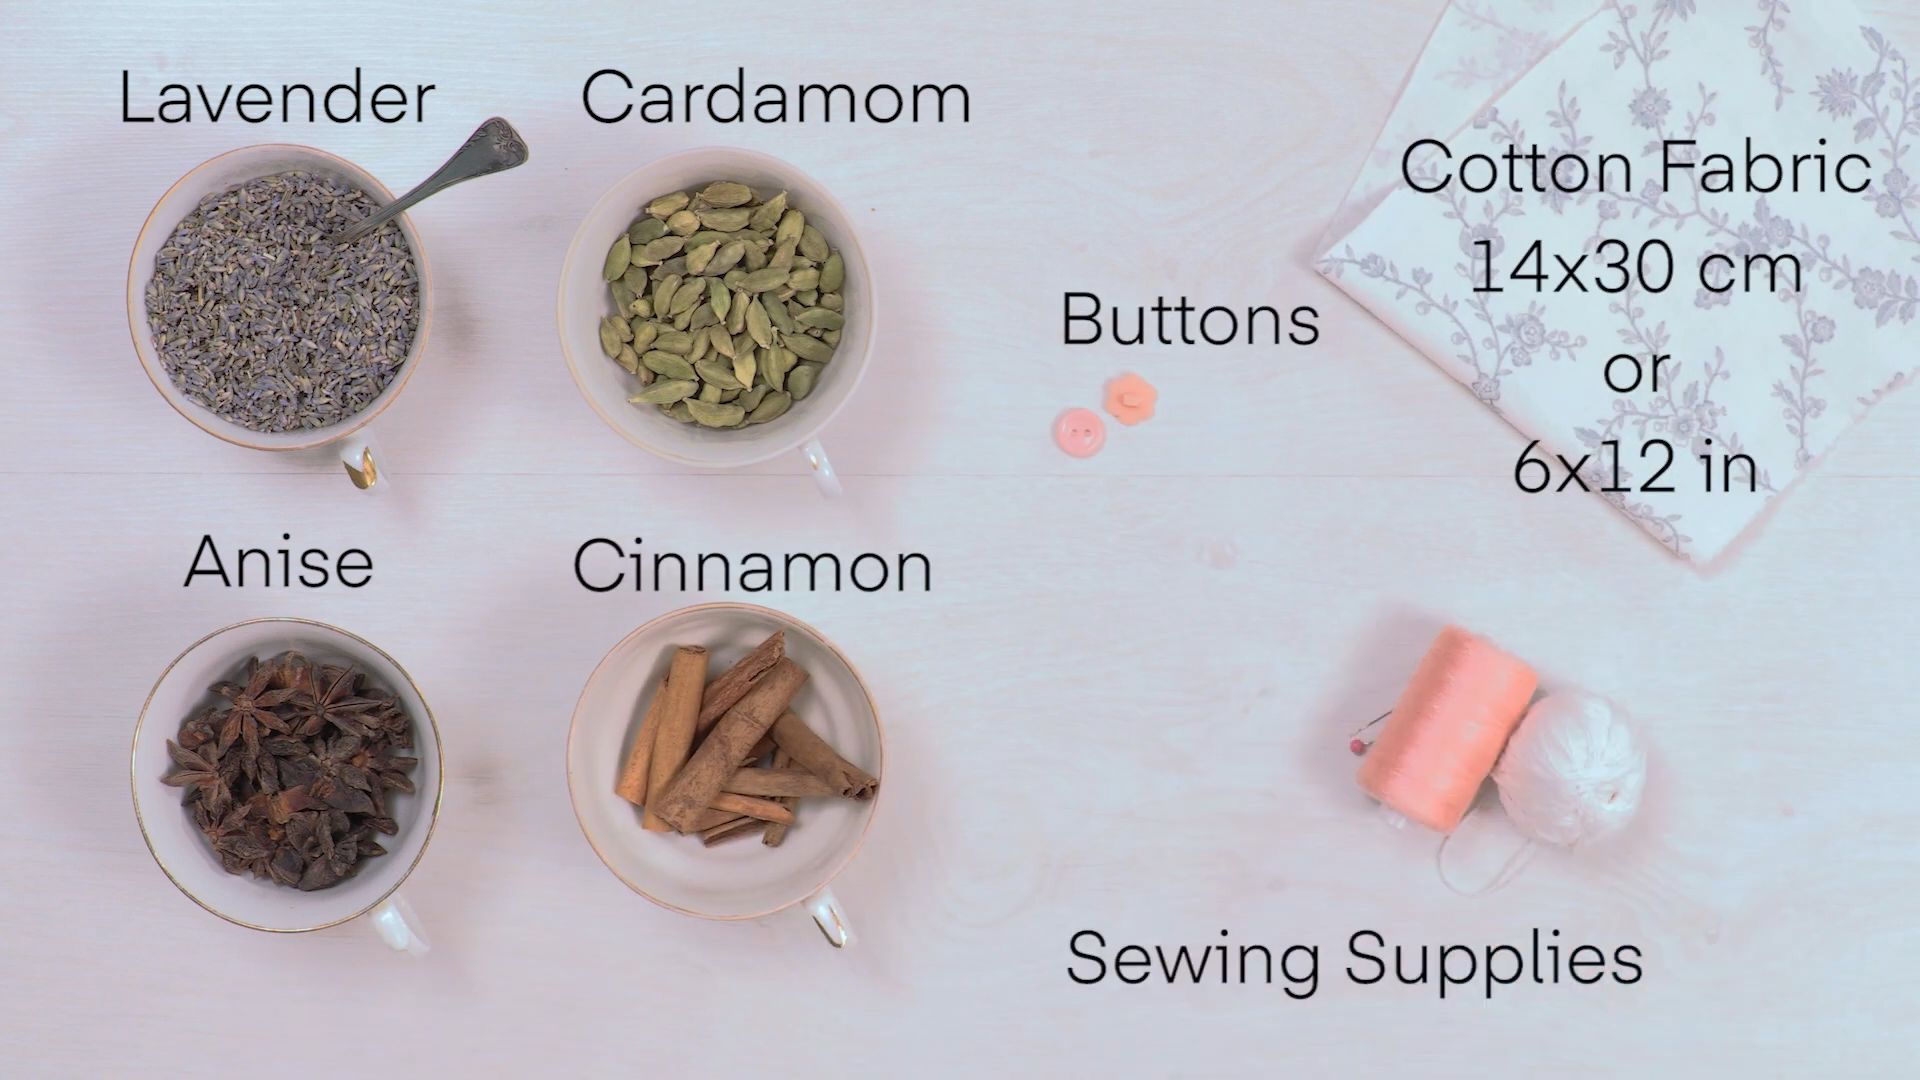
Before we dive in, let’s gather our supplies. Don’t worry, you probably have a lot of this stuff lying around already!
* Dried Lavender Buds: This is the star of the show! You can buy dried lavender buds online, at craft stores, or even grow and dry your own (more on that later!). The amount you need will depend on how many sachets you’re making. I usually buy a big bag to have on hand.
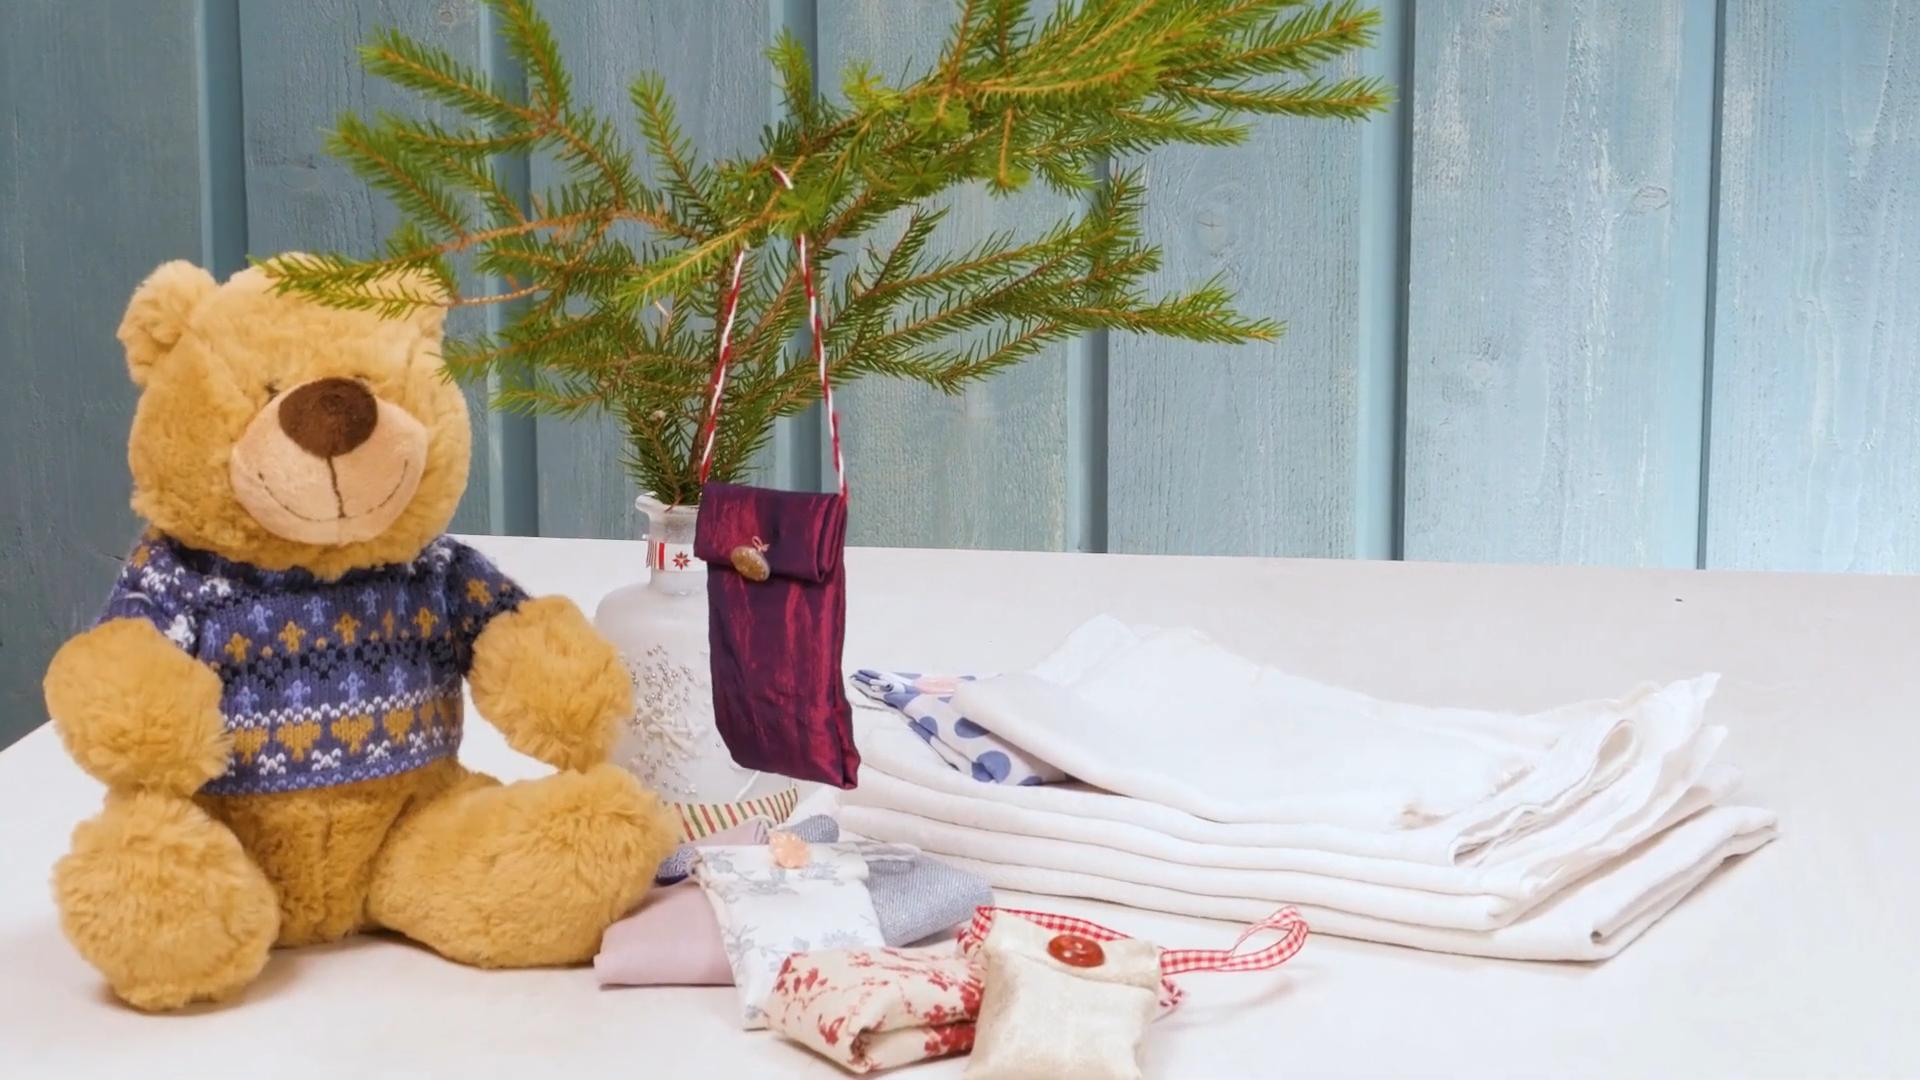
* Fabric: Choose a breathable fabric like cotton, linen, muslin, or even burlap. Scraps work great! Think about the size you want your sachets to be. I like to make mine about 4×4 inches, but feel free to experiment.
* Sewing Machine (Optional): If you have one, great! It’ll speed things up. But don’t worry if you don’t – hand-sewing works just as well.
* Needle and Thread: If you’re hand-sewing, you’ll need a needle and thread that matches your fabric.
* Scissors: For cutting your fabric.
* Ruler or Measuring Tape: To ensure your fabric squares are the right size.
* Pencil or Fabric Marker: For marking your cutting lines.
* Funnel (Optional): This can help you get the lavender buds into the sachets without making a mess. A paper cone works too!
* Embellishments (Optional): Get creative! You can add ribbons, buttons, lace, embroidery, or anything else that strikes your fancy.
* Rice (Optional): Adding a bit of rice to your lavender mixture helps to bulk it up and retain the scent longer.
Step-by-Step Instructions: Creating Your Lavender Sachets
Okay, let’s get started! I’ve broken it down into easy-to-follow steps.
1. Prepare Your Fabric:
* First, decide on the size of your sachets. As I mentioned, I like 4×4 inches, but you can adjust this to your preference.
* Using your ruler or measuring tape and pencil or fabric marker, mark out squares on your fabric. Remember to add a seam allowance of about 1/2 inch on each side. This will give you room to sew the edges together. So, for a 4×4 inch sachet, you’ll want to cut out squares that are 5×5 inches.
* Cut out the squares using your scissors. You’ll need two squares for each sachet.
2. Sewing the Sachets:
* Using a Sewing Machine: Place two fabric squares right sides together (meaning the patterned or “pretty” sides are facing each other). Sew around three sides of the square, leaving one side open. Use a straight stitch and a seam allowance of 1/2 inch. Remember to backstitch at the beginning and end of each seam to secure the stitches.
* Hand-Sewing: Place two fabric squares right sides together. Thread your needle and tie a knot at the end of the thread. Use a backstitch or a running stitch to sew around three sides of the square, leaving one side open. A backstitch is stronger and more durable, but a running stitch is faster. Make sure your stitches are close together to prevent the lavender buds from escaping.
* Trimming the Corners: Once you’ve sewn three sides, trim the corners of the fabric. This will help reduce bulk and make the corners look neater when you turn the sachet right side out. Be careful not to cut into the seam!
* Turning Right Side Out: Carefully turn the sachet right side out through the open side. Use a point turner or a blunt object (like a chopstick or the end of a pen) to gently push out the corners.
3. Filling the Sachets:
* Preparing the Lavender Mixture: In a bowl, mix your dried lavender buds with a small amount of rice (if using). The rice helps to absorb and retain the lavender scent. I usually use about 1/4 cup of rice for every cup of lavender buds.
* Filling the Sachet: Using a funnel or a paper cone, carefully pour the lavender mixture into the open sachet. Don’t overfill it – you want to leave some room to sew the opening closed. I usually fill it about 3/4 full.
4. Closing the Sachets:
* Folding the Edges: Fold the raw edges of the open side inward, about 1/2 inch. This will create a clean, finished edge.
* Sewing the Opening Closed: Using a sewing machine or hand-sewing, sew the opening closed. Use a straight stitch or a slip stitch (for hand-sewing) to create a neat and invisible closure. Make sure to backstitch at the beginning and end of the seam to secure the stitches.
5. Embellishing (Optional):
* Now comes the fun part! Decorate your sachets with ribbons, buttons, lace, embroidery, or anything else you like. You can glue on embellishments, sew them on, or even use fabric paint to create designs.
* I love adding a simple ribbon bow to mine. It’s a quick and easy way to add a touch of elegance.
Drying Your Own Lavender: From Garden to Sachet
If you’re feeling ambitious, you can even grow and dry your own lavender! It’s a rewarding process, and you’ll have a constant supply of fresh lavender for your sachets.
1. Harvesting Lavender:
* The best time to harvest lavender is in the morning, after the dew has dried but before the sun gets too hot.
* Cut the lavender stems when the flowers are just starting to open. This is when they have the most fragrance.
* Use sharp scissors or pruning shears to cut the stems, leaving about 2-3 inches of stem on the plant.
2. Drying Lavender:
* Bundling: Gather the lavender stems into small bundles and tie them together with twine or rubber bands.
* Hanging: Hang the bundles upside down in a cool, dark, and well-ventilated place. A closet or attic works well.
* Drying Time: It usually takes about 2-4 weeks for the lavender to dry completely. You’ll know it’s dry when the stems are brittle and the flowers easily crumble.
* Stripping the Buds: Once the lavender is dry, gently strip the buds from the stems. You can do this by running your fingers down the stems.
* Storing: Store the dried lavender buds in an airtight container in a cool, dark place until you’re ready to use them.
Creative Variations: Beyond the Basic Sachet
Want to take your lavender sachet game to the next level? Here are a few creative variations to try:
* Heart-Shaped Sachets: Cut your fabric into heart shapes instead of squares. These are perfect for Valentine’s Day or as a romantic gift.
* Sachet Pillows: Make larger sachets in the shape of small pillows. These are great for placing under your pillow at night to promote relaxation.
* Sachet Ornaments: Add a loop of ribbon to the top of your sachets to create fragrant ornaments for your Christmas tree or to hang around your home.
* Scented Drawer Liners: Sew together multiple sachets to create a long, narrow strip that you can use as a scented drawer liner.
* Lavender Eye Pillows: Fill a long, narrow sachet with lavender and flax seeds to create a soothing eye pillow. The flax seeds provide gentle pressure, while the lavender promotes relaxation.
* Adding Essential Oils: For an extra boost of fragrance, add a few drops of lavender essential oil to your dried lavender buds before filling the sachets.
* Mixing Herbs: Experiment with mixing other dried herbs with your lavender, such as chamomile, rose petals, or rosemary. Each herb will add its own unique fragrance and therapeutic properties.
Troubleshooting Tips: Common Issues and Solutions
Even with the best instructions, sometimes things don’t go exactly as planned. Here are a few common issues you might encounter and how to fix them:
* Lavender Buds Escaping: If you find that lavender buds are escaping from your sachets, it could be because your stitches are too far apart or your fabric is
Conclusion
So there you have it! Crafting your own DIY lavender sachets is more than just a fun afternoon project; it’s an investment in your well-being, a sustainable choice, and a personalized touch you can add to your home and life. Forget those mass-produced, often artificially scented air fresheners. With just a few simple ingredients and a little bit of your time, you can create aromatic treasures that are both beautiful and beneficial.
Why is this DIY trick a must-try? Because it empowers you to control the ingredients, ensuring you’re using pure, natural lavender without any hidden chemicals or synthetic fragrances. This is especially important for those with sensitivities or allergies. Plus, the act of creating something with your own hands is incredibly rewarding and therapeutic in itself. The gentle aroma of lavender as you work is an added bonus!
Beyond the basic recipe, the possibilities are endless. Want to boost the calming properties? Add a few drops of chamomile or sandalwood essential oil. Looking for a more invigorating scent? Try a blend of lavender and peppermint. You can even incorporate dried rose petals or other herbs for a unique and personalized fragrance. Experiment with different fabrics for your sachets – linen, cotton, and even burlap can all create a different aesthetic. Consider using upcycled fabric scraps for an even more eco-friendly approach.
These DIY lavender sachets aren’t just for drawers and closets. Place them under your pillow for a restful night’s sleep, tuck them into your luggage to keep your clothes smelling fresh, or even give them as thoughtful, handmade gifts. Imagine the delight of a friend or family member receiving a beautifully crafted sachet filled with the soothing scent of lavender.
We wholeheartedly encourage you to give this DIY project a try. It’s simple, affordable, and incredibly satisfying. Once you experience the joy of creating your own lavender sachets and the benefits they bring, you’ll wonder why you didn’t start sooner.
Don’t be afraid to get creative and personalize your sachets to suit your own preferences. And most importantly, we want to hear about your experience! Share your photos, tips, and variations in the comments below. Let’s build a community of lavender-loving crafters and inspire each other with our creations. What unique blends did you create? What fabrics did you use? What special touches did you add? We can’t wait to see what you come up with! This is your chance to embrace the power of aromatherapy and create something truly special with your own two hands. So gather your supplies, unleash your creativity, and get ready to experience the magic of DIY lavender sachets.
FAQ
What kind of lavender should I use for my sachets?
The best type of lavender for sachets is generally considered to be English lavender (Lavandula angustifolia). This variety has a sweet, floral scent that is both calming and long-lasting. However, you can also use other types of lavender, such as Lavandin (Lavandula x intermedia), which has a stronger, more camphoraceous scent. Experiment with different varieties to find the one you prefer. Make sure to use dried lavender buds for the best results. Fresh lavender will mold inside the sachet.
Where can I buy dried lavender buds?
Dried lavender buds are readily available at a variety of locations. You can find them at most craft stores, health food stores, and online retailers. Look for reputable suppliers that offer high-quality, fragrant lavender. You can also grow your own lavender and dry the buds yourself. This is a great way to ensure you have a constant supply of fresh, organic lavender for your sachets.
What kind of fabric is best for making lavender sachets?
Natural, breathable fabrics like cotton, linen, and muslin are ideal for making lavender sachets. These fabrics allow the scent of the lavender to permeate through the sachet. Avoid using synthetic fabrics, as they may not breathe as well and can trap moisture, potentially leading to mold. You can also use decorative fabrics like lace or embroidered cloth for a more elegant look.
How long will the scent of my lavender sachets last?
The scent of your lavender sachets will typically last for several months, depending on the quality of the lavender and the environment in which they are stored. To refresh the scent, gently squeeze the sachet to release more of the lavender oil. You can also add a few drops of lavender essential oil to the sachet to boost the fragrance. Storing the sachets in a cool, dry place will help to prolong their scent.
Can I use essential oils in my lavender sachets?
Yes, you can definitely use essential oils in your lavender sachets to enhance the scent or add other therapeutic benefits. Lavender essential oil is a natural choice, but you can also experiment with other complementary oils like chamomile, sandalwood, or cedarwood. Simply add a few drops of essential oil to the dried lavender buds before filling the sachets. Be careful not to overdo it, as too much essential oil can make the sachets oily and potentially stain fabrics.
Are lavender sachets safe for babies and pets?
While lavender is generally considered safe, it’s always best to exercise caution when using it around babies and pets. Avoid placing lavender sachets directly in a baby’s crib or play area, as they could pose a choking hazard. For pets, keep the sachets out of reach to prevent them from ingesting the lavender. Some animals may be sensitive to the scent of lavender, so monitor their behavior and remove the sachets if they show any signs of discomfort.
How do I clean my lavender sachets?
It’s generally not recommended to wash lavender sachets, as this can damage the fabric and diminish the scent of the lavender. If your sachets become soiled, spot clean them gently with a damp cloth and mild soap. Allow them to air dry completely before using them again. To keep your sachets fresh and clean, store them in a dust-free environment.
Can I use rice or other fillers in my lavender sachets?
While you can technically use rice or other fillers in your lavender sachets, it’s generally not recommended. Fillers can dilute the scent of the lavender and may not provide the same therapeutic benefits. If you want to add bulk to your sachets, consider using dried herbs like chamomile or rose petals, which will complement the lavender scent.
What are some creative ways to use lavender sachets?
Beyond the traditional uses of placing lavender sachets in drawers and closets, there are many other creative ways to enjoy their benefits. Place them under your pillow for a restful night’s sleep, tuck them into your car to freshen the air, or use them as potpourri in a decorative bowl. You can also give them as thoughtful, handmade gifts to friends and family. Consider adding a personalized tag or ribbon to make them even more special.
How do I make my own lavender oil to refresh the sachets?
Making your own lavender-infused oil is a great way to refresh your sachets and create other lavender-scented products. To make the oil, fill a clean glass jar with dried lavender buds and cover them with a carrier oil like olive oil, almond oil, or jojoba oil. Seal the jar tightly and let it sit in a cool, dark place for several weeks, shaking it occasionally. After the infusion period, strain the oil through a cheesecloth to remove the lavender buds. Store the infused oil in a clean, airtight container and use it to refresh your sachets or create other lavender-scented products like lotions, soaps, and candles.
Leave a Comment