

DIY Origami Divider Box: Transform your desk from chaotic to captivating with a simple fold! Ever feel like your workspace is a black hole, swallowing pens, paperclips, and your sanity? I know I have! That’s why I’m so excited to share this incredibly easy and surprisingly elegant DIY origami divider box project.
Origami, the ancient Japanese art of paper folding, has been around for centuries, evolving from ceremonial practices to a beloved pastime. While traditionally used for creating intricate sculptures, we’re repurposing its principles for practical organization. Think of it as a mindful craft that declutters your life, one fold at a time.
Why do you need this DIY Origami Divider Box? Because let’s face it, store-bought organizers can be expensive and often don’t quite fit your specific needs. This project is not only budget-friendly (using materials you likely already have!), but it’s also completely customizable. You can adjust the size and number of compartments to perfectly suit your desk, drawers, or even your craft supplies. Plus, the satisfaction of creating something beautiful and functional with your own two hands is simply unmatched. So, grab some paper, and let’s get folding! I promise, you’ll be amazed at how quickly you can create a stylish and practical solution to your organizational woes.

DIY Origami Divider Box: Organize Your Life with Paper!
Hey there, fellow crafters! Are you tired of messy drawers and cluttered desks? I know I am! That’s why I’m super excited to share this awesome DIY project with you: an origami divider box! It’s a fantastic way to create custom compartments for organizing everything from jewelry and makeup to office supplies and craft materials. Plus, it’s a fun and surprisingly easy project that anyone can tackle. Let’s get folding!
Materials You’ll Need
Before we dive in, let’s gather our supplies. The beauty of this project is that it’s super budget-friendly!
* Paper: This is the most important part! I recommend using square paper for the best results. You can use origami paper, scrapbook paper, or even regular printer paper. The size of the paper will determine the size of your finished box. I usually use 12×12 inch paper for a decent-sized box, but feel free to experiment! Thicker paper will create a sturdier box, but it might be a bit harder to fold.
* Ruler: A ruler will help you make precise folds, which is crucial for a neat and professional-looking box.
* Pencil: Use a pencil to lightly mark your folding lines. This will help you stay on track and avoid mistakes.
* Scissors (Optional): You might need scissors to trim any excess paper or to create decorative edges.
* Bone Folder (Optional): A bone folder is a handy tool for creating crisp, clean folds. If you don’t have one, you can use the edge of a ruler or a credit card.
* Glue or Double-Sided Tape (Optional): For extra security, you can use glue or double-sided tape to reinforce the folds. This is especially helpful if you’re using thinner paper.
Preparing Your Paper
Before we start folding, let’s prepare our paper. This step is crucial for ensuring that your box turns out perfectly square and symmetrical.
1. Choose Your Paper: Select the paper you want to use for your box. Consider the color, pattern, and thickness of the paper. Remember, thicker paper will create a sturdier box.
2. Ensure It’s Square: If your paper isn’t already square, you’ll need to trim it. To do this, fold one corner of the paper over to the opposite edge, creating a triangle. Cut off the excess paper along the edge of the triangle. Unfold the paper, and you should have a perfect square.
3. (Optional) Decorate Your Paper: If you want to add some extra flair to your box, now is the time to decorate your paper. You can use markers, paint, stamps, or any other embellishments you like. Just make sure the decorations are dry before you start folding.
Folding the Base of the Box
Okay, let’s get to the fun part: folding! We’ll start by creating the base of the box.
1. Fold in Half Diagonally: Fold the paper in half diagonally, creating a triangle. Make sure the edges line up perfectly. Crease the fold firmly. Unfold the paper.
2. Fold in Half Diagonally (Other Direction): Fold the paper in half diagonally again, but this time fold it in the opposite direction. Crease the fold firmly. Unfold the paper. You should now have two diagonal creases that intersect in the center of the paper.
3. Fold in Half Horizontally: Fold the paper in half horizontally, bringing the top edge to the bottom edge. Crease the fold firmly. Unfold the paper.
4. Fold in Half Vertically: Fold the paper in half vertically, bringing the left edge to the right edge. Crease the fold firmly. Unfold the paper. You should now have a grid of creases on your paper.
5. Collapse into a Square: This is where things get a little tricky, but don’t worry, I’ll guide you through it. Gently push the sides of the paper inwards along the vertical crease. As you do this, the top and bottom edges will fold inwards along the horizontal crease. Continue pushing until the paper collapses into a smaller square. You should now have a square with four flaps.
6. Fold the Top Flaps to the Center Line: Take the top two flaps of the square and fold them inwards towards the center line. Make sure the edges line up with the center crease. Crease the folds firmly.
7. Fold the Bottom Flaps to the Center Line: Repeat the previous step with the bottom two flaps. Fold them inwards towards the center line and crease the folds firmly. You should now have a rectangle.
8. Unfold the Last Two Folds: Unfold the last two folds you made (the top and bottom flaps). You should now see the creases you just made.
9. Fold the Top Layer Up: Fold the top layer of the rectangle up along the horizontal crease. Crease the fold firmly.
10. Fold the Bottom Layer Up: Fold the bottom layer of the rectangle up along the horizontal crease. Crease the fold firmly. You should now have a smaller square with four flaps.
11. Open the Flaps: Gently open the flaps on the sides of the square. You should see the inside of the box starting to form.
12. Shape the Box: Use your fingers to shape the box and create crisp edges. You can use a bone folder or the edge of a ruler to help you with this.
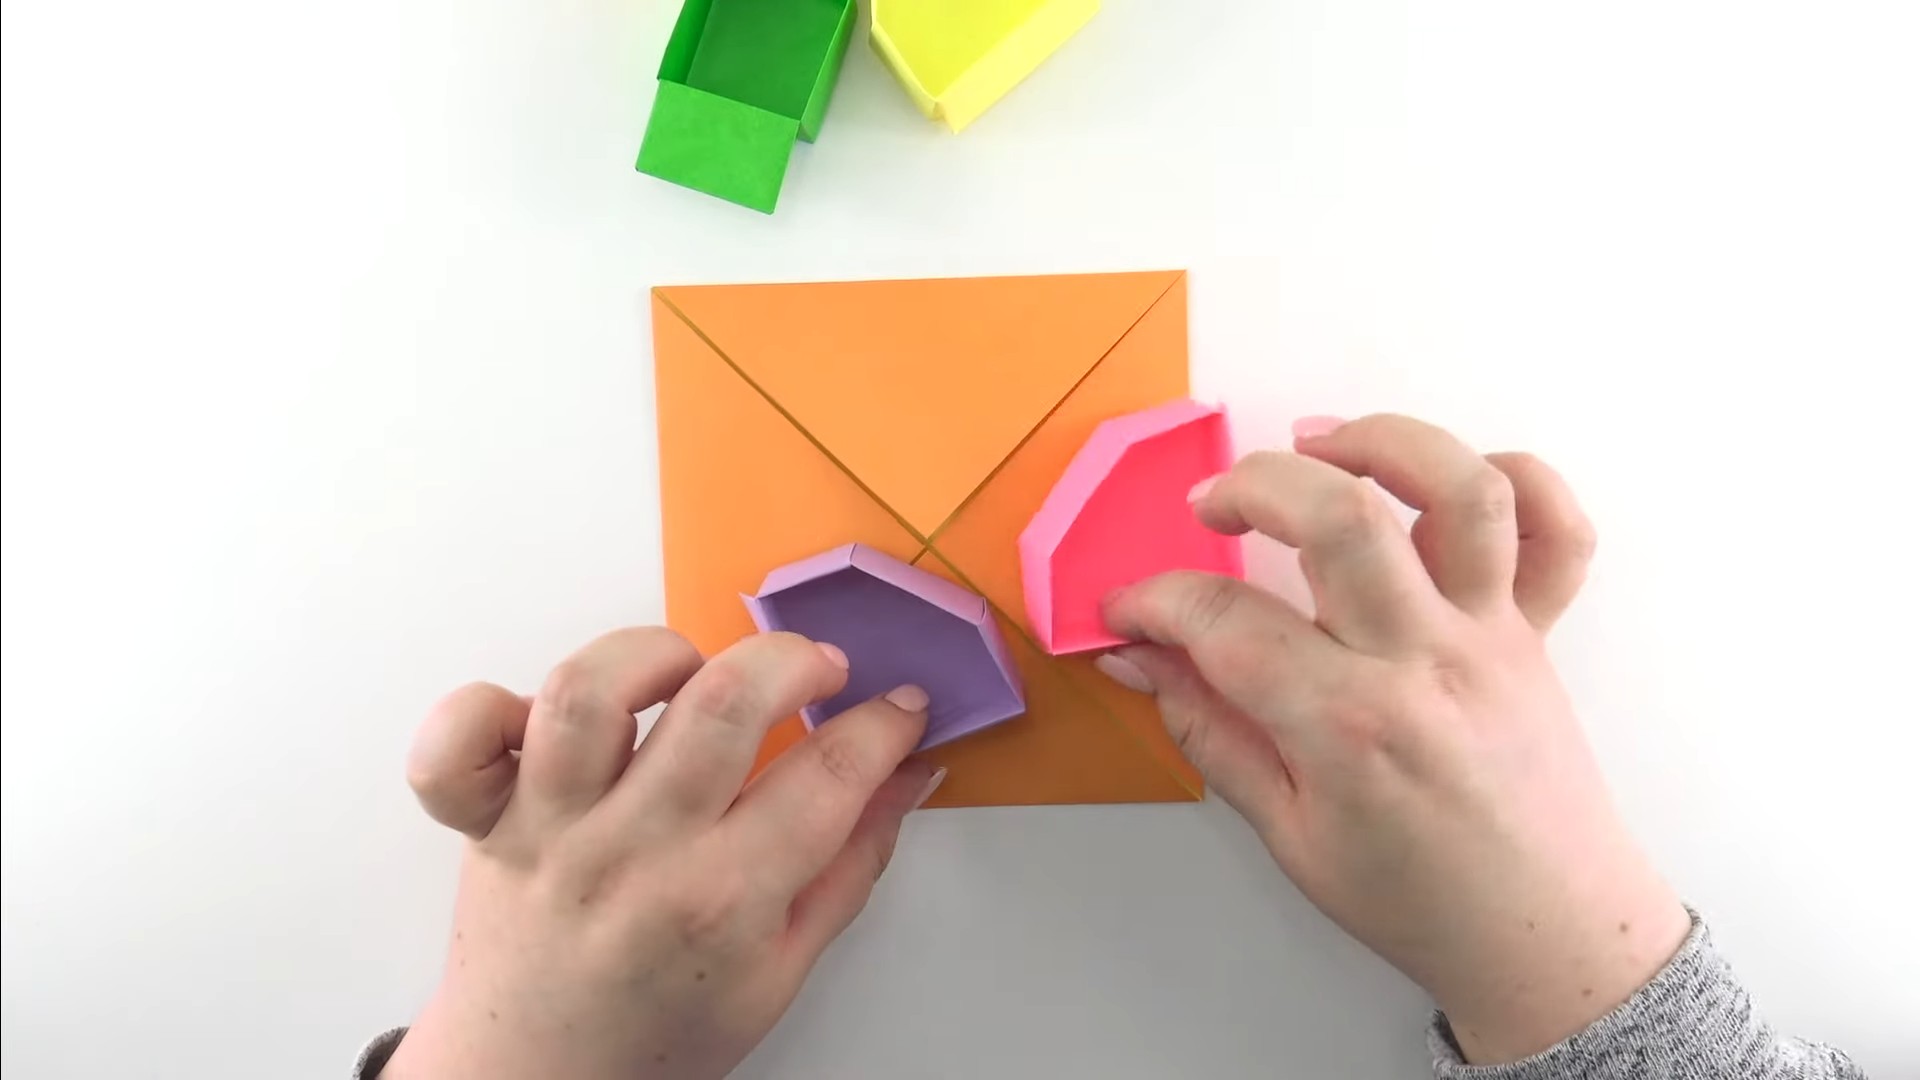
Creating the Dividers
Now that we have the base of the box, let’s create the dividers. This is where you can customize your box to fit your specific needs.
1. Measure and Mark: Use a ruler and pencil to measure and mark where you want the dividers to be. Consider the size and shape of the items you want to store in the box. I usually create dividers that are about 2-3 inches apart.
2. Cut the Paper: Cut strips of paper that are the same height as the box. The width of the strips will depend on how thick you want the dividers to be. I usually use strips that are about 1-2 inches wide.
3. Fold the Strips: Fold each strip of paper in half lengthwise. Crease the fold firmly. This will create a sturdy divider.
4. (Optional) Reinforce the Dividers: For extra strength, you can glue or tape the folded strips together. This is especially helpful if you’re using thinner paper.
5. Insert the Dividers: Carefully insert the dividers into the box, placing them along the lines you marked earlier. You can use glue or tape to secure the dividers in place.
Finishing Touches
We’re almost there! Now it’s time to add the finishing touches to your origami divider box.
1. Reinforce the Folds: Go over all the folds with a bone folder or the edge of a ruler to ensure they are crisp and clean. This will help the box hold its shape.
2. Add Glue or Tape (Optional): If you want to make the box even sturdier, you can add glue or double-sided tape to the folds. This is especially helpful if you’re using thinner paper or if you plan to store heavy items in the box.
3. Decorate the Box (Optional): Now is the time to add any final decorations to your box. You can use markers, paint, stickers, or any other embellishments you like.
4. Organize Your Items: Once the box is complete, it’s time to fill it with your items! Arrange them in the compartments you created with the dividers.
Tips and Tricks
Here are a few extra tips and tricks to help you create the perfect origami divider box:
* Experiment with Different Paper: Don’t be afraid to experiment with different types of paper. Try using origami paper, scrapbook paper, cardstock, or even recycled paper.
* Use a Bone Folder: A bone folder is a great tool for creating crisp, clean folds. If you don’t have one, you can use the edge of a ruler or a credit card.
* Be Precise: Precise folds are essential for a neat and professional-looking box. Take your time and make sure the edges line up perfectly.
* Reinforce the Folds: Reinforcing the folds with glue or tape will help the box hold its shape and prevent it from falling apart.
* Customize the Dividers: Customize the dividers to fit your specific needs. Consider the size and shape of the items you want to store in the box.
* Have Fun! Origami is a fun and relaxing craft. Don’t be afraid to experiment and get creative.
Troubleshooting
If you’re having trouble with your origami divider box, here are a few common problems and solutions:
* The Box Won’t Hold Its Shape: This is usually caused by using paper that is too thin
Conclusion
So, there you have it! Transforming a simple sheet of paper into a functional and aesthetically pleasing origami divider box is not just a fun craft project; it’s a practical solution for organizing your life, one fold at a time. We’ve walked you through the steps, highlighting the key techniques and offering tips to ensure your success. But why should you bother with this DIY project when you could just buy a box? Because this is more than just a box; it’s a testament to your creativity, a personalized storage solution, and a sustainable alternative to mass-produced plastic containers.
The beauty of this DIY origami divider box lies in its adaptability. Need smaller compartments? Adjust your initial measurements. Want a sturdier box? Use thicker paper or even cardstock. Feeling adventurous? Experiment with different paper patterns, colors, and textures to create boxes that perfectly complement your décor. Imagine a set of these boxes, each crafted from unique Japanese washi paper, gracing your desk or shelves. Or picture a collection of brightly colored boxes, perfect for organizing children’s toys or art supplies.
Beyond its practical uses, this origami project offers a mindful escape from the digital world. The repetitive folding motions can be surprisingly therapeutic, allowing you to focus on the present moment and quiet your mind. It’s a chance to disconnect from screens and reconnect with your hands, creating something tangible and beautiful.
We truly believe that everyone can master this simple origami technique. It requires no special skills or tools, just a little patience and a willingness to experiment. And the rewards are well worth the effort. You’ll not only end up with a set of functional and attractive divider boxes, but you’ll also gain a sense of accomplishment and a newfound appreciation for the art of origami.
Don’t just take our word for it, though. We encourage you to give this DIY origami divider box a try. Gather your paper, follow the instructions, and let your creativity flow. And most importantly, share your creations with us! We’d love to see your unique designs and hear about your experiences. Post photos of your finished boxes on social media using #DIYOrigamiBox and tag us so we can admire your handiwork. Let’s build a community of origami enthusiasts and inspire others to embrace the joy of crafting.
This project is more than just folding paper; it’s about resourcefulness, creativity, and the satisfaction of making something beautiful and useful with your own two hands. So, go ahead, unleash your inner artist and create your own origami divider box today! You might be surprised at how much you enjoy it.
Frequently Asked Questions (FAQ)
What kind of paper is best for making an origami divider box?
The best type of paper depends on the size and sturdiness you desire for your box. For smaller boxes, standard printer paper (20 lb or 75 gsm) works well and is readily available. However, for larger or more durable boxes, consider using thicker paper like cardstock (65-110 lb or 176-300 gsm). Origami paper, specifically designed for folding, is also an excellent choice as it’s thin enough to fold easily but strong enough to hold its shape. Washi paper, a traditional Japanese paper, adds a beautiful texture and aesthetic appeal. Experiment with different weights and textures to find what works best for your needs. Remember that very thin paper might tear easily, while very thick paper can be difficult to fold precisely.
How do I make the origami divider box sturdier?
Several factors contribute to the sturdiness of your origami divider box. First, as mentioned above, using thicker paper or cardstock will significantly increase its durability. Second, ensure your folds are crisp and precise. Use a bone folder or the edge of a ruler to create sharp creases, which will help the box maintain its shape. Third, consider adding a layer of glue or tape to reinforce the corners and edges of the box. This is especially helpful if you’re using thinner paper or if you plan to store heavier items in the box. Finally, you can also try layering two sheets of paper together before folding to create a double-thick box.
Can I customize the size of the compartments in the origami divider box?
Absolutely! Customizing the compartment sizes is one of the great advantages of making your own origami divider box. The size of the compartments is directly related to the initial measurements you use for your paper. To create smaller compartments, start with a smaller square of paper or adjust the folding measurements to create more divisions. Conversely, to create larger compartments, use a larger square of paper or reduce the number of folds. Experiment with different ratios and measurements to achieve the desired compartment sizes for your specific needs. You can even create boxes with asymmetrical compartments for storing items of varying sizes.
What can I use the origami divider box for?
The possibilities are endless! These boxes are incredibly versatile and can be used for a wide range of organizational purposes. They’re perfect for storing small items like jewelry, beads, buttons, paper clips, rubber bands, and other office supplies. They can also be used to organize makeup, skincare products, and other toiletries. In the kitchen, they can be used to store spices, tea bags, or small snacks. Children can use them to organize their toys, art supplies, or small collectibles. The boxes also make great gift boxes for small presents. Get creative and find new and innovative ways to use your origami divider boxes!
What if I make a mistake while folding?
Don’t worry, mistakes happen! Origami can be tricky, especially when you’re first starting out. If you make a mistake, try to gently unfold the paper and correct the fold. If the paper is creased too deeply, you may need to start with a fresh sheet. The key is to be patient and persistent. Don’t get discouraged if you don’t get it right on the first try. With practice, you’ll become more proficient at folding and less likely to make mistakes. There are also many online resources, including video tutorials, that can help you troubleshoot any problems you encounter.
How do I prevent the paper from tearing during folding?
Tearing can be a common problem, especially when using thinner paper or making sharp folds. To prevent tearing, use a gentle touch and avoid forcing the paper. Make sure your folds are precise and aligned before creasing them. Use a bone folder or the edge of a ruler to create sharp creases without applying excessive pressure. If you’re using thinner paper, consider reinforcing the corners and edges with tape or glue. Also, be mindful of the grain of the paper. Folding along the grain can sometimes make the paper more prone to tearing.
Can I decorate my origami divider box?
Absolutely! Decorating your origami divider box is a great way to personalize it and make it your own. You can use a variety of materials to decorate your box, including paint, markers, stickers, washi tape, and glitter. You can also add embellishments like beads, sequins, or ribbons. Consider using stencils or stamps to create intricate designs. Get creative and let your imagination run wild! You can even decoupage the box with fabric scraps or patterned paper. The possibilities are endless!
How do I store the origami divider boxes when they’re not in use?
One of the great things about these boxes is that they can be easily folded flat for storage when they’re not in use. Simply unfold the box along the existing creases until it lies flat. You can then stack the folded boxes on top of each other or store them in a drawer or container. This makes them a space-saving storage solution that’s perfect for small apartments or homes. When you need to use the box again, simply unfold it and reshape it into its original form.

Leave a Comment