

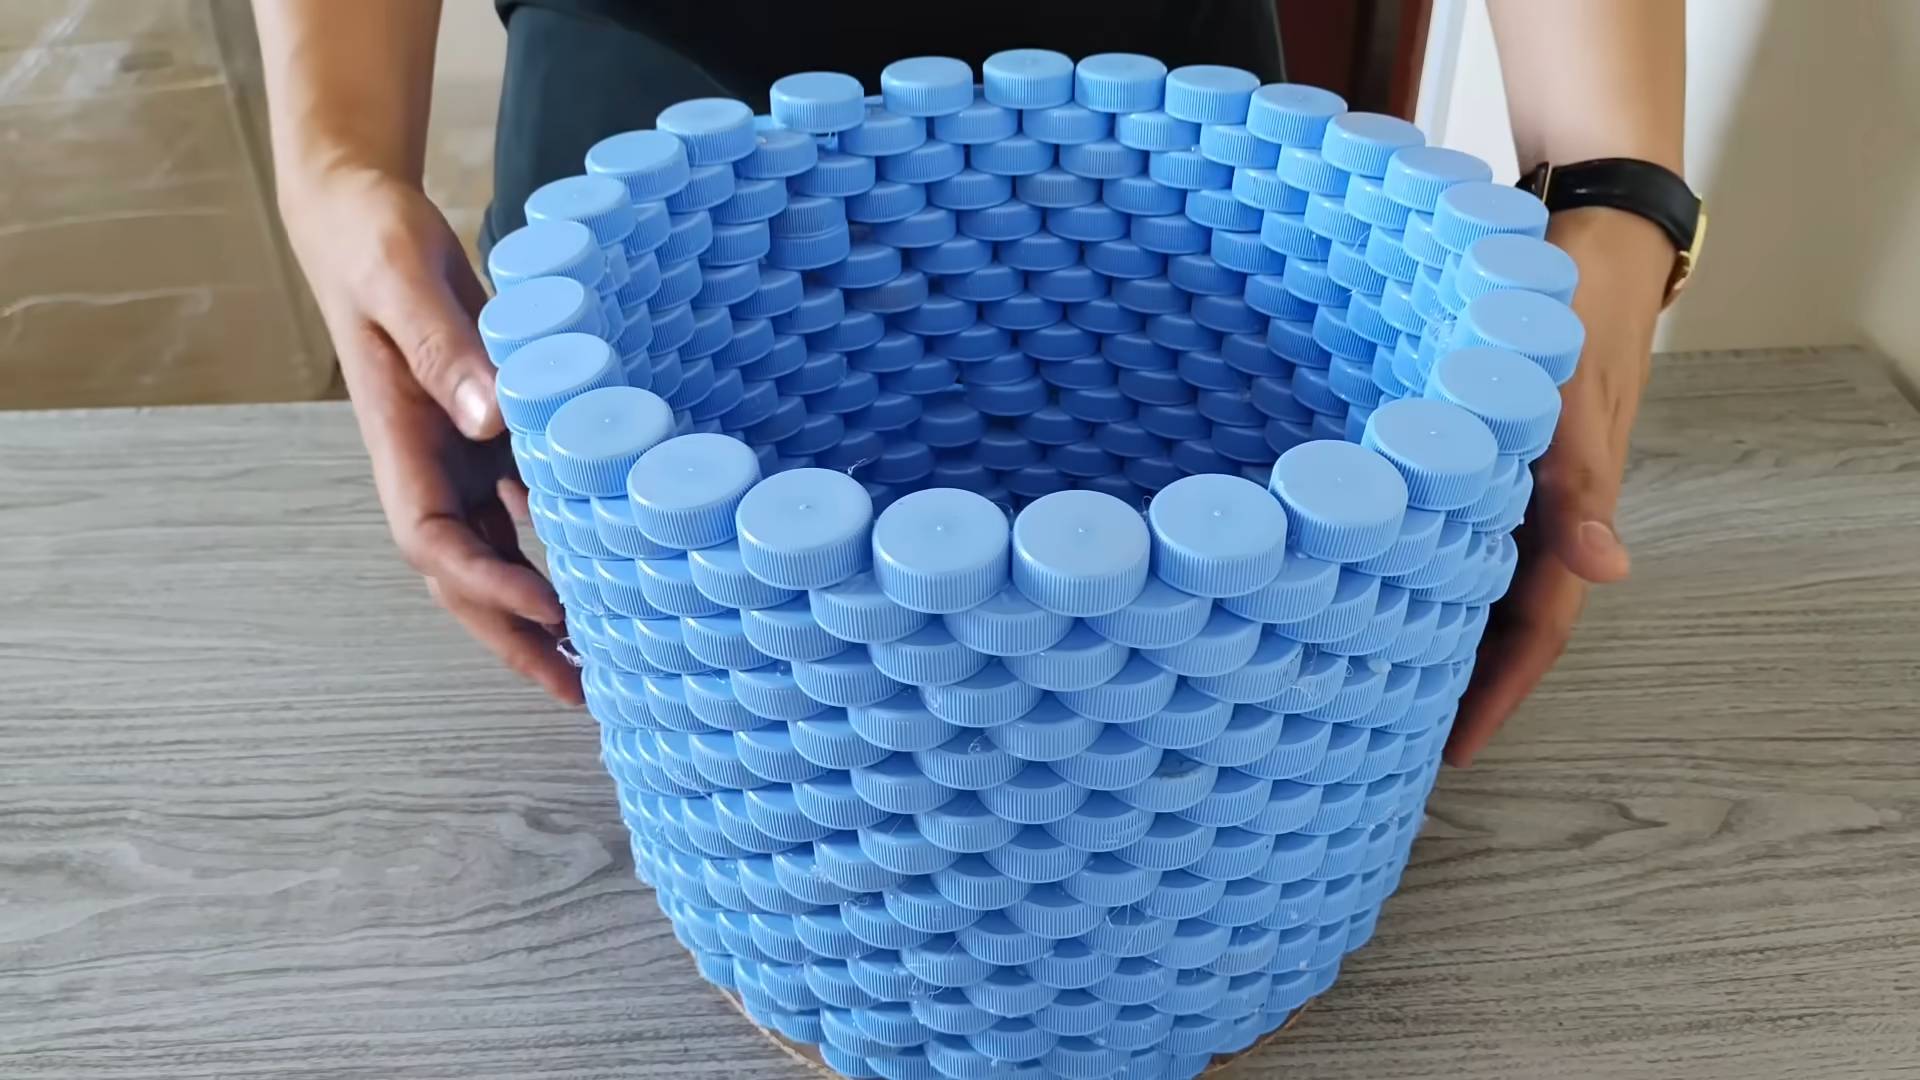
DIY Plastic Bottle Cap Basket: Who knew those colorful little circles destined for the landfill could transform into something so beautiful and functional? I’m so excited to share this incredible upcycling project with you! We’re diving headfirst into the world of creative reuse and crafting a charming basket entirely from plastic bottle caps.
Upcycling, the art of transforming waste materials into something of higher value, has roots stretching back centuries. Think of the rag rugs our grandmothers crafted from worn-out clothing – a testament to resourcefulness and ingenuity. Today, with growing concerns about plastic waste, upcycling has become more vital than ever. This DIY Plastic Bottle Cap Basket project is my way of contributing to a more sustainable lifestyle, one colorful cap at a time!
Let’s face it, we all accumulate a mountain of plastic bottle caps. Instead of tossing them out, imagine turning them into a unique and eye-catching basket perfect for storing small items, displaying plants, or even gifting to a friend. This project isn’t just about reducing waste; it’s about unleashing your creativity and adding a personal touch to your home decor. Plus, it’s a fantastic way to involve kids in a fun and educational activity that teaches them about recycling and resourcefulness. So, grab your stash of bottle caps, and let’s get crafting!
DIY Delight: Crafting a Charming Basket from Plastic Bottle Caps
Hey there, fellow crafters! Ever look at a pile of plastic bottle caps and think, “There has to be something cool I can do with these?” Well, you’re in luck! Today, I’m going to walk you through creating a surprisingly sturdy and adorable basket entirely from those colorful little discs. It’s a fantastic way to upcycle, add a unique touch to your home decor, and impress your friends with your resourcefulness. Let’s get started!
Materials You’ll Need:
* A mountain of plastic bottle caps (seriously, the more the merrier! Aim for at least 200-300 for a decent-sized basket). Try to collect a variety of colors for a vibrant look.
* Strong, durable thread or fishing line. I recommend a nylon thread or a thicker fishing line for extra strength.
* A large-eyed needle (one that can easily thread your chosen thread/line).
* Scissors.
* A ruler or measuring tape.
* Optional: Hot glue gun and glue sticks (for extra reinforcement, especially if you’re using thinner thread).
* Optional: Fabric scraps or ribbon for lining and decorating the basket.
* Optional: A circular template (like a plate or bowl) to help guide the base construction.
Preparing Your Bottle Caps
Before we dive into the construction, let’s get those bottle caps ready.
1. Clean the Caps: This is crucial! Wash all the bottle caps thoroughly with soap and water. Remove any lingering residue or sticky bits. Let them dry completely. Nobody wants a sticky basket!
2. Sort by Color (Optional): If you’re going for a specific color pattern, now’s the time to sort your caps. This will make the construction process smoother and help you achieve the desired aesthetic. I personally love a rainbow effect!
3. Punch Holes (Optional, but Recommended): While you *can* sew through the edges of the caps, it’s much easier and more secure to create small holes. You can use a small drill, a heated needle (be extremely careful!), or even a sturdy awl. I prefer a small drill for speed and precision. Aim for 4 holes evenly spaced around the edge of each cap. This provides multiple points of connection and makes the basket much stronger.
Creating the Base of the Basket
The base is the foundation of your basket, so let’s take our time and get it right.
1. Forming the Center Circle: Take 6-8 bottle caps and arrange them in a circle, with the open sides facing inwards. This will be the very center of your basket base.
2. Sewing the Center Circle: Thread your needle with a generous length of thread or fishing line. Tie a secure knot at the end. Now, begin sewing the caps together. Pass the needle through the pre-drilled holes (or carefully through the edges if you skipped the hole-punching step). Aim for a tight, secure stitch. I like to go around the circle twice for extra reinforcement.
3. Adding the Next Layer: Once the center circle is secure, it’s time to add the next layer of caps. Arrange these caps around the perimeter of the center circle, overlapping them slightly.
4. Sewing the Second Layer: Continue sewing the caps together, connecting them to both the adjacent caps in the second layer and to the caps in the center circle. Again, aim for tight, secure stitches. Double back on your stitches for added strength.
5. Expanding the Base: Keep adding layers of bottle caps, sewing each layer securely to the previous one. As you expand the base, you’ll notice it starting to flatten out. Use your hands to gently shape the base as you go. If you’re using a circular template, place it underneath the base to help maintain a consistent shape.
6. Base Size: Continue adding layers until your base reaches the desired size. I usually aim for a base that’s about 6-8 inches in diameter for a small to medium-sized basket. Remember, the larger the base, the larger the overall basket.
7. Reinforcing the Base (Optional): For extra durability, especially if you’re using thinner thread, you can use a hot glue gun to add a dab of glue to each connection point on the underside of the base. This will further secure the caps and prevent them from shifting.
Building the Walls of the Basket
Now for the fun part – building the walls! This is where your basket really starts to take shape.
1. Starting the First Wall Layer: Take a new set of bottle caps and arrange them around the perimeter of the base, standing them upright. Each cap should be positioned so that its edge is touching the edge of the base.
2. Sewing the First Wall Layer: Carefully sew the wall caps to the base caps. This is a bit trickier than sewing the base, as you’re now working in a vertical direction. Take your time and ensure that each cap is securely attached to the base. I find it helpful to hold the wall cap in place with one hand while I sew with the other.
3. Adding Subsequent Wall Layers: Continue adding layers of bottle caps, stacking them on top of each other to build the walls of the basket. Overlap each cap slightly with the cap below it.
4. Sewing the Wall Layers: As you add each layer, sew the caps together both horizontally (connecting them to the adjacent caps in the same layer) and vertically (connecting them to the caps in the layer below). This creates a strong, interwoven structure.
5. Maintaining the Shape: As you build the walls, pay attention to the shape of the basket. You can create a straight-sided basket, a slightly flared basket, or even a basket that tapers inwards. The angle at which you position the wall caps will determine the overall shape.
6. Wall Height: Continue adding layers until the walls reach the desired height. I usually aim for a wall height of about 4-6 inches for a small to medium-sized basket.
7. Finishing the Top Edge: For a neat and finished look, you can add a final layer of bottle caps that are slightly angled outwards. This creates a decorative lip around the top of the basket. Securely sew these caps in place.
Adding Handles (Optional)
If you want to add handles to your basket, here’s how:
1. Creating the Handle Loops: Take a small group of bottle caps (4-6 caps per handle) and sew them together to form a loop. Make two of these loops.
2. Attaching the Handles: Position the handle loops on opposite sides of the basket rim. Securely sew the loops to the basket, reinforcing the connection points with extra stitches.
3. Alternative Handle Options: You can also create handles using braided rope, fabric strips, or even repurposed wire. Attach these handles to the basket in a similar manner, ensuring that they are securely fastened.
Embellishing and Finishing Touches
Now for the fun part – adding your personal touch!
1. Lining the Basket (Optional): If you want to line the basket, cut a piece of fabric to fit the inside. You can either sew the lining in place or use hot glue to attach it. A lining adds a touch of elegance and can also help to protect delicate items stored in the basket.
2. Adding Decorative Elements: Get creative! You can decorate the basket with ribbons, buttons, beads, paint, or any other embellishments you like. I love adding colorful ribbons around the rim or gluing on small decorative buttons.
3. Reinforcing Weak Spots: Give your basket a final inspection and reinforce any areas that seem weak or unstable. Add extra stitches or dabs of hot glue as needed.
4. Cleaning Up: Trim any loose threads and remove any stray glue strands.
Tips and Tricks for Success
* Use a Thimble: Sewing through plastic can be tough on your fingers. A thimble will protect your finger and make the process much more comfortable.
* Don’t Be Afraid to Experiment: This is your creation! Don’t be afraid to try different color combinations, patterns, and embellishments.
* Take Breaks: This project can be time-consuming, so don’t try to do it all in one sitting. Take breaks to stretch your hands and rest your eyes.
* Enjoy the Process: Crafting should be fun! Relax, put on some music, and enjoy the process of creating something beautiful and unique from recycled materials.
* Cap Variety: Different brands of bottle caps have slightly different sizes and shapes. Using a variety can add visual interest, but try to keep the variations minimal for structural integrity.
* Thread Color: Consider using a thread color that complements your bottle caps. A clear or neutral thread will blend in, while a contrasting color can add a pop of visual interest.
* Hot Glue Caution: If using hot glue, be careful not to burn yourself.

Conclusion
So, there you have it! Transforming seemingly useless plastic bottle caps into a charming and functional basket is not only a fantastic way to reduce waste but also a surprisingly rewarding creative endeavor. This DIY plastic bottle cap basket project is more than just a craft; it’s a statement about sustainability and resourcefulness. It’s about looking at everyday items with fresh eyes and finding innovative ways to give them a new life.
Why is this a must-try? Because it’s accessible, affordable, and adaptable. You likely already have the primary material – plastic bottle caps – readily available. The basic technique is easy to grasp, making it suitable for crafters of all skill levels, from beginners to seasoned DIY enthusiasts. And the best part? The possibilities are endless!
Consider these variations to truly personalize your plastic bottle cap basket:
* Color Coordination: Sort your bottle caps by color to create a basket with a specific palette. Think vibrant rainbow hues, calming monochromatic tones, or even a patriotic red, white, and blue design.
* Size and Shape: Experiment with different base sizes and weaving patterns to create baskets of varying dimensions. A small, round basket is perfect for holding keys or jewelry, while a larger, rectangular basket could be used for organizing craft supplies or storing small toys.
* Handle Options: Get creative with the handles! Use sturdy rope, leather straps, or even more bottle caps to construct unique and eye-catching handles. You could even braid yarn or fabric scraps for a softer, more textured handle.
* Embellishments: Add decorative touches to your finished basket. Glue on beads, buttons, or shells for a whimsical look. Paint the bottle caps with acrylic paints for a more polished finish. Or, incorporate other recycled materials like fabric scraps or yarn into the weaving process.
* Functionality Focus: Tailor the basket to a specific purpose. Add a waterproof lining to create a planter for small succulents. Attach hooks to the inside to make a hanging organizer for your bathroom or kitchen.
This project is not just about creating a basket; it’s about unleashing your creativity and embracing a more sustainable lifestyle. It’s a chance to teach children about recycling and resourcefulness in a fun and engaging way. It’s an opportunity to transform something destined for the landfill into a beautiful and functional object that you can be proud of.
We wholeheartedly encourage you to give this DIY plastic bottle cap basket project a try. Gather your bottle caps, choose your colors, and let your imagination run wild. Don’t be afraid to experiment with different techniques and variations to create a basket that is uniquely yours.
And most importantly, we want to hear about your experience! Share your photos, tips, and stories with us in the comments section below. Let us know what challenges you faced, what creative solutions you came up with, and what you learned along the way. Together, we can inspire others to embrace the joy of DIY and the importance of sustainability. So, go ahead, get crafting, and let’s turn trash into treasure!
Frequently Asked Questions (FAQ)
What kind of glue is best for this project?
The best type of glue for this project depends on the type of plastic your bottle caps are made from. Generally, a strong adhesive like E6000 or a similar multi-purpose craft glue works well. Hot glue can also be used, but it may not provide as strong or durable a bond, especially if the basket will be exposed to heat or moisture. Always test the glue on a few bottle caps first to ensure it adheres properly and doesn’t melt or damage the plastic. For added security, consider using a glue that is specifically designed for plastics. Remember to work in a well-ventilated area when using strong adhesives.
How many bottle caps do I need to make a basket?
The number of bottle caps required will vary depending on the size and shape of the basket you want to create. A small basket might require around 100-150 bottle caps, while a larger basket could need 300 or more. It’s always a good idea to collect more bottle caps than you think you’ll need, just in case. You can also estimate the number of bottle caps by laying them out in the desired shape and size of your basket before you start gluing. This will give you a better idea of how many you’ll need to collect.
What if I don’t have enough bottle caps of the same color?
Don’t worry if you don’t have enough bottle caps of the same color! This is a great opportunity to get creative and experiment with different color combinations. You can create a basket with a random assortment of colors for a playful and eclectic look. Or, you can sort your bottle caps by color and create a basket with stripes, patterns, or other geometric designs. You can also paint the bottle caps with acrylic paints to achieve a more uniform color scheme. Remember, the beauty of DIY is that there are no rules!
How do I clean the bottle caps before using them?
Cleaning the bottle caps is an important step to ensure a clean and hygienic finished product. Simply wash the bottle caps with warm soapy water. Use a mild dish soap and a scrub brush to remove any dirt, grime, or residue. Rinse the bottle caps thoroughly with clean water and allow them to air dry completely before using them in your project. For stubborn stains or sticky residue, you can soak the bottle caps in a solution of baking soda and water for a few hours before washing them.
Is this project suitable for children?
This project can be suitable for children, but adult supervision is required, especially when using glue or sharp tools. Children can help with collecting and sorting the bottle caps, as well as designing the basket. However, the gluing process should be done by an adult or under close supervision, as some glues can be toxic or cause skin irritation. Consider using a non-toxic glue that is specifically designed for children’s crafts. Also, be sure to provide a safe and well-ventilated workspace for the project.
How can I make the basket more durable?
To make your DIY plastic bottle cap basket more durable, consider reinforcing the seams with extra glue or using a stronger adhesive. You can also add a layer of fabric or felt to the inside of the basket to provide extra support and prevent the bottle caps from shifting. For larger baskets, you may want to create a sturdier base by using a thicker piece of cardboard or plastic. If you plan to use the basket for heavy items, consider adding a handle made from a more durable material, such as rope or leather.
Can I use other types of plastic caps for this project?
Yes, you can use other types of plastic caps for this project, such as jar lids or detergent bottle caps. However, keep in mind that different types of plastic may require different types of glue. It’s always a good idea to test the glue on a few caps first to ensure it adheres properly. Also, be aware that different sizes and shapes of caps may affect the overall look and structure of the basket. Experiment with different combinations of caps to create a unique and interesting design.
How do I prevent the basket from becoming too wobbly?
To prevent your basket from becoming too wobbly, it’s important to create a solid and stable base. Make sure the base is flat and even before you start adding the sides. Use plenty of glue to secure the bottle caps together, and allow the glue to dry completely before moving on to the next layer. As you build up the sides of the basket, make sure to overlap the bottle caps slightly to create a stronger and more stable structure. You can also add a layer of cardboard or plastic to the inside of the basket to provide extra support.
What are some other uses for a plastic bottle cap basket?
The possibilities are endless! A plastic bottle cap basket can be used for a variety of purposes, depending on its size and shape. Small baskets can be used to hold keys, jewelry, or other small items. Medium-sized baskets can be used to organize craft supplies, store small toys, or hold toiletries. Larger baskets can be used to store blankets, towels, or other household items. You can also use a plastic bottle cap basket as a planter for small succulents or herbs. Get creative and find new and innovative ways to use your basket!
Leave a Comment