

DIY Raffia Wall Hanging: Transform your living space with a touch of bohemian charm! Have you ever looked at those stunning, textured wall hangings in home decor magazines and thought, “I wish I could make that”? Well, guess what? You absolutely can! This article is your ultimate guide to creating your very own DIY raffia wall hanging, a project that’s not only incredibly satisfying but also surprisingly easy on the wallet.
Raffia, derived from the raffia palm tree native to Madagascar, has a rich history of being used in various crafts and textiles across cultures. From traditional baskets to intricate ceremonial adornments, raffia’s natural texture and durability have made it a beloved material for centuries. Today, it’s experiencing a resurgence in popularity, particularly in the world of home decor, thanks to its ability to add warmth and organic beauty to any room.
In our increasingly digital world, there’s something incredibly grounding about creating something with your own two hands. A DIY raffia wall hanging is more than just a decoration; it’s a statement piece that reflects your personal style and creativity. Plus, let’s be honest, who doesn’t love the feeling of accomplishment that comes with completing a DIY project? This guide will walk you through each step, ensuring that even if you’re a complete beginner, you’ll be able to craft a stunning wall hanging that will impress your friends and family. So, grab your raffia and let’s get crafting!
DIY Raffia Wall Hanging: A Boho Chic Project You Can Totally Nail!
Okay, friends, let’s dive into creating a gorgeous raffia wall hanging that will add a touch of bohemian charm to any room. I’m so excited to share this project with you because it’s surprisingly easy, super customizable, and a fantastic way to use up those craft supplies you’ve been hoarding (guilty!). Get ready to unleash your inner artist!
What You’ll Need: The Supply Roundup
Before we get started, let’s gather our materials. Having everything organized will make the process smooth and enjoyable. Here’s what you’ll need:
* Raffia: This is the star of the show! You can find raffia in natural tones or dyed in various colors. I recommend getting a generous amount, especially if you’re planning a large wall hanging. Think about the color palette you want to achieve.
* Dowel Rod or Branch: This will be the base of your wall hanging. A wooden dowel rod from a craft store works perfectly, or you can forage for a cool-looking branch in your backyard (just make sure it’s clean and dry!). The length will determine the width of your finished piece.
* Scissors: A sharp pair of scissors is essential for cutting the raffia.
* Measuring Tape or Ruler: For precise measurements, especially when cutting the raffia strands.
* Comb or Brush: To smooth out the raffia and create a neat fringe.
* Yarn or Twine (Optional): For adding decorative elements or creating a hanging loop.
* Beads or Charms (Optional): To embellish your wall hanging and add a personal touch. Think wooden beads, macrame beads, or even small shells.
* Hot Glue Gun and Glue Sticks (Optional): For securing beads or other embellishments.
* Cardboard or a Book (Optional): To help create consistent lengths of raffia.
Preparing the Raffia: Getting Ready to Knot
This step is all about getting the raffia ready for knotting. Consistency is key here, so take your time.
1. Decide on Your Raffia Length: This will determine the overall length of your wall hanging. I usually aim for lengths between 12 inches and 36 inches, but feel free to experiment! Remember that the raffia will be folded in half, so the length you cut will be twice the length of the hanging strands.
2. Cut the Raffia: There are a couple of ways to do this.
* Method 1 (Using Cardboard): Wrap the raffia around a piece of cardboard or a book that’s the desired length. Then, cut along one edge to create a bunch of strands of the same length. This is my preferred method for larger projects.
* Method 2 (Measuring and Cutting): Measure and cut each strand individually. This is fine for smaller projects or if you want to vary the lengths of the raffia.
3. Separate the Raffia: Raffia often comes in bundles. Gently separate the strands to make them easier to work with.
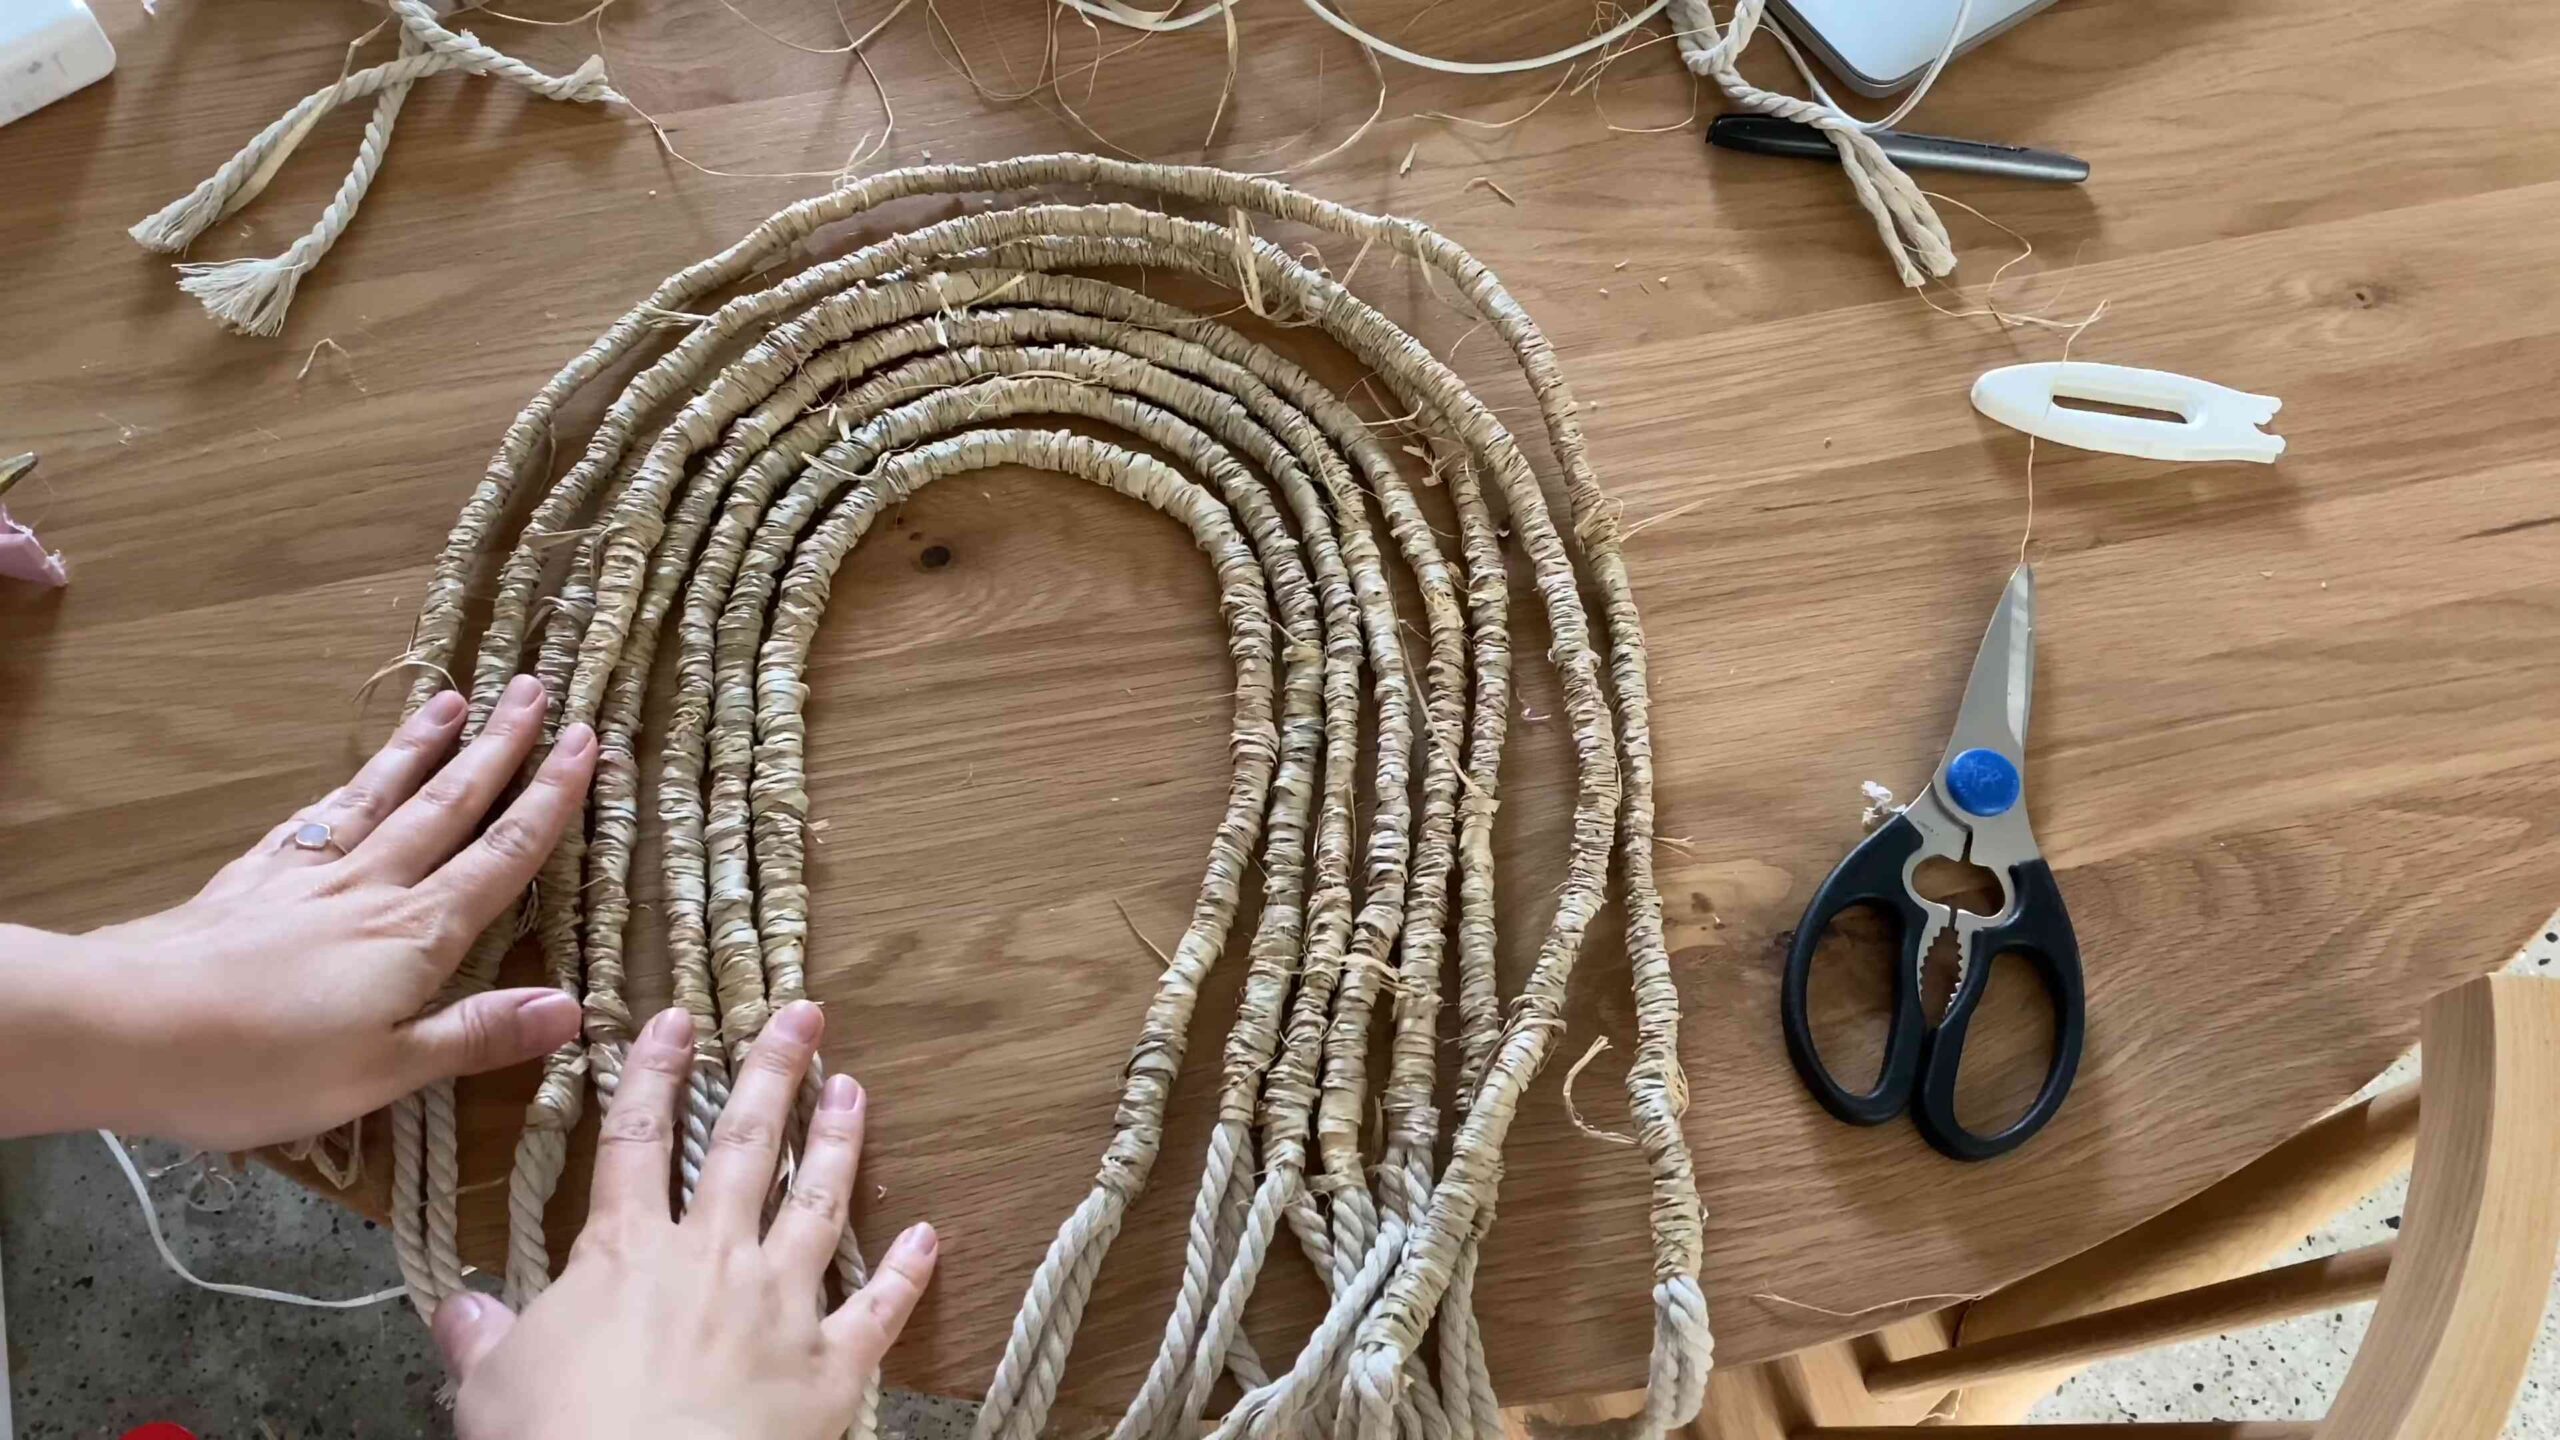
Knotting the Raffia: The Heart of the Project
Now for the fun part – attaching the raffia to the dowel rod! We’ll be using a simple lark’s head knot.
1. Fold a Strand of Raffia in Half: Take one of your pre-cut strands of raffia and fold it in half, creating a loop at the top.
2. Position the Loop: Place the loop behind the dowel rod, with the two ends of the raffia hanging down in front.
3. Pull the Ends Through the Loop: Reach through the loop from the front of the dowel rod and grab the two ends of the raffia. Pull them through the loop.
4. Tighten the Knot: Gently pull the ends down to tighten the knot around the dowel rod. Make sure the knot is snug but not too tight, as you want to be able to adjust the position of the raffia if needed.
5. Repeat: Continue adding strands of raffia using the lark’s head knot, working your way across the dowel rod. The closer you place the knots, the denser your wall hanging will be. I like to leave a little space between the knots for a more airy look.
6. Vary Colors and Textures (Optional): This is where you can get creative! Mix and match different colors of raffia, or add in other materials like yarn or twine for added texture.
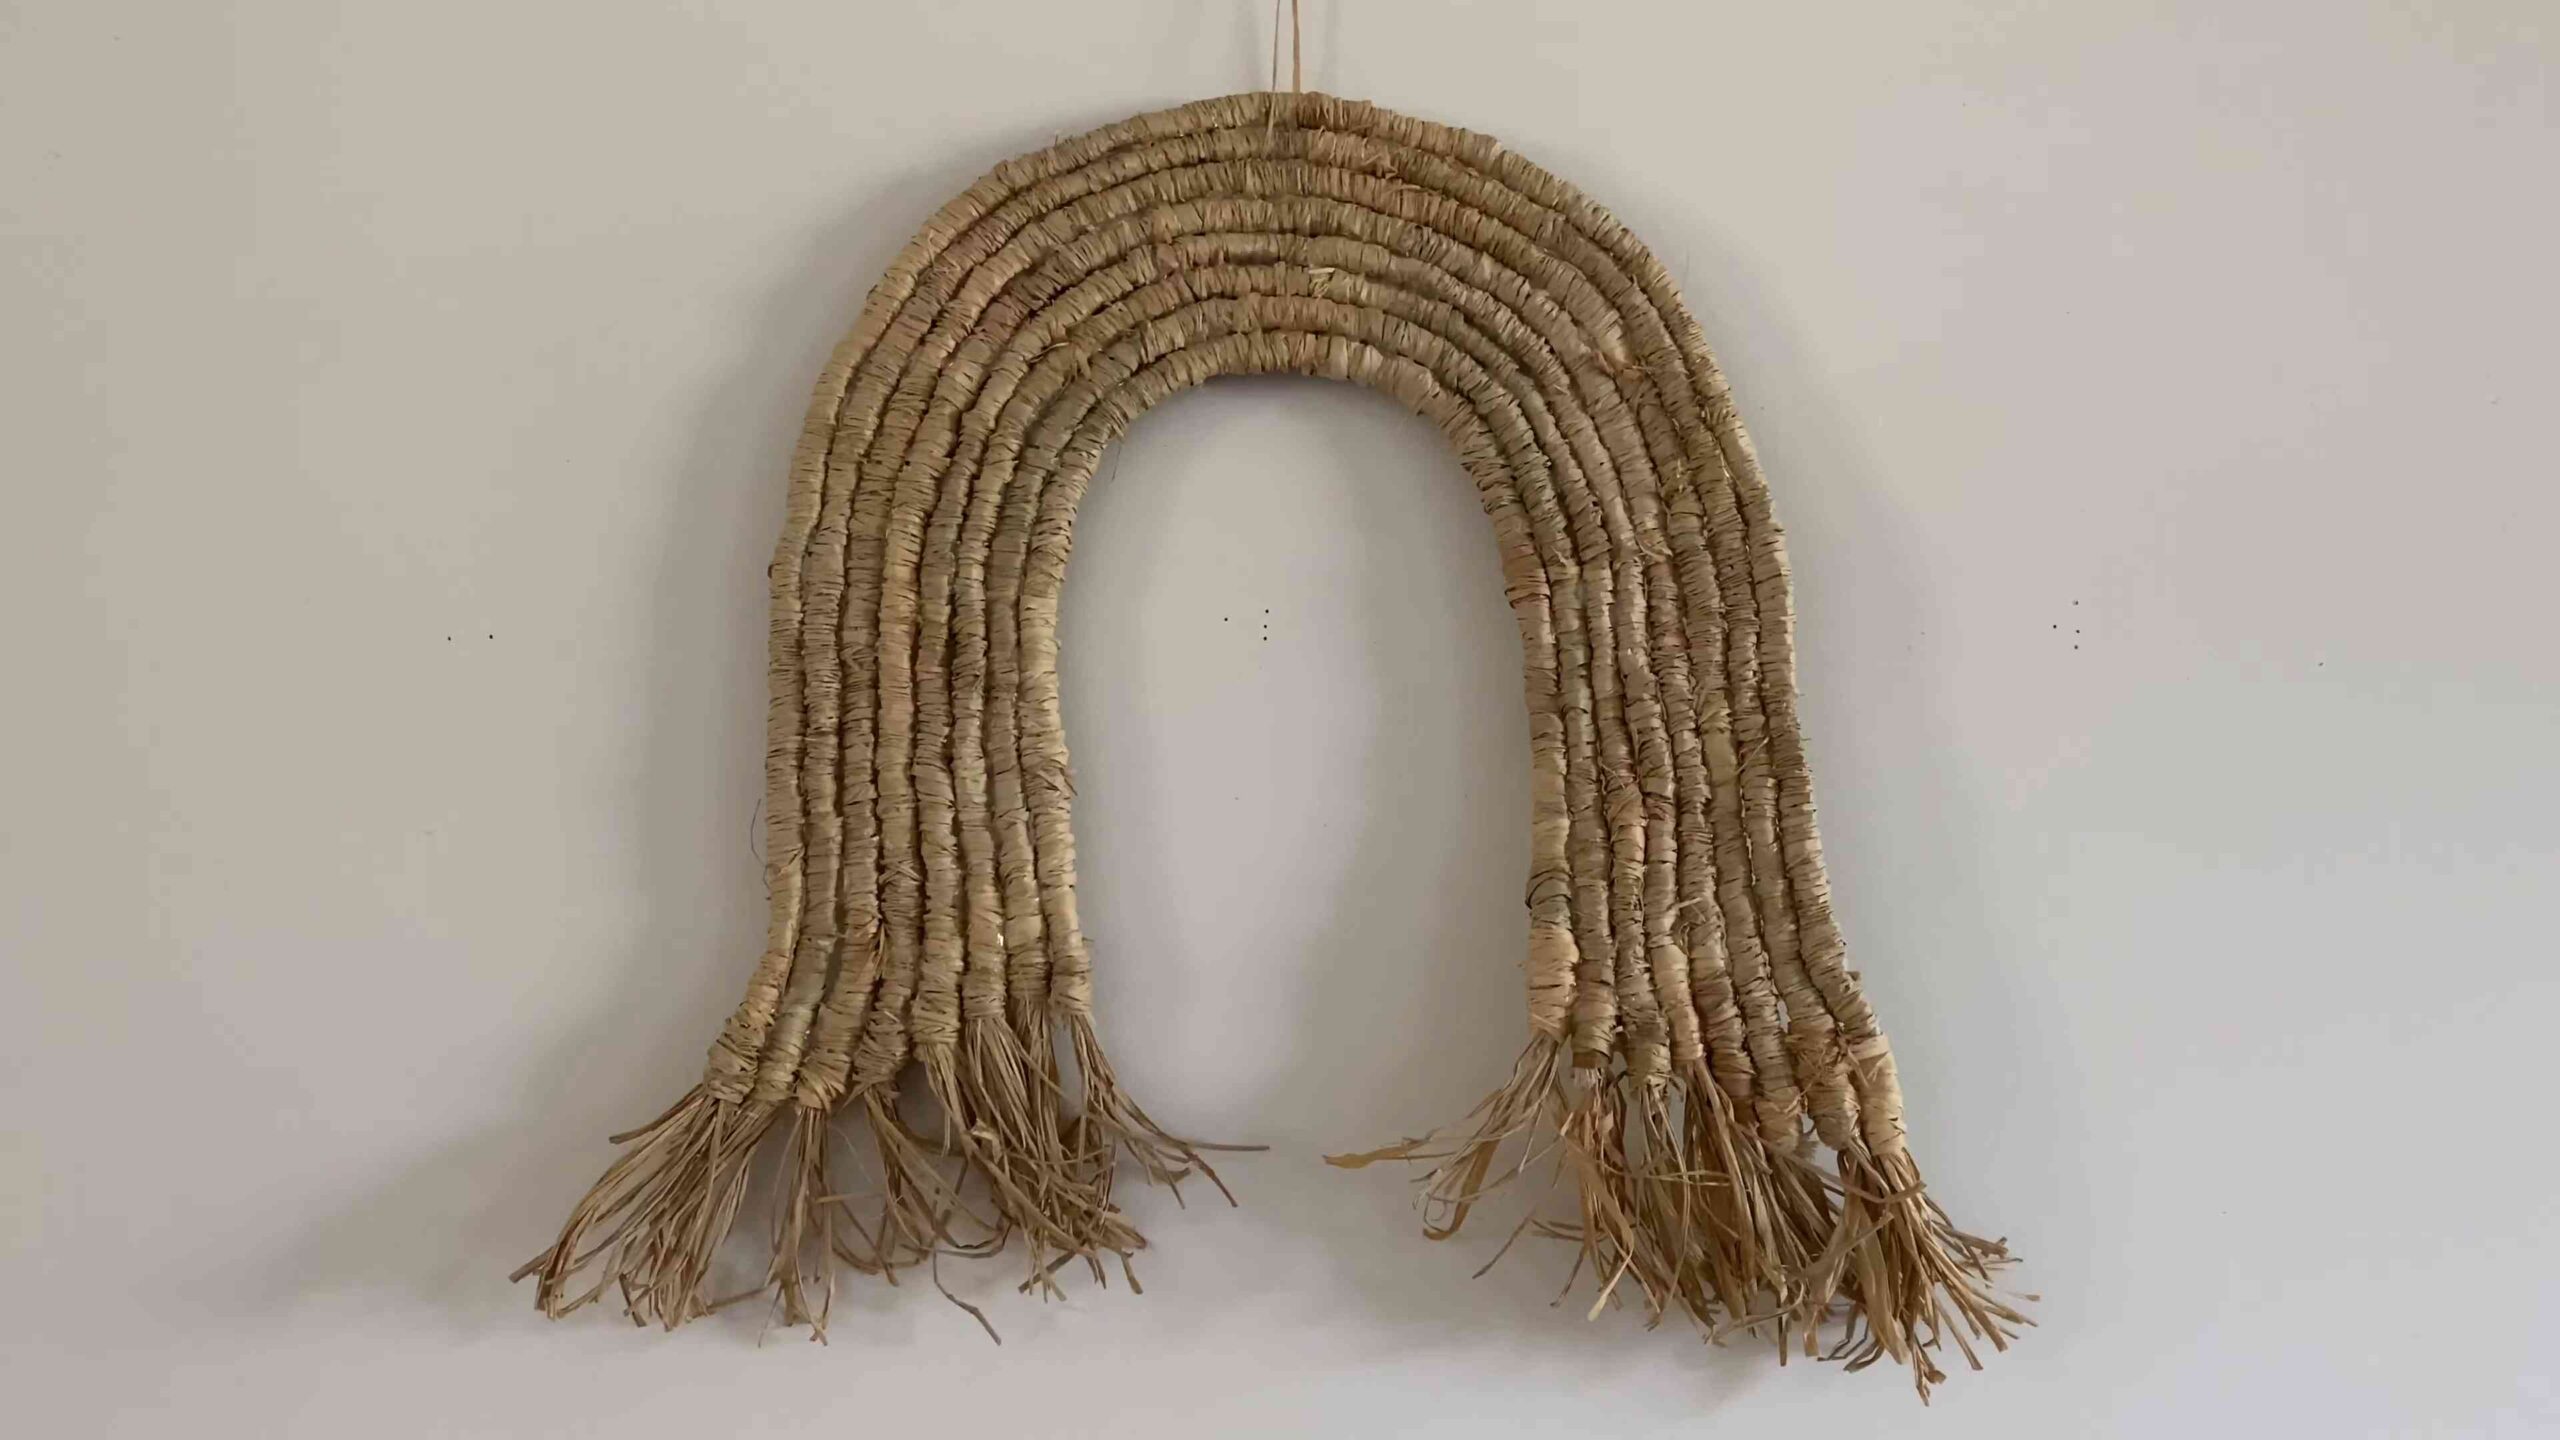
Creating the Design: Shaping Your Masterpiece
Once you’ve filled the dowel rod with raffia, it’s time to shape your wall hanging. This is where your artistic vision comes into play!
1. Hang the Wall Hanging: Hang your wall hanging on a wall or from a hook so you can see it from a distance. This will help you visualize the overall design.
2. Trim the Raffia: Use your scissors to trim the raffia to create the desired shape. You can create a straight line, an angled line, a curved line, or even a more abstract design. Don’t be afraid to experiment!
3. Layering: Consider layering the raffia by trimming different sections to different lengths. This can add depth and dimension to your wall hanging.
4. Adding Texture: You can create texture by cutting the raffia at different angles or by leaving some strands longer than others.
5. Comb or Brush the Raffia: Use a comb or brush to smooth out the raffia and create a neat fringe. This will also help to remove any loose strands.
Adding Embellishments: The Finishing Touches
Now for the fun part – adding those extra details that will make your wall hanging truly unique!
1. Beads: String beads onto individual strands of raffia or create beaded tassels to hang from the bottom of the wall hanging. You can use a hot glue gun to secure the beads in place.
2. Charms: Attach charms to the raffia using jump rings or by tying them on with yarn or twine.
3. Yarn or Twine: Wrap yarn or twine around sections of the raffia to add color and texture. You can also create macrame knots or braids to incorporate into the design.
4. Feathers: Add feathers for a touch of bohemian flair. You can attach them with hot glue or by tying them on with yarn or twine.
5. Dyeing: If you want to add more color, you can dye sections of the raffia using fabric dye or even food coloring. Just be sure to test the dye on a small piece of raffia first to make sure you like the color.
Creating a Hanging Loop: Ready to Display
Finally, let’s create a way to hang your beautiful creation!
1. Cut a Length of Yarn or Twine: Cut a length of yarn or twine that’s long enough to create a loop for hanging.
2. Attach the Yarn or Twine to the Dowel Rod: Tie the ends of the yarn or twine to the dowel rod, making sure the loop is centered. You can use a simple knot or a more decorative knot, depending on your preference.
3. Adjust the Loop: Adjust the length of the loop until it’s the desired size.
4. Secure the Knots: Make sure the knots are secure so your wall hanging doesn’t fall down. You can add a dab of hot glue to the knots for extra security.
Final Touches and Display: Admire Your Work!
1. Give it a Final Comb: Give your wall hanging one last comb or brush to make sure everything is in place.
2. Trim Any Stray Strands: Trim any stray strands of raffia that are sticking out.
3. Hang and Enjoy: Hang your beautiful raffia wall hanging in your favorite spot and admire your handiwork!
And there you have it! A stunning raffia wall hanging that you created yourself. I hope you had as much fun making it as I did sharing the process with you. Remember, this is just a starting point – feel free to experiment with different colors, textures, and embellishments to create a wall hanging that’s truly your own. Happy crafting!
Conclusion
So, there you have it! Crafting your own raffia wall hanging isn’t just a fun afternoon project; it’s a gateway to personalized home décor that reflects your unique style and adds a touch of natural elegance to any room. We’ve walked you through the simple steps, highlighting the affordability and creative freedom this DIY approach offers. Forget those expensive store-bought pieces that lack character. With a little time and effort, you can create a stunning statement piece that’s truly one-of-a-kind.
The beauty of this project lies in its versatility. Feel free to experiment with different colors of raffia to match your existing décor. Imagine a vibrant, multi-hued hanging for a bohemian-inspired space, or a calming, neutral-toned piece for a minimalist aesthetic. You can also play with different textures by incorporating other natural materials like feathers, beads, or small pieces of driftwood. Think about adding macrame knots for a more intricate design, or even weaving in LED fairy lights for a touch of whimsical charm. The possibilities are truly endless!
Beyond the aesthetic appeal, creating your own raffia wall hanging is a mindful and rewarding experience. It’s a chance to disconnect from the digital world and reconnect with your creativity. The process of working with natural materials can be incredibly therapeutic, and the satisfaction of displaying your finished masterpiece is unparalleled.
We firmly believe that anyone can master this DIY project, regardless of their crafting experience. The instructions are straightforward, the materials are readily available, and the potential for customization is vast. Don’t be intimidated by the idea of creating something from scratch. Embrace the process, experiment with different techniques, and most importantly, have fun!
We’re incredibly excited to see what you create! We encourage you to try this **DIY raffia wall hanging** project and share your creations with us. Tag us on social media using [Your Social Media Handle] and use the hashtag [Your Project Hashtag] so we can admire your handiwork and share it with our community. We’re confident that you’ll be thrilled with the results, and we can’t wait to see your unique interpretations of this classic craft. So, gather your materials, unleash your creativity, and get ready to transform your space with a beautiful, handmade raffia wall hanging! Let your imagination run wild and create a piece that truly reflects your personality and style. Happy crafting!
Frequently Asked Questions (FAQs)
What kind of raffia should I use for my wall hanging?
The best type of raffia for a wall hanging is natural raffia fiber. It’s durable, flexible, and has a beautiful, organic texture. You can find it in most craft stores or online retailers. Avoid synthetic raffia, as it may not have the same natural look and feel. Consider the color as well. Natural raffia has a lovely beige tone, but you can also find dyed raffia in a variety of colors to suit your décor. When purchasing, check for quality – the raffia should be strong and not easily breakable. Also, consider buying a bit more than you think you’ll need, just in case you want to add extra layers or make a larger piece.
How do I prevent my raffia wall hanging from shedding?
Shedding is a common concern with raffia, but there are a few things you can do to minimize it. First, when working with the raffia, handle it gently to avoid pulling or breaking the fibers. Second, after you’ve finished your wall hanging, you can lightly spray it with a clear acrylic sealant. This will help to bind the fibers together and reduce shedding. Be sure to test the sealant on a small, inconspicuous area first to ensure it doesn’t discolor the raffia. Another option is to gently brush the finished piece with a soft-bristled brush to remove any loose fibers. Regular dusting can also help prevent buildup and minimize shedding over time.
Can I add other materials to my raffia wall hanging?
Absolutely! One of the best things about this DIY project is the opportunity to personalize it with other materials. Feathers, beads, shells, driftwood, yarn, and even small pieces of fabric can be incorporated to add texture, color, and visual interest. Consider the overall aesthetic you’re aiming for and choose materials that complement the raffia and your existing décor. When adding heavier items, be sure to secure them well to the raffia base using strong glue or by weaving them directly into the design. Experiment with different combinations and placements to create a truly unique and eye-catching piece.
How do I clean my raffia wall hanging?
Cleaning a raffia wall hanging requires a gentle approach. Avoid using water or harsh chemicals, as these can damage the natural fibers. The best way to clean it is to dust it regularly with a soft-bristled brush or a feather duster. You can also use a vacuum cleaner with a brush attachment to gently remove dust and debris. If you notice any stains, try spot-cleaning them with a damp cloth and a mild detergent. Be sure to blot the area gently and avoid rubbing, as this can damage the raffia. Allow the area to air dry completely before hanging the wall hanging again.
What size should my raffia wall hanging be?
The size of your raffia wall hanging will depend on the space you have available and your personal preference. Consider the size of the wall where you plan to hang it and choose a size that is proportionate to the space. You can create a small, delicate hanging for a narrow wall or a large, statement piece for a larger area. Before you start, measure the space and sketch out a rough design to get an idea of the size and shape you want to achieve. Remember that you can always add more raffia or trim it down as needed during the crafting process.
How do I hang my raffia wall hanging?
There are several ways to hang your raffia wall hanging. You can attach a small loop of twine or yarn to the back of the hanging and use a nail or hook to hang it on the wall. Alternatively, you can use adhesive hooks or strips that are designed for hanging lightweight items. Be sure to choose hooks or strips that are strong enough to support the weight of the wall hanging. For larger or heavier pieces, you may need to use more than one hook or strip to ensure it is securely attached to the wall. Consider the type of wall you’re hanging it on (drywall, plaster, etc.) and choose the appropriate hanging method.
Can I make a raffia wall hanging with a specific pattern or design?
Yes, absolutely! While the instructions provide a basic framework, you can definitely incorporate specific patterns or designs into your raffia wall hanging. You can create geometric patterns by varying the length and placement of the raffia strands. You can also use different colors of raffia to create stripes, chevrons, or other visual patterns. If you’re feeling ambitious, you can even try weaving in more complex designs using macrame knots or other weaving techniques. Before you start, sketch out your design on paper to help you visualize the finished product and plan your approach.
Is this a good project for beginners?
Yes, this **DIY raffia wall hanging** project is perfect for beginners! The basic technique is simple to learn, and the materials are readily available and inexpensive. The instructions are straightforward and easy to follow, even if you have no prior crafting experience. The project is also very forgiving, so you don’t have to worry about making mistakes. If you do make a mistake, you can easily undo it and try again. The most important thing is to have fun and experiment with different techniques and materials. With a little patience and creativity, you can create a beautiful and unique raffia wall hanging that you’ll be proud to display in your home.
Leave a Comment