

DIY Reed Diffuser: Ever walk into a room and get enveloped by a beautiful, subtle fragrance that instantly lifts your mood? I know I have! And while store-bought air fresheners can do the trick, they often come with harsh chemicals and hefty price tags. That’s where the magic of a DIY reed diffuser comes in!
For centuries, people have sought natural ways to scent their homes, from burning fragrant woods to using essential oil blends. The concept of diffusing scents isn’t new, but the modern reed diffuser offers a simple, elegant, and flame-free way to enjoy aromatherapy. Think of it as a sophisticated upgrade from potpourri, offering a consistent and gentle release of fragrance.
Why should you embrace this DIY project? Well, for starters, it’s incredibly cost-effective! You can create a beautiful, personalized fragrance experience for a fraction of the price of commercial diffusers. Plus, you have complete control over the ingredients, ensuring you’re only breathing in natural, non-toxic aromas. In this article, I’m going to show you how to create your own DIY Reed Diffuser, step-by-step, using simple ingredients you probably already have at home. Get ready to transform your space into a fragrant oasis!
DIY Reed Diffuser: Freshen Your Home Naturally!
Hey there, fellow DIY enthusiasts! Are you tired of those artificial-smelling air fresheners that cost a fortune and are packed with chemicals? I know I was! That’s why I decided to dive into the world of DIY reed diffusers, and let me tell you, it’s been a game-changer for my home. Not only is it incredibly easy and cost-effective, but you also get to customize the scent to perfectly match your mood and style. So, grab your supplies, and let’s get started on creating your own natural and delightful reed diffuser!
What You’ll Need
Before we jump into the step-by-step instructions, let’s gather all the necessary materials. This will make the process smoother and more enjoyable. Here’s a comprehensive list:
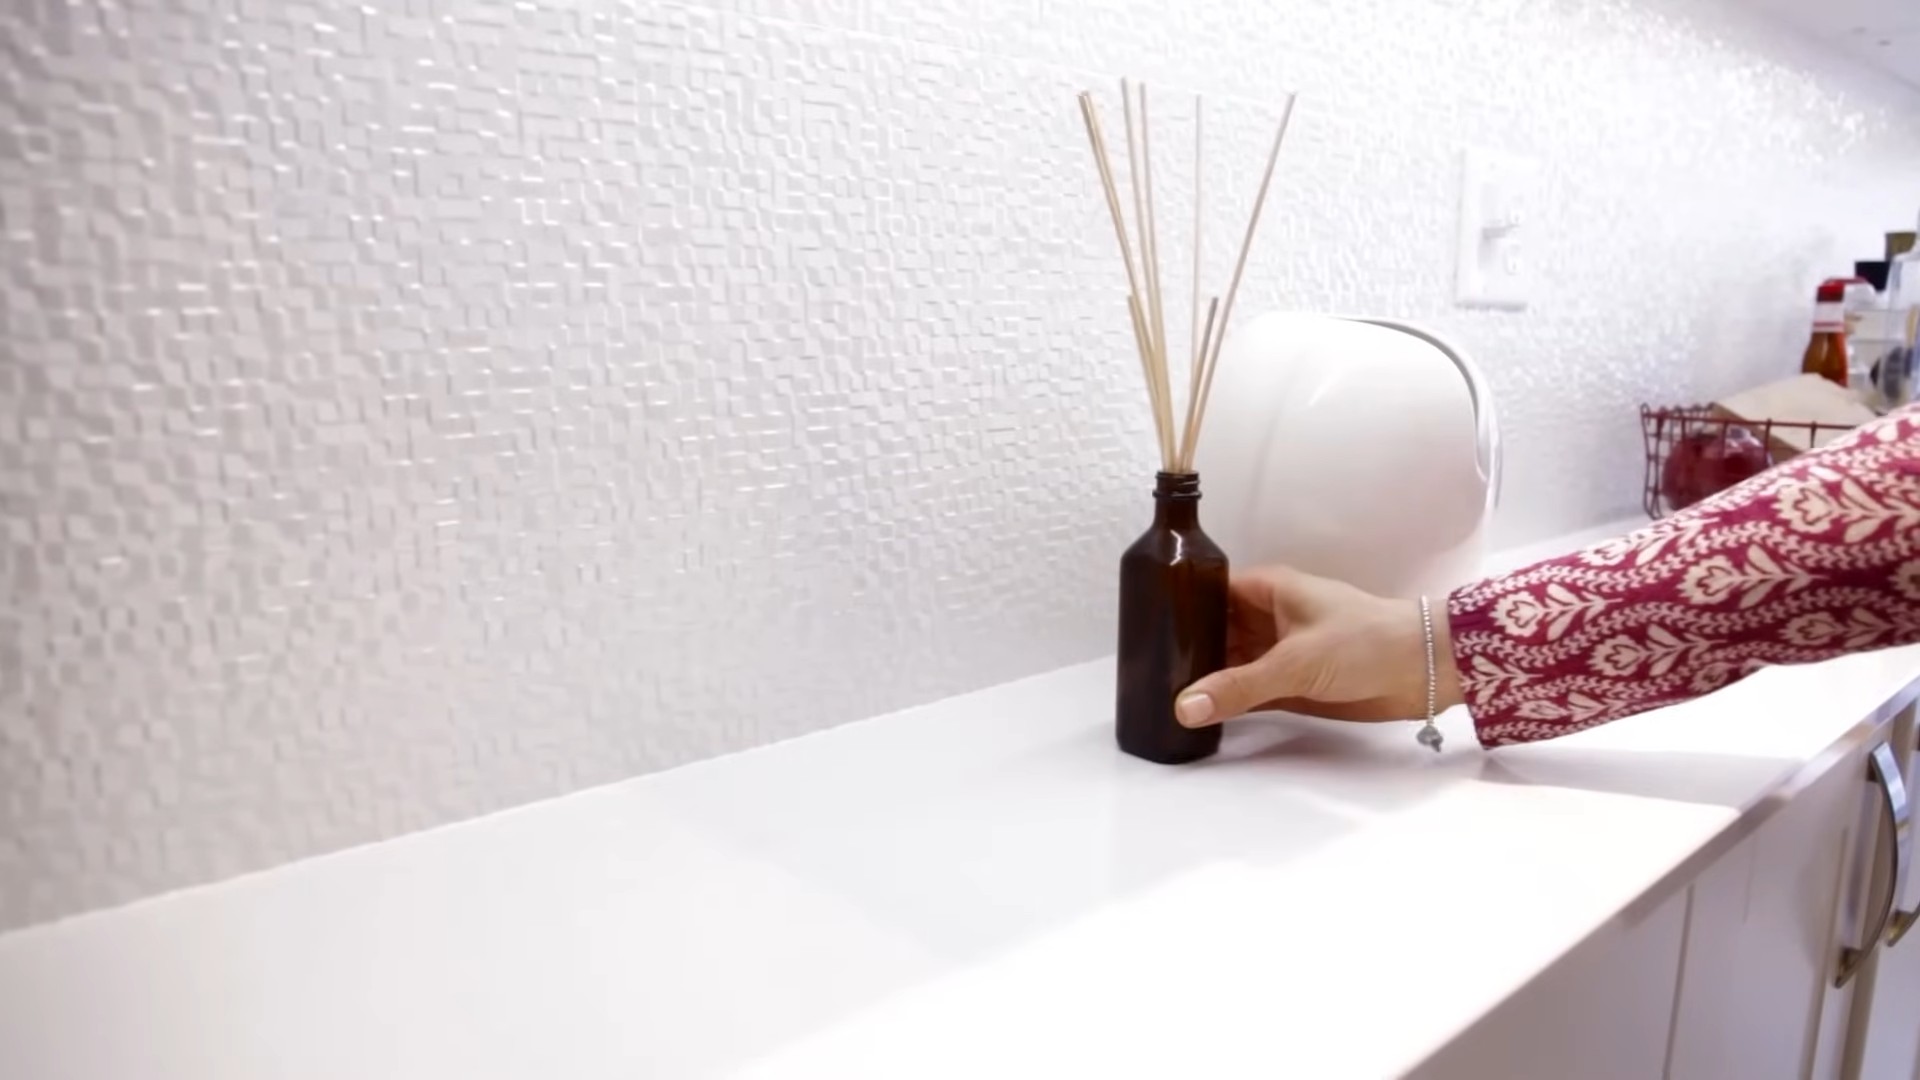
* **A Small Glass Bottle or Vase:** This will be your diffuser container. Choose one with a narrow opening to minimize evaporation. I personally love using repurposed bottles – think small mason jars, vintage perfume bottles, or even a stylish olive oil bottle. Just make sure it’s clean and dry!
* **Reed Diffuser Sticks:** These are essential for drawing the fragrance up and dispersing it into the air. You can find them online or at craft stores. Look for natural rattan reeds, as they have open channels that allow the fragrance to travel efficiently. The length of the reeds should be about twice the height of your bottle.
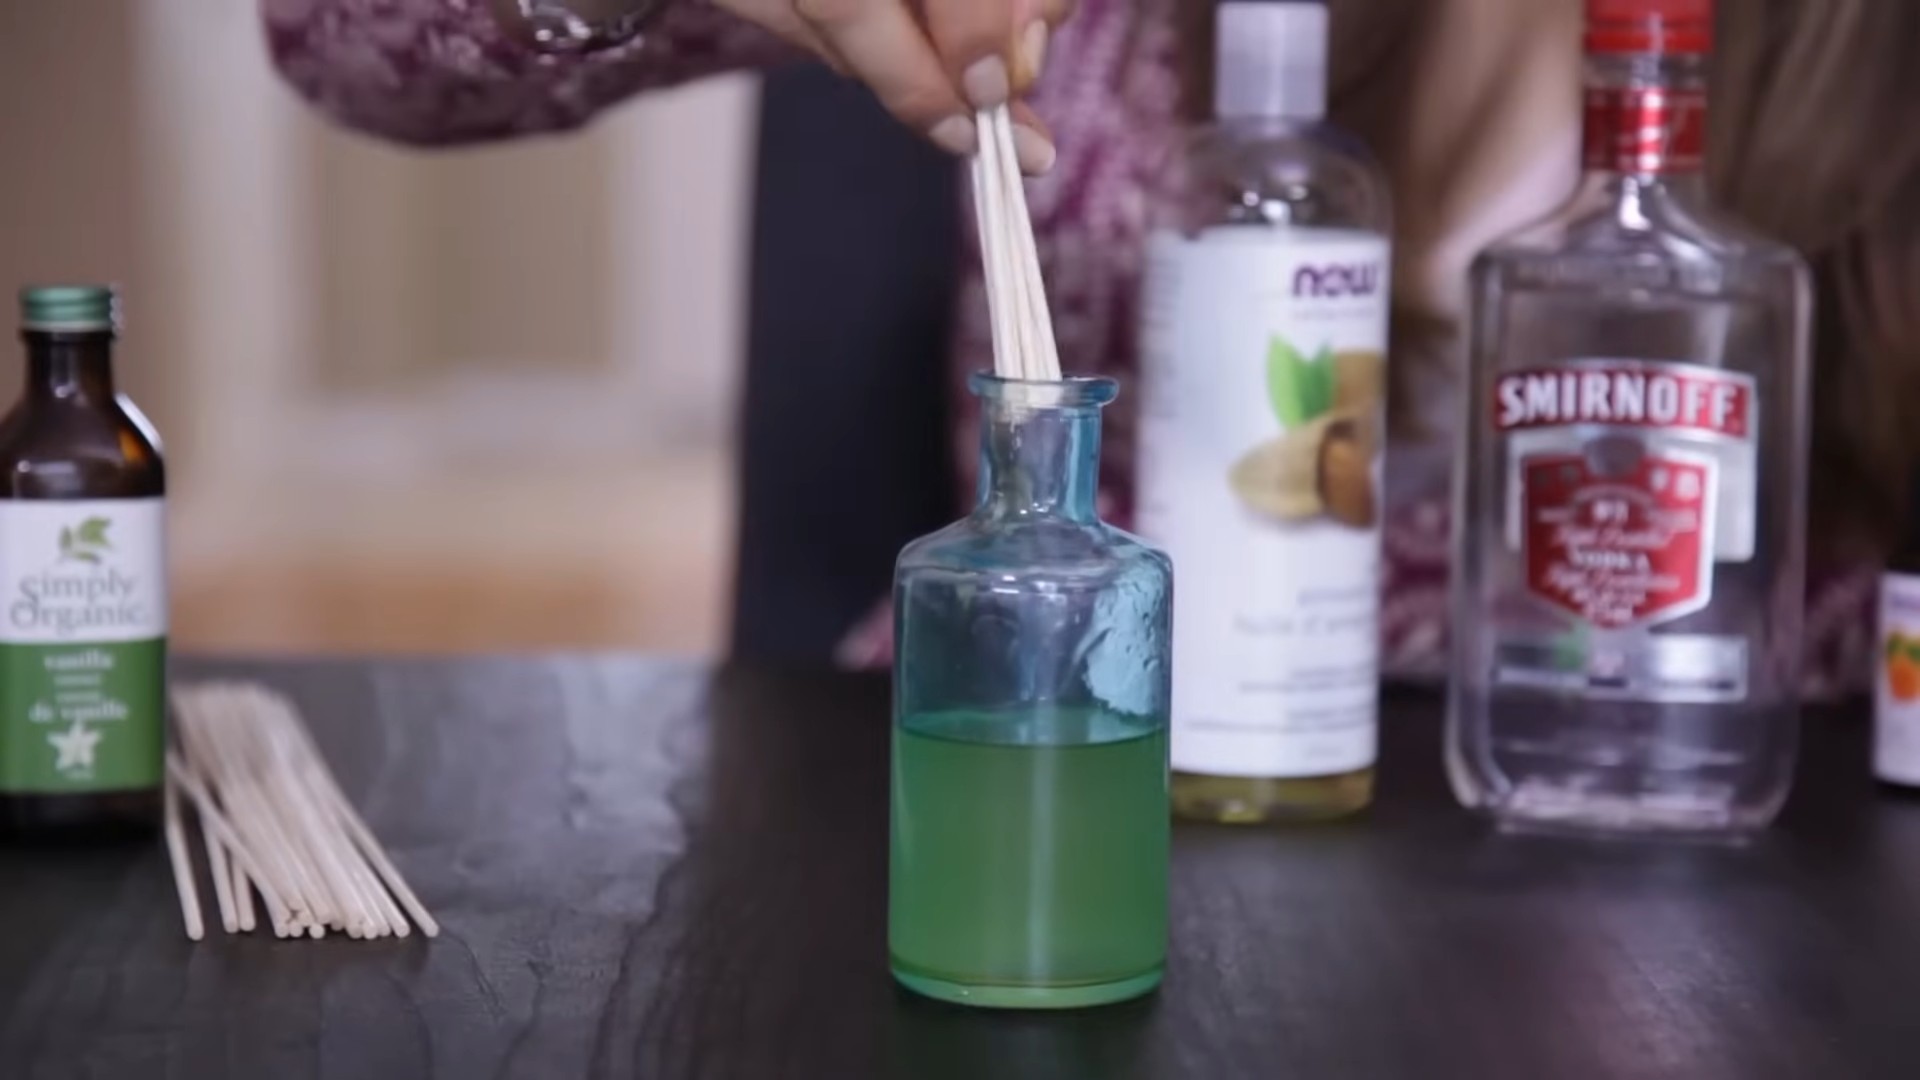
* **Carrier Oil:** This is the base of your diffuser liquid and helps to dilute the essential oils. Fractionated coconut oil is my go-to choice because it’s odorless, colorless, and has a long shelf life. Other options include sweet almond oil, safflower oil, or even mineral oil (though I prefer to avoid mineral oil due to environmental concerns).
* **Essential Oils:** This is where you get to unleash your creativity! Choose your favorite essential oils or create a blend that suits your preferences. Some popular choices include lavender, eucalyptus, lemon, peppermint, rosemary, and cedarwood. Remember to use high-quality, pure essential oils for the best scent and therapeutic benefits.
* **Isopropyl Alcohol (Optional):** A small amount of isopropyl alcohol (rubbing alcohol) can help the essential oils and carrier oil blend better. It also thins the mixture slightly, allowing it to travel up the reeds more easily.
* **Measuring Spoons or Droppers:** For accurate measurements of the carrier oil and essential oils.
* **Funnel (Optional):** To help pour the mixture into the bottle without spilling.
* **Gloves (Optional):** To protect your hands from essential oils, especially if you have sensitive skin.
* **Paper Towels:** For easy cleanup.
Choosing Your Scent: Essential Oil Blending Tips
One of the best things about making your own reed diffuser is the ability to create custom scent blends. Here are a few tips to help you create a fragrance that you’ll love:
* **Consider the Mood:** Think about the atmosphere you want to create in your space. Do you want something relaxing and calming for your bedroom? Or something energizing and uplifting for your home office?
* **Start with a Base Note:** Base notes are the foundation of your fragrance and provide a long-lasting scent. Common base notes include cedarwood, sandalwood, vanilla, and patchouli.
* **Add a Middle Note:** Middle notes provide the body of the fragrance and typically last for a few hours. Popular middle notes include lavender, geranium, rosemary, and chamomile.
* **Finish with a Top Note:** Top notes are the first scents you’ll notice and are usually light and refreshing. Common top notes include lemon, orange, grapefruit, peppermint, and eucalyptus.
* **Experiment and Adjust:** Don’t be afraid to experiment with different combinations and ratios. Start with a small batch and adjust the blend until you find your perfect scent.
* **Some of My Favorite Blends:**
* **Relaxing Lavender:** 15 drops lavender, 5 drops chamomile, 2 drops cedarwood.
* **Energizing Citrus:** 10 drops lemon, 8 drops grapefruit, 4 drops peppermint.
* **Woodsy and Grounding:** 12 drops cedarwood, 6 drops rosemary, 4 drops pine.
* **Spicy and Warm:** 10 drops orange, 6 drops cinnamon, 4 drops clove.
Step-by-Step Instructions: Creating Your Reed Diffuser
Alright, let’s get down to the nitty-gritty and create your very own reed diffuser! Follow these simple steps, and you’ll have a beautifully scented home in no time.
1. **Prepare Your Bottle:** Make sure your glass bottle or vase is clean and completely dry. Any residue or moisture can affect the scent and longevity of your diffuser.
2. **Mix the Carrier Oil and Essential Oils:** In a small bowl or measuring cup, combine the carrier oil and essential oils. A good starting ratio is 75% carrier oil and 25% essential oils. For example, if you’re using a 4-ounce bottle, you would use 3 ounces of carrier oil and 1 ounce of essential oils.
* **Adding Isopropyl Alcohol (Optional):** If you’re using isopropyl alcohol, add a small amount (about 10% of the total volume) to the mixture. This will help the oils blend better and travel up the reeds more efficiently. So, in our 4-ounce example, you’d use 2.7 ounces of carrier oil, 0.4 ounces of isopropyl alcohol, and 0.9 ounces of essential oils.
* **Important Note:** Always add the essential oils to the carrier oil, not the other way around. This helps the essential oils disperse evenly.
3. **Pour the Mixture into the Bottle:** Using a funnel (if desired), carefully pour the oil mixture into your prepared bottle. Be careful not to overfill it – leave about an inch of space at the top.
4. **Insert the Reed Diffuser Sticks:** Place the reed diffuser sticks into the bottle, making sure they are submerged in the oil mixture. The number of reeds you use will affect the intensity of the scent. Start with 5-7 reeds and add more if you want a stronger fragrance.
5. **Flip the Reeds (Important!):** After about an hour, flip the reeds so that the saturated ends are now facing up. This will help to jumpstart the diffusion process. Be sure to do this over a sink or paper towel to catch any drips.
6. **Placement is Key:** Place your reed diffuser in a well-ventilated area where the fragrance can circulate easily. Avoid placing it in direct sunlight or near heat sources, as this can cause the oil to evaporate more quickly.
7. **Maintain Your Diffuser:** To keep your reed diffuser working effectively, flip the reeds every week or two. This will help to refresh the scent and prevent the reeds from becoming clogged. You may also need to add more oil mixture as it evaporates over time.
Troubleshooting and Tips for Success
Even with the best instructions, sometimes things don’t go exactly as planned. Here are a few common issues you might encounter and how to fix them:
* **Weak Scent:**
* **Not Enough Essential Oils:** Try adding more essential oils to the mixture.
* **Clogged Reeds:** Replace the reeds with fresh ones.
* **Poor Ventilation:** Move the diffuser to a more open area.
* **Low-Quality Essential Oils:** Use high-quality, pure essential oils.
* **Oil Evaporates Too Quickly:**
* **Too Much Alcohol:** Reduce the amount of isopropyl alcohol in the mixture.
* **Direct Sunlight or Heat:** Move the diffuser away from direct sunlight or heat sources.
* **Wide-Mouthed Bottle:** Use a bottle with a narrower opening.
* **Reeds Aren’t Absorbing the Oil:**
* **Reeds Are Too Old:** Replace the reeds with fresh ones.
* **Oil Is Too Thick:** Add a small amount of isopropyl alcohol to thin the mixture.
* **Reeds Aren’t Rattan:** Ensure you are using rattan reeds, as other types may not wick the oil effectively.
* **Allergic Reaction:**
* **Discontinue Use:** If you experience any allergic reactions, such as skin irritation or respiratory problems, discontinue use immediately.
* **Identify the Allergen:** Try to identify which essential oil is causing the reaction and avoid using it in the future.
* **Consult a Doctor:** If your symptoms are severe, consult a doctor.
Safety Precautions
While DIY reed diffusers are a safe and natural way to freshen your home, it’s important to take a few precautions:
* **Keep Out of Reach of Children and Pets:** Essential oils can be harmful if ingested. Keep your reed diffuser out of reach of children and pets.
* **Avoid Contact with Skin and Eyes:** Essential oils can cause skin irritation and eye damage. If you get essential oils on your skin or in your eyes, rinse immediately with plenty of water.
* **Flammability:** Essential oils are
Conclusion
So, there you have it! Crafting your own DIY reed diffuser is not just a fun project; it’s a game-changer for creating a personalized and inviting atmosphere in your home. Forget those expensive store-bought diffusers filled with questionable chemicals. With just a few simple ingredients and a dash of creativity, you can tailor the scent to perfectly match your mood, the season, or even a specific room’s purpose.
Why is this a must-try? Because it empowers you to control every aspect of your home fragrance. You choose the essential oils, ensuring they are pure, therapeutic-grade, and aligned with your wellness goals. You select the carrier oil, opting for a natural and skin-friendly option. And you decide on the aesthetic, creating a diffuser that complements your décor and reflects your personal style.
Beyond the control and customization, making your own reed diffuser is incredibly cost-effective. The initial investment in essential oils and a carrier oil will last you through multiple diffuser refills, saving you a significant amount of money compared to constantly purchasing pre-made diffusers. Plus, it’s an eco-friendly choice, reducing plastic waste and promoting sustainable living.
Looking for variations? Experiment with different essential oil blends to create unique and captivating aromas. Try a calming lavender and chamomile blend for your bedroom, a refreshing citrus and mint blend for your bathroom, or an energizing rosemary and eucalyptus blend for your home office. You can also add a few drops of your favorite fragrance oil to enhance the scent and create a more complex aroma profile.
Consider using different types of reeds for varying diffusion rates. Rattan reeds are the most common and readily available, but bamboo skewers can also work in a pinch. Just be sure to trim them to the desired length and remove any sharp edges. For a more visually appealing diffuser, add decorative elements such as dried flowers, crystals, or colored pebbles to the jar.
Don’t be afraid to get creative and personalize your DIY reed diffuser to make it truly your own. The possibilities are endless!
We wholeheartedly encourage you to give this DIY trick a try. It’s a simple, rewarding, and cost-effective way to elevate your home fragrance and create a more inviting and enjoyable living space. Once you’ve created your masterpiece, we’d love to hear about your experience! Share your favorite essential oil blends, any tips or tricks you discovered along the way, and photos of your beautiful DIY reed diffusers in the comments below. Let’s inspire each other to create fragrant and welcoming homes!
Frequently Asked Questions (FAQ)
What exactly is a reed diffuser and how does it work?
A reed diffuser is a simple yet effective way to passively diffuse fragrance into a room. It consists of a container, typically a glass bottle or jar, filled with a base liquid (usually a carrier oil) and essential oils or fragrance oils. Reeds, typically made of rattan, are inserted into the liquid. The oil is drawn up through the reeds via capillary action and evaporates into the air, releasing the fragrance. The reeds act as wicks, continuously drawing the scented oil upwards and dispersing it throughout the room.
What type of carrier oil should I use for my DIY reed diffuser?
The best carrier oils for DIY reed diffusers are those that are light, odorless, and have a low viscosity, allowing them to travel easily up the reeds. Popular choices include:
* Fractionated Coconut Oil: This is a great option because it’s odorless, colorless, and has a very long shelf life. It also doesn’t solidify at room temperature, unlike regular coconut oil.
* Sweet Almond Oil: Another good choice, sweet almond oil is light and has a slightly nutty aroma that complements many essential oils. However, it can go rancid more quickly than fractionated coconut oil, so store it in a cool, dark place.
* Safflower Oil: This is a very light and odorless oil that is readily available and relatively inexpensive.
* Dipropylene Glycol (DPG): While not a natural oil, DPG is a common solvent used in commercial reed diffusers. It’s very effective at dispersing fragrance and has a long shelf life. However, some people prefer to avoid synthetic ingredients.
Avoid using heavy oils like olive oil or vegetable oil, as they are too thick to travel up the reeds effectively.
What essential oils are best for a reed diffuser?
The best essential oils for a reed diffuser are those that have a strong and long-lasting aroma. Some popular choices include:
* Lavender: Calming and relaxing, perfect for bedrooms and living rooms.
* Eucalyptus: Refreshing and invigorating, ideal for bathrooms and home offices.
* Lemon: Uplifting and energizing, great for kitchens and entryways.
* Peppermint: Invigorating and refreshing, use sparingly as it can be overpowering.
* Rosemary: Stimulating and focusing, good for home offices and study areas.
* Cedarwood: Grounding and calming, perfect for creating a cozy atmosphere.
* Orange: Cheerful and uplifting, a great all-around fragrance.
* Grapefruit: Energizing and refreshing, similar to lemon but with a slightly sweeter scent.
Experiment with different blends to find your favorite combinations. A good starting point is to use 15-30 drops of essential oil per 1/2 cup of carrier oil.
How many reeds should I use in my DIY reed diffuser?
The number of reeds you use will depend on the size of your container and the desired intensity of the fragrance. A good rule of thumb is to use 5-10 reeds for a standard-sized diffuser (around 4-6 ounces). The more reeds you use, the stronger the scent will be. You can always start with fewer reeds and add more if needed.
How often should I flip the reeds in my diffuser?
Flipping the reeds helps to refresh the scent and keep the diffuser working effectively. It’s generally recommended to flip the reeds every 1-2 weeks, or whenever you notice the scent fading. When you flip the reeds, be sure to do it over a sink or paper towel to avoid dripping oil.
How long will my DIY reed diffuser last?
The lifespan of your DIY reed diffuser will depend on several factors, including the size of the container, the type of carrier oil and essential oils used, and the ambient temperature and humidity. On average, a 4-6 ounce diffuser should last for 1-3 months. You’ll know it’s time to refill the diffuser when the oil level gets low or the scent fades significantly.
Can I reuse the reeds?
It’s generally not recommended to reuse the reeds, as they can become clogged with oil and dust over time, reducing their effectiveness. However, if you want to try reusing them, you can soak them in warm, soapy water for a few hours, then rinse them thoroughly and allow them to dry completely before using them again. Keep in mind that even after cleaning, they may not perform as well as new reeds. It’s best to replace the reeds when you refill the diffuser.
Is it safe to use essential oils around pets and children?
While essential oils offer many benefits, it’s important to use them safely around pets and children. Some essential oils can be toxic to pets, so it’s crucial to research which oils are safe to use. Keep diffusers out of reach of children and pets to prevent accidental ingestion or spills. If you have any concerns, consult with a veterinarian or healthcare professional before using essential oils around your family.
My reed diffuser doesn’t seem to be diffusing much scent. What can I do?
If your reed diffuser isn’t diffusing much scent, here are a few things you can try:
* Flip the reeds: As mentioned earlier, flipping the reeds helps to refresh the scent.
* Add more reeds: Increasing the number of reeds will increase the surface area for evaporation.
* Check the oil level: If the oil level is low, the reeds won’t be able to draw up enough oil.
* Make sure the reeds are clean: Clogged reeds won’t diffuse scent effectively.
* Move the diffuser to a warmer location: Heat helps to increase evaporation.
* Use a stronger essential oil blend: Some essential oils are more potent than others.
* Ensure proper ventilation: While you want the scent to linger, stagnant air can hinder diffusion. A gentle breeze can help.
Where can I buy supplies for my DIY reed diffuser?
You can find supplies for your DIY reed diffuser at a variety of places, including:
* Online retailers: Amazon, Etsy, and specialty essential oil websites are great sources for carrier oils, essential oils, reeds, and diffuser bottles.
* Craft stores: Stores like Michaels and Hobby Lobby often carry diffuser bottles, reeds, and some essential oils.
* Health food stores: Many health food stores sell essential oils and carrier oils.
* Bulk supply stores: If you plan on making a lot of diffusers, consider buying supplies in bulk from a supplier like Bramble Berry.
Leave a Comment