

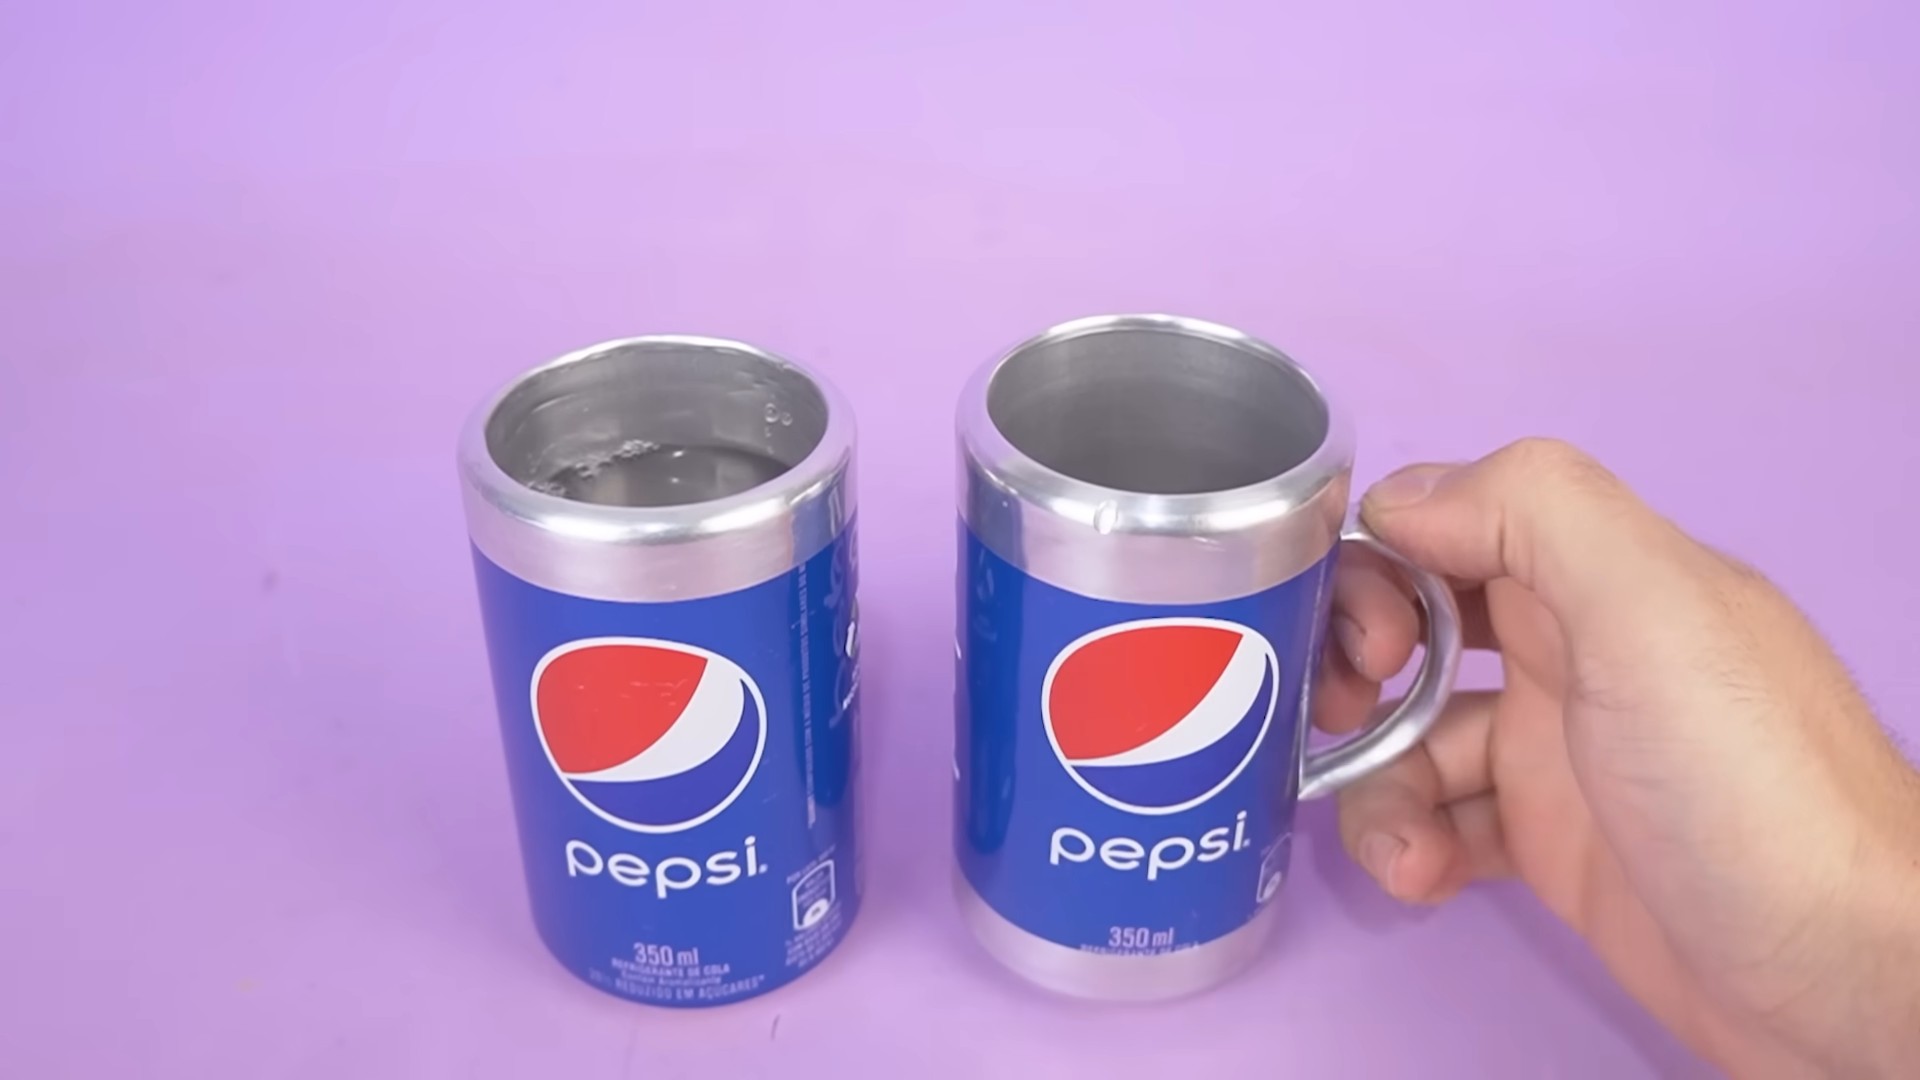
DIY Soda Can Cups: Who knew your empty soda cans could have a second life, far beyond the recycling bin? I’m excited to share a super fun and surprisingly practical DIY project with you – turning those discarded aluminum cans into stylish and unique drinking cups!
Upcycling, in general, has a rich history, deeply rooted in resourcefulness and necessity. Think back to the “make do and mend” ethos of past generations. While not specifically soda can cups, the spirit of transforming waste into something useful is timeless. Today, it’s not just about saving money; it’s about reducing our environmental footprint and embracing creativity.
But why DIY soda can cups, you might ask? Well, think about it: how many times have you needed an extra cup for a picnic, a party, or even just a casual drink on the patio? Store-bought cups can be expensive and often end up in landfills. This DIY project is a fantastic way to reuse materials, save money, and add a personal touch to your everyday life. Plus, they’re surprisingly durable and perfect for outdoor use. I’ll guide you through each step, ensuring you create safe and stylish cups that will impress your friends and family. Let’s get crafting!
DIY Soda Can Cups: Upcycling Your Way to Unique Drinkware
Hey everyone! Ever look at a pile of empty soda cans and think, “There has to be something cool I can do with these?” Well, you’re in luck! Today, I’m going to show you how to transform those aluminum cylinders into surprisingly stylish and functional cups. This project is not only a fun way to recycle, but it also lets you create unique drinkware that’s sure to be a conversation starter.
Important Safety Note: Aluminum cans can have sharp edges. Please exercise extreme caution throughout this project and always wear gloves when handling cut metal. Adult supervision is highly recommended, especially if children are participating.
Materials You’ll Need:
Before we dive in, let’s gather our supplies. You probably already have most of these lying around:
* Empty aluminum soda cans (washed and dried thoroughly)
* Can opener (the kind that cuts the lid off completely, leaving a smooth edge)
* Scissors (heavy-duty ones are best)
* Sandpaper (various grits, from coarse to fine – 120, 220, 400 grit recommended)
* Pliers (needle-nose pliers are particularly helpful)
* Ruler or measuring tape
* Permanent marker
* Cutting mat (optional, but protects your work surface)
* Gloves (essential for safety!)
* Safety glasses (also essential!)
* Epoxy resin (food-safe, for sealing the edges – optional but recommended for durability and safety)
* Mixing cups and stir sticks (if using epoxy resin)
* Heat gun or lighter (for removing bubbles in epoxy resin – optional)
* Spray paint or vinyl wrap (optional, for decorating)
Phase 1: Preparing the Can
This is where we turn the can from a potential hazard into a workable material. Take your time and be careful!
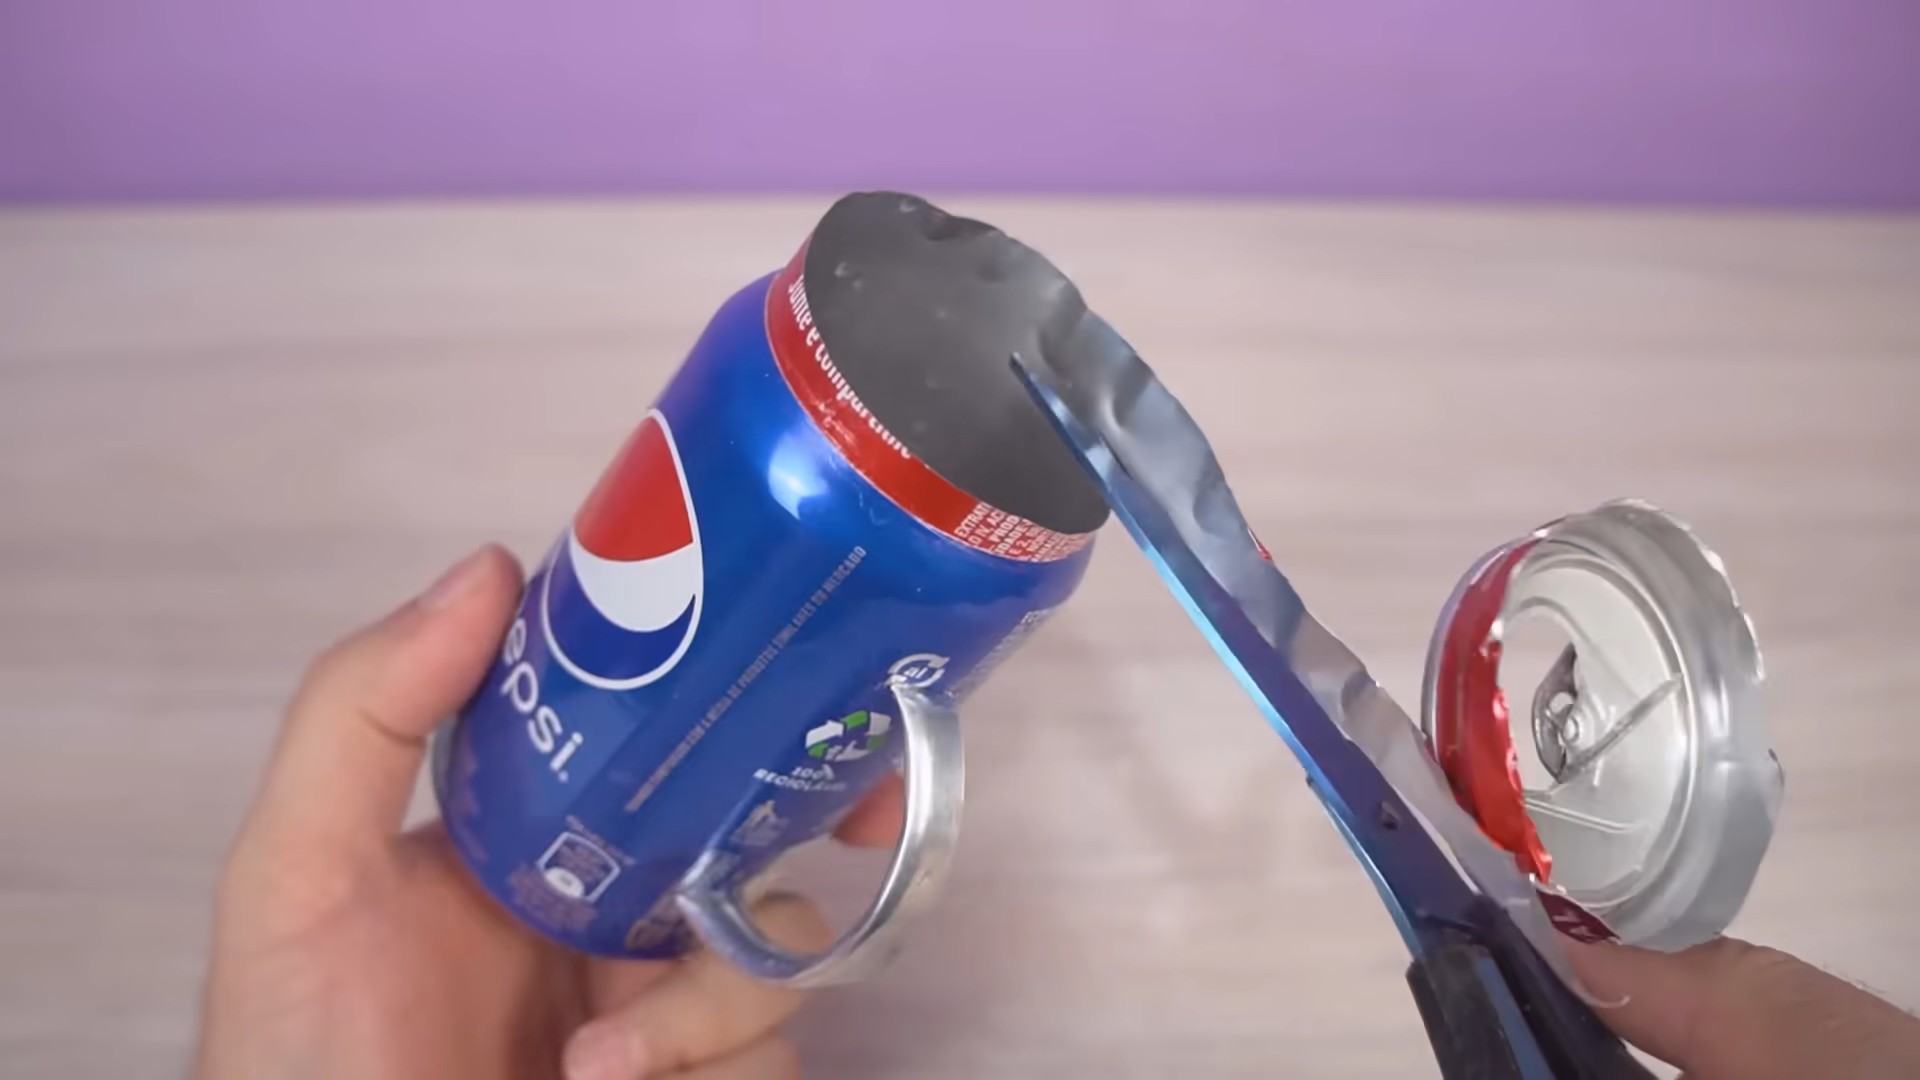
1. Open the Can: Using your can opener, carefully remove the entire top of the can. The goal is to create a smooth, clean edge without any jagged bits. Go slowly and steadily. If you end up with any sharp points, use the pliers to gently bend them inward.
2. Clean the Inside: Even though you washed the cans earlier, give the inside another quick rinse with soap and water to remove any lingering residue. Dry thoroughly.
3. Measure and Mark: Decide how tall you want your cup to be. I usually aim for around 4-5 inches, but you can adjust this to your preference. Use your ruler and permanent marker to draw a line around the can at your desired height. Make sure the line is even all the way around. This will be your cutting guide.
4. Cut the Can: This is the trickiest part. Carefully use your scissors to cut along the line you just drew. Go slowly and steadily, making small cuts at a time. It’s better to cut a little too high and then trim it down than to cut too low and ruin the can. Remember to wear your gloves!
5. Deburr the Edges: After cutting, the edge of the can will be very sharp. This is where the sandpaper comes in. Start with the coarse grit (120) to remove any major burrs or sharp points. Then, gradually move to finer grits (220, then 400) to smooth the edge as much as possible. This process takes time and patience, but it’s crucial for safety and comfort.
6. Bend the Edge Inward (Optional but Recommended): Using your pliers, gently bend the top edge of the can inward. This will create a rounded, safer edge. Work in small sections, bending the metal a little at a time. Be careful not to crease or dent the can.
Phase 2: Smoothing and Refining
Now we’ll focus on making the cup as smooth and comfortable to use as possible.
1. Continue Sanding: Even after bending the edge, continue sanding to further smooth and round it. Pay particular attention to any areas that still feel sharp or rough. The goal is to create an edge that feels comfortable against your lips.
2. Check for Sharp Points: Run your finger carefully along the edge of the cup to check for any remaining sharp points. If you find any, use the sandpaper or pliers to address them.
3. Clean Again: Once you’re satisfied with the smoothness of the edge, give the inside and outside of the cup another thorough cleaning to remove any metal shavings or sanding dust. Dry completely.
Phase 3: Sealing the Edge (Optional but Highly Recommended)
This step is crucial for making your cup food-safe and durable. Epoxy resin will create a smooth, sealed edge that prevents the aluminum from leaching into your drinks and protects against cuts.
1. Prepare the Epoxy Resin: Follow the manufacturer’s instructions to mix the epoxy resin. Be sure to use a food-safe epoxy resin specifically designed for contact with food and beverages. Mix the resin and hardener thoroughly, paying attention to the recommended ratio.
2. Apply the Epoxy: Using a stir stick or small brush, carefully apply a thin layer of epoxy resin to the top edge of the cup. Make sure to coat the entire edge, both inside and out.
3. Remove Bubbles: If you notice any bubbles in the epoxy, you can use a heat gun or lighter to gently remove them. Hold the heat source a few inches away from the epoxy and move it back and forth. The heat will cause the bubbles to rise to the surface and pop. Be careful not to overheat the epoxy, as this can cause it to cure too quickly or even burn.
4. Cure the Epoxy: Allow the epoxy resin to cure completely according to the manufacturer’s instructions. This usually takes 24-72 hours. Make sure the cup is placed on a level surface during the curing process to prevent the epoxy from running.
5. Sand the Epoxy (Optional): Once the epoxy is fully cured, you can lightly sand it with fine-grit sandpaper (400 grit or higher) to smooth out any imperfections. Be careful not to sand through the epoxy layer.
Phase 4: Decoration (Optional)
Now for the fun part! You can personalize your soda can cup in a variety of ways.
1. Spray Painting: If you want to change the color of your cup, you can use spray paint. Make sure to use a paint that is designed for use on metal and is food-safe if it will come into contact with the inside of the cup. Apply several thin coats of paint, allowing each coat to dry completely before applying the next.
2. Vinyl Wrapping: Vinyl wrapping is another great way to decorate your cup. You can find a wide variety of vinyl colors and patterns online or at craft stores. Simply cut the vinyl to the desired size and shape and apply it to the cup. Use a heat gun to help the vinyl conform to the curves of the can.
3. Permanent Markers: You can also use permanent markers to draw designs or write messages on your cup. This is a great way to add a personal touch.
4. Stickers: Stickers are a quick and easy way to decorate your cup. You can find stickers in a variety of sizes, shapes, and designs.
Final Touches and Considerations:
* Testing: Before using your cup for the first time, fill it with water and check for any leaks. If you find any leaks, you may need to apply another layer of epoxy resin.
* Cleaning: Hand wash your soda can cup with mild soap and water. Avoid using abrasive cleaners or scrub brushes, as these can damage the finish.
* Durability: While these cups are surprisingly durable, they are not indestructible. Avoid dropping them or subjecting them to excessive force.
* Variations: Experiment with different sizes and shapes of cans to create a variety of cups. You can also try adding handles or other embellishments.
* Gifting: These DIY soda can cups make unique and thoughtful gifts. Personalize them with the recipient’s favorite colors or designs.
And there you have it! You’ve successfully transformed a humble soda can into a cool and functional cup. I hope you enjoyed this project. Remember to always prioritize safety and have fun with it! Happy crafting!
Conclusion
So, there you have it! Transforming ordinary soda cans into surprisingly stylish and functional cups is not just a fun craft project; it’s a testament to resourcefulness and a fantastic way to reduce waste. We’ve walked you through the simple steps, highlighting the importance of safety and precision to ensure a smooth and enjoyable crafting experience.
Why is this DIY soda can cups trick a must-try? Beyond the obvious environmental benefits of upcycling, these homemade cups offer a unique aesthetic that you simply can’t find in store-bought alternatives. Imagine serving refreshing drinks in these quirky, personalized vessels at your next barbecue or picnic. They’re conversation starters, eco-friendly statements, and a delightful way to showcase your creativity.
But the possibilities don’t stop there! Feel free to experiment with different can sizes and designs. Try using cans from your favorite beverages to create a truly personalized set. You can even decorate the finished cups with paint, stickers, or decoupage techniques to match your individual style or the theme of your event. Consider adding a protective coating, like a food-safe sealant, to enhance durability and longevity, especially if you plan on using them frequently.
For a more sophisticated look, explore techniques for smoothing the edges further, perhaps using a fine-grit sandpaper or even a specialized tool for metal deburring. You could also experiment with different handle designs, perhaps crafting them from wire or even repurposing handles from other discarded items. The only limit is your imagination!
We understand that venturing into DIY projects can sometimes feel daunting, but we assure you that this one is incredibly rewarding. The satisfaction of transforming something seemingly useless into something beautiful and functional is truly unparalleled. Plus, it’s a fantastic activity to do with kids, teaching them about recycling and fostering their creativity.
So, gather your soda cans, grab your tools, and get ready to embark on this exciting crafting adventure. We’re confident that you’ll be amazed at the results. Don’t be afraid to experiment, personalize, and most importantly, have fun!
We’re eager to see your creations! Please share your experiences, tips, and photos of your finished DIY soda can cups in the comments section below. Let’s inspire each other and build a community of resourceful crafters. We can’t wait to see what you come up with! Let us know if you have any questions or run into any snags along the way. We’re here to help! Happy crafting!
Frequently Asked Questions (FAQ)
Is it safe to drink from soda can cups?
This is a crucial question, and safety should always be your top priority. When properly made, DIY soda can cups can be safe to drink from, but it’s essential to follow the instructions carefully and take necessary precautions. The biggest concern is the sharpness of the cut edges. Thoroughly sanding and smoothing the edges is paramount to prevent cuts or injuries. Consider using a food-safe epoxy or sealant to coat the edges for added protection and to prevent any potential leaching of aluminum into your beverage. However, it’s important to note that some experts advise against prolonged or repeated use of aluminum containers for food and beverages due to potential health concerns related to aluminum exposure. Therefore, while these cups can be great for occasional use or decorative purposes, they might not be the best choice for everyday drinking. Always prioritize your health and safety.
What tools do I need to make soda can cups?
The essential tools for this project include a can opener (preferably one that leaves a smooth edge), scissors or a craft knife, sandpaper (various grits, from coarse to fine), and safety gloves. Depending on the design you’re aiming for, you might also need a ruler, a marker, pliers (for bending edges), and potentially a deburring tool for metal. A cutting mat is also highly recommended to protect your work surface. Remember to always use sharp tools with caution and follow safety guidelines.
How do I prevent the edges from being sharp?
Preventing sharp edges is the most critical aspect of this project. Start by using a can opener that creates a smooth, rounded edge rather than a jagged one. After cutting the can, use coarse-grit sandpaper to remove any initial burrs or sharp points. Gradually move to finer grits of sandpaper to achieve a smooth, polished finish. You can also use pliers to gently bend the edges inward, further reducing the risk of cuts. As mentioned earlier, applying a food-safe epoxy or sealant to the edges can provide an extra layer of protection and create a more comfortable drinking experience.
Can I use these cups for hot beverages?
While technically you can pour hot beverages into these cups, it’s generally not recommended. Aluminum conducts heat very efficiently, so the cup will quickly become hot to the touch, making it difficult to hold comfortably. Additionally, the heat could potentially affect any sealant or coating you’ve applied to the edges. For hot beverages, it’s best to stick to insulated mugs or cups specifically designed for that purpose.
How do I clean my DIY soda can cups?
Hand washing is the best way to clean these cups. Avoid using abrasive cleaners or scouring pads, as they can scratch the surface and damage any decorative finishes. Use mild dish soap and warm water, and gently scrub the inside and outside of the cup. Rinse thoroughly and allow to air dry completely. Do not put these cups in the dishwasher, as the high heat and harsh detergents can damage them.
Can I decorate my soda can cups?
Absolutely! Decorating your DIY soda can cups is a great way to personalize them and add your own unique touch. You can use acrylic paints, permanent markers, stickers, decoupage techniques, or even engrave them with a rotary tool. Before decorating, make sure the surface is clean and dry. If using paint, consider applying a primer first to help the paint adhere better. After decorating, you can apply a clear sealant to protect your design and make it more durable.
How long will these cups last?
The lifespan of your DIY soda can cups depends on how frequently you use them and how well you care for them. With proper care and gentle handling, they can last for a reasonable amount of time. However, keep in mind that aluminum is a relatively soft metal, so they are susceptible to dents and scratches. Avoid dropping them or exposing them to extreme temperatures. Regularly inspect the edges for any signs of wear or damage, and discontinue use if you notice any sharp edges or cracks.
Are there any variations to this DIY project?
Yes, there are many variations you can explore! Instead of making simple cups, you can create more elaborate designs, such as pencil holders, small planters, or even decorative lanterns. You can also experiment with different cutting techniques to create unique shapes and patterns. Another variation is to use different types of cans, such as those from energy drinks or canned goods, to create a variety of sizes and shapes. Let your creativity guide you!
What if I accidentally cut myself while making these cups?
Safety is paramount. If you accidentally cut yourself, immediately wash the wound thoroughly with soap and water. Apply an antiseptic ointment and cover the cut with a sterile bandage. If the cut is deep or bleeding profusely, seek medical attention immediately. It’s always better to be safe than sorry. Always wear safety gloves and use caution when working with sharp tools.
Where can I find inspiration for my DIY soda can cups?
The internet is a treasure trove of inspiration! Search for “DIY soda can crafts” or “upcycled can projects” on platforms like Pinterest, YouTube, and Instagram to find countless ideas and tutorials. You can also browse craft blogs and websites for step-by-step instructions and creative inspiration. Don’t be afraid to experiment and adapt ideas to your own style and preferences.

Leave a Comment