

DIY Teacher’s Day Card: Show your appreciation with a heartfelt, handmade creation! Forget generic store-bought cards; this year, let’s craft something truly special for the educators who shape our lives. I’m going to guide you through creating a beautiful and personalized card that your teacher will cherish.
The tradition of Teacher’s Day has deep roots, celebrated worldwide to acknowledge the dedication and hard work of teachers. From ancient Greece, where philosophers like Socrates were revered, to modern-day celebrations honoring educators, the sentiment remains the same: teachers deserve our gratitude. What better way to express that gratitude than with a DIY Teacher’s Day Card made with love?
In a world of emails and digital messages, a handmade card stands out. It shows you took the time and effort to create something unique, reflecting your personal appreciation. Plus, let’s be honest, teachers receive countless apples and mugs – a thoughtful, personalized card is something they can truly treasure. I believe that a handmade card is a tangible expression of gratitude that speaks volumes. So, let’s dive in and create a memorable DIY Teacher’s Day Card that will brighten your teacher’s day!
DIY Teacher’s Day Card: A Heartfelt Handmade Gift
Okay, let’s get crafty! Teacher’s Day is just around the corner, and what better way to show your appreciation than with a handmade card? Forget store-bought generic greetings; we’re going to create a card that’s personal, thoughtful, and totally unique. I’m going to walk you through a few different design ideas, from simple and sweet to a little more elaborate. Don’t worry, even if you think you’re not “crafty,” I promise you can do this!
Materials You’ll Need (For All Card Ideas)
Before we dive into the specific designs, let’s gather our supplies. Having everything ready will make the process so much smoother.
* Cardstock: This is the base of your card. Choose a color your teacher loves, or go with a classic white or cream. I recommend a heavier weight cardstock for durability.
* Construction Paper: A variety of colors will allow for more creative designs.
* Scissors: A good pair of scissors is essential for clean cuts.
* Glue Stick or Liquid Glue: I prefer a glue stick for less mess, but liquid glue works too. Just be careful not to use too much!
* Markers, Colored Pencils, or Crayons: For adding details, writing messages, and coloring in designs.
* Ruler: For measuring and creating straight lines.
* Pencil: For sketching out your designs before you commit.
* Eraser: For correcting any mistakes.
* Optional Embellishments: Stickers, glitter, ribbon, buttons, googly eyes, washi tape – anything you want to add some extra flair!
Card Idea 1: The “Thank You” Flower Bouquet
This card is simple, elegant, and perfect for any teacher who loves flowers. It’s all about creating a beautiful bouquet on the front of the card.
Step-by-Step Instructions:
1. Prepare the Card Base: Fold your cardstock in half to create the card base. Make sure the fold is nice and crisp. You can use a bone folder or the edge of a ruler to help with this.
2. Cut Out the Flowers: Using different colors of construction paper, cut out flower shapes. You can freehand them, use a flower-shaped punch, or find templates online. I like to vary the sizes and shapes of the flowers for a more realistic look. Aim for at least 5-7 flowers.
3. Create the Stems: Cut out thin strips of green construction paper to serve as the flower stems. Vary the lengths of the stems to create a more natural arrangement.
4. Assemble the Bouquet: Arrange the stems on the front of the card, starting from the bottom and working your way up. Glue them in place.
5. Attach the Flowers: Glue the flowers to the tops of the stems, creating a bouquet effect. Overlap the flowers slightly to add depth.
6. Add Leaves: Cut out small leaf shapes from green construction paper and glue them around the flowers and stems.
7. Write Your Message: Use a marker or pen to write a heartfelt “Thank You” message on the card. You can write it above the bouquet, below it, or even incorporate it into the design. Some ideas include: “Thank you for helping me grow!”, “Best Teacher Ever!”, or simply “Thank You!”.
8. Add Embellishments (Optional): If you want to add some extra sparkle, you can add glitter to the flowers, tie a ribbon around the stems, or add some small stickers.
Card Idea 2: The “Apple for the Teacher” Pop-Up Card
This card is a little more challenging, but the pop-up element will definitely impress your teacher! It features a classic apple design that pops up when the card is opened.
Step-by-Step Instructions:
1. Prepare the Card Base: Fold your cardstock in half to create the card base.
2. Create the Pop-Up Mechanism: This is the trickiest part.
* Cut two slits, about 1 inch long and 1 inch apart, in the center of the folded card. These slits should be parallel to the fold.
* Gently push the section between the slits inward, creating a small “platform” that pops out when the card is opened. Crease the edges of this platform to make it more defined.
3. Cut Out the Apple: Cut out an apple shape from red construction paper. You can use a template or freehand it.
4. Attach the Apple to the Pop-Up Platform: Fold the bottom of the apple slightly to create a tab. Glue this tab to the pop-up platform so that the apple stands up when the card is opened.
5. Add Details to the Apple: Cut out a small leaf from green construction paper and a stem from brown construction paper. Glue them to the apple. You can also add some shading with a colored pencil to give the apple more dimension.
6. Decorate the Card Front: Decorate the front of the card with markers, colored pencils, or other embellishments. You can draw a border, add some stickers, or write a message.
7. Write Your Message Inside: Write a heartfelt message inside the card, around the pop-up apple. Some ideas include: “You’re the apple of my eye, Teacher!”, “Thank you for being a great teacher!”, or “I appreciate everything you do!”.
Card Idea 3: The “School Supplies” Collage Card
This card is a fun and playful way to celebrate Teacher’s Day. It features a collage of school supplies on the front of the card.
Step-by-Step Instructions:
1. Prepare the Card Base: Fold your cardstock in half to create the card base.
2. Gather School Supply Images: You can either draw school supplies (pencils, erasers, rulers, books, etc.) on construction paper and cut them out, or you can find images online and print them out.
3. Arrange the Collage: Arrange the school supply images on the front of the card to create a collage. Play around with the placement until you’re happy with the design.
4. Glue the Images in Place: Glue the school supply images to the card, overlapping them slightly to create a layered effect.
5. Add Details: Use markers or colored pencils to add details to the school supplies. You can draw lines on the pencils, add shading to the books, or write labels on the erasers.
6. Write Your Message: Write a heartfelt message on the card. You can write it above the collage, below it, or even incorporate it into the design. Some ideas include: “Thank you for helping me learn!”, “You’re the best teacher!”, or “Happy Teacher’s Day!”.
7. Add Embellishments (Optional): Add some extra flair with stickers, glitter, or washi tape. You can even add a small piece of ribbon to the top of the card to make it look like a gift.
Card Idea 4: The “Handprint Tree” Card
This card is super personal and makes a wonderful keepsake. It uses your handprint to create the leaves of a tree, symbolizing growth and knowledge.
Step-by-Step Instructions:
1. Prepare the Card Base: Fold your cardstock in half to create the card base.
2. Draw the Tree Trunk and Branches: Using a brown marker or colored pencil, draw a tree trunk and branches on the front of the card. Keep it simple and slightly bare, as the handprints will fill it out.
3. Prepare Your Handprint: Choose a green paint color (or a mix of greens for a more vibrant look). Carefully paint your hand with the paint. Make sure to cover your entire hand, but avoid applying too much paint, which can cause smudging.
4. Create the Leaves: Press your painted hand onto the branches of the tree, creating the leaves. Repeat this process multiple times, using different angles and slightly overlapping the handprints to create a full and leafy tree. You can also use different shades of green paint for variation.
5. Clean Up: Immediately wash your hand with soap and water.
6. Let it Dry: Allow the paint to dry completely before moving on to the next step.
7. Add Details: Once the paint is dry, you can add details to the tree with markers or colored pencils. You can draw small apples on the tree, add some birds, or even write your teacher’s name on the trunk.
8. Write Your Message: Write a heartfelt message inside the card. Some ideas include: “Thank you for helping me grow!”, “You’ve helped me blossom!”, or “Happy Teacher’s Day from the bottom of my heart!”.
Tips for Making Your Card Extra Special
* Personalize it: Think about your teacher’
Conclusion
Creating a heartfelt, personalized gift doesn’t have to break the bank or require advanced crafting skills. This DIY Teacher’s Day card project is a testament to that. It’s more than just a piece of paper; it’s a tangible expression of gratitude, a small token that speaks volumes about the impact a teacher has had. In a world saturated with generic, store-bought items, a handmade card stands out, radiating sincerity and thoughtfulness.
Why is this DIY trick a must-try? Because it’s deeply personal. You’re not just buying a card; you’re investing time and effort into creating something unique for someone special. The act of crafting itself is therapeutic, allowing you to reflect on the teacher’s contributions and infuse your card with genuine appreciation. Furthermore, it’s incredibly budget-friendly, utilizing materials you likely already have at home. This makes it accessible to everyone, regardless of their financial situation.
But the best part? The possibilities are endless! Feel free to adapt this basic design to suit your teacher’s personality and interests. Is your teacher a bookworm? Incorporate miniature book cutouts or a quote from their favorite author. Are they passionate about science? Add elements like beakers, atoms, or even a tiny, hand-drawn solar system. For the art teacher, consider using different painting techniques, collage elements, or even a miniature version of one of their famous projects.
Consider these variations to elevate your DIY Teacher’s Day card:
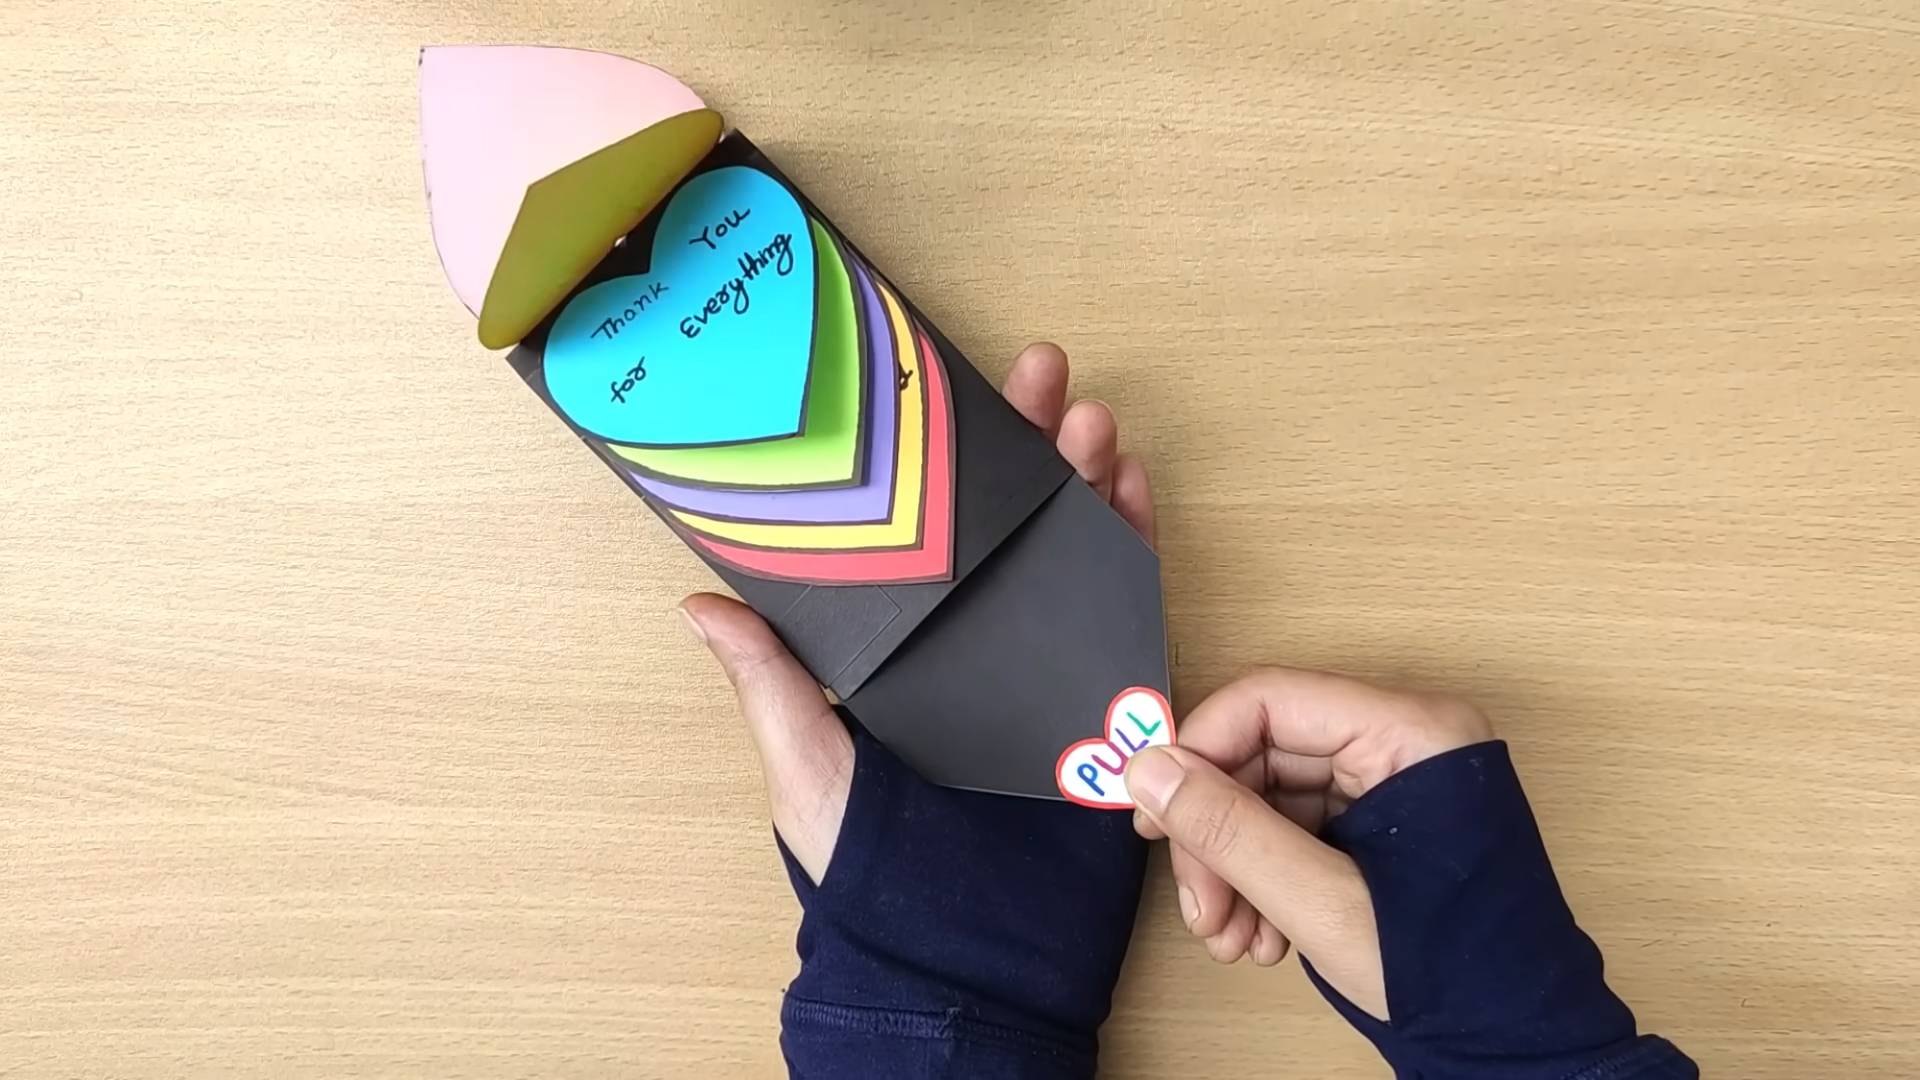
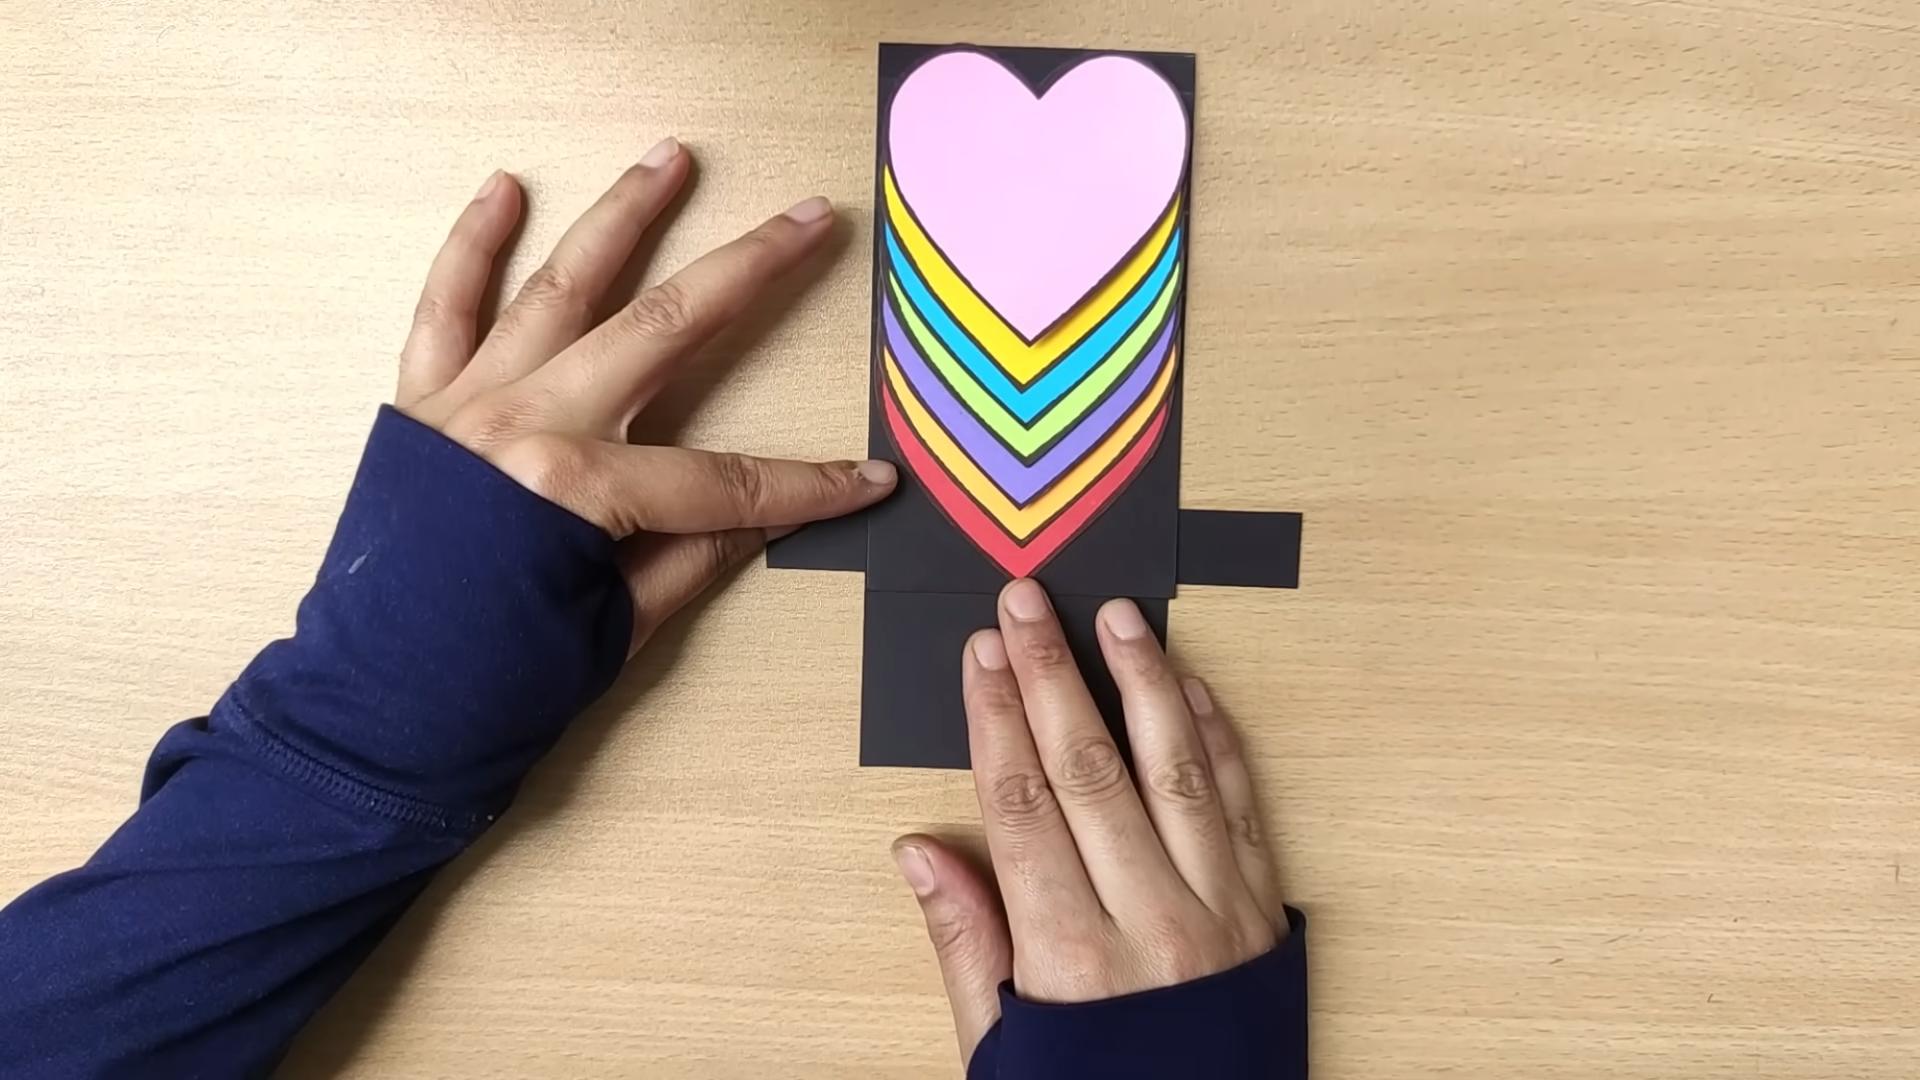
* **Pop-Up Elements:** Add a pop-up element inside the card for an extra touch of surprise and delight. A simple pop-up heart, star, or even a miniature version of the school building can make a big impact.
* **Personalized Messages:** Go beyond the standard “Thank You” and write a specific anecdote about how the teacher has helped you or a classmate. Share a memorable moment from class or a specific skill you’ve learned.
* **Photo Integration:** Include a class photo or a picture of you and the teacher. This adds a personal touch and creates a lasting memory.
* **Mixed Media:** Experiment with different materials like fabric scraps, buttons, glitter, or even dried flowers to add texture and visual interest.
* **Themed Cards:** Tailor the card to the teacher’s subject. For a math teacher, use geometric shapes and patterns. For a history teacher, incorporate historical images or symbols.
* **Collaborative Card:** Get the whole class involved in creating one large card. Each student can contribute a small drawing, message, or decoration.
Don’t be afraid to get creative and let your imagination run wild. The most important thing is that the card comes from the heart.
We wholeheartedly encourage you to try this DIY Teacher’s Day card project. It’s a fun, rewarding, and meaningful way to show your appreciation for the educators who shape our lives. Once you’ve created your masterpiece, we’d love to see it! Share your creations with us on social media using #DIYTeachersDayCard and inspire others to spread the love. We can’t wait to see what you come up with! Let’s make this Teacher’s Day extra special with a touch of handmade magic.
Frequently Asked Questions (FAQ)
What if I’m not very crafty?
Don’t worry! This DIY project is designed to be simple and accessible to everyone, regardless of their crafting experience. The basic design is easy to follow, and you can always simplify it further by using pre-cut shapes, stickers, or stamps. The most important thing is the thought and effort you put into the card, not the perfection of the execution. Remember, even a simple, heartfelt message on a plain card can be incredibly meaningful. Focus on expressing your gratitude and appreciation, and don’t stress about making it look perfect. There are many free templates online that you can print and use as a base for your card.
What kind of paper should I use?
Cardstock is generally the best option for making cards because it’s sturdy and durable. However, you can also use construction paper, scrapbook paper, or even recycled paper. If you’re planning on using wet media like paint or markers, choose a thicker paper that won’t bleed through. Experiment with different textures and colors to find what you like best. Consider using textured cardstock for a more professional look.
What if I don’t have all the materials listed?
No problem! Feel free to substitute materials based on what you have available. For example, if you don’t have glitter, you can use sequins, beads, or even colored sand. If you don’t have paint, you can use markers, crayons, or colored pencils. The key is to be resourceful and creative. Look around your house for items that you can repurpose or upcycle. Old magazines, newspapers, and fabric scraps can all be used to add unique elements to your card.
How can I make the card more personalized?
Personalization is key to making a DIY card truly special. Think about your teacher’s interests, hobbies, and personality. What are they passionate about? What are their favorite colors? What are some memorable moments you’ve shared in class? Incorporate these elements into your card to show that you’ve put thought and effort into it. Write a heartfelt message that expresses your specific appreciation for their contributions. Share a specific example of how they’ve helped you or inspired you. A personalized card is a gift that your teacher will cherish for years to come.
How can I involve my child in making the card?
Involving your child in the crafting process is a great way to make the card even more meaningful. Let them choose the colors, materials, and decorations. Help them write a message in their own words. Even if they’re too young to write, they can draw pictures or add stickers. The important thing is to let them express their creativity and contribute to the project in their own way. This will not only make the card more special but also teach them the importance of showing gratitude and appreciation.
How do I prevent the glue from making the paper wrinkle?
Using glue sparingly is key to preventing wrinkles. Opt for glue sticks or double-sided tape for a cleaner application. If you’re using liquid glue, apply a thin layer and spread it evenly. Avoid using too much glue in one spot. You can also try using a glue that’s specifically designed for paper crafts, as these tend to be less likely to cause wrinkles. Another tip is to let the glue dry completely before adding any additional layers or decorations.
Where can I find inspiration for my card design?
The internet is a treasure trove of inspiration for DIY card designs. Browse Pinterest, Instagram, and other social media platforms for ideas. Search for “DIY Teacher’s Day cards” or “handmade cards” to find a wide variety of examples. You can also find inspiration in everyday objects and surroundings. Look at nature, architecture, and art for ideas. Don’t be afraid to experiment and try new things. The most important thing is to have fun and let your creativity flow.
What if I make a mistake?
Don’t worry about making mistakes! Everyone makes them. The beauty of DIY projects is that they’re not meant to be perfect. If you make a mistake, try to fix it or incorporate it into the design. Sometimes, mistakes can even lead to unexpected and creative solutions. If you can’t fix the mistake, simply start over. Remember, the process is just as important as the final product.
How early should I start making the card?
It’s always a good idea to start making the card a few days before Teacher’s Day to avoid feeling rushed. This will give you plenty of time to gather your materials, brainstorm ideas, and complete the project without feeling stressed. Starting early also allows you to take breaks and come back to the project with fresh eyes. This can help you catch any mistakes or think of new ideas.
Is it okay to give a DIY card along with another gift?
Absolutely! A DIY card is a wonderful complement to any gift. It shows that you’ve put extra thought and effort into expressing your appreciation. The card can be a standalone gift or a personalized accompaniment to a store-bought present. The combination of a thoughtful card and a practical gift is a perfect way to show your teacher how much you care.


Leave a Comment