

DIY tile and grout cleaner: Are you tired of staring at dingy, stained tile and grout, wishing you could magically restore its original sparkle? I know I am! Store-bought cleaners can be expensive and often filled with harsh chemicals that leave you feeling uneasy. But don’t despair! There’s a simple, effective, and budget-friendly solution waiting for you right in your own home.
The quest for clean and gleaming tiles is nothing new. Throughout history, from the intricate mosaics of ancient Rome to the vibrant tilework of Moorish Spain, people have valued the beauty and hygiene of tiled surfaces. Maintaining that beauty, however, has always been a challenge. While our ancestors relied on natural ingredients like vinegar and lemon juice, we now have the power of modern science combined with the simplicity of DIY.
That’s why I’m so excited to share this incredible DIY tile and grout cleaner recipe with you. This isn’t just about aesthetics; clean tile and grout contribute to a healthier home environment by eliminating mold and mildew that can thrive in damp areas. Plus, who doesn’t love the satisfaction of transforming a grimy surface into something sparkling clean with their own two hands? This simple hack will save you money, reduce your exposure to harsh chemicals, and leave your tile and grout looking brand new. Let’s get started!
DIY Tile and Grout Cleaner: Say Goodbye to Grime!
Okay, let’s face it, cleaning tile and grout is nobody’s favorite chore. But dingy grout can make even the cleanest tiles look awful. Store-bought cleaners can be harsh and expensive, so I’m going to show you how to make your own powerful and effective tile and grout cleaner using ingredients you probably already have in your pantry! This method is not only budget-friendly but also avoids harsh chemicals, making it a win-win for your home and your health.
What You’ll Need
Before we dive in, let’s gather our supplies. This will make the whole process smoother and more efficient.
* Baking Soda: This is our gentle abrasive, perfect for scrubbing away grime without scratching your tiles.
* Hydrogen Peroxide (3%): This acts as a mild bleach and disinfectant, helping to lift stains and kill bacteria.
* Dish Soap (Dawn is my go-to!): Cuts through grease and helps the mixture cling to the grout.
* White Vinegar: A natural disinfectant and descaler. Be careful when mixing with baking soda, as it creates a fizzing reaction.
* Spray Bottle: For easy application of the cleaner.
* Old Toothbrush or Grout Brush: Essential for scrubbing those narrow grout lines.
* Sponge or Cloth: For wiping away the cleaner and rinsing the tiles.
* Gloves: To protect your hands from the cleaning solution.
* Eye Protection (Optional but Recommended): Just in case of splashes.
* Small Bowl: For mixing the paste.
* Measuring Spoons/Cups: For accurate measurements.
Making the Magic Paste: Baking Soda and Hydrogen Peroxide
This is my favorite method for tackling really tough grout stains. The combination of baking soda and hydrogen peroxide creates a powerful cleaning action.
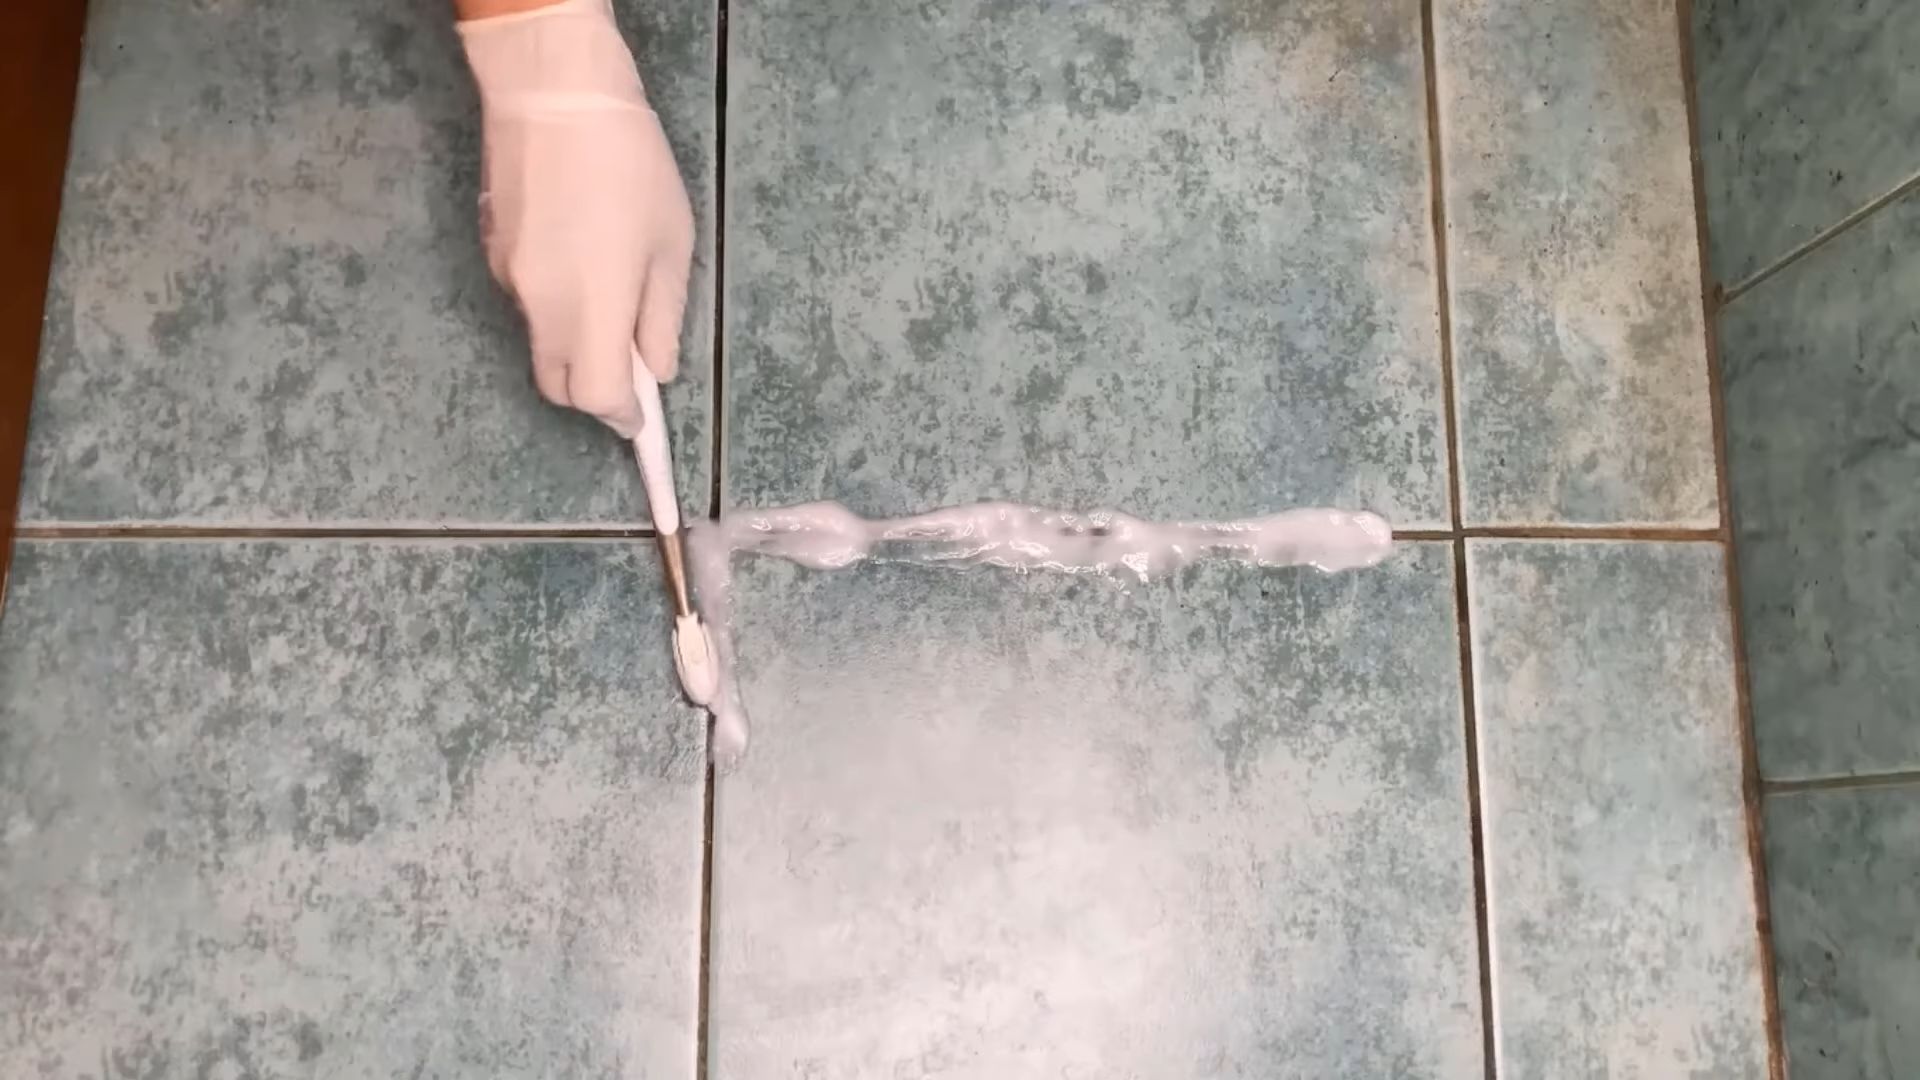
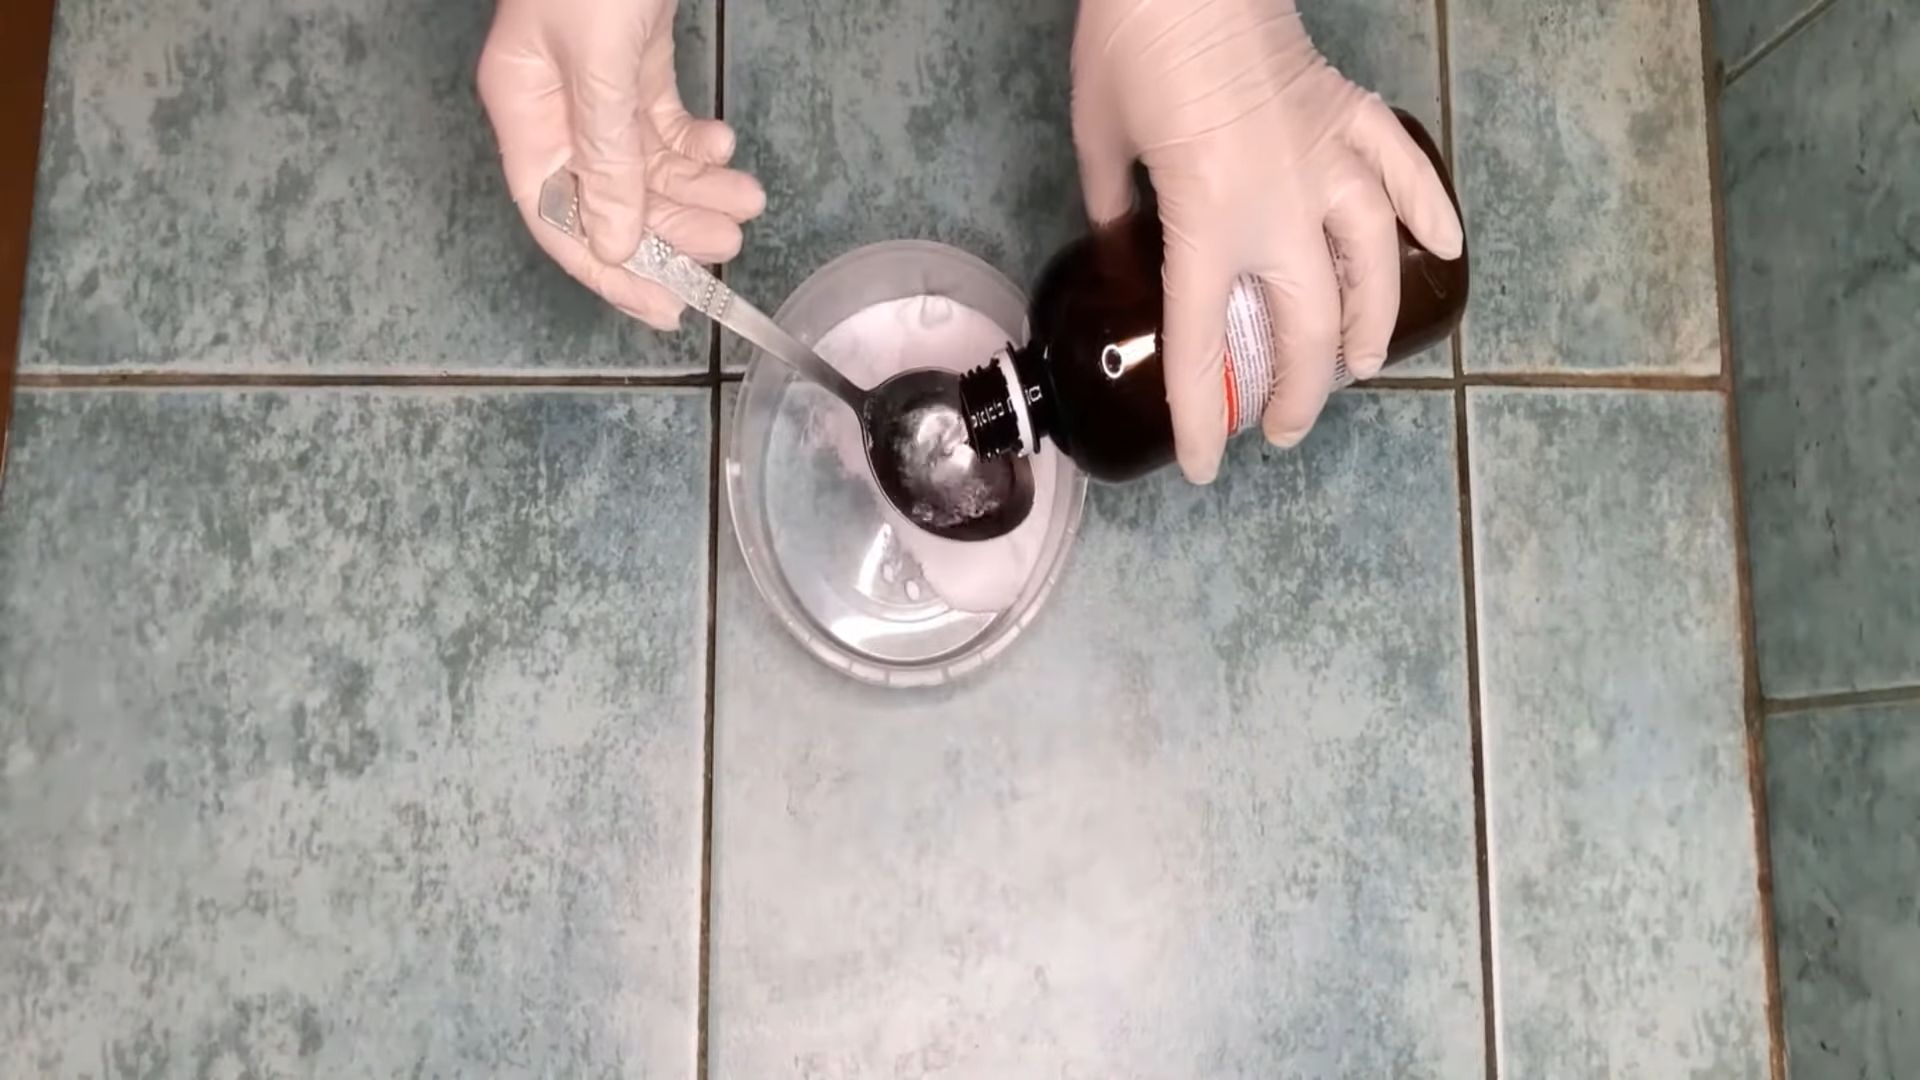
1. Mix the Paste: In your small bowl, combine ½ cup of baking soda with enough hydrogen peroxide to form a thick paste. You’ll probably need around ¼ cup of hydrogen peroxide, but add it gradually until you get the right consistency. It should be thick enough to stick to the grout lines.
2. Apply the Paste: Using your fingers (with gloves on, of course!) or a small spatula, apply the paste generously to the grout lines. Make sure to cover the entire area you want to clean.
3. Let it Sit: This is the key! Allow the paste to sit on the grout for at least 5-10 minutes. For really stubborn stains, you can let it sit for up to 30 minutes. The longer it sits, the more time it has to break down the grime.
4. Scrub-a-dub-dub: Grab your old toothbrush or grout brush and start scrubbing! Use firm, circular motions to loosen the dirt and stains. You’ll probably see the paste start to turn gray or brown as it lifts the grime.
5. Rinse and Wipe: Once you’ve scrubbed the grout, rinse the area thoroughly with clean water. Use a sponge or cloth to wipe away any remaining paste and dirt. You might need to rinse and wipe a few times to get everything clean.
6. Admire Your Work: Stand back and admire your sparkling clean grout! You’ll be amazed at the difference.
The Power Couple: Vinegar and Baking Soda
This method is great for general cleaning and maintenance. The fizzing action of vinegar and baking soda helps to loosen dirt and grime. Remember to never mix vinegar and bleach, as it creates toxic fumes.
1. Sprinkle Baking Soda: Lightly sprinkle baking soda over the tile and grout you want to clean.
2. Spray with Vinegar: Fill your spray bottle with white vinegar and spray it generously over the baking soda. You’ll see it start to fizz – that’s the cleaning action happening!
3. Let it Fizz: Allow the vinegar and baking soda to fizz for a few minutes. This will help to loosen the dirt and grime.
4. Scrub-a-dub-dub (Again!): Use your toothbrush or grout brush to scrub the grout lines. The fizzing action should make it easier to remove the dirt.
5. Rinse and Wipe: Rinse the area thoroughly with clean water and wipe away any remaining residue with a sponge or cloth.
The Grease Buster: Dish Soap Solution
This method is perfect for cleaning tile and grout in kitchens or areas prone to grease buildup. Dish soap is a powerful degreaser that can cut through even the toughest grime.
1. Mix the Solution: In a bucket or bowl, mix warm water with a squirt of dish soap (about a tablespoon per gallon of water).
2. Apply the Solution: Use a sponge or cloth to apply the soapy water to the tile and grout.
3. Let it Sit: Allow the solution to sit for a few minutes to loosen the grease and grime.
4. Scrub-a-dub-dub (You know the drill!): Use your toothbrush or grout brush to scrub the grout lines.
5. Rinse and Wipe: Rinse the area thoroughly with clean water and wipe away any remaining soap residue.
Boosting Power: Adding a Little Borax
For extra cleaning power, you can add a tablespoon or two of Borax to any of the above solutions. Borax is a natural mineral that acts as a disinfectant and deodorizer. Always wear gloves when handling Borax.
Important Considerations and Tips
* Test in an Inconspicuous Area: Before cleaning your entire tile and grout surface, test the cleaning solution in a small, inconspicuous area to make sure it doesn’t damage the tile or grout.
* Ventilation is Key: Make sure to ventilate the area you’re cleaning by opening windows or turning on a fan.
* Protect Your Surfaces: Cover any nearby surfaces that you don’t want to get wet or stained.
* Regular Cleaning is Best: The more often you clean your tile and grout, the easier it will be to keep it looking its best.
* Dry Thoroughly: After cleaning, dry the tile and grout thoroughly to prevent mildew growth.
* Sealing Grout: Consider sealing your grout after cleaning to help protect it from future stains and dirt. You can find grout sealers at most home improvement stores.
* Colored Grout: Be extra cautious when cleaning colored grout, as some cleaning solutions can cause the color to fade. Always test in an inconspicuous area first.
* Stubborn Stains: For really stubborn stains, you may need to repeat the cleaning process or try a stronger cleaning solution.
* Steam Cleaning: A steam cleaner can also be a very effective way to clean tile and grout. The hot steam helps to loosen dirt and grime without the need for harsh chemicals.
* Preventative Measures: Place mats at entrances to trap dirt and debris before they get tracked onto your tile floors. Wipe up spills immediately to prevent staining.
Troubleshooting Common Problems
* Grout Still Looks Dirty: If your grout still looks dirty after cleaning, you may need to repeat the process or try a stronger cleaning solution. You can also try using a grout brush with stiffer bristles.
* Tile is Streaky: If your tile is streaky after cleaning, you may need to rinse it more thoroughly or use a different cleaning solution.
* Cleaning Solution is Damaging the Tile: If the cleaning solution is damaging the tile, stop using it immediately and try a gentler cleaning solution.
* Mold and Mildew: For mold and mildew, use a solution of bleach and water (1 part bleach to 10 parts water). Apply the solution to the affected area, let it sit for a few minutes, and then scrub with a brush. Rinse thoroughly with clean water. Always wear gloves and eye protection when working with bleach.
Alternative Cleaning Solutions
While the baking soda, hydrogen peroxide, vinegar, and dish soap methods are my go-to choices, here are a few other options you can try:
* Lemon Juice: Lemon juice is a natural disinfectant and can help to brighten grout. Apply lemon juice to the grout, let it sit for a few minutes, and then scrub with a brush. Rinse thoroughly with clean water.
* Cream of Tartar: Mix cream of tartar with a little water to form a paste. Apply the paste to the grout, let it sit for a few minutes, and then scrub with a brush. Rinse thoroughly with clean water.
* Commercial Grout Cleaners: If you’re not having luck with homemade cleaners, you can try a commercial grout cleaner. Be sure to follow the instructions on the label carefully.
I hope these tips and tricks help you get your tile and grout sparkling clean! Remember to be patient, persistent, and always test in an inconspicuous area first. Happy cleaning!
Conclusion
So, there you have it! A simple, effective, and budget-friendly way to tackle grimy tile and grout without resorting to harsh chemicals. This DIY tile and grout cleaner isn’t just about saving money; it’s about creating a healthier home environment for you and your family. The satisfaction of seeing your tiles sparkle again, knowing you achieved it with natural ingredients, is truly rewarding.
Why is this DIY trick a must-try? Because it’s a game-changer. It’s a powerful solution that cuts through grease, grime, and mildew, leaving your tile surfaces looking brand new. Commercial cleaners often contain harsh chemicals that can irritate skin, damage surfaces over time, and contribute to indoor air pollution. Our homemade version avoids all of that, offering a safer and more sustainable cleaning option. Plus, you likely already have most of the ingredients in your pantry!
But the beauty of DIY lies in its adaptability. Feel free to experiment with variations to suit your specific needs and preferences. For instance, if you’re dealing with particularly stubborn stains, consider adding a tablespoon of borax to the mixture for extra cleaning power. Borax is a natural mineral that acts as a powerful disinfectant and deodorizer. If you prefer a more fragrant cleaner, add a few drops of your favorite essential oil, such as lemon, tea tree, or eucalyptus. Lemon essential oil is known for its degreasing properties, while tea tree and eucalyptus oils have antibacterial and antifungal benefits. Always test any new mixture on an inconspicuous area first to ensure it doesn’t damage the tile or grout.
Another variation involves the application method. While a scrub brush is effective for general cleaning, a toothbrush can be incredibly useful for targeting narrow grout lines. For larger areas, consider using a steam cleaner after applying the DIY cleaner to loosen stubborn dirt and grime. The steam will also help to sanitize the surface.
We are confident that this DIY tile and grout cleaner will become your go-to solution for maintaining sparkling clean tile surfaces. It’s easy to make, effective, and environmentally friendly.
Now, it’s your turn! We encourage you to try this DIY tile and grout cleaner and experience the difference for yourself. Don’t be afraid to experiment with the variations and find what works best for your specific needs. And most importantly, share your experience with us! Let us know in the comments how this DIY cleaner worked for you, what variations you tried, and any tips or tricks you discovered along the way. Your feedback will help other readers and contribute to a community of DIY enthusiasts. Together, we can create a cleaner, healthier, and more sustainable world, one sparkling tile at a time. We can’t wait to hear your success stories!
Frequently Asked Questions (FAQ)
What exactly makes this DIY tile and grout cleaner better than store-bought options?
Store-bought tile and grout cleaners often contain harsh chemicals like bleach, ammonia, and phosphates. These chemicals can be harmful to your health, irritating your skin and respiratory system. They can also damage your tile and grout over time, causing discoloration and weakening the grout structure. Furthermore, these chemicals contribute to environmental pollution when they are washed down the drain. Our DIY cleaner uses natural ingredients like baking soda, vinegar, and dish soap, which are safer for you, your home, and the environment. They are also readily available and much more affordable than commercial cleaners.
Is this DIY cleaner safe for all types of tile and grout?
While this DIY cleaner is generally safe for most types of tile and grout, it’s always a good idea to test it on an inconspicuous area first, especially if you have delicate or porous tiles like natural stone (marble, granite, slate). Vinegar, while effective, is acidic and can etch or dull the surface of some natural stones. If you’re unsure, consult with a tile professional or use a pH-neutral cleaner specifically designed for natural stone. For colored grout, test the cleaner in a hidden area to ensure it doesn’t cause discoloration.
How often should I use this DIY tile and grout cleaner?
The frequency of cleaning depends on the amount of foot traffic and the level of dirt and grime buildup in your tile and grout. For high-traffic areas like bathrooms and kitchens, cleaning once a week is generally recommended. For less frequently used areas, cleaning every two to four weeks may be sufficient. Regular cleaning will prevent dirt and grime from becoming deeply embedded in the grout, making it easier to maintain a clean and sparkling surface.
Can I use this cleaner on other surfaces besides tile and grout?
While this cleaner is primarily designed for tile and grout, it can also be used on other surfaces like porcelain sinks, bathtubs, and shower stalls. However, avoid using it on surfaces that are sensitive to acidic cleaners, such as natural stone countertops or painted surfaces. Always test the cleaner on an inconspicuous area first to ensure it doesn’t cause any damage or discoloration.
What if the grout is heavily stained and the DIY cleaner doesn’t completely remove the stains?
For heavily stained grout, you may need to repeat the cleaning process several times. You can also try making a paste of baking soda and water and applying it directly to the stained grout lines. Let the paste sit for several hours or even overnight before scrubbing and rinsing. For particularly stubborn stains, consider using a grout brush with stiff bristles to scrub the grout lines more effectively. As a last resort, you can try using a commercial grout cleaner specifically designed for removing tough stains, but be sure to follow the manufacturer’s instructions carefully and wear appropriate protective gear.
How do I prevent tile and grout from getting dirty in the first place?
Prevention is key to keeping your tile and grout clean and sparkling. Here are a few tips:
* Wipe up spills immediately to prevent them from soaking into the grout.
* Use doormats and rugs to trap dirt and debris before they reach your tile floors.
* Ventilate your bathroom properly to prevent moisture buildup and mildew growth.
* Seal your grout regularly to protect it from stains and dirt.
* Sweep or vacuum your tile floors regularly to remove loose dirt and debris.
Can I use bleach in this DIY cleaner for extra cleaning power?
While bleach is a powerful disinfectant, it’s not recommended to mix it with vinegar or other acidic cleaners, as this can create toxic fumes. Bleach can also damage some types of tile and grout, causing discoloration and weakening the grout structure. If you want to use bleach, it’s best to use it separately and follow the manufacturer’s instructions carefully. However, we recommend sticking to the natural ingredients in our DIY cleaner for a safer and more sustainable cleaning option.
What kind of dish soap should I use in this DIY cleaner?
Any mild dish soap will work in this DIY cleaner. However, avoid using dish soaps that contain harsh chemicals or abrasives, as these can damage your tile and grout. Look for dish soaps that are labeled as “gentle” or “natural.” You can also use a dish soap that contains degreasing agents for extra cleaning power.
How long will the DIY tile and grout cleaner last?
This DIY tile and grout cleaner is best used fresh. The mixture of vinegar and baking soda creates a fizzing reaction that helps to loosen dirt and grime. Over time, this reaction will subside, and the cleaner will become less effective. We recommend making a fresh batch of cleaner each time you need to clean your tile and grout. However, if you have leftover cleaner, you can store it in a sealed container for up to a week.
Is there a way to make this cleaner smell better?
Yes! Adding a few drops of your favorite essential oil can make this cleaner smell much more pleasant. Lemon, tea tree, eucalyptus, and lavender essential oils are all great options. Lemon essential oil has degreasing properties, while tea tree and eucalyptus oils have antibacterial and antifungal benefits. Lavender essential oil has a calming and relaxing scent. Add the essential oil after the fizzing reaction has subsided to prevent it from being diluted by the carbon dioxide gas.

Leave a Comment