

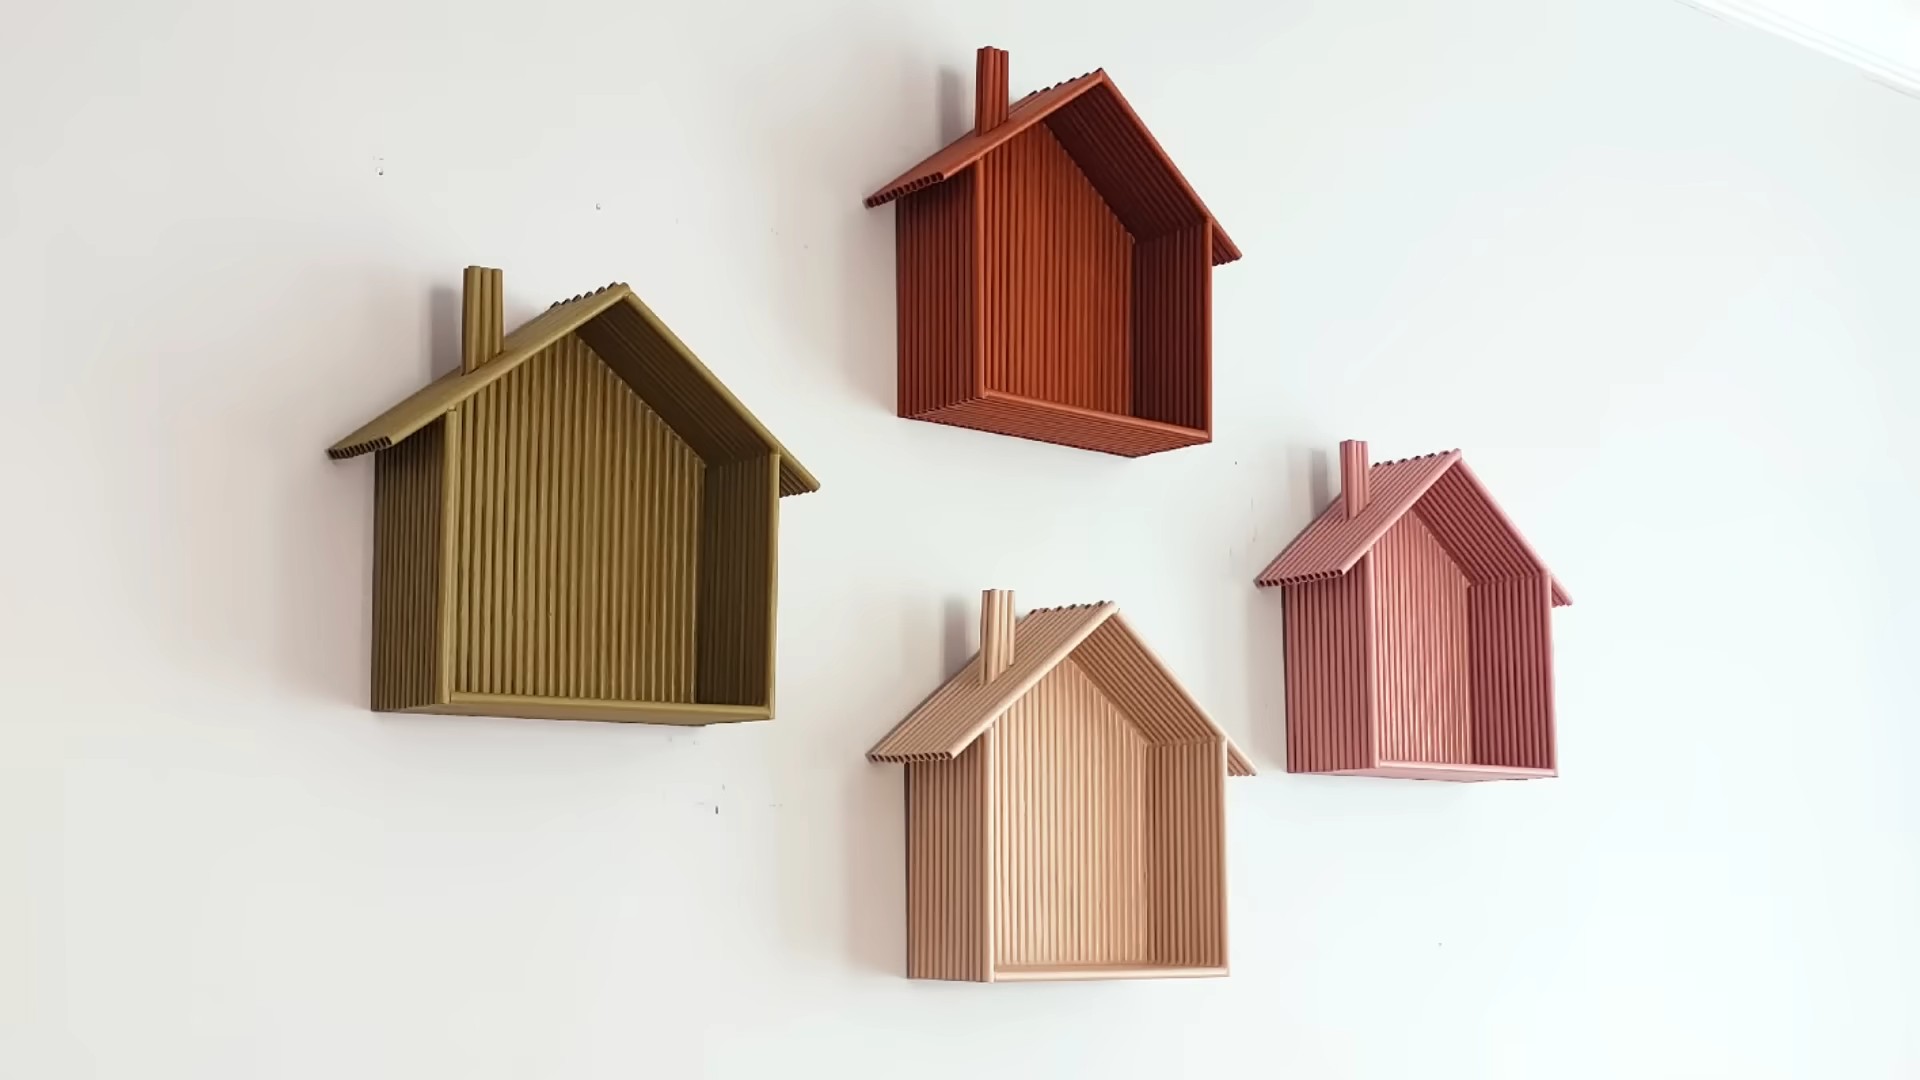
DIY Wall Box Shelf: Transform your living space with a touch of creativity and functionality! Have you ever looked at a blank wall and thought, “This needs something… but what?” I know I have! That’s where the magic of a DIY wall box shelf comes in. It’s not just about adding storage; it’s about adding personality and a unique design element that reflects your style.
Wall shelves, in various forms, have been around for centuries. From simple wooden planks in ancient homes to ornate, carved shelves in grand libraries, they’ve always been a practical and decorative solution. Today, we’re taking that concept and giving it a modern, DIY twist.
In today’s world, space is often a premium. Whether you’re living in a cozy apartment or a sprawling house, maximizing your storage and display options is essential. A DIY wall box shelf is the perfect solution! It allows you to showcase your favorite books, plants, or decorative items while keeping your space organized and clutter-free. Plus, building it yourself gives you the freedom to customize the size, shape, and color to perfectly match your existing decor. I’m excited to show you how easy and rewarding it can be to create your own stylish and functional wall box shelf!
“`html
DIY Wall Box Shelf: A Stylish and Functional Project
Hey there, fellow DIY enthusiasts! Today, I’m super excited to share a project that’s both practical and adds a touch of modern flair to any room: a DIY wall box shelf. These shelves are incredibly versatile – you can use them to display your favorite books, plants, photos, or even create a mini bar area. Plus, they’re surprisingly easy to build! Let’s dive in and get started.
Materials You’ll Need
Before we get our hands dirty, let’s gather all the necessary materials. This will save you time and frustration later on.
* **Wood:** I recommend using pine or poplar for this project, as they’re affordable, easy to work with, and readily available at most hardware stores. The thickness should be around ¾ inch. Decide on the dimensions of your box shelf beforehand to determine how much wood you need. For a standard size, you might consider 12 inches deep, 12 inches high, and 24 inches wide.
* **Wood Glue:** A good quality wood glue is essential for creating strong and durable joints.
* **Screws:** Use wood screws that are long enough to securely join the wood pieces together, but not so long that they poke through the other side. 1 ¼ inch screws are usually a good choice for ¾ inch wood.
* **Wood Filler:** This will help you fill any gaps or imperfections in the wood, creating a smooth and seamless finish.
* **Sandpaper:** You’ll need various grits of sandpaper, starting with a coarser grit (like 80 or 100) to smooth out any rough edges, and then moving to finer grits (like 150 or 220) for a smooth finish.
* **Primer:** A good primer will help the paint adhere to the wood and create a more even finish.
* **Paint or Stain:** Choose a paint or stain that complements your existing décor. I personally love using a semi-gloss paint for a clean and modern look, but stain can also add a beautiful rustic touch.
* **Polyurethane (Optional):** If you’re using stain, consider applying a coat of polyurethane to protect the wood and enhance its durability.
* **Mounting Hardware:** Depending on the weight of the items you plan to display on your shelf, you’ll need appropriate mounting hardware, such as screws, wall anchors, or heavy-duty brackets.
Tools You’ll Need
Having the right tools will make this project much easier and more enjoyable.
* **Measuring Tape:** Accurate measurements are crucial for creating a well-proportioned shelf.
* **Pencil:** For marking your measurements on the wood.
* **Square:** To ensure that your cuts are straight and your corners are square.
* **Saw:** A circular saw or miter saw is ideal for making straight cuts, but a hand saw can also work if you’re comfortable using it.
* **Drill:** You’ll need a drill to pre-drill holes for the screws and to drive the screws into the wood.
* **Screwdriver:** If you’re using screws that require a screwdriver, make sure you have the correct type and size.
* **Clamps:** Clamps are essential for holding the wood pieces together while the glue dries.
* **Sander:** An electric sander will make sanding much faster and easier, but you can also sand by hand if you prefer.
* **Paintbrushes or Roller:** For applying primer and paint.
* **Safety Glasses:** Always wear safety glasses when working with power tools to protect your eyes.
* **Dust Mask:** A dust mask will protect your lungs from wood dust.
Cutting the Wood
This is a crucial step, so take your time and double-check your measurements.
1. **Measure and Mark:** Using your measuring tape and pencil, carefully measure and mark the wood according to the dimensions you’ve chosen for your box shelf. Remember to account for the thickness of the wood when calculating the dimensions of each piece. For example, if you want your shelf to be 12 inches deep, and you’re using ¾ inch thick wood, you’ll need to subtract ¾ inch from the length of the side pieces.
2. **Cut the Wood:** Using your saw, carefully cut the wood along the marked lines. Make sure to keep the saw blade straight and follow the line closely. If you’re using a miter saw, you can set the angle to 90 degrees for straight cuts.
3. **Double-Check:** Once you’ve cut all the pieces, double-check the measurements to ensure that they’re accurate. It’s always better to catch a mistake now than to discover it later on.
Assembling the Box
Now comes the fun part – putting the pieces together!
1. **Apply Wood Glue:** Apply a generous amount of wood glue to the edges of the wood pieces that will be joined together. Make sure to spread the glue evenly to ensure a strong bond.
2. **Clamp the Pieces:** Carefully align the wood pieces and clamp them together. Use a square to ensure that the corners are square. The clamps will hold the pieces in place while the glue dries.
3. **Pre-Drill Holes:** Before driving the screws, pre-drill holes through the wood. This will prevent the wood from splitting and make it easier to drive the screws. Use a drill bit that’s slightly smaller than the diameter of the screws.
4. **Drive the Screws:** Drive the screws into the pre-drilled holes, making sure to countersink them slightly. This will allow you to fill the holes with wood filler later on.
5. **Let the Glue Dry:** Allow the glue to dry completely according to the manufacturer’s instructions. This usually takes at least 24 hours.
Finishing Touches
This is where you can really personalize your shelf and make it your own.
1. **Remove Clamps:** Once the glue is completely dry, remove the clamps.
2. **Sand the Shelf:** Using your sander, sand the entire shelf to smooth out any rough edges or imperfections. Start with a coarser grit sandpaper (like 80 or 100) and then move to finer grits (like 150 or 220).
3. **Fill the Holes:** Use wood filler to fill any gaps, imperfections, or screw holes. Allow the wood filler to dry completely according to the manufacturer’s instructions.
4. **Sand Again:** Once the wood filler is dry, sand it smooth with fine-grit sandpaper.
5. **Prime the Shelf:** Apply a coat of primer to the entire shelf. This will help the paint adhere to the wood and create a more even finish. Allow the primer to dry completely according to the manufacturer’s instructions.
6. **Paint or Stain the Shelf:** Apply your chosen paint or stain to the shelf. If you’re using paint, you may need to apply multiple coats to achieve the desired coverage. If you’re using stain, follow the manufacturer’s instructions for application and drying time.
7. **Apply Polyurethane (Optional):** If you’re using stain, consider applying a coat of polyurethane to protect the wood and enhance its durability. Allow the polyurethane to dry completely according to the manufacturer’s instructions.
Mounting the Shelf
The final step is to mount your beautiful new shelf to the wall!
1. **Locate Studs:** Use a stud finder to locate the studs in your wall. Mounting the shelf to the studs will provide the most secure support.
2. **Mark Mounting Points:** Mark the location of the studs on the wall.
3. **Pre-Drill Holes:** Pre-drill holes through the back of the shelf at the marked locations.
4. **Attach Mounting Hardware:** Attach the appropriate mounting hardware to the back of the shelf. This could include screws, wall anchors, or heavy-duty brackets.
5. **Mount the Shelf:** Carefully align the shelf with the marked locations on the wall and attach it to the wall using screws. Make sure the shelf is level before tightening the screws completely.
6. **Test the Shelf:** Before placing any items on the shelf, test its stability by gently pushing on it. If it feels wobbly, you may need to add additional support.
Alternative Mounting Methods
If you can’t locate studs or prefer a different mounting method, here are a couple of alternatives:
* **Wall Anchors:** Wall anchors are designed to provide support in drywall. Choose wall anchors that are appropriate for the weight of the items you plan to display on the shelf.
* **Heavy-Duty Brackets:** Heavy-duty brackets can provide additional support for heavier items. Attach the brackets to the wall using screws and wall anchors.
Tips and Tricks
Here are a few extra tips to help you create a perfect wall box shelf:
* Use a Level: Always use a level to ensure that your shelf is straight and even.
* Take Your Time: Don’t rush the process. Take your time and pay attention to detail.
* Protect Your Work Surface: Cover your work surface with a

Conclusion
So, there you have it! Transforming ordinary wall boxes into stylish and functional shelves is not just a budget-friendly alternative to expensive store-bought options; it’s a chance to unleash your creativity and personalize your living space. We’ve walked you through the simple steps, highlighting the ease and affordability of this project. But why is this DIY wall box shelf trick a must-try?
Firstly, it’s incredibly versatile. Whether you need extra storage in your bathroom for toiletries, a display area in your living room for cherished mementos, or a quirky bookshelf in your study, these shelves adapt to your needs. The modular nature of using individual boxes allows you to create unique configurations, stacking them vertically, arranging them horizontally, or even staggering them for a more dynamic look.
Secondly, it’s a sustainable choice. Repurposing wall boxes gives them a new lease on life, reducing waste and contributing to a more eco-conscious lifestyle. Plus, you can often find these boxes for free or at a very low cost, making this project incredibly economical.
Thirdly, the customization options are endless. Feel free to experiment with different paint colors, stains, or even wallpaper to match your existing décor. Consider adding decorative elements like stencils, decoupage, or even small hooks for hanging keys or jewelry. For a rustic touch, you could sand the edges of the boxes to create a distressed look. If you’re feeling ambitious, try incorporating LED strip lights inside the boxes to create a warm and inviting glow. You could even line the back of the boxes with fabric or patterned paper for added visual interest.
Don’t be afraid to get creative with the arrangement of your shelves. Try creating a geometric pattern on your wall, or use different sized boxes to add visual interest. You can also use these shelves to create a gallery wall, displaying your favorite artwork and photographs.
For a more modern look, consider using metal brackets to mount the boxes to the wall, creating a floating shelf effect. You can also use different types of wood for the boxes, such as reclaimed wood or pallet wood, to add a unique and rustic touch.
We encourage you to embrace the challenge and give this DIY wall box shelf project a try. It’s a rewarding experience that will not only enhance your home décor but also give you a sense of accomplishment. Once you’ve completed your project, we’d love to see your creations! Share your photos and experiences with us on social media using the hashtag #DIYWallBoxShelf. Let’s inspire each other with our creativity and resourcefulness. We are confident that you will find this project to be both fun and fulfilling. So, gather your supplies, unleash your inner DIY enthusiast, and transform those ordinary wall boxes into extraordinary shelves! We can’t wait to see what you create!
Frequently Asked Questions
What kind of wall boxes are best for this project?
Ideally, you want sturdy cardboard wall boxes that can withstand some weight. Look for boxes that are in good condition, without any major tears or damage. Boxes from liquor stores or bookstores often work well because they are designed to hold heavy items. Avoid using flimsy boxes that are likely to collapse under pressure. If you’re concerned about the strength of the boxes, you can reinforce them with extra cardboard or wood supports. You can also purchase new cardboard boxes specifically designed for storage, which are typically more durable than recycled boxes.
How do I properly secure the shelves to the wall?
The method you use to secure the shelves to the wall will depend on the type of wall you have and the weight of the items you plan to display. For drywall, use drywall anchors that are rated for the appropriate weight. For plaster walls, use plaster screws or anchors. For brick or concrete walls, use masonry screws or anchors. Always follow the manufacturer’s instructions for installing the anchors or screws. It’s also a good idea to use a level to ensure that the shelves are straight before you secure them to the wall. If you’re unsure about how to properly secure the shelves, consult a professional.
What if I don’t want to paint the boxes?
Painting the boxes is optional. If you prefer a more natural look, you can leave them unpainted or simply apply a clear coat of sealant to protect the cardboard. You can also cover the boxes with fabric, wallpaper, or decorative paper. Another option is to use contact paper, which comes in a variety of colors and patterns and is easy to apply. If you choose to leave the boxes unpainted, make sure they are clean and free of any markings or labels.
Can I use different sized boxes for this project?
Absolutely! Using different sized boxes can add visual interest and create a more dynamic arrangement. Just make sure that the boxes are all sturdy enough to support the weight of the items you plan to display. You can also use different shapes of boxes, such as square, rectangular, or even triangular boxes. Experiment with different combinations to find a look that you like.
How much weight can these shelves hold?
The amount of weight these shelves can hold depends on the strength of the boxes, the type of anchors you use, and the type of wall you have. As a general rule, it’s best to err on the side of caution and avoid overloading the shelves. If you’re planning to display heavy items, such as books or vases, make sure to use strong boxes and heavy-duty anchors. You can also reinforce the boxes with extra cardboard or wood supports. It’s always a good idea to test the shelves with a small amount of weight before you load them up completely.
What are some other creative ways to decorate these shelves?
Besides painting, staining, or covering the boxes with fabric or wallpaper, there are many other creative ways to decorate these shelves. You can add stencils, decoupage, or even small hooks for hanging keys or jewelry. For a rustic touch, you could sand the edges of the boxes to create a distressed look. If you’re feeling ambitious, try incorporating LED strip lights inside the boxes to create a warm and inviting glow. You could even line the back of the boxes with fabric or patterned paper for added visual interest. Consider adding small plants or succulents to the shelves to bring a touch of nature into your home. You can also use the shelves to display your favorite collections, such as vintage toys, seashells, or travel souvenirs.
How do I clean these shelves?
To clean these shelves, simply wipe them down with a damp cloth. Avoid using harsh chemicals or abrasive cleaners, as these can damage the cardboard or the finish. If the shelves are painted or stained, you can use a mild soap and water solution. For stubborn stains, try using a soft brush or sponge. Make sure to dry the shelves thoroughly after cleaning to prevent moisture damage.
Where can I find wall boxes if I don’t have any?
If you don’t have any wall boxes on hand, you can often find them for free at local stores, such as liquor stores, bookstores, or grocery stores. You can also check online marketplaces or classified ads for people who are giving away boxes. Another option is to purchase new cardboard boxes specifically designed for storage, which are typically more durable than recycled boxes. You can find these boxes at most office supply stores or online retailers.
Leave a Comment