

Easy home cleaning hacks – who doesn’t want them? Let’s be honest, spending hours scrubbing and polishing isn’t exactly anyone’s idea of a good time. We all crave a sparkling clean home, but the thought of the effort involved can be daunting. But what if I told you that achieving a spotless haven doesn’t have to be a Herculean task?
For centuries, people have been devising clever shortcuts to maintain their homes. From ancient civilizations using natural remedies to clean their dwellings to modern-day innovations, the quest for efficient cleaning solutions has always been a priority. Think about it – our grandmothers probably had a whole arsenal of easy home cleaning hacks passed down through generations! These weren’t just about saving time; they were about preserving resources and making life a little bit easier.
That’s why I’m so excited to share some of my favorite DIY cleaning tricks with you. In today’s busy world, time is precious. These hacks are designed to help you reclaim your weekends and spend more time doing the things you love, rather than battling stubborn stains and grime. Plus, many of these solutions use ingredients you probably already have in your pantry, making them budget-friendly and eco-conscious. Get ready to transform your cleaning routine and discover the joy of a sparkling home, achieved with minimal effort!

Easy Home Cleaning Hacks That Will Save You Time and Effort!
Hey there, fellow cleaning enthusiasts! I’m always on the lookout for ways to make cleaning less of a chore and more of a breeze. Over the years, I’ve stumbled upon some amazing DIY cleaning hacks that have seriously changed my cleaning game. I’m so excited to share them with you! Get ready to transform your cleaning routine with these simple, effective, and budget-friendly tips.
Cleaning Your Microwave with Lemon Power
Microwaves can get incredibly gross, incredibly fast. Splatters, spills, and lingering odors can make them a real eyesore. But don’t worry, I’ve got a super easy way to clean your microwave using just a lemon and some water.
* The Problem: Baked-on food splatters and unpleasant odors.
* The Solution: Steam cleaning with lemon-infused water.
* Why it Works: The steam loosens the grime, and the lemon helps to deodorize and disinfect.
Step-by-Step Instructions:
1. Slice a Lemon: Grab a lemon from your fridge and slice it in half. You only need one half for this hack, but you can use the other half for another cleaning project (more on that later!).
2. Prepare the Lemon Water: In a microwave-safe bowl, combine the lemon half (squeeze the juice into the bowl and then drop the lemon half in) with about one cup of water.
3. Microwave the Mixture: Place the bowl in your microwave and heat it on high for 3-5 minutes. You want the water to boil and create plenty of steam.
4. Let it Sit: Once the timer goes off, don’t open the microwave door immediately! Let the steam work its magic for another 5-10 minutes. This is crucial for loosening the stubborn grime.
5. Wipe it Clean: Carefully remove the bowl (it will be hot!) and use a clean cloth or sponge to wipe down the inside of the microwave. You’ll be amazed at how easily the dirt comes off.
6. Dry it Off: Finally, use a dry cloth to wipe down the interior and remove any remaining moisture. Your microwave will be sparkling clean and smell wonderfully fresh!
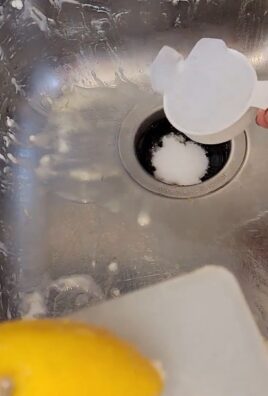
Unclogging Drains with Baking Soda and Vinegar
A clogged drain is a common household problem that can be a real headache. Instead of reaching for harsh chemical drain cleaners, try this natural and effective solution using baking soda and vinegar.
* The Problem: Slow or completely clogged drains.
* The Solution: A chemical reaction between baking soda and vinegar to break down the clog.
* Why it Works: The fizzing action helps to dislodge debris and grease buildup.
Step-by-Step Instructions:
1. Pour Baking Soda: Pour about one cup of baking soda down the clogged drain. Try to get as much of it down the drain as possible.
2. Add Vinegar: Next, pour one cup of white vinegar down the drain. You’ll immediately notice a fizzing reaction.
3. Let it Fizz: Let the mixture fizz and bubble for about 30 minutes. This is where the magic happens!
4. Flush with Hot Water: After 30 minutes, flush the drain with a generous amount of hot water. Let the water run for several minutes to ensure the clog is completely cleared.
5. Repeat if Necessary: If the drain is still slow, repeat the process. For stubborn clogs, you might need to repeat it a couple of times.
6. Prevention Tip: To prevent future clogs, pour boiling water down your drains once a week.
Cleaning Your Shower Head with Vinegar
Over time, shower heads can accumulate mineral deposits that reduce water pressure and affect the spray pattern. Cleaning them with vinegar is a simple and effective way to restore them to their former glory.
* The Problem: Mineral buildup and reduced water pressure in the shower head.
* The Solution: Soaking the shower head in vinegar to dissolve the mineral deposits.
* Why it Works: Vinegar is a mild acid that effectively breaks down mineral buildup without damaging the shower head.
Step-by-Step Instructions:
1. Gather Your Supplies: You’ll need a plastic bag (a Ziploc bag works great), white vinegar, a rubber band or twist tie, and a toothbrush or small scrub brush.
2. Fill the Bag with Vinegar: Pour enough white vinegar into the plastic bag to completely submerge the shower head.
3. Attach the Bag to the Shower Head: Carefully position the bag over the shower head, ensuring that the shower head is fully immersed in the vinegar. Secure the bag tightly with a rubber band or twist tie.
4. Soak Overnight: Let the shower head soak in the vinegar overnight (or for at least a few hours). This allows the vinegar to effectively dissolve the mineral deposits.
5. Remove the Bag and Rinse: In the morning, remove the bag and discard the vinegar. Rinse the shower head thoroughly with water to remove any remaining vinegar and loosened mineral deposits.
6. Scrub Away Stubborn Deposits: If there are any stubborn deposits remaining, use a toothbrush or small scrub brush to gently scrub them away.
7. Run the Shower: Turn on the shower and let the water run for a few minutes to flush out any remaining debris. Your shower head should now be clean and provide a much better spray.
Freshening Your Mattress with Baking Soda
Mattresses can harbor dust mites, odors, and moisture. Freshening them with baking soda is a simple way to keep them clean and hygienic.
* The Problem: Dust mites, odors, and moisture buildup in the mattress.
* The Solution: Deodorizing and absorbing moisture with baking soda.
* Why it Works: Baking soda is a natural deodorizer and absorbent that helps to eliminate odors and moisture.
Step-by-Step Instructions:
1. Strip the Bed: Remove all bedding, including sheets, blankets, and pillowcases.
2. Vacuum the Mattress: Use the upholstery attachment on your vacuum cleaner to thoroughly vacuum the entire surface of the mattress. This will remove loose dust and debris.
3. Sprinkle Baking Soda: Generously sprinkle baking soda over the entire surface of the mattress. Don’t be shy – you want a good, even coating.
4. Let it Sit: Allow the baking soda to sit on the mattress for at least 30 minutes, or even better, for several hours. The longer it sits, the more effective it will be at absorbing odors and moisture.
5. Vacuum Again: After the baking soda has sat for the desired amount of time, vacuum the mattress again to remove all of the baking soda.
6. Flip and Repeat: Flip the mattress over and repeat the process on the other side.
7. Optional: Add Essential Oils: For an extra boost of freshness, you can add a few drops of your favorite essential oil to the baking soda before sprinkling it on the mattress. Lavender, eucalyptus, and tea tree oil are all great choices.
Cleaning Grout with Baking Soda Paste
Dirty grout can make even the cleanest tiles look dingy. This simple baking soda paste is a powerful and natural way to brighten your grout lines.
* The Problem: Dirty, stained, or discolored grout lines.
* The Solution: A paste of baking soda and water to scrub away dirt and stains.
* Why it Works: Baking soda is a mild abrasive that helps to lift dirt and grime from the grout lines.
Step-by-Step Instructions:
1. Make a Paste: In a small bowl, mix baking soda with a small amount of water to create a thick paste. The consistency should be similar to toothpaste.
2. Apply the Paste: Apply the baking soda paste to the grout lines using your finger, a toothbrush, or a grout brush.
3. Let it Sit: Allow the paste to sit on the grout lines for about 10-15 minutes. This gives the baking soda time to loosen the dirt and grime.
4. Scrub the Grout: Use a toothbrush or grout brush to scrub the grout lines vigorously. You’ll see the dirt and grime start to lift away.
5. Rinse with Water: Rinse the grout lines thoroughly with water to remove the baking soda paste and any remaining dirt.
6. Dry with a Towel: Dry the grout lines with a clean towel. Your grout should now be noticeably brighter and cleaner.
7. For Stubborn Stains: For stubborn stains, you can add a small amount of hydrogen peroxide to the baking soda paste.
Polishing Wood Furniture with Olive Oil and Lemon Juice
Instead of using harsh chemical polishes, try this natural and effective wood furniture polish made with olive oil and lemon juice.
* The Problem: Dull,

Conclusion
So, there you have it! These easy home cleaning hacks aren’t just about saving money; they’re about reclaiming your time and creating a healthier, happier living space. We’ve explored simple solutions using everyday ingredients, proving that you don’t need harsh chemicals or expensive products to achieve a sparkling clean home. From banishing stubborn stains to refreshing your furniture, these DIY methods are gentle on your surfaces, your wallet, and the environment.
Why is this a must-try? Because it empowers you to take control of your cleaning routine. You know exactly what’s going into your cleaning solutions, avoiding potentially harmful chemicals and reducing your reliance on single-use plastics. Plus, the satisfaction of creating something effective and eco-friendly is incredibly rewarding.
But the beauty of these easy home cleaning hacks lies in their adaptability. Feel free to experiment with different essential oils to customize the scents of your cleaning solutions. For example, add a few drops of lavender oil to your all-purpose cleaner for a calming aroma, or use tea tree oil for its antibacterial properties. You can also adjust the ratios of ingredients to suit your specific needs and preferences. If you have particularly stubborn stains, try increasing the concentration of vinegar or baking soda in your cleaning paste.
Consider these variations to further enhance your cleaning experience:
* **Citrus Power:** Infuse your vinegar with citrus peels (lemon, orange, grapefruit) for a more pleasant scent and added cleaning power. Simply soak the peels in vinegar for a few weeks before using.
* **Essential Oil Blends:** Create your own signature cleaning blends by combining different essential oils. Experiment with combinations like eucalyptus and peppermint for a refreshing scent, or lemon and rosemary for a revitalizing boost.
* **DIY Disinfectant:** For a natural disinfectant, combine white vinegar, water, and a few drops of tea tree oil or eucalyptus oil. This solution is perfect for cleaning surfaces in the kitchen and bathroom.
* **Fabric Refresher Upgrade:** Add a tablespoon of fabric softener to your DIY fabric refresher for an extra boost of freshness and softness.
We strongly encourage you to give these easy home cleaning hacks a try. Start with one or two that resonate with you and see the difference they can make. You might be surprised at how effective and enjoyable DIY cleaning can be.
More importantly, we want to hear about your experiences! Share your tips, tricks, and variations in the comments below. Let us know which hacks worked best for you, what challenges you encountered, and any creative solutions you came up with. Your feedback will not only help other readers but also contribute to a growing community of eco-conscious cleaners. Together, we can create a cleaner, healthier, and more sustainable world, one DIY cleaning hack at a time. So, roll up your sleeves, gather your ingredients, and get ready to experience the joy of natural cleaning!
Frequently Asked Questions (FAQ)
Q: Are these DIY cleaning hacks safe for all surfaces?
A: While most of these easy home cleaning hacks are gentle and safe for a wide range of surfaces, it’s always a good idea to test them in an inconspicuous area first, especially on delicate materials like marble, granite, or wood. Avoid using abrasive cleaners or scrub brushes on easily scratched surfaces. For specific concerns about a particular surface, consult the manufacturer’s instructions or a professional cleaner.
Q: Can I use these cleaning hacks if I have allergies or sensitivities?
A: If you have allergies or sensitivities, it’s crucial to be cautious when using any new cleaning product, even DIY ones. Carefully review the ingredients list and avoid using anything you know you’re allergic to. Consider wearing gloves and a mask while cleaning to minimize exposure to potential allergens. If you experience any adverse reactions, discontinue use immediately and consult a doctor. You can also opt for hypoallergenic ingredients or essential oils that are known to be less irritating.
Q: How long do these DIY cleaning solutions last?
A: The shelf life of DIY cleaning solutions can vary depending on the ingredients used. Solutions containing water are more prone to bacterial growth and should be used within a week or two. Solutions made with vinegar or alcohol have a longer shelf life, typically several months. To prolong the shelf life of your DIY cleaners, store them in airtight containers in a cool, dark place. Always label your containers with the date and ingredients to avoid confusion. If you notice any changes in color, odor, or consistency, discard the solution.
Q: Can I use these cleaning hacks on tough stains like grease or mildew?
A: Yes, many of these easy home cleaning hacks are effective on tough stains. For grease stains, try using a paste of baking soda and water or a solution of vinegar and dish soap. For mildew, a solution of vinegar and water or hydrogen peroxide can be effective. For stubborn stains, you may need to repeat the cleaning process or let the solution sit for a longer period of time before wiping it away. Always test the solution in an inconspicuous area first to ensure it doesn’t damage the surface.
Q: Are essential oils safe to use in cleaning solutions?
A: Essential oils can be a great addition to DIY cleaning solutions, but it’s important to use them safely and responsibly. Always dilute essential oils properly before using them on surfaces, as undiluted oils can be corrosive or damaging. Some essential oils are not safe for use around pets or children, so do your research before using them. Choose high-quality, pure essential oils from reputable sources. If you’re pregnant or breastfeeding, consult with a healthcare professional before using essential oils.
Q: What are some eco-friendly alternatives to common cleaning products?
A: There are many eco-friendly alternatives to common cleaning products. Instead of using disposable wipes, opt for reusable microfiber cloths. Instead of using harsh chemical cleaners, try using vinegar, baking soda, lemon juice, or castile soap. Instead of using air fresheners, try using essential oil diffusers or opening windows to ventilate your home. Look for cleaning products that are labeled as eco-friendly, biodegradable, or non-toxic. By making small changes to your cleaning routine, you can significantly reduce your environmental impact.
Q: How can I make my own DIY laundry detergent?
A: Making your own DIY laundry detergent is surprisingly easy and cost-effective. A simple recipe involves combining washing soda, borax, and grated castile soap. You can also add essential oils for fragrance. Store the detergent in an airtight container and use 1-2 tablespoons per load. Be sure to research different recipes and choose one that suits your needs and preferences.
Q: What’s the best way to clean a microwave naturally?
A: Cleaning a microwave naturally is simple and effective. Place a microwave-safe bowl filled with water and a few slices of lemon or a tablespoon of vinegar in the microwave. Heat the mixture on high for several minutes until the water boils and the microwave is steamy. Let the steam sit for a few minutes to loosen any stuck-on food particles. Carefully remove the bowl and wipe down the inside of the microwave with a clean cloth.
Q: How do I get rid of unpleasant odors in my home?
A: There are several ways to get rid of unpleasant odors in your home naturally. Place bowls of baking soda around your home to absorb odors. Simmer a pot of water with cinnamon sticks, cloves, or citrus peels to create a pleasant aroma. Open windows to ventilate your home and allow fresh air to circulate. Clean your garbage disposal regularly with baking soda and vinegar. Use essential oil diffusers to freshen the air.

Leave a Comment