

Effective Home Dusting Tips are more than just a chore; they’re your secret weapon to a healthier, happier home! Let’s face it, nobody enjoys dusting. It feels like a never-ending battle against those pesky particles that settle on every surface. But what if I told you that with a few clever DIY tricks and hacks, you could transform this dreaded task into a breeze?
Dusting has been around for as long as we’ve had homes! In ancient civilizations, keeping living spaces clean was crucial for hygiene and preventing the spread of disease. While our methods have evolved from simple cloths to high-tech vacuums, the fundamental goal remains the same: to create a clean and comfortable environment.
Why are effective home dusting tips so important today? Well, beyond the obvious aesthetic benefits of a sparkling clean home, regular dusting significantly improves indoor air quality. Dust can trigger allergies, asthma, and other respiratory problems. Plus, a dust-free environment simply feels more relaxing and inviting. In this article, I’m going to share my favorite DIY dusting tricks and hacks that will not only save you time and effort but also help you breathe easier and enjoy your home to the fullest. Get ready to say goodbye to dust bunnies and hello to a cleaner, healthier, and happier you!
Effective Home Dusting Tips: A DIY Guide to a Sparkling Clean Home
Hey there, fellow cleaning enthusiasts! Are you tired of battling dust bunnies and feeling like you’re constantly chasing after a clean home? I totally get it! Dust is a persistent foe, but fear not! I’m here to share my tried-and-true DIY dusting tips that will transform your cleaning routine and leave your home sparkling. Let’s dive in!
Understanding the Enemy: Dust
Before we launch into our dusting strategy, let’s understand what we’re up against. Dust isn’t just dirt; it’s a complex mixture of:
* Dead skin cells: Yep, that’s us shedding!
* Pet dander: Furry friends contribute a lot.
* Pollen: Especially prevalent during allergy season.
* Dust mites and their droppings: Ugh, I know!
* Textile fibers: From clothes, carpets, and upholstery.
* Dirt and soil: Tracked in from outside.
* Insect parts: Let’s not dwell on this one too much.
Knowing what dust is made of helps us choose the right tools and techniques to combat it effectively.
Assembling Your Dust-Busting Arsenal
Having the right tools makes all the difference. Here’s what I recommend:
* Microfiber cloths: These are my absolute go-to! They trap dust instead of just spreading it around.
* Feather duster (ostrich feather preferred): Great for delicate items and reaching high places.
* Vacuum cleaner with attachments: Essential for carpets, upholstery, and hard-to-reach areas.
* Dusting spray: Choose a product that’s safe for your surfaces and helps repel dust. I often make my own (recipe below!).
* Extendable duster: Perfect for ceiling fans, light fixtures, and crown molding.
* Old socks: Sounds weird, but they’re fantastic for dusting blinds!
* Paintbrushes (various sizes): Ideal for getting into crevices and cleaning intricate details.
* Cotton swabs: For those super tiny, hard-to-reach spots.
* Spray bottle: For your homemade dusting spray.
* Ladder or step stool: For reaching high places safely.
DIY Dusting Spray Recipe
I love making my own dusting spray because I can control the ingredients and avoid harsh chemicals. Here’s my favorite recipe:
Ingredients:
* 1 cup water
* 1/4 cup white vinegar (acts as a disinfectant and helps dissolve grime)
* 2 tablespoons olive oil (adds shine and helps repel dust)
* 10-15 drops essential oil (optional, for fragrance – I like lemon, lavender, or tea tree)
Instructions:
1. Combine all ingredients in a spray bottle.
2. Shake well before each use.
3. Lightly spray onto a microfiber cloth and wipe surfaces.
The Dusting Game Plan: Room by Room
Now, let’s get down to the nitty-gritty. I like to tackle dusting room by room to stay organized and focused.
Living Room/Family Room
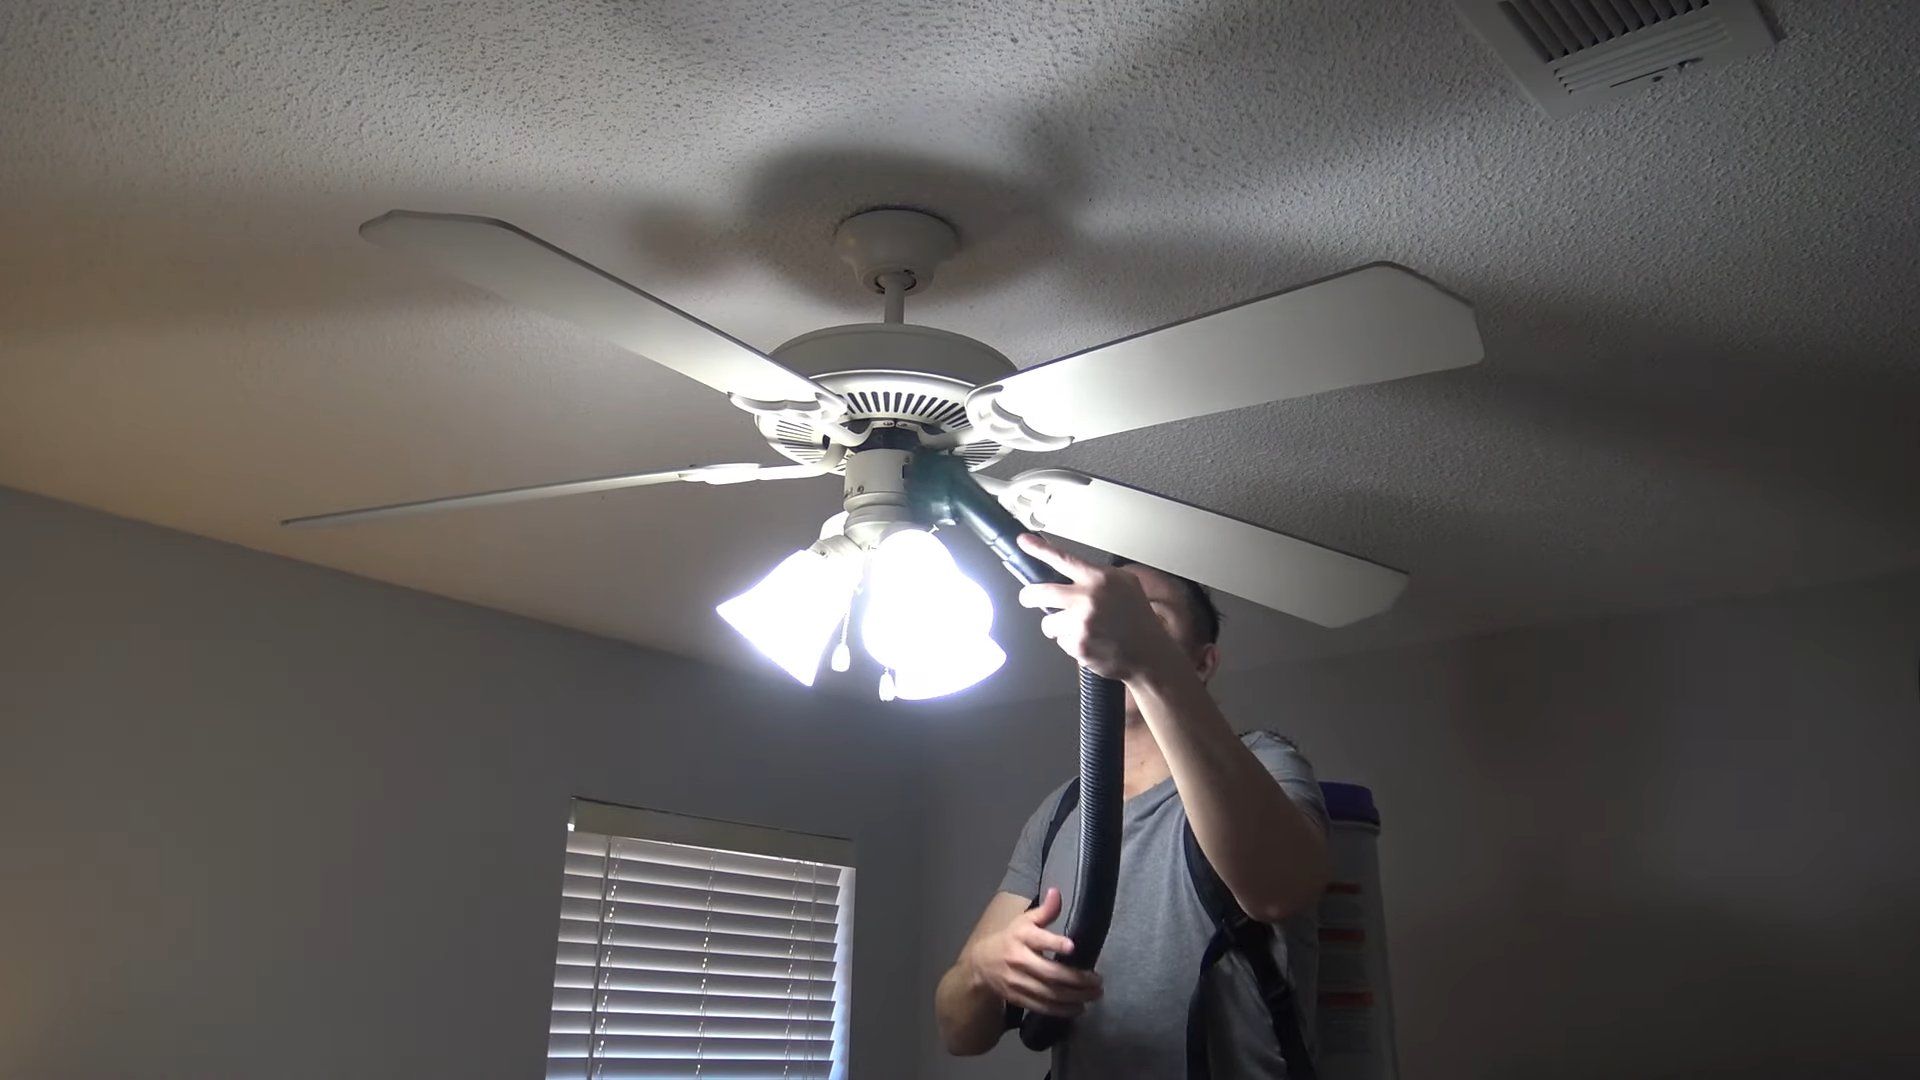
1. Start High: Begin with ceiling fans and light fixtures. Use an extendable duster or a feather duster to remove dust. Be careful and use a sturdy ladder if needed.
2. Curtains and Blinds: Vacuum curtains with the upholstery attachment. For blinds, slip an old sock over your hand and wipe each slat. You can also use a damp microfiber cloth.
3. Shelves and Surfaces: Remove all items from shelves and surfaces. Dust the shelves and items individually with a microfiber cloth. Use a paintbrush to get into crevices and decorative details.
4. Electronics: Unplug electronics before dusting. Use a dry microfiber cloth to wipe screens and surfaces. Avoid spraying liquid directly onto electronics. Compressed air can be helpful for cleaning keyboards and vents.
5. Upholstery: Vacuum sofas, chairs, and other upholstered furniture with the upholstery attachment. Pay special attention to seams and crevices where dust tends to accumulate.
6. Rugs and Carpets: Vacuum thoroughly to remove dust and debris. Consider using a carpet cleaner periodically for a deeper clean.
7. Baseboards and Trim: Wipe down baseboards and trim with a damp microfiber cloth.
8. Don’t forget the plants! Dust them off with a soft cloth or give them a gentle shower.
Bedrooms
1. Bedding: Strip the bed and wash all bedding in hot water. This helps kill dust mites.
2. Mattress: Vacuum the mattress thoroughly. Consider using a mattress protector to prevent dust mites from settling in.
3. Headboard and Bed Frame: Dust the headboard and bed frame with a microfiber cloth.
4. Nightstands and Dressers: Remove all items from nightstands and dressers. Dust the surfaces and items individually.
5. Closets: Dust shelves and hanging rods in closets. Consider decluttering regularly to reduce dust accumulation.
6. Mirrors: Clean mirrors with a glass cleaner and a microfiber cloth.
7. Under the Bed: This is a dust bunny haven! Use a vacuum cleaner with a long attachment or an extendable duster to clean under the bed.
Kitchen
1. Countertops: Wipe down countertops with a damp microfiber cloth.
2. Cabinets: Dust cabinet doors and drawers with a microfiber cloth. Pay attention to handles and knobs.
3. Appliances: Wipe down the exterior of appliances with a damp microfiber cloth. Clean the stovetop and oven regularly to prevent grease and grime buildup.
4. Sink: Clean the sink with a disinfectant cleaner.
5. Backsplash: Wipe down the backsplash with a damp microfiber cloth.
6. Floors: Sweep or vacuum the floors to remove dust and debris. Mop regularly.
7. Don’t forget the range hood! It collects a lot of grease and dust.
Bathrooms
1. Countertops and Sink: Wipe down countertops and the sink with a disinfectant cleaner.
2. Toilet: Clean the toilet thoroughly.
3. Shower/Tub: Clean the shower or tub to remove soap scum and mildew.
4. Mirror: Clean the mirror with a glass cleaner and a microfiber cloth.
5. Floors: Sweep or vacuum the floors to remove dust and debris. Mop regularly.
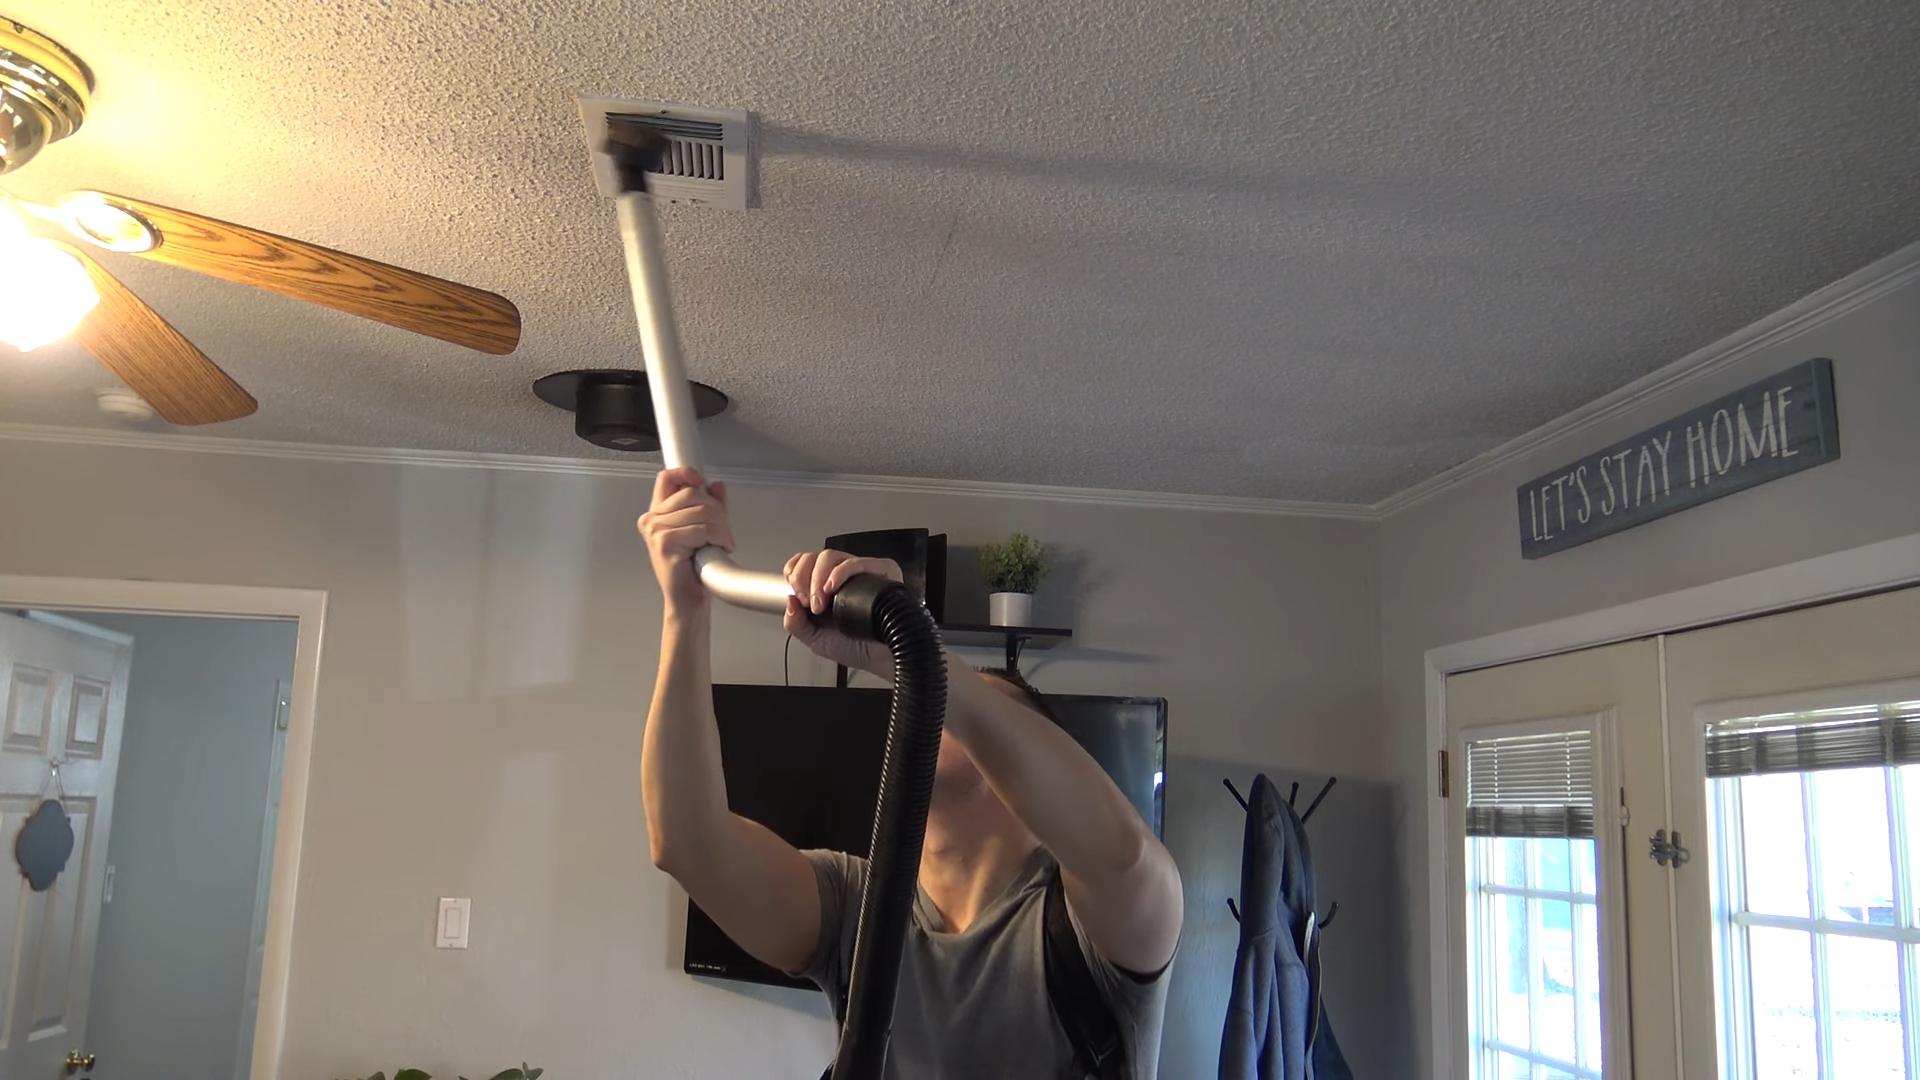
6. Ventilation Fan: Clean the ventilation fan to remove dust and lint. This is important for air quality.
Dusting Strategies for Specific Items
Some items require special dusting techniques. Here are a few tips:
* Books: Dust books with a soft brush or a microfiber cloth. For valuable books, consider using a specialized book cleaning product.
* Artwork: Dust artwork with a soft brush or a feather duster. Avoid using liquid cleaners on delicate artwork.
* Lampshades: Dust lampshades with a microfiber cloth or a vacuum cleaner with a brush attachment.
* Plants: Dust plant leaves with a damp cloth. You can also give them a gentle shower.
* Picture Frames: Dust picture frames with a microfiber cloth. Use a glass cleaner for the glass.
Preventing Dust Buildup
While dusting is essential, preventing dust buildup is even better! Here are some tips:
* Use doormats: Place doormats at all entrances to trap dirt and debris before they enter your home.
* Change air filters regularly: Replace air filters in your HVAC system every 1-3 months to improve air quality and reduce dust.
* Wash bedding frequently: Wash bedding in hot water at least once a week to kill dust mites.
* Declutter regularly: The less stuff you have, the less dust can accumulate.
* Control humidity: High humidity can encourage dust mite growth. Use a dehumidifier if necessary.
* Groom pets regularly: Brush your pets regularly to reduce shedding.
* Close windows and doors: During allergy season, keep windows and doors closed to prevent pollen from entering your home.
* Consider an air purifier: An air purifier can help remove dust and allergens from the air.
The Importance of Regular Dusting
Dusting isn’t just about aesthetics; it’s also about your health. Dust can trigger allergies, asthma, and other respiratory problems. Regular dusting can improve air quality and create a healthier living environment. Plus, a clean home is just a happier home, right?
My Final Thoughts
Dusting might seem like a chore, but with the right tools, techniques, and a little bit of elbow grease, you can conquer the dust bunnies and enjoy a sparkling clean home. Remember to be consistent, and don’t be afraid to experiment with different methods
Conclusion
So, there you have it! Mastering effective home dusting isn’t about endless hours of scrubbing or expensive cleaning products. It’s about understanding the science of dust, employing the right techniques, and embracing a proactive approach. We’ve explored how to create your own dusting spray, a cost-effective and environmentally friendly alternative to store-bought options, and delved into the best tools and methods for tackling dust in every nook and cranny of your home.
This DIY dusting spray is more than just a cleaning solution; it’s a commitment to a healthier and happier living space. By controlling the ingredients, you eliminate harsh chemicals and potential allergens, creating a safer environment for yourself, your family, and your pets. Plus, the satisfaction of crafting your own cleaning product is an added bonus!
Why is this DIY dusting trick a must-try? Because it’s effective, economical, eco-friendly, and customizable. You can tailor the scent to your liking by experimenting with different essential oils. Lavender for relaxation, lemon for a fresh, clean scent, or eucalyptus for its antibacterial properties – the possibilities are endless!
Consider these variations to further personalize your dusting routine:
* For Wood Furniture: Add a teaspoon of olive oil to your DIY dusting spray for added shine and protection. The oil helps to condition the wood and prevent it from drying out.
* For Electronics: Always spray your dusting cloth, not the electronic device directly. Use a microfiber cloth to gently wipe screens and keyboards. Avoid using any liquid on sensitive components.
* For Allergy Sufferers: Focus on dusting frequently in bedrooms and living areas. Consider using a HEPA filter vacuum cleaner to remove dust mites and allergens from carpets and upholstery.
* For a Natural Disinfectant: Incorporate tea tree oil into your DIY dusting spray. Tea tree oil possesses potent antibacterial and antifungal properties, making it an excellent addition for disinfecting surfaces.
We understand that embarking on a new DIY project can sometimes feel daunting. But trust us, this one is incredibly simple and rewarding. The benefits of using a homemade dusting spray extend far beyond just a clean home. It’s about creating a healthier, more sustainable lifestyle.
Now, it’s your turn! We encourage you to try this DIY dusting trick and experience the difference for yourself. Experiment with different essential oils, adapt the recipe to suit your specific needs, and discover the joy of a truly clean and healthy home.
Don’t forget to share your experiences with us! We’d love to hear about your favorite essential oil combinations, any modifications you made to the recipe, and the overall impact this DIY dusting spray has had on your home. Share your tips and tricks in the comments below, and let’s create a community of dust-busting experts! Your insights could help others discover the benefits of this simple yet effective cleaning solution. Let’s make effective home dusting a breeze for everyone!
FAQ
What exactly is dust, and why is it important to remove it?
Dust is a complex mixture of various particles, including dead skin cells, pet dander, pollen, dust mites, mold spores, textile fibers, soil, and even microscopic pieces of plastic. While a small amount of dust is unavoidable, excessive accumulation can trigger allergies, asthma, and other respiratory problems. Dust mites, in particular, thrive in dusty environments and their waste products are a common allergen. Removing dust regularly improves indoor air quality, reduces allergy symptoms, and creates a healthier living environment. Furthermore, dust can damage surfaces over time, especially delicate items like furniture and electronics.
Can I use any type of essential oil in my DIY dusting spray?
While most essential oils are safe to use in a DIY dusting spray, it’s important to consider their properties and potential interactions with surfaces. Some essential oils, like citrus oils, can be corrosive to certain materials, so it’s best to test them on an inconspicuous area first. Always dilute essential oils properly with water and vinegar to avoid damaging surfaces. Popular choices for dusting sprays include lavender, lemon, eucalyptus, tea tree, and peppermint. Lavender is known for its calming properties, lemon for its fresh scent and antibacterial properties, eucalyptus for its respiratory benefits, tea tree for its antifungal and antibacterial properties, and peppermint for its invigorating scent.
How often should I dust my home?
The frequency of dusting depends on several factors, including the number of occupants, the presence of pets, and the level of outdoor pollution. As a general guideline, aim to dust high-traffic areas like living rooms and bedrooms at least once a week. Less frequently used areas can be dusted every two weeks. If you have allergies or pets, you may need to dust more frequently, perhaps two to three times per week. Pay special attention to areas where dust tends to accumulate, such as shelves, window sills, and baseboards. Regular dusting not only improves air quality but also prevents dust from building up and becoming more difficult to remove.
Is vinegar safe to use on all surfaces?
While vinegar is a versatile and effective cleaning agent, it’s not suitable for all surfaces. Avoid using vinegar on natural stone surfaces like marble and granite, as it can etch and damage them. Vinegar can also damage waxed wood furniture, cast iron, and certain types of flooring. Always test vinegar on an inconspicuous area before applying it to a larger surface. For delicate surfaces, consider using a milder cleaning solution or simply dampening a microfiber cloth with water.
What are the best tools for effective home dusting?
The right tools can make dusting much easier and more efficient. Microfiber cloths are excellent for trapping dust and preventing it from spreading. They are also gentle on surfaces and can be washed and reused. Extendable dusters are ideal for reaching high areas like ceiling fans and light fixtures. Vacuum cleaners with HEPA filters are effective for removing dust from carpets, upholstery, and hard floors. Dusters with electrostatic properties attract and hold dust particles. For delicate items, consider using a soft brush or a can of compressed air.
How can I prevent dust from accumulating in my home?
Preventing dust from accumulating is just as important as removing it. Use doormats to trap dirt and debris before they enter your home. Change your HVAC filters regularly to improve air circulation and remove dust particles. Wash bedding frequently to remove dust mites and allergens. Declutter your home to reduce the number of surfaces where dust can accumulate. Consider using air purifiers with HEPA filters to remove dust and other pollutants from the air. Keep windows and doors closed during periods of high pollen or pollution. By taking these preventative measures, you can significantly reduce the amount of dust in your home and create a cleaner, healthier living environment.
Can I use this DIY dusting spray on my car’s dashboard?
Yes, you can use this DIY dusting spray on your car’s dashboard, but with caution. As with any cleaning product, it’s best to test it on an inconspicuous area first to ensure it doesn’t damage the material. Avoid spraying the spray directly onto the dashboard, instead spray it onto a microfiber cloth and then wipe the dashboard. Be especially careful around electronic components and screens. If your car’s dashboard has a special coating or finish, consult your car’s manual or a professional detailer before using any cleaning products.
What if I don’t have essential oils? Can I still make the DIY dusting spray?
Yes, you can still make the DIY dusting spray without essential oils. The essential oils primarily add fragrance and some additional cleaning or disinfecting properties. If you don’t have them, simply omit them from the recipe. The vinegar and water solution will still effectively remove dust and grime. You can also add a small amount of lemon juice for a fresh scent and extra cleaning power.

Leave a Comment