

Garbage Disposal Cleaning DIY: Let’s face it, we’ve all been there. That funky smell wafting from your kitchen sink, a subtle (or not-so-subtle!) reminder that your garbage disposal is crying out for help. But before you reach for harsh chemicals or call a plumber, I’m here to tell you that a sparkling clean and fresh-smelling disposal is totally achievable with a few simple DIY tricks!
For generations, resourceful homeowners have sought ways to maintain their homes, and the garbage disposal, a relatively modern convenience, is no exception. While not steeped in ancient history, the need to keep our drains clear and our kitchens hygienic is a timeless concern. Think about it – our grandmothers likely had their own methods for keeping food scraps at bay, even without the whirring blades of a disposal!
Why is garbage disposal cleaning DIY so important? Well, beyond the unpleasant odors, a neglected disposal can become a breeding ground for bacteria and attract unwanted pests. Plus, built-up food debris can lead to clogs and, eventually, costly plumbing repairs. Nobody wants that! This article will provide you with easy, effective, and eco-friendly methods to tackle that grime and keep your disposal running smoothly. I’m going to share my favorite hacks that use common household items, saving you time, money, and a whole lot of frustration. Get ready to say goodbye to that funky smell and hello to a fresh, clean kitchen!
DIY Deep Clean: Revive Your Smelly Garbage Disposal!
Okay, let’s face it. Your garbage disposal is probably one of the most neglected appliances in your kitchen. We toss food scraps down there, grind them up, and then…forget about it. But all that gunk can build up, leading to some seriously unpleasant smells and even attracting unwanted pests. Don’t worry, though! I’m going to walk you through a super effective DIY cleaning method that will have your disposal smelling fresh and working like new in no time.
What You’ll Need
Before we get started, let’s gather our supplies. You probably have most of these items already!
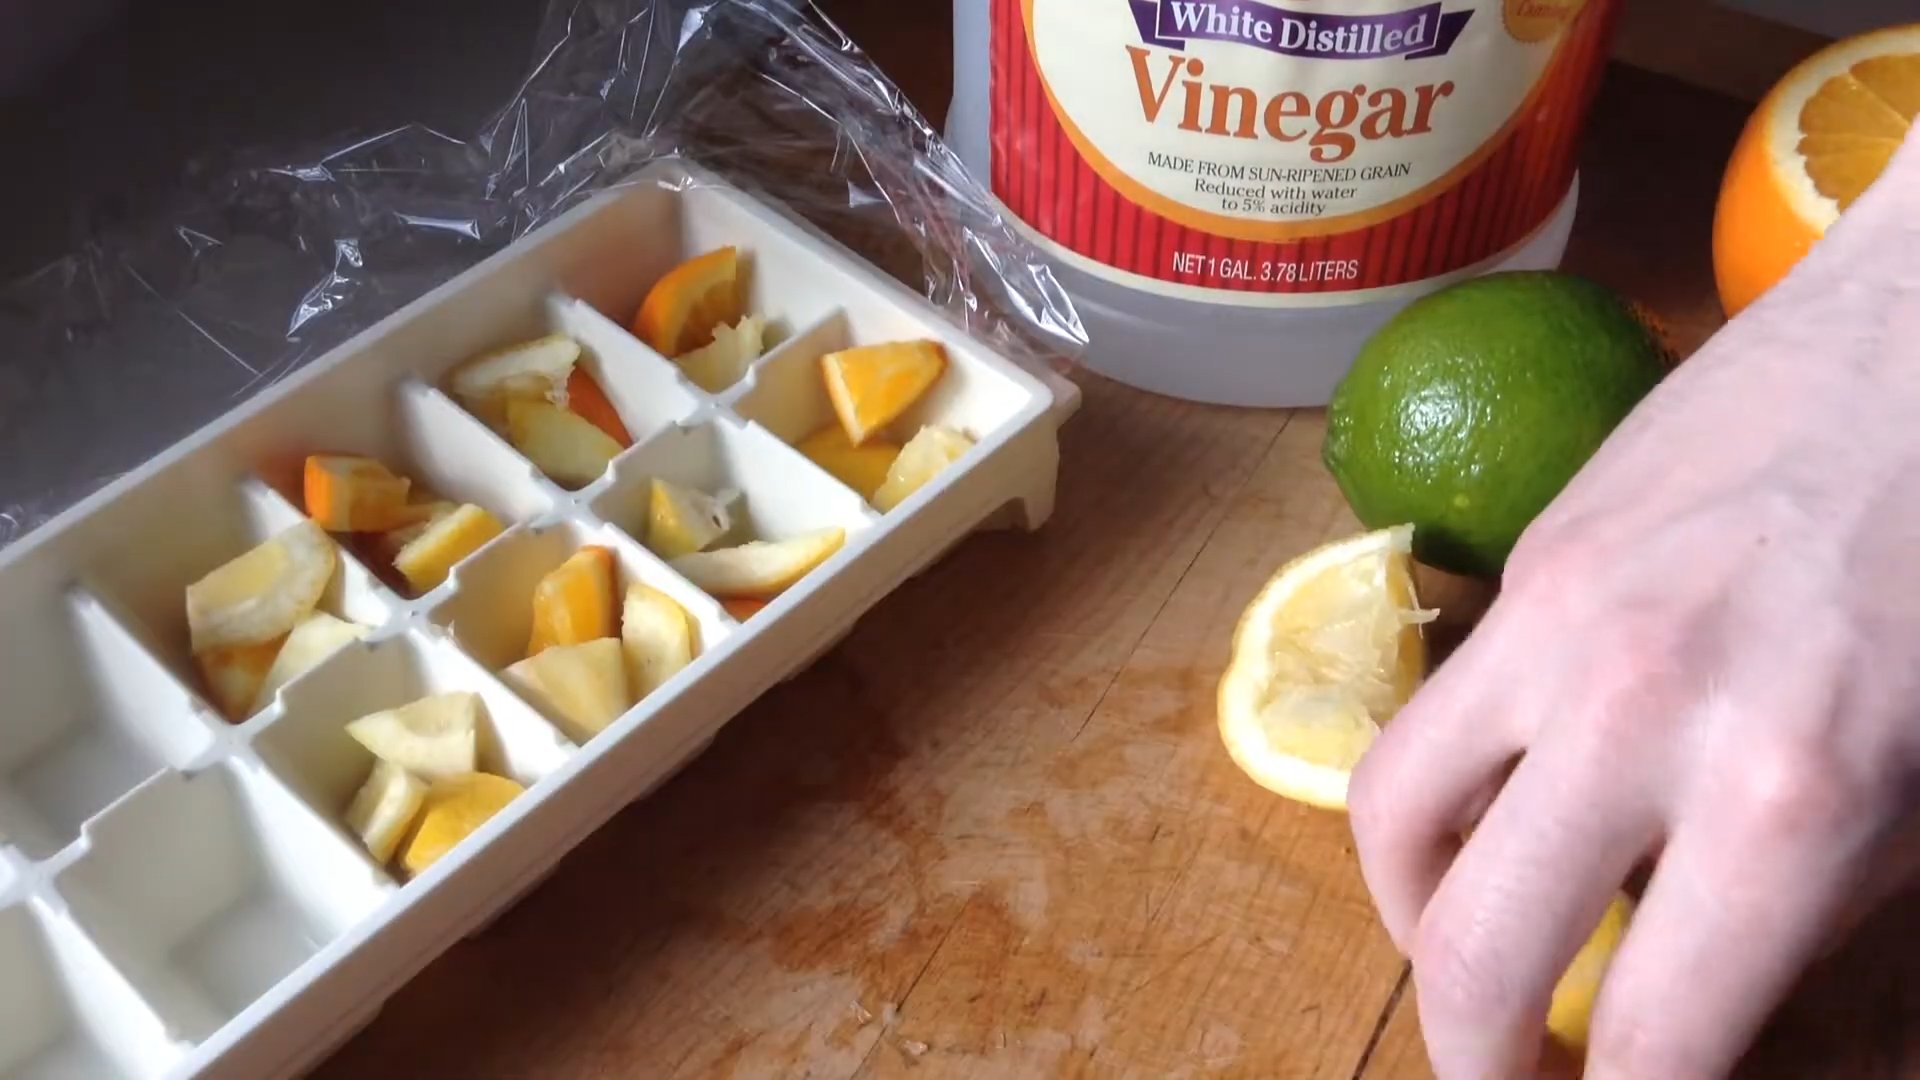
* Ice cubes (a tray or two)
* White vinegar (about 1 cup)
* Baking soda (about 1/2 cup)
* Lemon or lime (halved or quartered)
* Dish soap (a squirt or two)
* Tongs or pliers (for removing any large debris)
* Old toothbrush or scrub brush
* Kettle or pot for boiling water
* Rubber gloves (optional, but recommended)
Safety First!
Before you do anything, make absolutely sure the garbage disposal is turned OFF at the circuit breaker. This is crucial for your safety. We don’t want any accidental activations while our hands are near the blades. Trust me, it’s better to be safe than sorry!
Step-by-Step Cleaning Guide
Here’s the breakdown of how we’re going to tackle this smelly situation:
* Inspection and Debris Removal: We’ll start by checking for any large pieces of food or debris that might be stuck in the disposal.
* Ice and Salt Scrub (Optional): This step helps to dislodge grime and sharpen the blades (if you use salt).
* Baking Soda and Vinegar Fizz: This classic combination creates a powerful cleaning action to break down grease and odors.
* Citrus Refresh: Lemon or lime helps to freshen the disposal and leave a pleasant scent.
* Hot Water Flush: A final flush with boiling water helps to clear away any remaining debris and residue.
Step-by-Step Instructions
Now, let’s get down to the nitty-gritty!
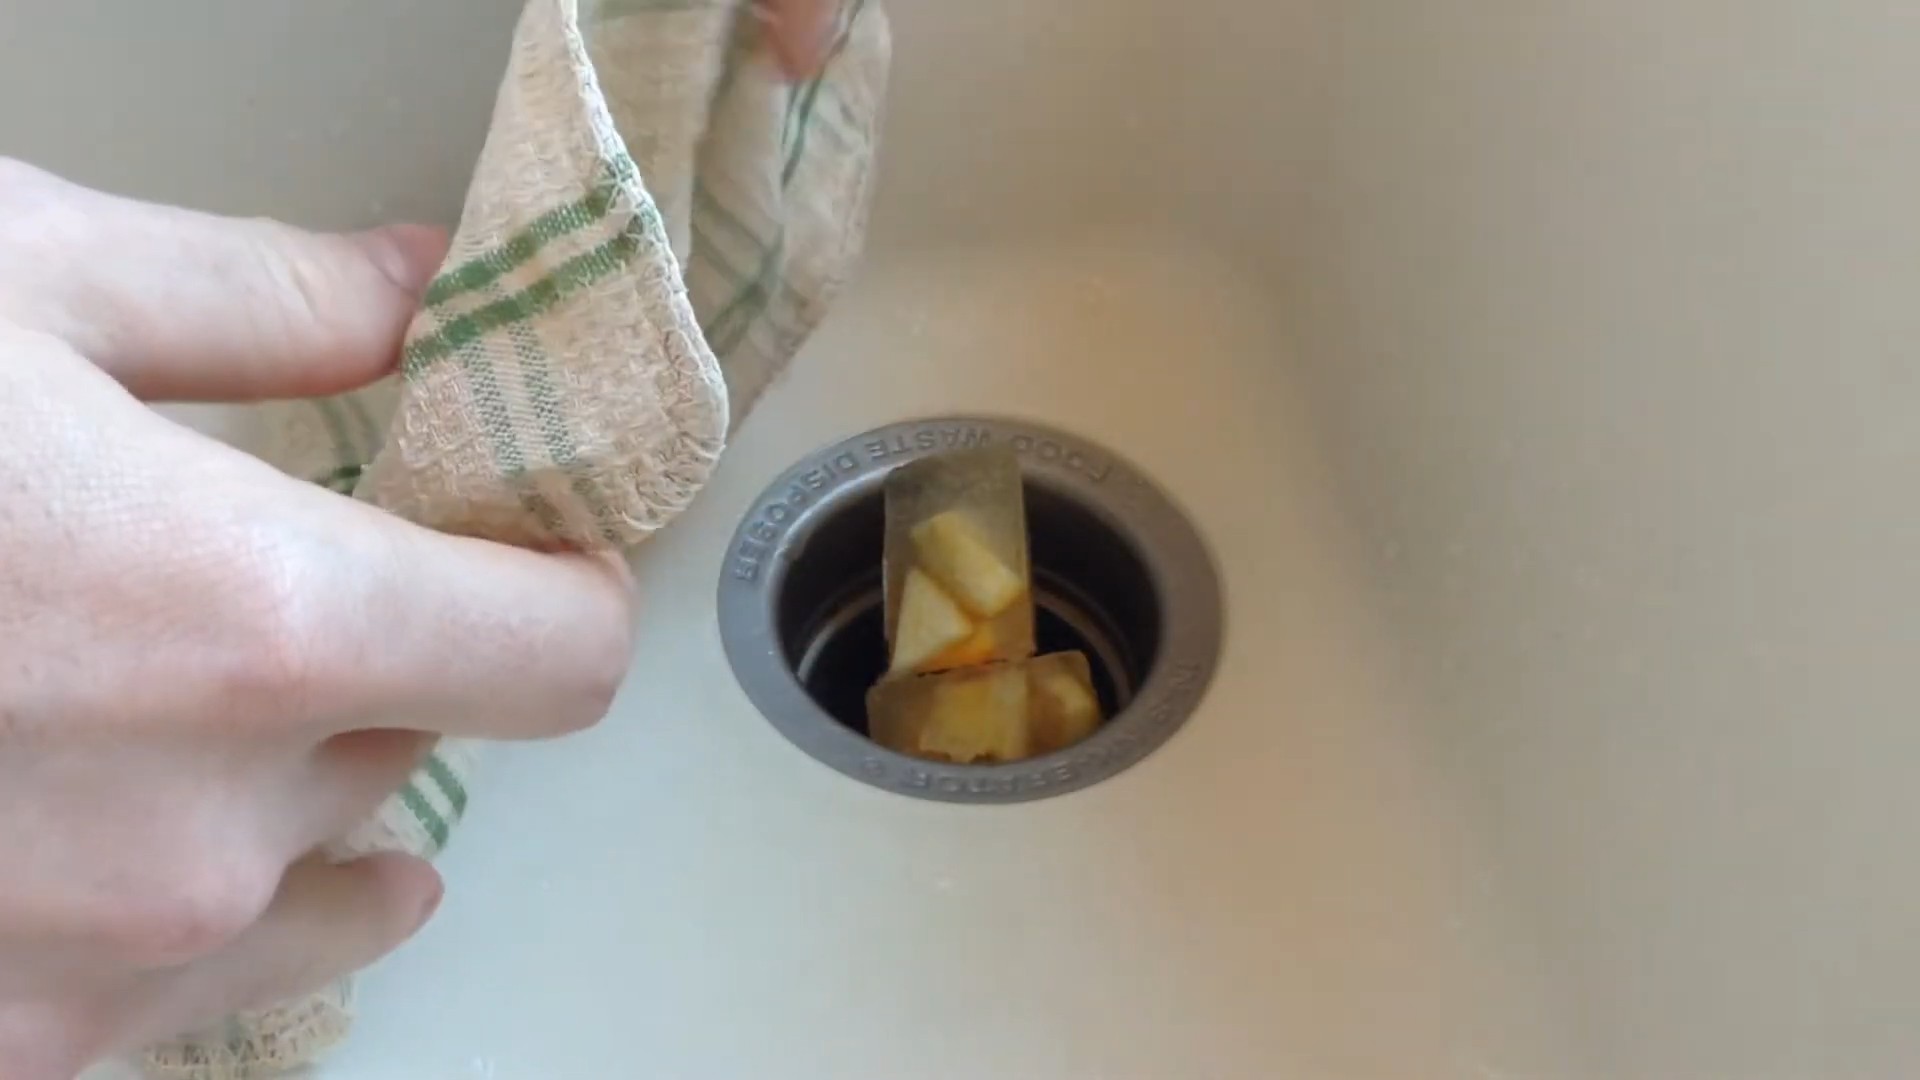
1. Inspect and Remove Debris: Put on your rubber gloves (if you’re using them). Shine a flashlight down into the disposal. Look for any large pieces of food, silverware (yes, it happens!), or other debris. Use tongs or pliers to carefully remove anything you find. Never put your hand directly into the disposal!
2. Ice and Vinegar Scrub: Fill your disposal with ice cubes – about a tray or two should do the trick. Pour about 1/2 cup of white vinegar over the ice. Turn on the cold water to a slow, steady stream. Now, turn on the disposal. The ice will help to scrub the sides of the disposal and dislodge any stuck-on food particles. The vinegar will help to disinfect and deodorize. Let it run for about 30-60 seconds.
3. Baking Soda and Vinegar Volcano: Turn off the disposal and the water. Pour about 1/2 cup of baking soda down the drain. Then, slowly pour about 1 cup of white vinegar over the baking soda. Stand back! It will fizz and bubble – this is the chemical reaction that’s breaking down the grease and grime. Let this mixture sit for about 5-10 minutes. This gives it time to really work its magic.
4. Citrus Power: After the baking soda and vinegar have done their thing, take your lemon or lime halves (or quarters) and drop them into the disposal. Turn on the cold water to a slow, steady stream. Turn on the disposal. The citrus will help to freshen the disposal and leave a pleasant scent. The rinds will also help to scrub the sides. Let it run for about 30 seconds.
5. Dish Soap Cleanse: Squeeze a squirt or two of dish soap down the drain. Turn on the cold water to a slow, steady stream. Turn on the disposal for a few seconds to create some suds. This will help to further clean and degrease the disposal.
6. Hot Water Flush: This is the final step! Boil a kettle or pot of water. Carefully pour the boiling water down the drain while running the cold water at a slow, steady stream. This will flush away any remaining debris and residue. Let it run for about a minute or two. Be careful when pouring the boiling water – avoid splashing!
7. Scrub-a-dub-dub (Optional): If you still notice any lingering grime or odors, you can use an old toothbrush or scrub brush to scrub the inside of the disposal. Be sure to turn off the disposal at the circuit breaker before doing this! Focus on the splash guard and any areas where you see buildup. Rinse thoroughly with hot water.
Dealing with Stubborn Odors
Sometimes, even after a thorough cleaning, stubborn odors can persist. Here are a few extra tips for tackling those lingering smells:
* Borax Soak: Mix 1/2 cup of borax with 2 cups of hot water. Pour the mixture down the drain and let it sit for several hours or overnight. Flush with hot water in the morning.
* Enzyme Cleaner: Use an enzyme-based drain cleaner specifically designed for garbage disposals. These cleaners contain enzymes that break down organic matter and eliminate odors. Follow the instructions on the product label.
* Repeat the Process: Sometimes, a single cleaning isn’t enough. If the odors are particularly strong, repeat the entire cleaning process.
Preventative Maintenance
The best way to keep your garbage disposal clean and fresh is to prevent buildup in the first place. Here are a few tips for preventative maintenance:
* Run Cold Water: Always run cold water when using the disposal. Cold water helps to solidify grease, which allows it to be ground up and flushed away more easily. Hot water can melt grease, causing it to stick to the sides of the disposal.
* Grind Food in Small Batches: Avoid overloading the disposal with too much food at once. Grind food in small batches to prevent clogs.
* Cut Food into Small Pieces: Cut large pieces of food into smaller pieces before putting them down the disposal. This will make it easier for the disposal to grind the food and prevent jams.
* Avoid Certain Foods: Some foods are notorious for causing problems in garbage disposals. Avoid putting the following items down the drain:
* Grease and oil
* Coffee grounds (in large quantities)
* Eggshells (the membrane can wrap around the blades)
* Pasta and rice (they can expand and cause clogs)
* Fibrous vegetables (like celery and corn husks)
* Bones
* Fruit pits
* Regular Cleaning: Clean your garbage disposal regularly – at least once a month – to prevent buildup and odors.
Troubleshooting Common Problems
Even with regular cleaning and maintenance, you might encounter some common problems with your garbage disposal. Here are a few troubleshooting tips:
* Disposal Won’t Turn On: Check the circuit breaker to make sure the disposal is getting power. Also, check for a reset button on the bottom of the disposal. Press the reset button to reset the motor.
* Disposal is Humming But Not Grinding: This usually indicates that something is stuck in the disposal. Turn off the disposal at the circuit breaker. Use tongs or pliers to carefully remove any debris.
* Disposal is Leaking: Check the connections to the drain pipes. Tighten any loose connections. If the leak persists, you may need to replace the drain pipes or the disposal itself.
* Persistent Odors: If you’ve tried all the cleaning methods and the odors still persist, there may be a problem with the drain pipes. Contact a plumber to inspect the drain pipes and identify the source of the odor.
Final Thoughts
Cleaning your garbage disposal is a simple but important task that can help to keep your kitchen smelling fresh and prevent plumbing problems. By following these steps and tips, you can easily maintain your garbage disposal and keep it working like new for years to come. So, go ahead and give your disposal some love – it will thank you for it! And remember, safety first! Always turn off the power before working on your disposal. Happy cleaning!
Conclusion
So, there you have it! A simple, effective, and surprisingly satisfying way to tackle that smelly situation lurking beneath your sink. This garbage disposal cleaning DIY isn’t just about eliminating odors; it’s about maintaining a healthier kitchen environment and extending the life of your appliance. Think of it as a mini-spa day for your disposal, a little TLC that pays off big time in the long run.
Why is this a must-try? Because it’s inexpensive, uses ingredients you likely already have on hand, and takes only minutes to complete. Forget those harsh chemical cleaners that can damage your pipes and leave behind lingering fumes. This natural approach is gentle yet powerful, effectively breaking down food particles and banishing bacteria that cause those unpleasant smells. Plus, the citrus scent leaves your kitchen smelling fresh and clean.
But don’t stop there! Feel free to experiment and personalize this garbage disposal cleaning DIY to suit your preferences. For an extra boost of cleaning power, add a tablespoon of borax to the ice cubes before freezing. Borax is a natural mineral that helps to disinfect and deodorize. You could also try using different citrus fruits, like limes or grapefruits, for a slightly different scent profile. If you’re dealing with particularly stubborn odors, consider adding a few drops of tea tree oil to the ice cubes. Tea tree oil is a natural antiseptic and antifungal agent that can help to kill odor-causing bacteria.
Another variation involves using vinegar ice cubes instead of lemon or lime. Vinegar is a powerful cleaning agent that can help to break down grease and grime. Simply freeze white vinegar in ice cube trays and use them in the same way as the citrus ice cubes. Just be sure to run plenty of water after using vinegar to flush out any remaining residue.
For a deeper clean, you can also try pouring a mixture of baking soda and vinegar down the drain before using the ice cubes. Let the mixture fizz for about 30 minutes, then flush with hot water. This will help to loosen any stubborn debris that may be clinging to the sides of the disposal.
The key is to be consistent. Aim to perform this garbage disposal cleaning DIY at least once a week, or more often if you notice any unpleasant odors. Regular maintenance will prevent buildup and keep your disposal running smoothly.
We’re confident that this simple trick will make a noticeable difference in the freshness of your kitchen. So, gather your ingredients, get those ice cubes freezing, and prepare to say goodbye to those lingering garbage disposal odors.
Don’t just take our word for it – try it out for yourself! We’re eager to hear about your experiences. Share your results, variations, and any tips you discover in the comments below. Let’s create a community of clean and fresh-smelling kitchens! We encourage you to share this simple yet effective garbage disposal cleaning DIY with your friends and family. Let’s all enjoy a fresher, cleaner kitchen!
Frequently Asked Questions (FAQ)
1. How often should I clean my garbage disposal?
The frequency of cleaning depends on how often you use your garbage disposal. However, a good rule of thumb is to clean it at least once a week. If you notice any unpleasant odors, you may need to clean it more frequently. Regular cleaning prevents buildup and keeps your disposal running smoothly.
2. What if I don’t have lemons or limes? Can I use something else?
Absolutely! While lemons and limes are great for their scent and cleaning properties, you can use other citrus fruits like oranges or grapefruits. You can also use vinegar ice cubes as a substitute. Simply freeze white vinegar in ice cube trays and use them in the same way as the citrus ice cubes. Vinegar is a powerful cleaning agent that can help to break down grease and grime.
3. Is it safe to use ice cubes in my garbage disposal?
Yes, it is perfectly safe to use ice cubes in your garbage disposal. In fact, ice cubes are a great way to sharpen the blades and dislodge any food particles that may be stuck. The cold temperature of the ice also helps to solidify any grease or oil, making it easier to grind up.
4. What if my garbage disposal is still smelly after cleaning it with this DIY method?
If your garbage disposal is still smelly after cleaning it with this DIY method, there are a few things you can try. First, make sure you are running plenty of water while the disposal is running. This will help to flush out any remaining debris. You can also try adding a tablespoon of borax to the ice cubes for an extra boost of cleaning power. Borax is a natural mineral that helps to disinfect and deodorize. If the odor persists, you may need to consult a professional plumber.
5. Can I use bleach to clean my garbage disposal?
While bleach is a powerful disinfectant, it is not recommended for cleaning garbage disposals. Bleach can damage the rubber components of the disposal and can also be harmful to the environment. It’s best to stick to natural cleaning methods like the one described in this article.
6. What are some signs that my garbage disposal needs to be cleaned?
The most obvious sign that your garbage disposal needs to be cleaned is an unpleasant odor coming from the drain. Other signs include slow draining, unusual noises, and food particles backing up into the sink. If you notice any of these signs, it’s time to give your garbage disposal a good cleaning.
7. How do I prevent my garbage disposal from getting smelly in the first place?
There are several things you can do to prevent your garbage disposal from getting smelly. Avoid putting greasy or oily foods down the drain, as these can clog the disposal and cause odors. Also, avoid putting large amounts of food down the drain at once. Cut food into smaller pieces before putting it in the disposal. Finally, run plenty of water while the disposal is running to help flush out any debris.
8. Can I use this method to clean a septic system-safe garbage disposal?
Yes, this method is generally safe for septic system-safe garbage disposals. The ingredients used are natural and biodegradable, so they won’t harm your septic system. However, it’s always a good idea to check the manufacturer’s instructions for your specific disposal to ensure that it is compatible with this cleaning method.
9. What type of ice cubes work best for this method?
Regular ice cubes made from water work perfectly fine for this method. However, you can also use ice cubes made from vinegar or citrus juice for an extra boost of cleaning power. The key is to use enough ice cubes to fill the disposal chamber about halfway.
10. Is it necessary to use hot water after cleaning the garbage disposal with ice cubes?
Yes, it is important to run hot water after cleaning the garbage disposal with ice cubes. The hot water will help to flush out any remaining debris and dissolve any grease or oil that may have been solidified by the ice. Run the hot water for at least 30 seconds to ensure that the disposal is thoroughly cleaned.

Leave a Comment