

Grape Vine Water Propagation: Ever dreamt of having your own flourishing vineyard, but thought it was too complicated or expensive? I’m here to tell you it’s easier than you think! For centuries, gardeners have been propagating plants, sharing the bounty of nature with friends and family. The ancient Romans, known for their viticulture, understood the magic of grapevines, and now, you can too, with a simple DIY trick.
This article will guide you through the fascinating process of grape vine water propagation, a technique that allows you to grow new grapevines from cuttings, right in the comfort of your own home. Forget complicated grafting or expensive nursery plants. This method is budget-friendly, beginner-friendly, and incredibly rewarding.
In today’s world, where sustainability and self-sufficiency are becoming increasingly important, learning how to propagate your own plants is a valuable skill. Not only will you save money, but you’ll also gain a deeper connection to the natural world. Plus, imagine the satisfaction of sharing your homegrown grapes with loved ones! So, grab your pruning shears and a jar of water, and let’s get started on this exciting journey of creating new life from a simple cutting.
DIY Grape Vine Propagation: A Simple Water Method
Hey there, fellow gardening enthusiasts! Ever looked at your thriving grape vine and thought, “I wish I had more of these!” Well, you’re in luck! Propagating grape vines is surprisingly easy, and one of the simplest methods is water propagation. I’m going to walk you through the entire process, step-by-step, so you can expand your vineyard without breaking the bank.
What You’ll Need
Before we dive in, let’s gather our supplies. This is a pretty low-tech operation, so you probably have most of this stuff lying around already:
* Healthy Grape Vine Cuttings: These should be from the previous year’s growth (dormant season is best). Look for canes that are about pencil-thick and have several buds.
* Sharp Pruning Shears or Knife: Clean and sharp tools are crucial for preventing disease.
* Clean Water: Tap water is fine, but letting it sit out for 24 hours to dissipate chlorine is even better.
* Clear Glass or Jar: Something tall enough to hold the cuttings upright with the bottom submerged.
* Rooting Hormone (Optional): This can speed up the process, but it’s not strictly necessary.
* Small Pots or Containers: For planting the rooted cuttings.
* Potting Mix: A well-draining mix is essential for healthy root development.
* Spray Bottle: For misting the cuttings.
* Labels and a Permanent Marker: To keep track of your different grape varieties.
Taking the Cuttings
The timing of taking cuttings is important. Ideally, you want to do this during the dormant season, typically late winter or early spring, before the buds start to swell. This is when the vine’s energy is concentrated in the canes, making them more likely to root.
1. Identify Suitable Canes: Look for healthy, mature canes from the previous year’s growth. They should be about the thickness of a pencil and have several healthy buds. Avoid canes that are thin, weak, or damaged.
2. Make the Cuts: Using your sharp pruning shears or knife, make a clean cut about 1/4 inch above a bud at the top of the cutting. This helps prevent rot. At the bottom of the cutting, make a cut about 1/4 inch below a bud. The bottom cut should be angled to help with water absorption and to distinguish the top from the bottom. Each cutting should be about 6-8 inches long, containing at least 3-4 buds.
3. Prepare the Cuttings (Optional): Some people like to make a few shallow scrapes along the bottom inch of the cutting. This can encourage root formation. If you’re using rooting hormone, now’s the time to apply it. Dip the bottom inch of the cutting into the hormone powder or solution, following the instructions on the product label.
Water Propagation: The Main Event
Now for the fun part! This is where we coax those cuttings into growing roots.
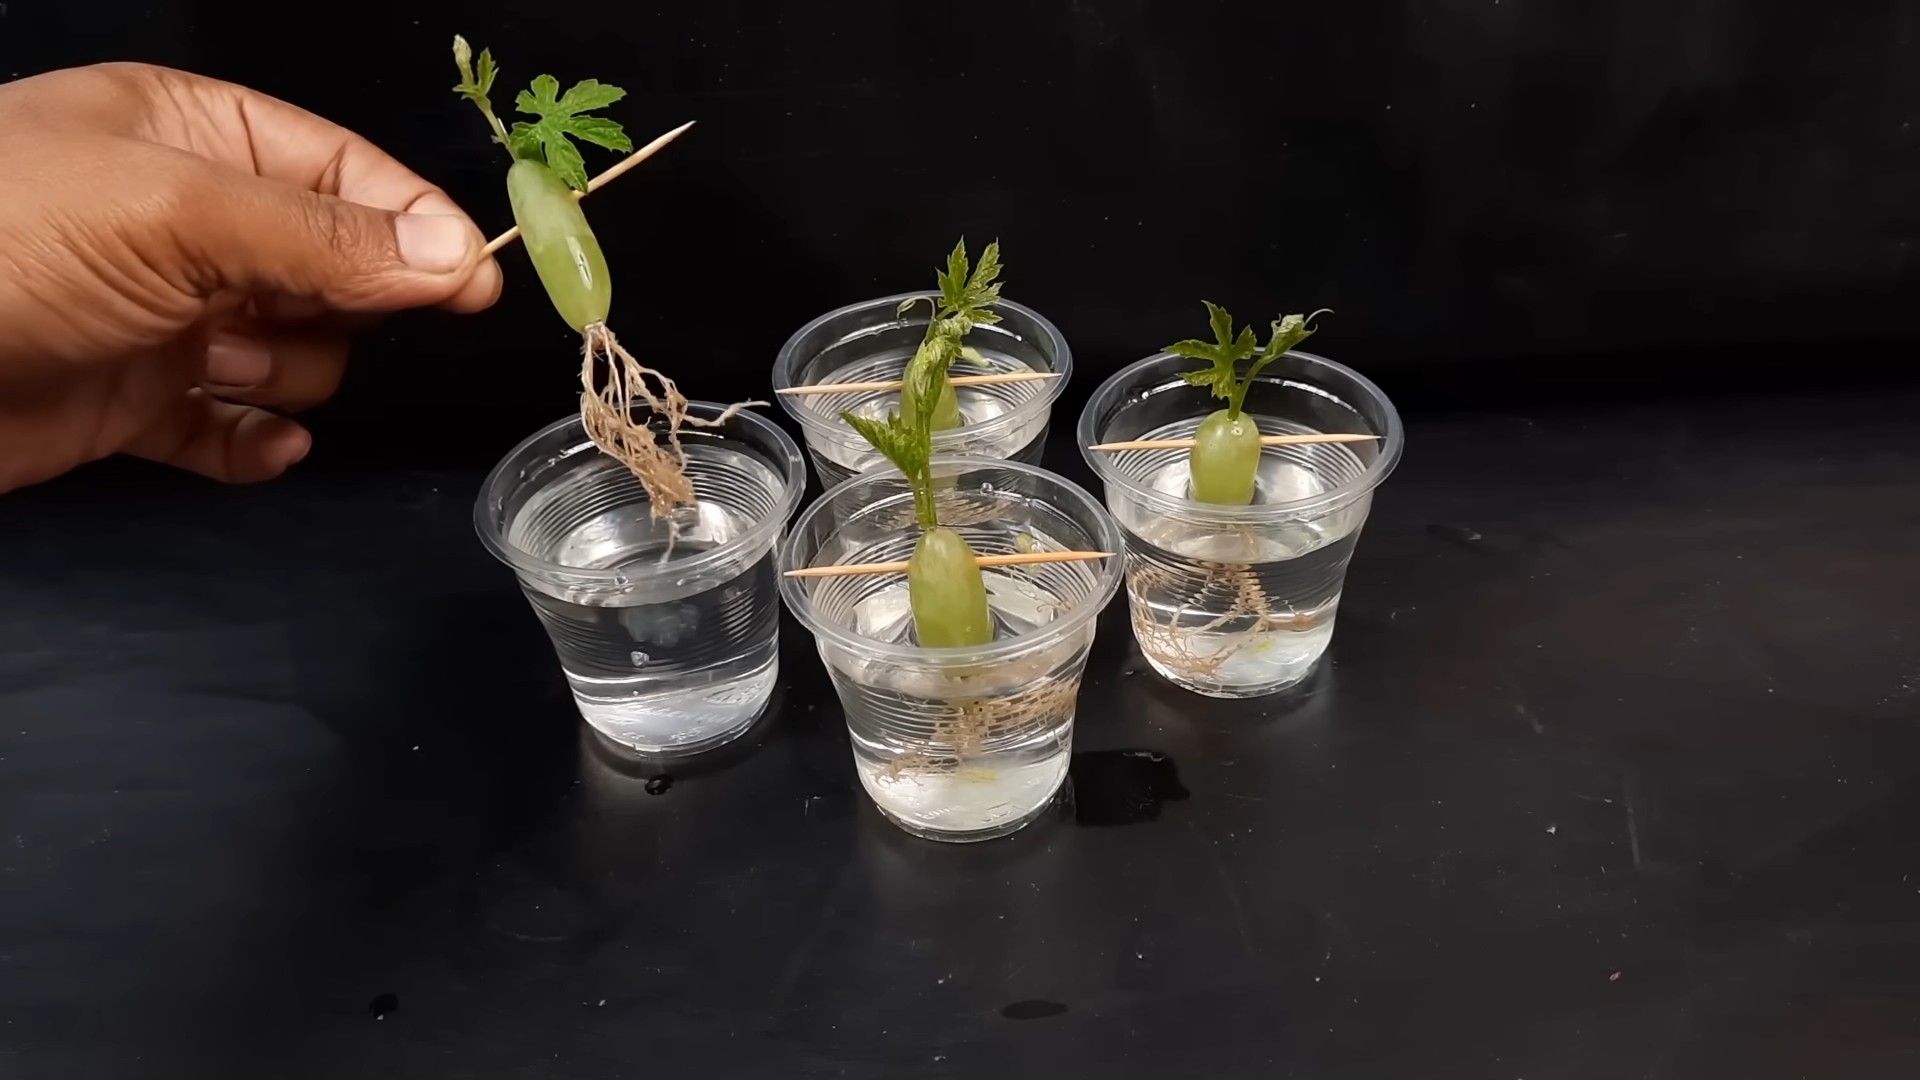
1. Fill Your Container: Fill your clear glass or jar with clean water. Make sure the water is deep enough to submerge the bottom inch or two of the cuttings.
2. Place the Cuttings in Water: Arrange the cuttings in the jar, making sure the bottom ends are submerged in water. Avoid overcrowding the jar; give each cutting some space.
3. Find the Right Spot: Place the jar in a warm, bright location, but out of direct sunlight. Direct sunlight can overheat the water and damage the cuttings. A windowsill with indirect light is ideal.
4. Change the Water Regularly: This is crucial for preventing algae growth and keeping the water fresh. Change the water every 2-3 days.
5. Monitor Root Development: Keep an eye on the cuttings for root development. This can take anywhere from 2-6 weeks, depending on the variety of grape and the environmental conditions. You should start to see small white roots emerging from the nodes (the points where the buds are located).
6. Misting (Optional): To help keep the cuttings hydrated, you can mist them with water every day or two. This is especially helpful if the air is dry.
Planting Your Rooted Cuttings
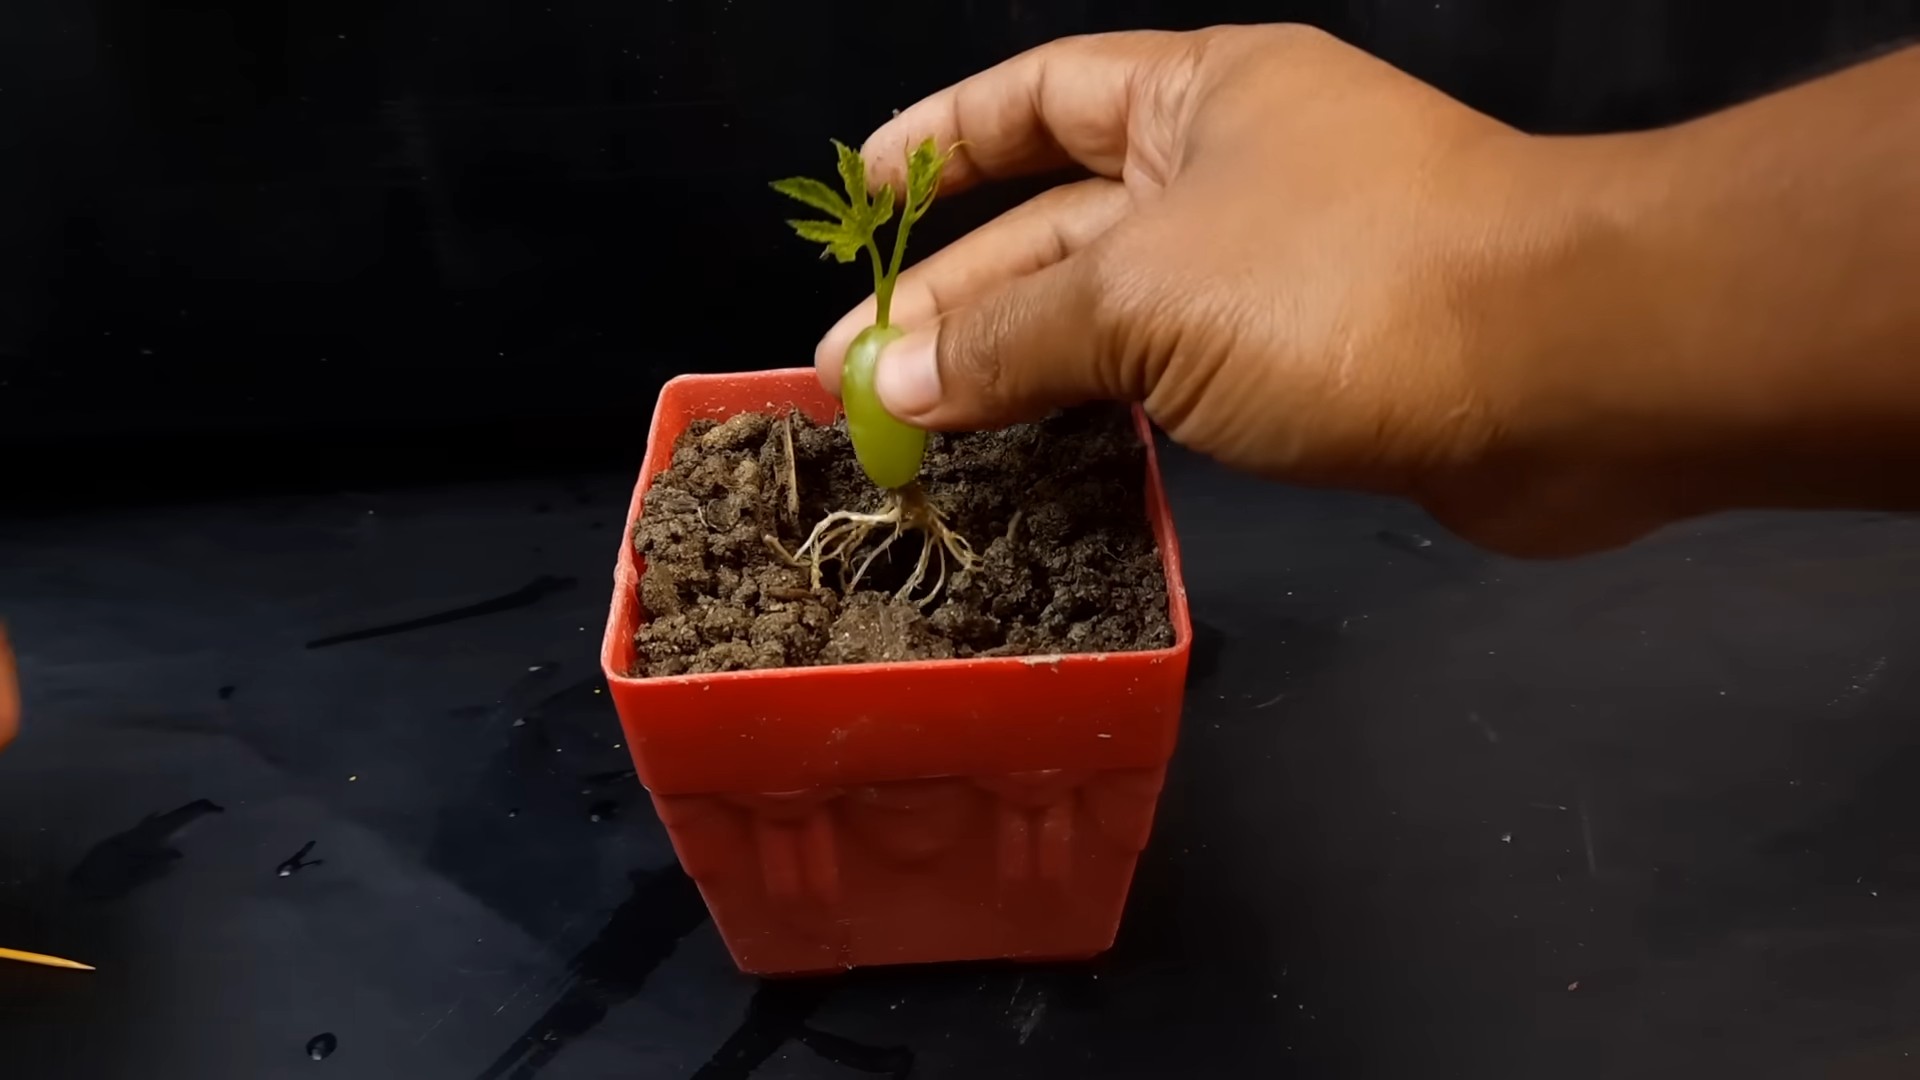
Once the roots are about an inch or two long, it’s time to plant your new grape vines!
1. Prepare Your Pots: Fill your small pots or containers with a well-draining potting mix. Make a hole in the center of each pot large enough to accommodate the roots.
2. Carefully Remove the Cuttings: Gently remove the rooted cuttings from the water, being careful not to damage the delicate roots.
3. Plant the Cuttings: Place each cutting in the prepared pot, making sure the roots are spread out and covered with potting mix. Leave the top bud or two exposed above the soil line.
4. Water Thoroughly: Water the newly planted cuttings thoroughly, until water drains out of the bottom of the pot.
5. Provide Humidity: To help the cuttings adjust to their new environment, you can create a humid environment by covering the pots with a clear plastic bag or dome. This will help prevent the cuttings from drying out. Make sure to vent the bag or dome occasionally to prevent mold growth.
6. Acclimatize the Cuttings: Gradually acclimatize the cuttings to outdoor conditions by removing the plastic bag or dome for increasing periods of time each day. After a week or two, you can remove the cover completely.
7. Care for Your New Vines: Keep the soil consistently moist, but not waterlogged. Provide the cuttings with plenty of sunlight. Fertilize them with a balanced fertilizer every few weeks.
Hardening Off and Transplanting
Before planting your new grape vines in their permanent location, you’ll need to harden them off. This process gradually acclimates the plants to outdoor conditions, making them more resilient.
1. Gradual Exposure: Start by placing the pots outdoors in a sheltered location for a few hours each day. Gradually increase the amount of time the plants spend outdoors, until they can tolerate full sun and wind.
2. Monitor the Weather: Pay attention to the weather forecast and protect the plants from extreme temperatures or harsh weather conditions.
3. Transplant to Permanent Location: Once the plants are hardened off, you can transplant them to their permanent location in your garden or vineyard. Choose a sunny spot with well-draining soil. Dig a hole that is twice as wide as the root ball and just as deep. Gently remove the plant from the pot and place it in the hole. Backfill with soil and water thoroughly.
Tips for Success
* Cleanliness is Key: Always use clean tools and containers to prevent the spread of disease.
* Patience is a Virtue: Rooting can take time, so don’t get discouraged if you don’t see results immediately.
* Experiment: Try different grape varieties and techniques to see what works best for you.
* Don’t Give Up: Not all cuttings will root, so don’t be afraid to try again.
* Label Everything: Keep track of your different grape varieties by labeling your cuttings and pots.
Troubleshooting
* Cuttings Rotting: This is usually caused by overwatering or poor drainage. Make sure the soil is well-draining and avoid overwatering.
* No Root Development: This could be due to several factors, such as poor quality cuttings, improper watering, or lack of sunlight. Try again with fresh cuttings and adjust your watering and lighting.
* Yellowing Leaves: This could be a sign of nutrient deficiency. Fertilize the cuttings with a balanced fertilizer.
Why Water Propagation?
I personally love water propagation for a few reasons:
* It’s Easy: Seriously, it’s one of the simplest propagation methods out there.
* It’s Affordable: You don’t need any fancy equipment or expensive supplies.
* It’s Fun: Watching the roots develop is incredibly rewarding.
* You Can See the Roots: Unlike other methods, you can easily monitor root development.
So there you have it! A comprehensive guide to propagating grape vines using the water method. With a little patience and care, you’ll be well on your way to expanding your vineyard and enjoying the fruits (or grapes!) of your labor. Happy gardening!
Conclusion
So, there you have it! This simple yet effective DIY grape vine water propagation method opens up a world of possibilities for expanding your vineyard, sharing your favorite varieties with friends, or simply enjoying the satisfaction of nurturing new life from a cutting. It’s a cost-effective and rewarding way to cultivate more of the grapes you love, without the need for expensive equipment or specialized knowledge.
Why is this a must-try? Because it’s accessible to everyone, regardless of their gardening experience. It bypasses the complexities of traditional grafting or seed propagation, offering a straightforward path to new grape vines. Imagine the joy of harvesting grapes from vines you personally propagated, knowing you played an integral role in their creation.
But the beauty of this method lies not only in its simplicity but also in its adaptability. Feel free to experiment with different types of grape vine cuttings. While hardwood cuttings are generally recommended, you can also try semi-hardwood cuttings taken in late spring or early summer. Just remember to adjust your approach based on the cutting type, ensuring proper hydration and environmental conditions.
Consider variations like adding a rooting hormone to the water to potentially speed up the rooting process. While not strictly necessary, a rooting hormone can provide an extra boost, especially for more challenging varieties. You can also experiment with different water sources. While tap water works fine, some gardeners prefer using rainwater or distilled water, believing it promotes healthier root development.
Another exciting variation is to try propagating multiple cuttings in a single container. This can be a space-saving solution, but be sure to provide adequate space between the cuttings to prevent overcrowding and ensure each has access to sufficient light and nutrients. Monitor the water level closely and change it regularly to prevent the growth of algae or bacteria.
Ultimately, the success of your grape vine water propagation depends on your attention to detail and your willingness to experiment. Observe your cuttings closely, monitor their progress, and adjust your approach as needed. Don’t be discouraged if some cuttings don’t take root; that’s a natural part of the process. The key is to learn from your experiences and keep trying.
We wholeheartedly encourage you to give this DIY grape vine water propagation trick a try. It’s a fantastic way to connect with nature, expand your gardening skills, and enjoy the fruits (literally!) of your labor. And most importantly, we want to hear about your experiences! Share your successes, your challenges, and any tips or tricks you discover along the way. Your insights can help other gardeners embark on their own grape vine propagation journeys. Post your photos and stories on social media using relevant hashtags, or leave a comment below to share your thoughts with our community. Let’s grow together!
Frequently Asked Questions (FAQ)
What type of grape vine cuttings are best for water propagation?
The most successful cuttings for water propagation are typically hardwood cuttings taken during the dormant season, usually in late fall or early winter after the leaves have fallen. These cuttings are mature and have stored energy, making them more likely to root. Look for healthy, disease-free canes that are about pencil-thick and 12-18 inches long. Avoid cuttings from very young or very old vines, as they may not root as easily.
How long does it take for grape vine cuttings to root in water?
Rooting times can vary depending on the grape variety, the quality of the cutting, and the environmental conditions. Generally, you can expect to see roots emerge within 2-6 weeks. Be patient and continue to monitor the cuttings, changing the water regularly. Once the roots are a few inches long, the cuttings are ready to be transplanted into soil.
What kind of water should I use for grape vine water propagation?
Tap water is generally suitable for grape vine water propagation, but it’s best to let it sit out for 24 hours to allow chlorine to dissipate. Some gardeners prefer using rainwater or distilled water, as they are free of chemicals and minerals that could potentially inhibit root growth. Regardless of the water source, it’s crucial to change the water every few days to prevent the growth of algae or bacteria.
How often should I change the water?
It’s recommended to change the water every 2-3 days to keep it fresh and prevent the buildup of algae or bacteria. This will also help to ensure that the cuttings receive adequate oxygen. When changing the water, gently rinse the cuttings to remove any debris or slime that may have accumulated.
Do I need to use rooting hormone for grape vine water propagation?
While not strictly necessary, using a rooting hormone can potentially speed up the rooting process and increase the success rate, especially for more challenging grape varieties. Rooting hormones contain auxins, which are plant hormones that stimulate root development. If you choose to use a rooting hormone, follow the instructions on the product label carefully.
What is the best location for grape vine cuttings during water propagation?
Grape vine cuttings need indirect sunlight during water propagation. Avoid placing them in direct sunlight, as this can scorch the cuttings and inhibit root growth. A bright, well-ventilated room is ideal. You can also use a grow light to provide supplemental lighting, especially during the winter months.
How do I know when the grape vine cuttings are ready to be planted in soil?
The grape vine cuttings are ready to be planted in soil when the roots are a few inches long and well-developed. The roots should be white or light brown in color and appear healthy. Avoid waiting too long to transplant the cuttings, as the roots can become brittle and damaged if they remain in water for an extended period.
What type of soil should I use for planting the rooted grape vine cuttings?
Use a well-draining potting mix that is specifically formulated for young plants. Avoid using garden soil, as it can be too heavy and may not provide adequate drainage. You can also amend the potting mix with perlite or vermiculite to improve drainage and aeration.
How do I care for the newly planted grape vine cuttings?
After planting the rooted grape vine cuttings, water them thoroughly and keep the soil consistently moist but not waterlogged. Place the plants in a location that receives indirect sunlight. As the plants grow, gradually acclimate them to more direct sunlight. Fertilize the plants regularly with a balanced fertilizer, following the instructions on the product label.
What are some common problems I might encounter during grape vine water propagation?
Some common problems include cuttings rotting, not rooting, or developing algae or bacteria in the water. To prevent rotting, use healthy, disease-free cuttings and change the water regularly. If cuttings are not rooting, try using a rooting hormone or adjusting the environmental conditions. To prevent algae or bacteria growth, change the water frequently and keep the cuttings in a clean container.
Can I propagate any type of grape vine using this method?
While this method works well for many grape varieties, some may be more challenging to propagate than others. Experimentation is key. If you’re having trouble with a particular variety, try using a rooting hormone or adjusting the environmental conditions. Researching the specific propagation requirements of your chosen grape variety can also be helpful.
Leave a Comment