

Grow Apple Tree From Seed: Imagine biting into a crisp, juicy apple, knowing you nurtured it from a tiny seed right in your own backyard! It sounds like a fairytale, doesn’t it? But trust me, it’s absolutely achievable, and this DIY guide will show you exactly how. For centuries, the apple tree has held a special place in human history, symbolizing knowledge, abundance, and even a bit of temptation (thanks, Eve!). From ancient orchards to modern-day gardens, the allure of growing your own apples remains strong.
But why bother with the effort of growing an apple tree from seed when you can just buy one from a nursery? Well, for starters, it’s incredibly rewarding! There’s a unique satisfaction in watching something you started from scratch flourish and bear fruit. Plus, you’ll have the chance to cultivate a truly unique apple variety, as seeds don’t always produce the exact same apple as the parent tree. Think of it as a fun experiment with potentially delicious results!
This DIY trick is essential because it empowers you to take control of your food source, connect with nature on a deeper level, and potentially save money in the long run. Let’s face it, store-bought apples can be expensive, and you never quite know what they’ve been sprayed with. By learning how to grow apple tree from seed, you’re investing in a healthier, more sustainable future for yourself and your family. So, grab your gardening gloves, and let’s get started on this exciting journey!
Growing Your Own Apple Tree From Seed: A Gardener’s Adventure!
Hey there, fellow green thumbs! Ever dreamt of biting into an apple you grew yourself, right from seed? It’s a longer journey than buying a sapling, but trust me, the satisfaction is immense. Growing an apple tree from seed is a rewarding project, a true testament to patience and the magic of nature. It’s not just about getting fruit; it’s about understanding the life cycle of a tree and connecting with the earth. So, let’s dive in!
Understanding the Process: It’s Not Always What You Expect!
Before we get our hands dirty, let’s talk about expectations. Apple trees grown from seed are unlikely to produce fruit identical to the parent apple. This is because apple trees are typically hybrids, meaning they have a mix of genes from different apple varieties. When you plant a seed, you’re essentially rolling the genetic dice. You might get something amazing, something okay, or something… well, let’s just say not quite apple-pie worthy.
However, that’s part of the fun! You’re creating something unique. And even if the fruit isn’t perfect for eating, it could be great for cider, cooking, or even as a rootstock for grafting (we’ll touch on that later).
Important Considerations:
* Patience is Key: It can take 5-10 years for an apple tree grown from seed to produce fruit.
* Genetic Variation: The apple you get will likely be different from the apple the seed came from.
* Pollination: Apple trees need cross-pollination to produce fruit. You’ll need at least two different apple varieties nearby.
* Climate: Choose an apple variety that’s suited to your local climate.
* Space: Apple trees need plenty of space to grow. Consider the mature size of the tree before planting.
Phase 1: Seed Stratification – Mimicking Winter
Apple seeds need a period of cold, moist stratification to break their dormancy. Think of it as tricking them into thinking they’ve been through winter. This process is crucial for successful germination.
What you’ll need:
* Apple seeds (from a ripe apple – organic is best!)
* Paper towels
* Ziplock bag or airtight container
* Refrigerator
Step-by-Step Instructions:
1. Extract the Seeds: Carefully cut open your apple and remove the seeds. Choose plump, brown seeds. Discard any that are shriveled or damaged.
2. Clean the Seeds: Rinse the seeds thoroughly under running water to remove any pulp or sugary residue. This will help prevent mold growth.
3. Prepare the Paper Towel: Moisten a paper towel with water. It should be damp, not soaking wet. You want it to feel like a wrung-out sponge.
4. Wrap the Seeds: Place the apple seeds on the damp paper towel and fold it over to enclose them.
5. Seal and Label: Place the wrapped seeds in a ziplock bag or airtight container. Label the bag with the date and the apple variety (if you know it). This is important for keeping track of your progress.
6. Refrigerate: Place the bag in the refrigerator. The ideal temperature is between 35-45°F (2-7°C).
7. Monitor Moisture: Check the paper towel every week or so to make sure it’s still moist. If it’s drying out, lightly mist it with water. Also, keep an eye out for any mold growth. If you see mold, gently rinse the seeds and replace the paper towel.
8. Stratification Period: Stratify the seeds for 60-90 days. This is the recommended time for most apple varieties.
Phase 2: Germination – Sprouting New Life
After stratification, it’s time to wake up those seeds and encourage them to sprout!
What you’ll need:
* Stratified apple seeds
* Small pots or seedling trays
* Seed starting mix or potting soil
* Water
* Warm, sunny location
Step-by-Step Instructions:
1. Prepare the Pots: Fill your small pots or seedling trays with seed starting mix or potting soil. Moisten the soil thoroughly.
2. Plant the Seeds: Make a small hole (about ½ inch deep) in the center of each pot. Place one or two stratified apple seeds in each hole.
3. Cover the Seeds: Gently cover the seeds with soil and lightly pat it down.
4. Water Gently: Water the pots gently to avoid disturbing the seeds. You can use a spray bottle or a watering can with a fine rose.
5. Provide Warmth and Light: Place the pots in a warm, sunny location. A south-facing windowsill is ideal. You can also use a grow light if you don’t have enough natural light.
6. Keep the Soil Moist: Keep the soil consistently moist, but not waterlogged. Check the soil moisture daily and water as needed.
7. Watch for Germination: Germination typically takes 1-3 weeks. Be patient! Once the seedlings emerge, provide them with plenty of light and air circulation.
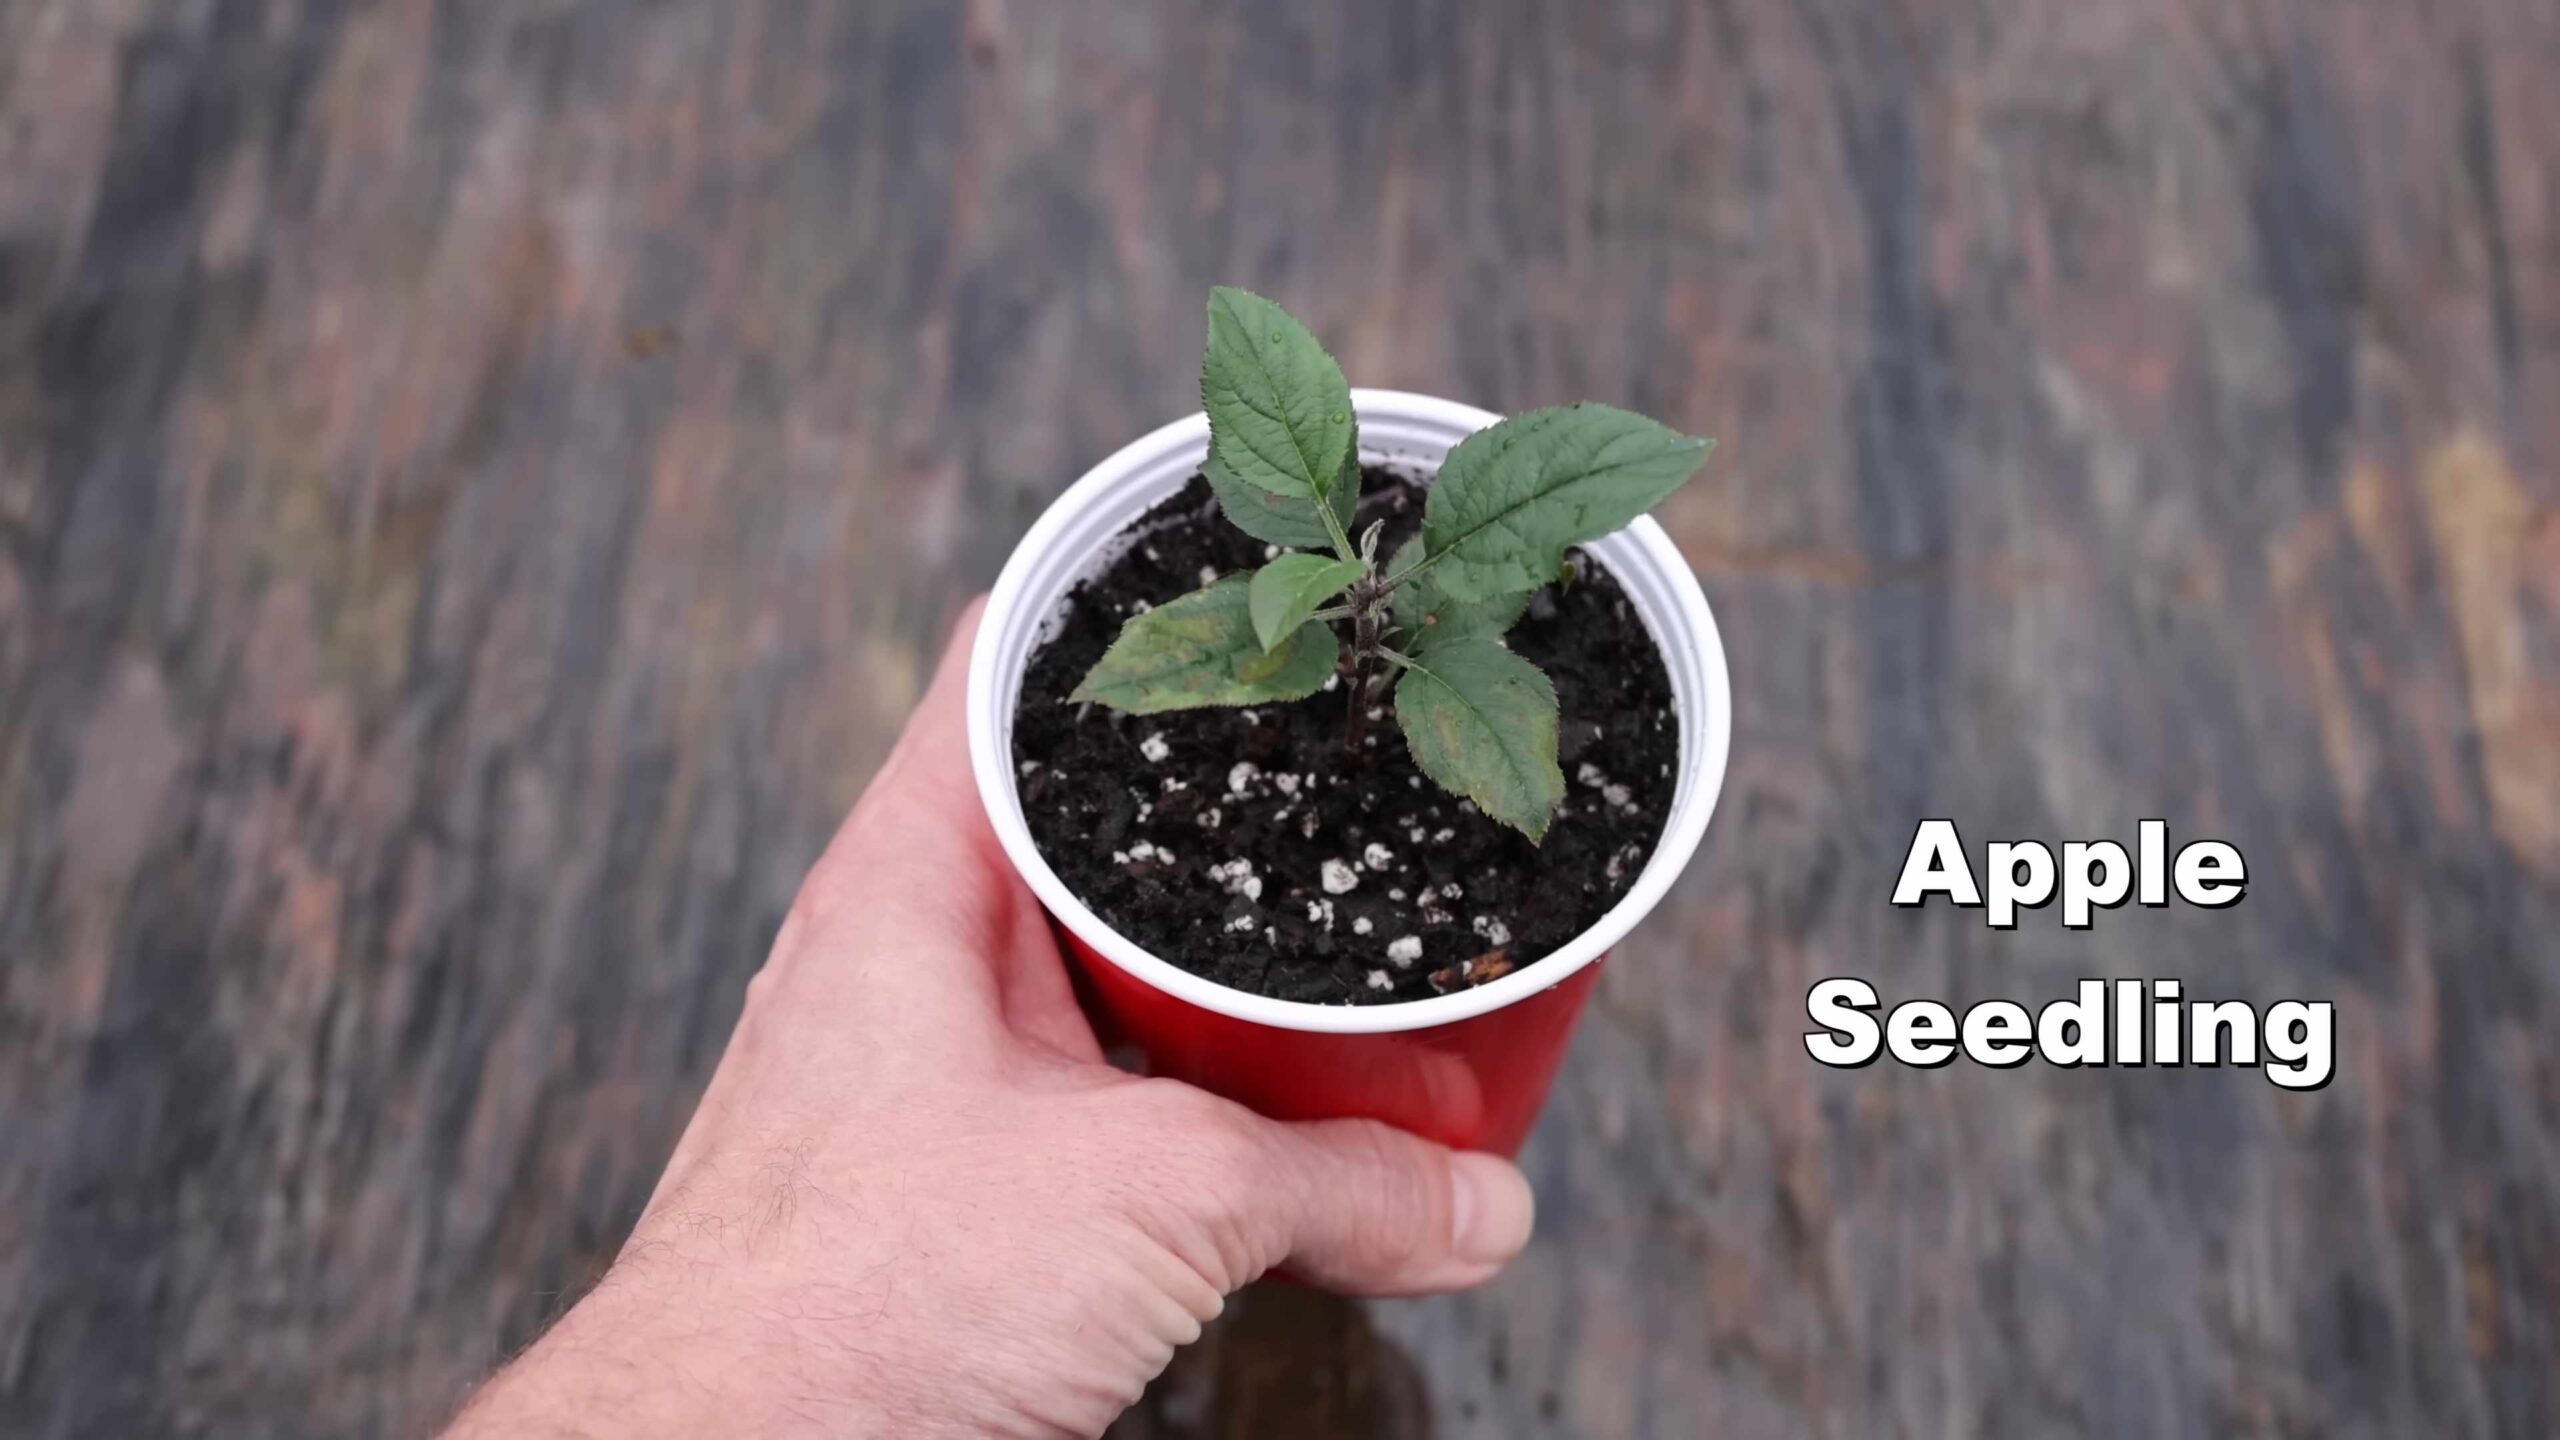
Phase 3: Seedling Care – Nurturing Young Trees
Once your apple seedlings have sprouted, it’s time to provide them with the care they need to grow into strong, healthy trees.
What you’ll need:
* Apple seedlings
* Larger pots (if needed)
* Potting soil
* Fertilizer (optional)
* Water
* Sunny location
* Protection from pests and diseases
Step-by-Step Instructions:
1. Thinning (if necessary): If you planted two seeds in each pot and both germinated, thin out the weaker seedling. Choose the strongest seedling and gently snip off the other one at the soil line.
2. Repotting (if necessary): Once the seedlings have developed a few sets of true leaves (the leaves that look like miniature apple leaves), you may need to repot them into larger containers. Choose a pot that is at least twice the size of the original pot.
3. Watering: Water the seedlings regularly, keeping the soil consistently moist but not waterlogged. Allow the soil to dry out slightly between waterings.
4. Fertilizing (optional): You can fertilize the seedlings with a balanced liquid fertilizer diluted to half strength. Fertilize every 2-4 weeks during the growing season.
5. Providing Sunlight: Apple seedlings need plenty of sunlight to grow. Provide them with at least 6 hours of direct sunlight per day.
6. Protecting from Pests and Diseases: Keep an eye out for pests and diseases. Common apple tree pests include aphids, spider mites, and caterpillars. Common diseases include apple scab and powdery mildew. Treat any problems promptly with appropriate organic pest control methods.
7. Overwintering: In colder climates, you’ll need to protect your apple seedlings from frost and freezing temperatures during the winter. You can bring them indoors to a cool, bright location, or you can overwinter them in a sheltered outdoor location, such as a garage or shed.
Phase 4: Planting in the Ground – Giving Your Tree a Home
After a year or two of growing in pots, your apple tree seedling will be ready to be planted in the ground. This is a big step, so choose the location carefully!
What you’ll need:
* Apple tree seedling
* Shovel
* Compost or well-rotted manure
* Water
* Tree stake (optional)
* Tree guard (optional)
Step-by-Step Instructions:
1. Choose a Location: Select a sunny location with well-drained soil. Apple trees need at least 6 hours of direct sunlight per day. Avoid planting in low-lying areas where water tends to collect.
2. Prepare the Soil: Dig a hole that is twice as wide and just as deep as the root ball of the seedling. Amend the soil with compost or well-rotted manure to improve drainage and fertility.
3. Plant the Tree: Gently remove the seedling from its pot and loosen the roots. Place the tree in the hole, making sure that the top of the root ball is level with the ground.
4. Backfill the Hole: Backfill the hole with the amended soil, gently tamping it down around the roots.
5. Water Thoroughly: Water the tree thoroughly after planting.
6. Stake the Tree (optional): If the tree is wobbly or exposed to strong winds, you can stake it for support. Drive a stake into the ground a few inches away from the trunk and tie the tree to the stake with a soft cloth or rope.
7. Protect from Animals (optional): If you live in an area with

Conclusion
So, you’ve journeyed with us through the process of growing an apple tree from seed. It’s a longer road than buying a sapling, yes, but the rewards are immeasurable. Think about it: you’re not just planting a tree; you’re nurturing a life, a legacy, from its very beginning. You’re creating a unique apple variety, potentially discovering a flavor profile the world has never tasted before. That’s the magic of growing an apple tree from seed.
This isn’t just about saving money (though that’s a nice perk!). It’s about connecting with nature on a deeper level, understanding the intricate dance of germination, growth, and fruiting. It’s about patience, perseverance, and the sheer joy of watching something you started from scratch flourish into a bountiful provider.
But the best part? You get to brag about it! Imagine serving apples from *your* tree, a tree you grew from a tiny seed. The stories you can tell, the pride you can feel – it’s an experience that simply can’t be bought.
Now, let’s talk variations. While we’ve focused on a general approach, feel free to experiment. Try different apple varieties for your seeds. Explore different stratification methods – perhaps burying the seeds directly in the ground over winter in a protected area. Consider using different soil mixes for your seedlings. The beauty of this DIY project is that it’s adaptable to your specific climate and preferences.
Don’t be afraid to get creative with your grafting techniques, too. While we suggested a simple whip and tongue graft, there are many other methods to explore, each with its own advantages. Research different grafting techniques and find one that suits your skill level and the size of your rootstock.
And remember, success isn’t always guaranteed. Growing an apple tree from seed requires patience and dedication. You might encounter challenges along the way, but don’t let that discourage you. Learn from your mistakes, adapt your approach, and keep trying. The journey is just as important as the destination.
We wholeheartedly encourage you to embark on this rewarding adventure. Start small, perhaps with a few seeds, and see where it takes you. Document your progress, take pictures, and share your experiences with us and the wider gardening community. We’d love to hear your stories, learn from your successes, and offer support along the way.
So, grab some apple seeds, prepare your soil, and get ready to witness the miracle of life unfold. Growing an apple tree from seed is a truly special experience, and we believe you’ll find it incredibly rewarding. Don’t just buy apples; grow them! Share your journey and inspire others to experience the joy of nurturing their own apple trees from seed. Let’s cultivate a community of passionate apple growers, one seed at a time.
Frequently Asked Questions
Q: How long does it take to grow an apple tree from seed to fruiting?
A: This is probably the most common question, and the answer is: patience is key! Unlike grafted trees that can produce fruit in 2-5 years, apple trees grown from seed typically take 6-10 years to bear fruit. This is because you’re starting from scratch, and the tree needs time to mature and develop its fruiting capacity. Grafting accelerates this process by using a mature scion (the fruiting part) on a vigorous rootstock. However, the wait is worth it for the unique apple you’ll eventually harvest.
Q: Will the apple tree grown from seed produce the same type of apple as the parent tree?
A: This is where things get interesting! Apple trees are rarely “true to seed.” This means that the apple you get from a seed will likely be different from the apple you took the seed from. This is because apple trees are hybrids, meaning they are the result of cross-pollination between two different apple varieties. The seed contains a mix of genetic material from both parent trees, resulting in a unique apple variety. This is why growing apple trees from seed can be so exciting – you might discover a completely new and delicious apple!
Q: Is it necessary to graft an apple tree grown from seed?
A: While not strictly necessary, grafting is highly recommended. Grafting allows you to control the characteristics of the fruit and the size of the tree. By grafting a scion (a cutting from a known apple variety) onto your seedling rootstock, you can ensure that you get the desired apple variety and that the tree grows to a manageable size. Grafting also often results in earlier fruiting. If you choose not to graft, you’ll have to wait longer for fruit, and the apple variety will be a surprise.
Q: What are the best apple varieties to use for seeds?
A: You can use seeds from any apple variety, but some varieties are known to produce more interesting offspring. Heirloom varieties, which are older and less hybridized, often have more diverse genetics and may produce more unique apples. Experiment with different varieties and see what you get! Keep in mind that some apple varieties are sterile and won’t produce viable seeds.
Q: What kind of soil is best for growing apple tree seedlings?
A: Apple tree seedlings prefer well-draining soil that is rich in organic matter. A good potting mix for seedlings would consist of equal parts peat moss, perlite, and vermiculite. You can also add some compost to provide extra nutrients. Avoid using heavy clay soil, as it can become waterlogged and suffocate the roots.
Q: How often should I water my apple tree seedlings?
A: Water your apple tree seedlings regularly, keeping the soil consistently moist but not waterlogged. Check the soil moisture level daily and water when the top inch of soil feels dry to the touch. Avoid overwatering, as this can lead to root rot.
Q: How much sunlight do apple tree seedlings need?
A: Apple tree seedlings need at least 6 hours of direct sunlight per day. Place them in a sunny location where they will receive plenty of light. If you are growing them indoors, you may need to supplement with artificial light.
Q: How do I protect my apple tree seedlings from pests and diseases?
A: Keep an eye out for common pests and diseases that affect apple trees, such as aphids, spider mites, and apple scab. Inspect your seedlings regularly and take action if you notice any signs of infestation or disease. You can use organic pest control methods, such as insecticidal soap or neem oil, to control pests. Ensure good air circulation around your seedlings to prevent fungal diseases.
Q: What do I do with my apple tree seedling after it has grown for a year?
A: After your apple tree seedling has grown for a year, you can transplant it to a larger pot or plant it directly in the ground. If you are planting it in the ground, choose a sunny location with well-draining soil. Dig a hole that is twice as wide as the root ball and just as deep. Gently remove the seedling from its pot and place it in the hole. Backfill the hole with soil and water thoroughly.
Q: Can I grow an apple tree from seed in a container?
A: Yes, you can grow an apple tree from seed in a container, but you’ll need a large container (at least 20 gallons) to accommodate the tree’s root system. Choose a dwarf or semi-dwarf rootstock if you plan to keep the tree in a container long-term. Container-grown apple trees will require more frequent watering and fertilization than trees planted in the ground.
Q: What if my apple seeds don’t germinate?
A: Don’t give up! Germination rates can vary. Ensure your seeds have undergone proper stratification. Check the viability of your seeds by placing them in water; seeds that sink are more likely to be viable. Try again with a fresh batch of seeds, adjusting your stratification method if necessary. Sometimes, it just takes a little persistence.
Q: How do I know when my apple is ripe?
A: Determining ripeness depends on the variety, but generally, ripe apples will have a deeper color, a fragrant aroma, and will detach easily from the tree with a gentle twist. The seeds inside the apple will also be dark brown or black. Taste-testing is always the best way to be sure!
Q: What are some resources for learning more about growing apple trees?
A: There are many excellent resources available online and in print. Local nurseries and agricultural extension offices can provide valuable information specific to your region. Look for books and websites dedicated to fruit tree cultivation and grafting. Don’t hesitate to join online gardening forums and connect with other apple growers to share tips and experiences.
Leave a Comment