

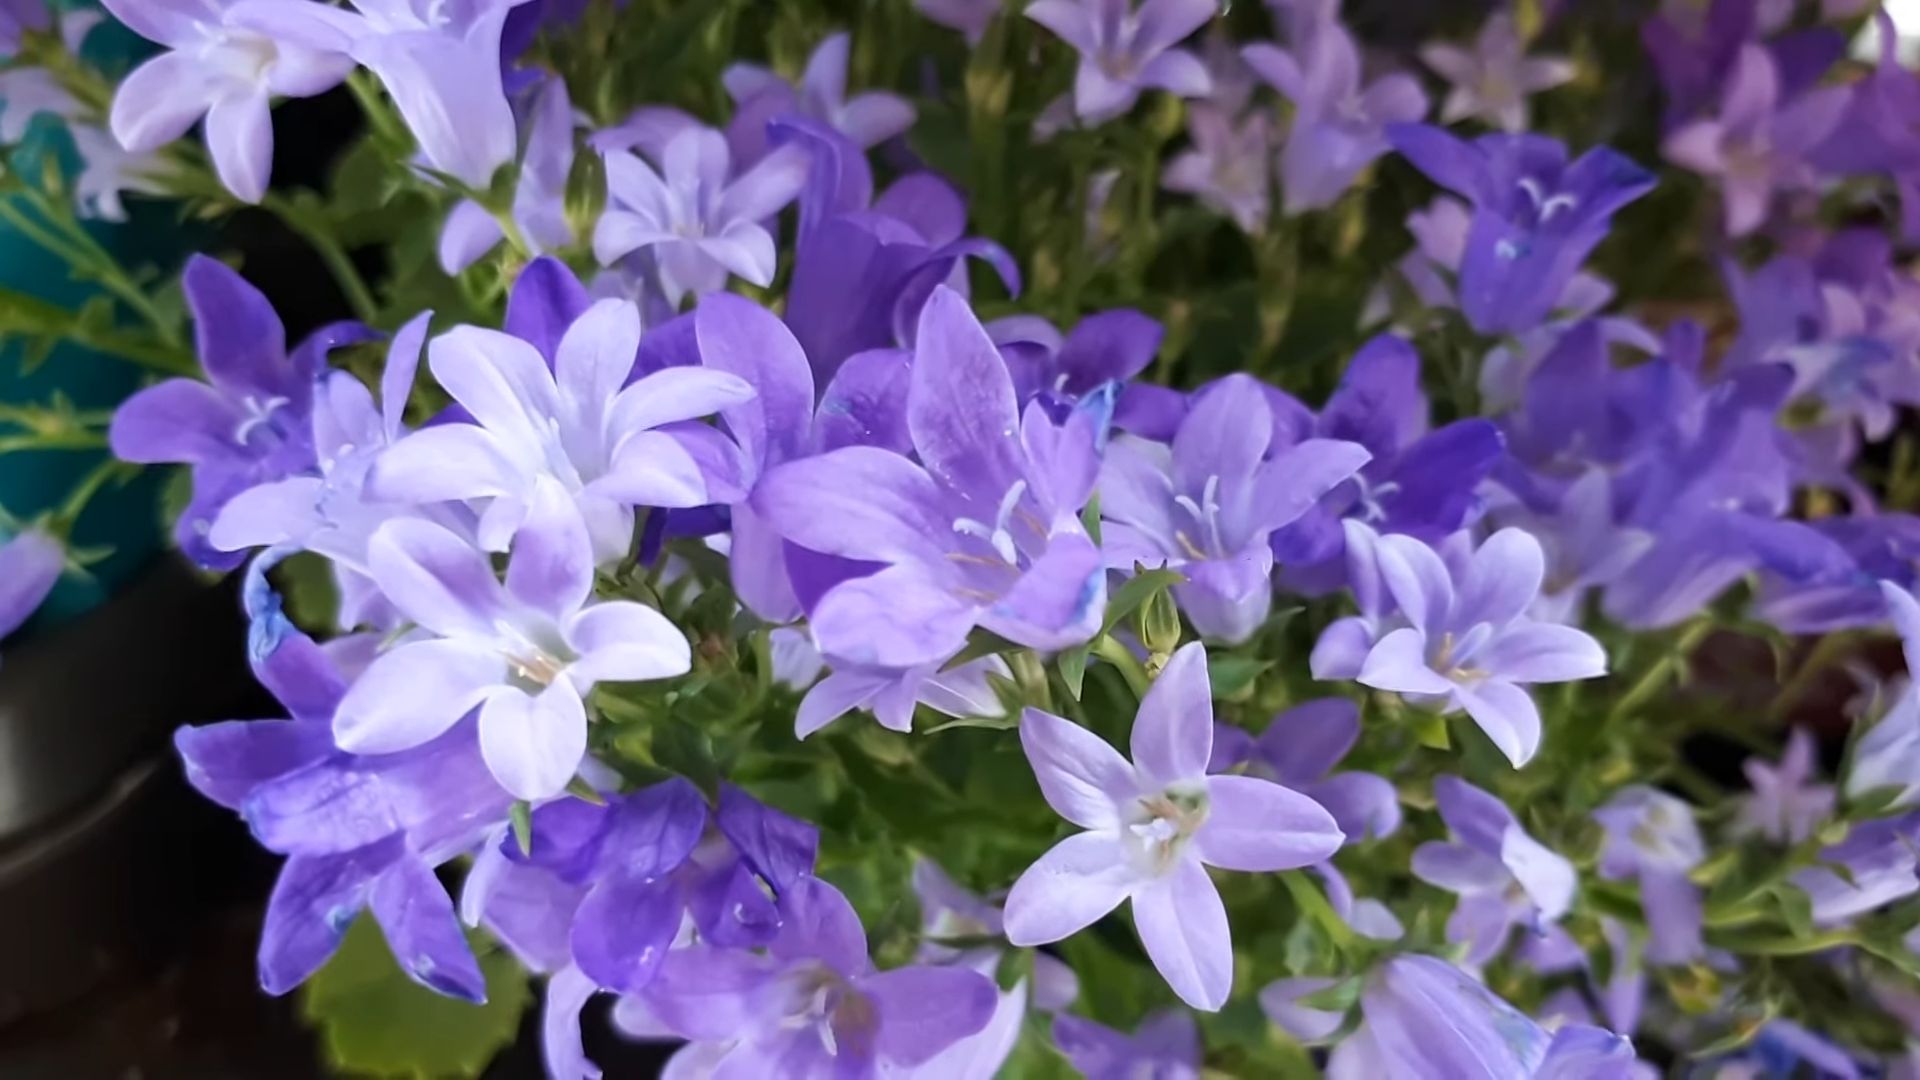
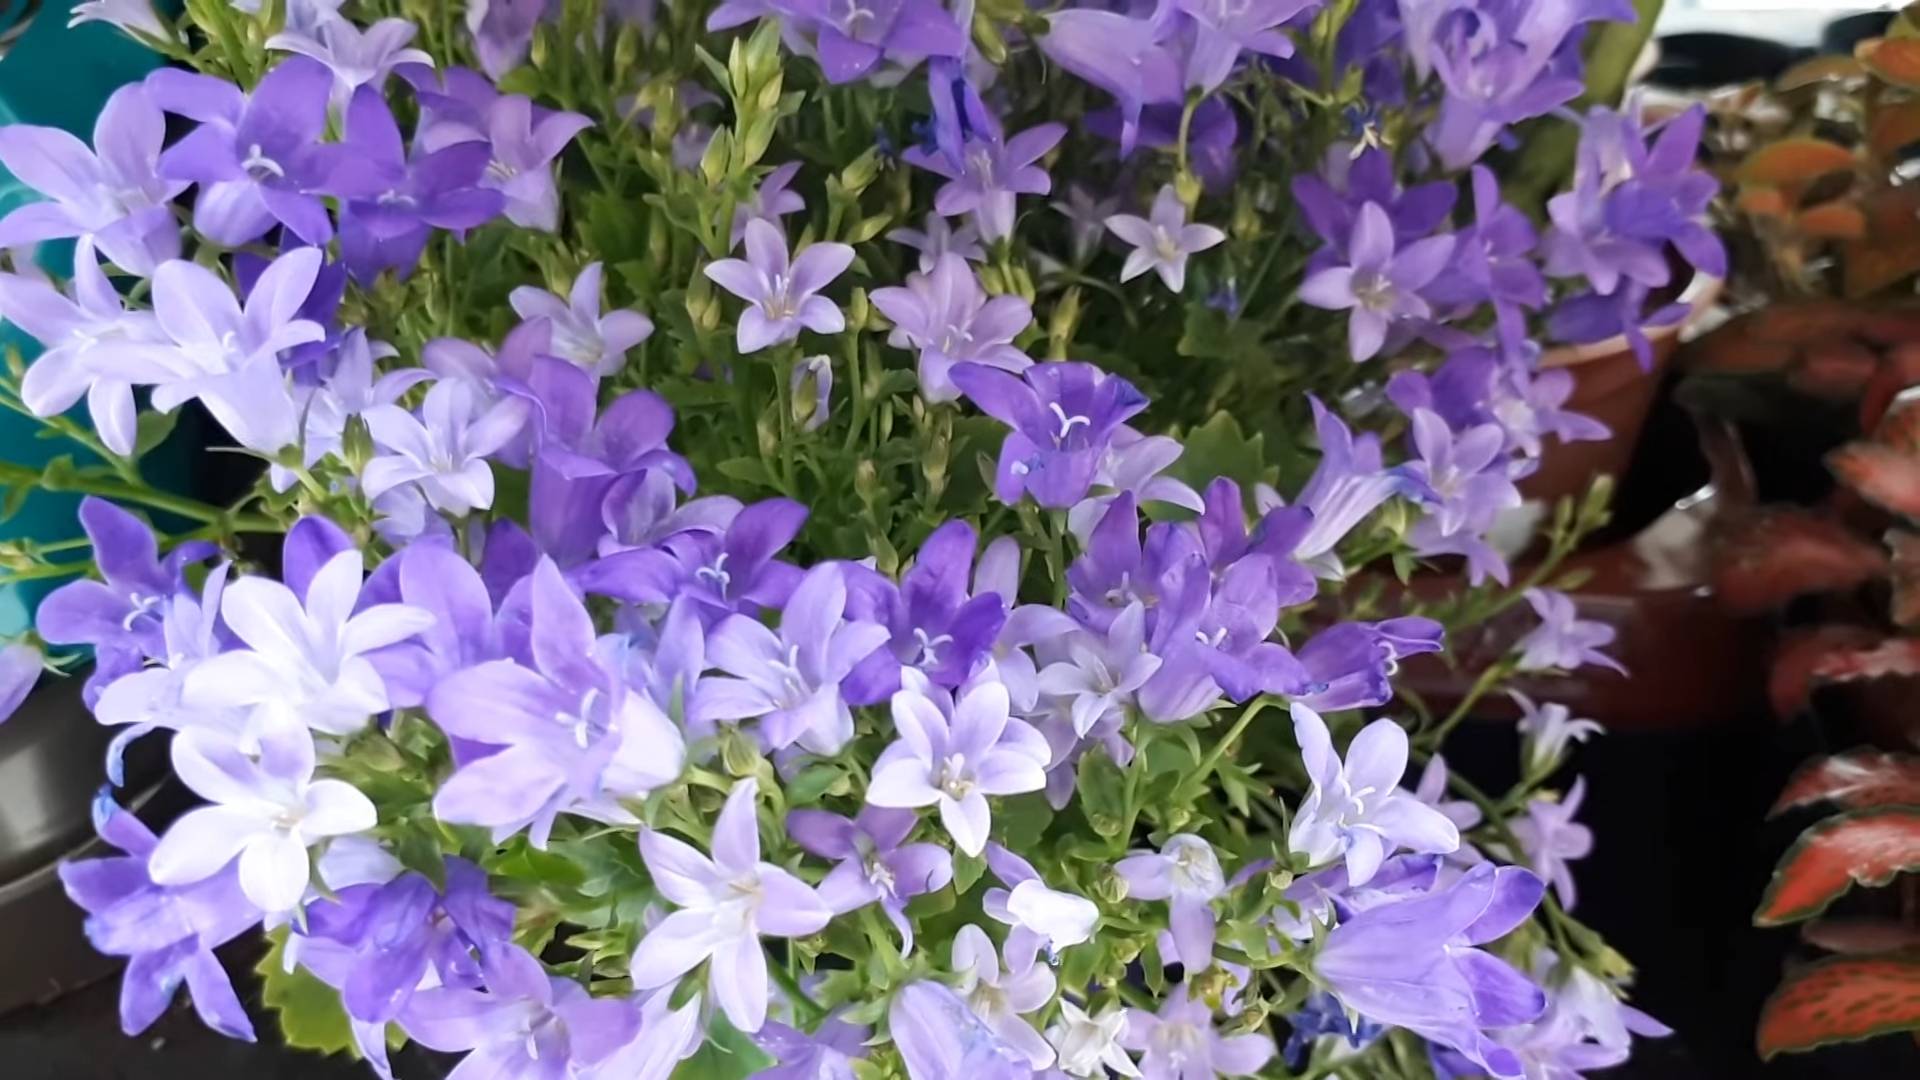
Grow bellflowers perennials and transform your garden into a vibrant, blooming paradise! Have you ever dreamed of a garden bursting with charming, bell-shaped flowers that return year after year? Well, you’re in the right place! This article is your ultimate guide to unlocking the secrets of cultivating these delightful perennials, even if you’re a complete beginner.
Bellflowers, with their rich history and delicate beauty, have been cherished in gardens for centuries. Their elegant blooms have graced landscapes from cottage gardens to formal estates, adding a touch of whimsy and sophistication. In some cultures, they even symbolize gratitude and everlasting love, making them a meaningful addition to any outdoor space.
But why should you learn how to grow bellflowers perennials? In today’s busy world, creating a tranquil and beautiful outdoor space is more important than ever. Bellflowers offer a low-maintenance way to add color, attract pollinators, and create a sense of peace and serenity in your own backyard. Plus, who doesn’t love the satisfaction of nurturing something beautiful from seed to bloom? I’m excited to share my favorite DIY tricks and hacks that will help you successfully grow these stunning perennials and enjoy their beauty for years to come!
DIY Guide: Propagating Bellflowers (Campanula) for a Bountiful Bloom
Hey there, fellow gardening enthusiasts! I’m super excited to share my tried-and-true method for propagating bellflowers, also known as Campanula. These charming perennials, with their delightful bell-shaped blooms, are a fantastic addition to any garden. And the best part? You can easily multiply your collection without spending a fortune! I’m going to walk you through everything you need to know, from choosing the right method to nurturing your new bellflower babies. Let’s get started!
Understanding Bellflower Propagation Methods
Before we dive into the nitty-gritty, let’s quickly cover the main ways you can propagate bellflowers. Each method has its pros and cons, so choosing the right one depends on your experience level, the type of bellflower you have, and your desired outcome.
* Division: This is my go-to method for established bellflowers. It’s relatively simple and yields mature plants quickly. You essentially separate a clump of the plant into smaller sections, each with its own roots and shoots.
* Stem Cuttings: This method involves taking cuttings from the stems of your bellflower and rooting them in water or soil. It’s a great way to propagate specific cultivars and maintain their unique characteristics.
* Seed Propagation: While this is a viable option, it can be a bit more time-consuming and the resulting plants may not be identical to the parent plant. However, it’s a fun way to experiment and expand your bellflower collection.
For this guide, I’ll focus primarily on division and stem cuttings, as they are the most reliable and beginner-friendly methods.
Propagating Bellflowers by Division
Division is best done in early spring or fall when the plant is not actively blooming. This allows the divided sections to establish themselves before the stresses of summer heat or winter cold.
Materials You’ll Need:
* A mature bellflower plant (at least 2-3 years old)
* A sharp spade or garden fork
* A clean knife or pruning shears
* Gardening gloves
* Potting mix or garden soil
* Watering can
Step-by-Step Instructions:
1. Prepare the Parent Plant: A day or two before you plan to divide your bellflower, give it a good watering. This will help to loosen the soil and make the division process easier.
2. Dig Up the Plant: Carefully dig around the bellflower plant, making sure to avoid damaging the roots. Use your spade or garden fork to gently lift the entire plant out of the ground.
3. Clean the Roots: Gently shake off any excess soil from the roots. This will allow you to see the root structure more clearly and identify natural division points.
4. Divide the Plant: Using your clean knife or pruning shears, carefully separate the plant into smaller sections. Each section should have a healthy portion of roots and at least a few shoots or leaves. I like to aim for sections that are about the size of my fist.
5. Prepare the Planting Site: Choose a location in your garden with well-drained soil and partial to full sun. Amend the soil with compost or other organic matter to improve its fertility and drainage. Alternatively, you can pot the divisions in containers filled with potting mix.
6. Plant the Divisions: Dig a hole that is slightly larger than the root ball of each division. Place the division in the hole and backfill with soil, gently firming it around the base of the plant.
7. Water Thoroughly: Water the newly planted divisions thoroughly to help settle the soil and encourage root growth.
8. Ongoing Care: Keep the soil consistently moist, but not waterlogged, for the first few weeks after planting. Once the divisions have established themselves, you can reduce watering frequency. Fertilize with a balanced fertilizer in the spring to promote healthy growth and blooming.
Propagating Bellflowers from Stem Cuttings
Stem cuttings are a great way to propagate bellflowers, especially if you want to maintain the specific characteristics of a particular cultivar. This method is best done in late spring or early summer when the plant is actively growing.
Materials You’ll Need:
* A healthy bellflower plant
* Clean pruning shears or a sharp knife
* Rooting hormone (optional, but recommended)
* Small pots or containers
* Potting mix or a mixture of perlite and vermiculite
* Clear plastic bags or a humidity dome
* Watering can or spray bottle
Step-by-Step Instructions:
1. Take the Cuttings: Select healthy, non-flowering stems from your bellflower plant. Using your clean pruning shears or knife, cut a 4-6 inch section from the tip of the stem. Make the cut just below a node (the point where leaves emerge from the stem).
2. Prepare the Cuttings: Remove the lower leaves from the cutting, leaving only a few leaves at the top. This will help to prevent the cutting from rotting and encourage root development.
3. Apply Rooting Hormone (Optional): Dip the cut end of the stem in rooting hormone powder or liquid. This will help to stimulate root growth and increase the success rate of your cuttings.
4. Plant the Cuttings: Fill your small pots or containers with potting mix or a mixture of perlite and vermiculite. Make a small hole in the center of the potting mix and insert the cutting, burying the bottom 1-2 inches of the stem.
5. Water Thoroughly: Water the cuttings thoroughly to moisten the potting mix.
6. Create a Humid Environment: Cover the pots with clear plastic bags or place them in a humidity dome. This will help to create a humid environment that is essential for root development. Make sure the plastic bag doesn’t touch the leaves; you can use skewers to prop it up.
7. Provide Indirect Light: Place the cuttings in a location with bright, indirect light. Avoid direct sunlight, as this can scorch the leaves.
8. Maintain Humidity and Moisture: Check the cuttings regularly and mist them with water if the potting mix starts to dry out. Remove the plastic bags or humidity dome for a few minutes each day to allow for air circulation and prevent fungal growth.
9. Check for Root Development: After a few weeks, gently tug on the cuttings to check for root development. If you feel resistance, it means that roots have formed.
10. Transplant the Cuttings: Once the cuttings have developed a good root system, you can transplant them into larger pots or directly into your garden.
Caring for Your New Bellflower Plants
Whether you propagated your bellflowers by division or stem cuttings, proper care is essential for their long-term health and blooming success.
* Sunlight: Bellflowers generally prefer partial to full sun. In hotter climates, provide some afternoon shade to protect them from scorching.
* Soil: Bellflowers thrive in well-drained soil that is rich in organic matter. Amend your soil with compost or other organic matter to improve its fertility and drainage.
* Watering: Water your bellflowers regularly, especially during dry periods. Avoid overwatering, as this can lead to root rot.
* Fertilizing: Fertilize your bellflowers in the spring with a balanced fertilizer to promote healthy growth and blooming.
* Deadheading: Deadhead spent flowers regularly to encourage continued blooming.
* Pest and Disease Control: Bellflowers are generally resistant to pests and diseases. However, they can occasionally be affected by aphids, slugs, or powdery mildew. Monitor your plants regularly and take appropriate action if you notice any problems.
Troubleshooting Common Bellflower Propagation Issues
Even with the best intentions, sometimes things don’t go as planned. Here are a few common issues you might encounter when propagating bellflowers and how to address them:
* Cuttings Rotting: This is often caused by overwatering or poor air circulation. Make sure your potting mix is well-drained and that you are not overwatering the cuttings. Increase air circulation by removing the plastic bags or humidity dome for longer periods each day.
* Cuttings Not Rooting: This could be due to a variety of factors, including poor quality cuttings, lack of humidity, or insufficient light. Make sure you are taking cuttings from healthy stems, providing adequate humidity, and placing the cuttings in a location with bright, indirect light. Using rooting hormone can also help to improve the success rate.
* Divisions Not Establishing: This can be caused by planting the divisions too deep, not watering them enough, or exposing them to extreme temperatures. Make sure you are planting the divisions at the correct depth, watering them regularly, and protecting them from extreme heat or cold.
With a little patience and attention, you can successfully propagate bellflowers and enjoy their beautiful blooms for years to come. Happy gardening!
Conclusion
So, there you have it! Growing bellflowers perennials doesn’t have to be an expensive or complicated endeavor. By embracing this simple DIY trick, you’re not just saving money; you’re also gaining a deeper connection to your garden and fostering a more sustainable approach to horticulture. The satisfaction of nurturing a plant from a simple cutting or seed to a thriving, blooming beauty is truly unparalleled.
This method, focusing on propagation through division or seed starting, offers a cost-effective and rewarding way to expand your bellflower collection and fill your garden with their charming, bell-shaped blooms. Imagine the vibrant display of blues, purples, pinks, and whites cascading through your flower beds, attracting pollinators and adding a touch of whimsical elegance to your outdoor space.
But the benefits extend beyond aesthetics. By propagating your own bellflowers, you’re also ensuring the genetic diversity of your plants, making them more resilient to diseases and environmental changes. You’re also contributing to a more sustainable gardening practice by reducing your reliance on commercially grown plants, which often come with a larger carbon footprint.
Ready to take your bellflower game to the next level? Consider these variations and suggestions:
* Experiment with different bellflower varieties: There are numerous bellflower species and cultivars to choose from, each with its unique characteristics. Try propagating different varieties to create a diverse and visually stunning display. Explore dwarf varieties for containers or taller species for borders and cottage gardens.
* Use rooting hormone: While not always necessary, using a rooting hormone can significantly increase the success rate of your cuttings, especially for more challenging varieties.
* Improve soil drainage: Bellflowers thrive in well-drained soil. Amend heavy clay soils with compost or other organic matter to improve drainage and prevent root rot.
* Consider companion planting: Plant bellflowers alongside other perennials that share similar growing requirements, such as lavender, salvia, and echinacea. These plants can complement each other and create a beautiful and harmonious garden display.
* Seed Starting Mix: When starting from seed, use a high-quality seed starting mix to ensure proper drainage and aeration.
* Cold Stratification: Some bellflower seeds benefit from cold stratification. This involves exposing the seeds to cold temperatures for a period of time before sowing to break dormancy. Check the specific requirements for your chosen variety.
Don’t be afraid to experiment and adapt this DIY trick to suit your specific needs and preferences. Gardening is a journey of learning and discovery, and there’s no one-size-fits-all approach. The most important thing is to have fun and enjoy the process.
We are confident that this DIY trick will empower you to grow bellflowers perennials successfully and affordably. So, grab your gardening tools, gather your supplies, and get ready to embark on a rewarding gardening adventure.
We’d love to hear about your experience! Share your success stories, tips, and photos in the comments below. Let’s create a community of bellflower enthusiasts and inspire others to embrace the joy of DIY gardening. Your insights and experiences can help others overcome challenges and achieve their gardening goals. Happy gardening!
Frequently Asked Questions (FAQ)
What are the best bellflower varieties to propagate using this DIY trick?
The success of propagation can vary depending on the bellflower variety. However, some varieties are generally easier to propagate than others. For beginners, we recommend starting with Campanula persicifolia (Peach-leaved Bellflower) or Campanula rotundifolia (Harebell). These varieties are known for their relatively easy propagation through division or seed starting. Campanula carpatica (Carpathian Bellflower) is also a good option, especially for propagation from cuttings. As you gain experience, you can experiment with other varieties, such as Campanula glomerata (Clustered Bellflower) or Campanula takesimana (Korean Bellflower), which may require more attention and care. Always research the specific propagation requirements of the variety you choose to ensure the best results.
How long does it take for bellflower cuttings to root?
The time it takes for bellflower cuttings to root can vary depending on several factors, including the variety of bellflower, the time of year, and the environmental conditions. Generally, you can expect cuttings to root within 2-4 weeks. To speed up the rooting process, provide consistent moisture, warmth, and humidity. You can use a propagation dome or plastic bag to create a humid environment. Avoid overwatering, as this can lead to rot. Once the cuttings have developed a healthy root system, you can transplant them into individual pots or directly into the garden.
What is the best time of year to propagate bellflowers?
The best time of year to propagate bellflowers depends on the method you’re using. For division, early spring or fall is ideal, when the plants are not actively growing. This allows the divided plants to establish themselves before the onset of extreme temperatures. For cuttings, late spring or early summer is generally the best time, when the plants are producing new growth. For seed starting, you can start seeds indoors in late winter or early spring, or direct sow them in the garden in spring or fall. Consider your local climate and growing conditions when determining the best time to propagate bellflowers in your area.
How do I care for bellflower seedlings?
Bellflower seedlings require consistent moisture, adequate light, and proper fertilization to thrive. Water the seedlings regularly, keeping the soil consistently moist but not waterlogged. Provide bright, indirect light. Avoid direct sunlight, which can scorch the delicate seedlings. Once the seedlings have developed a few sets of true leaves, you can start fertilizing them with a diluted liquid fertilizer. Transplant the seedlings into larger pots or directly into the garden once they are large enough to handle. Harden off the seedlings gradually before transplanting them outdoors to acclimate them to the outdoor environment.
What are some common problems when growing bellflowers, and how can I prevent them?
Some common problems when growing bellflowers include powdery mildew, root rot, and slug or snail damage. Powdery mildew is a fungal disease that can cause a white, powdery coating on the leaves. To prevent powdery mildew, provide good air circulation and avoid overhead watering. Root rot is caused by overwatering and poor drainage. To prevent root rot, plant bellflowers in well-drained soil and avoid overwatering. Slugs and snails can damage bellflower foliage. To prevent slug and snail damage, use slug bait or handpick them from the plants. You can also create barriers around the plants using copper tape or diatomaceous earth. Regularly inspect your bellflowers for signs of pests or diseases and take action promptly to prevent them from spreading.
Can I grow bellflowers in containers?
Yes, many bellflower varieties are well-suited for container gardening. Choose a pot that is large enough to accommodate the plant’s root system and provide good drainage. Use a high-quality potting mix and water regularly, especially during hot weather. Fertilize the plants regularly with a balanced fertilizer. Choose a location that provides adequate sunlight. Dwarf varieties, such as Campanula carpatica, are particularly well-suited for containers.
How do I encourage more blooms on my bellflowers?
To encourage more blooms on your bellflowers, provide them with adequate sunlight, water, and fertilizer. Deadhead spent flowers regularly to encourage the plant to produce more blooms. Avoid overwatering, as this can lead to root rot and reduce flowering. Fertilize the plants regularly with a fertilizer that is high in phosphorus, which promotes flowering. Consider adding compost to the soil to improve its fertility and drainage. With proper care, your bellflowers will reward you with a profusion of beautiful blooms.
Leave a Comment