

Grow Bitter Melon, and unlock a world of culinary possibilities right in your backyard! Have you ever dreamt of harvesting your own exotic vegetables, bursting with flavor and packed with nutrients? Well, dream no more! This DIY guide is your passport to cultivating this unique and often misunderstood fruit, even if you’re a complete beginner.
Bitter melon, also known as bitter gourd or karela, has a rich history deeply intertwined with traditional medicine and cuisine across Asia, Africa, and the Caribbean. For centuries, it’s been revered for its health benefits and distinctive bitter taste, adding a unique dimension to countless dishes. But let’s be honest, finding fresh, high-quality bitter melon at the grocery store can be a challenge, and sometimes, the prices are just outrageous!
That’s where this guide comes in. I’m going to share my tried-and-true secrets for successfully grow bitter melon at home, regardless of your gardening experience. Imagine the satisfaction of harvesting your own vibrant, healthy bitter melons, knowing exactly where they came from and how they were grown. Plus, you’ll save money and have a constant supply of this amazing vegetable. So, grab your gardening gloves, and let’s embark on this exciting journey together!
DIY: Growing Bitter Melon Like a Pro (Even if You’re a Beginner!)
Hey there, fellow gardening enthusiasts! I’m so excited to share my experience with growing bitter melon, also known as bitter gourd or karela. It might seem intimidating, but trust me, with a little patience and these simple steps, you can harvest your own delicious (and healthy!) bitter melons right in your backyard. I’ve broken down the process to make it super easy to follow.
What You’ll Need: The Essential Supplies
Before we dive in, let’s gather everything you’ll need. Having everything on hand will make the whole process smoother.
* Bitter Melon Seeds: You can find these online or at your local garden center. Make sure they are from a reputable source.
* Seed Starting Trays or Small Pots: These are perfect for getting your seedlings started indoors.
* Seed Starting Mix: This is a light and airy soil mix specifically designed for seedlings.
* Potting Soil: Once your seedlings are ready to transplant, you’ll need a good quality potting soil.
* Garden Soil: If you’re planting directly in the ground, you’ll need to amend your garden soil with compost and other organic matter.
* Compost or Well-Rotted Manure: This will enrich your soil and provide essential nutrients.
* Trellis or Support Structure: Bitter melon is a vine, so it needs something to climb on.
* Watering Can or Hose: For regular watering.
* Fertilizer: A balanced fertilizer will help your plants thrive. I prefer an organic option.
* Gloves: To protect your hands.
* Gardening Tools: Trowel, shovel, and pruning shears.
* Sunny Location: Bitter melon loves sunshine!
Phase 1: Starting Your Seeds (Indoor or Direct Sowing)
You have two options here: starting your seeds indoors or directly sowing them in the ground. I personally prefer starting them indoors because it gives them a head start, especially if you live in a cooler climate.
Option 1: Starting Seeds Indoors
1. Soaking the Seeds: This is a crucial step to improve germination. Soak your bitter melon seeds in warm water for 24 hours. This helps soften the hard outer shell.
2. Preparing the Seed Starting Trays: Fill your seed starting trays or small pots with seed starting mix. Make sure the mix is moist but not soggy.
3. Planting the Seeds: Make a small hole (about 1/2 inch deep) in the center of each pot or cell. Place one seed in each hole and cover it gently with the seed starting mix.
4. Watering: Water the seeds gently using a watering can or spray bottle. Avoid overwatering, as this can lead to rot.
5. Creating a Humid Environment: Cover the trays with a clear plastic lid or plastic wrap to create a humid environment. This will help the seeds germinate.
6. Finding a Warm Spot: Place the trays in a warm location, ideally between 75-85°F (24-29°C). A heat mat can be helpful if you live in a colder area.
7. Waiting for Germination: Bitter melon seeds can take anywhere from 7 to 21 days to germinate. Be patient! Keep the soil moist and the environment humid.
8. Removing the Cover: Once the seedlings emerge, remove the plastic lid or wrap.
9. Providing Light: Place the seedlings under a grow light or in a sunny window. They need at least 6 hours of sunlight per day.
10. Watering Regularly: Water the seedlings regularly, but avoid overwatering. Let the soil dry out slightly between waterings.
Option 2: Direct Sowing
If you live in a warm climate with a long growing season, you can directly sow your bitter melon seeds in the ground.
1. Preparing the Soil: Choose a sunny location with well-drained soil. Amend the soil with compost or well-rotted manure to improve its fertility.
2. Soaking the Seeds: Just like with starting seeds indoors, soak your bitter melon seeds in warm water for 24 hours before planting.
3. Planting the Seeds: Sow the seeds about 1/2 inch deep and 12-18 inches apart.
4. Watering: Water the seeds gently but thoroughly.
5. Keeping the Soil Moist: Keep the soil moist until the seeds germinate.
6. Thinning Seedlings: Once the seedlings emerge, thin them to one plant per 12-18 inches.
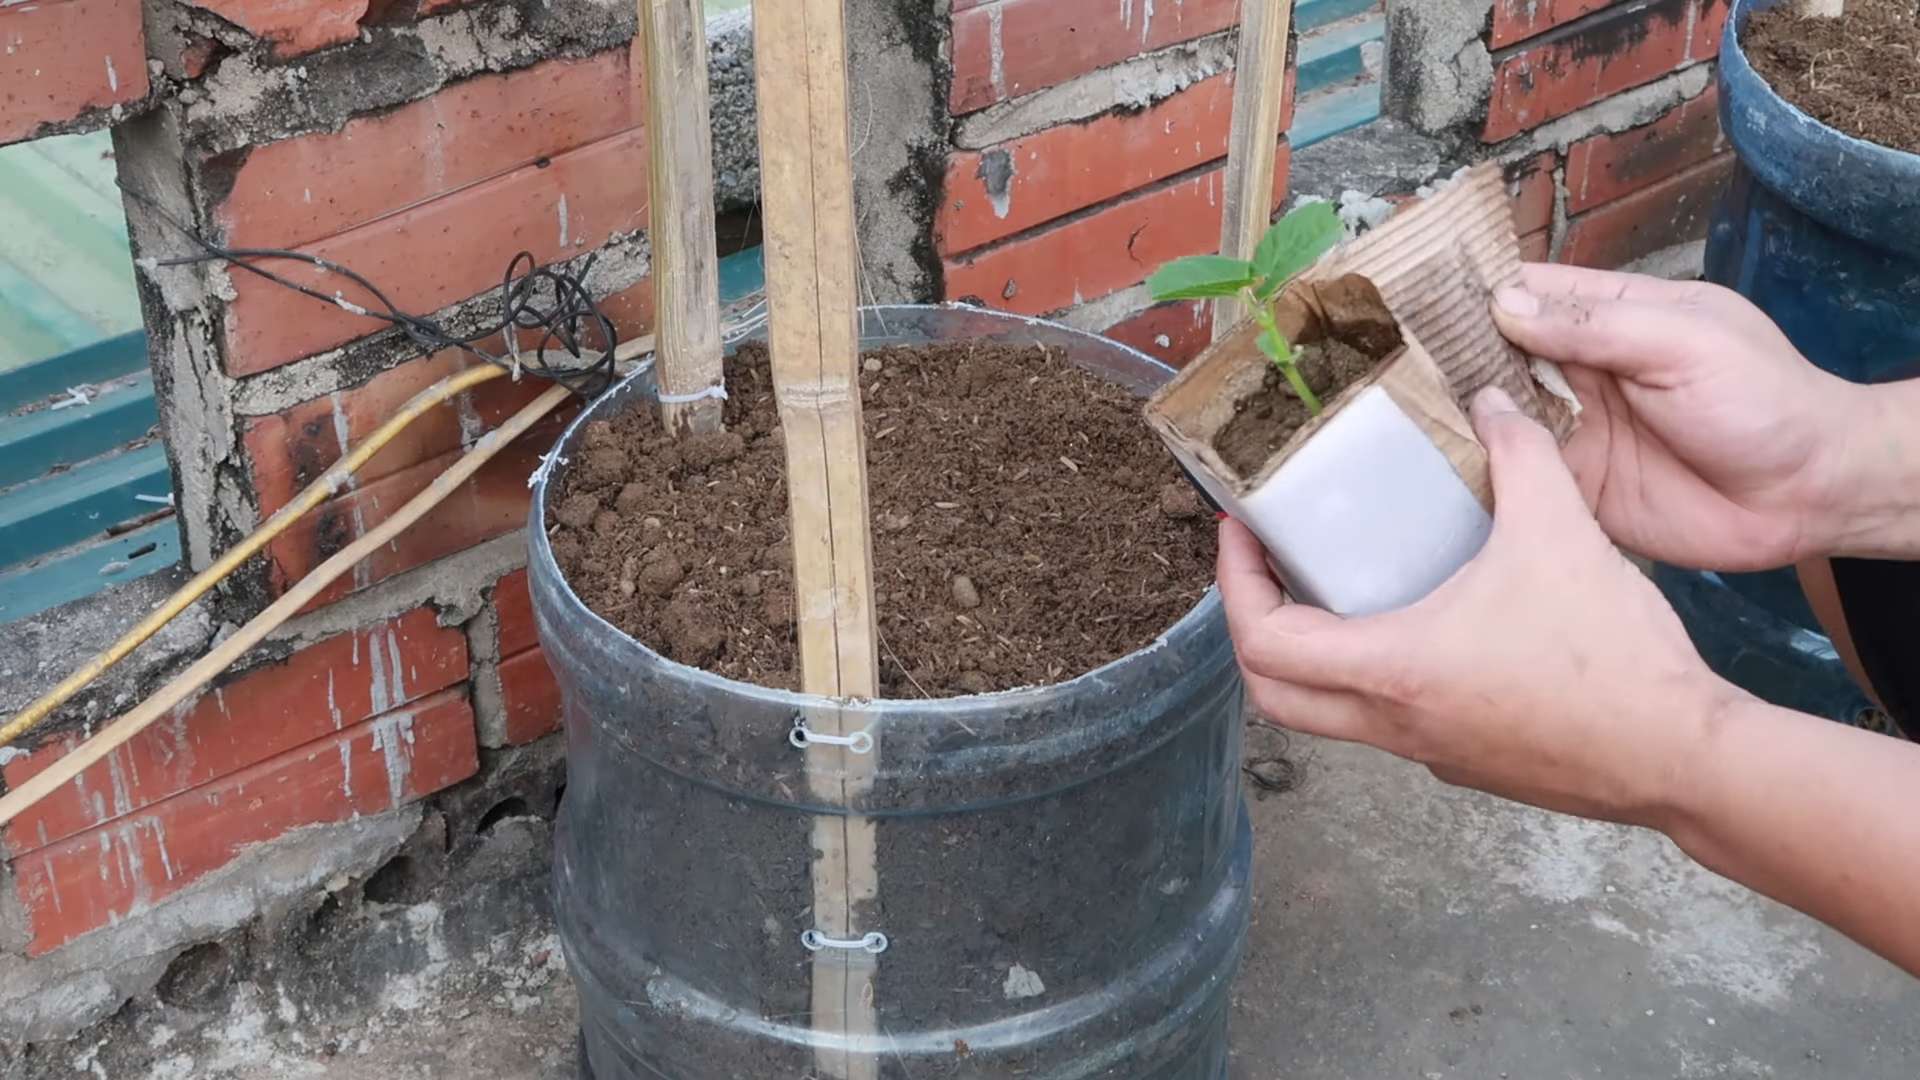
Phase 2: Transplanting Your Seedlings (If You Started Indoors)
Once your seedlings have developed a few sets of true leaves (the leaves that look like miniature versions of the adult leaves), they’re ready to be transplanted into larger pots or directly into the garden.
1. Hardening Off: Before transplanting, you need to harden off your seedlings. This means gradually exposing them to outdoor conditions over a period of 7-10 days. Start by placing them outside for an hour or two each day, gradually increasing the amount of time they spend outdoors. This will help them adjust to the sun, wind, and temperature changes.
2. Preparing the Planting Site: Choose a sunny location with well-drained soil. Amend the soil with compost or well-rotted manure.
3. Digging the Holes: Dig holes that are slightly larger than the root balls of your seedlings. Space the holes 12-18 inches apart.
4. Removing the Seedlings: Gently remove the seedlings from their pots or trays. Be careful not to damage the roots.
5. Planting the Seedlings: Place the seedlings in the holes and cover the roots with soil. Gently firm the soil around the base of the plants.
6. Watering: Water the seedlings thoroughly after transplanting.
7. Adding Mulch: Add a layer of mulch around the base of the plants to help retain moisture and suppress weeds.
Phase 3: Providing Support and Training the Vines
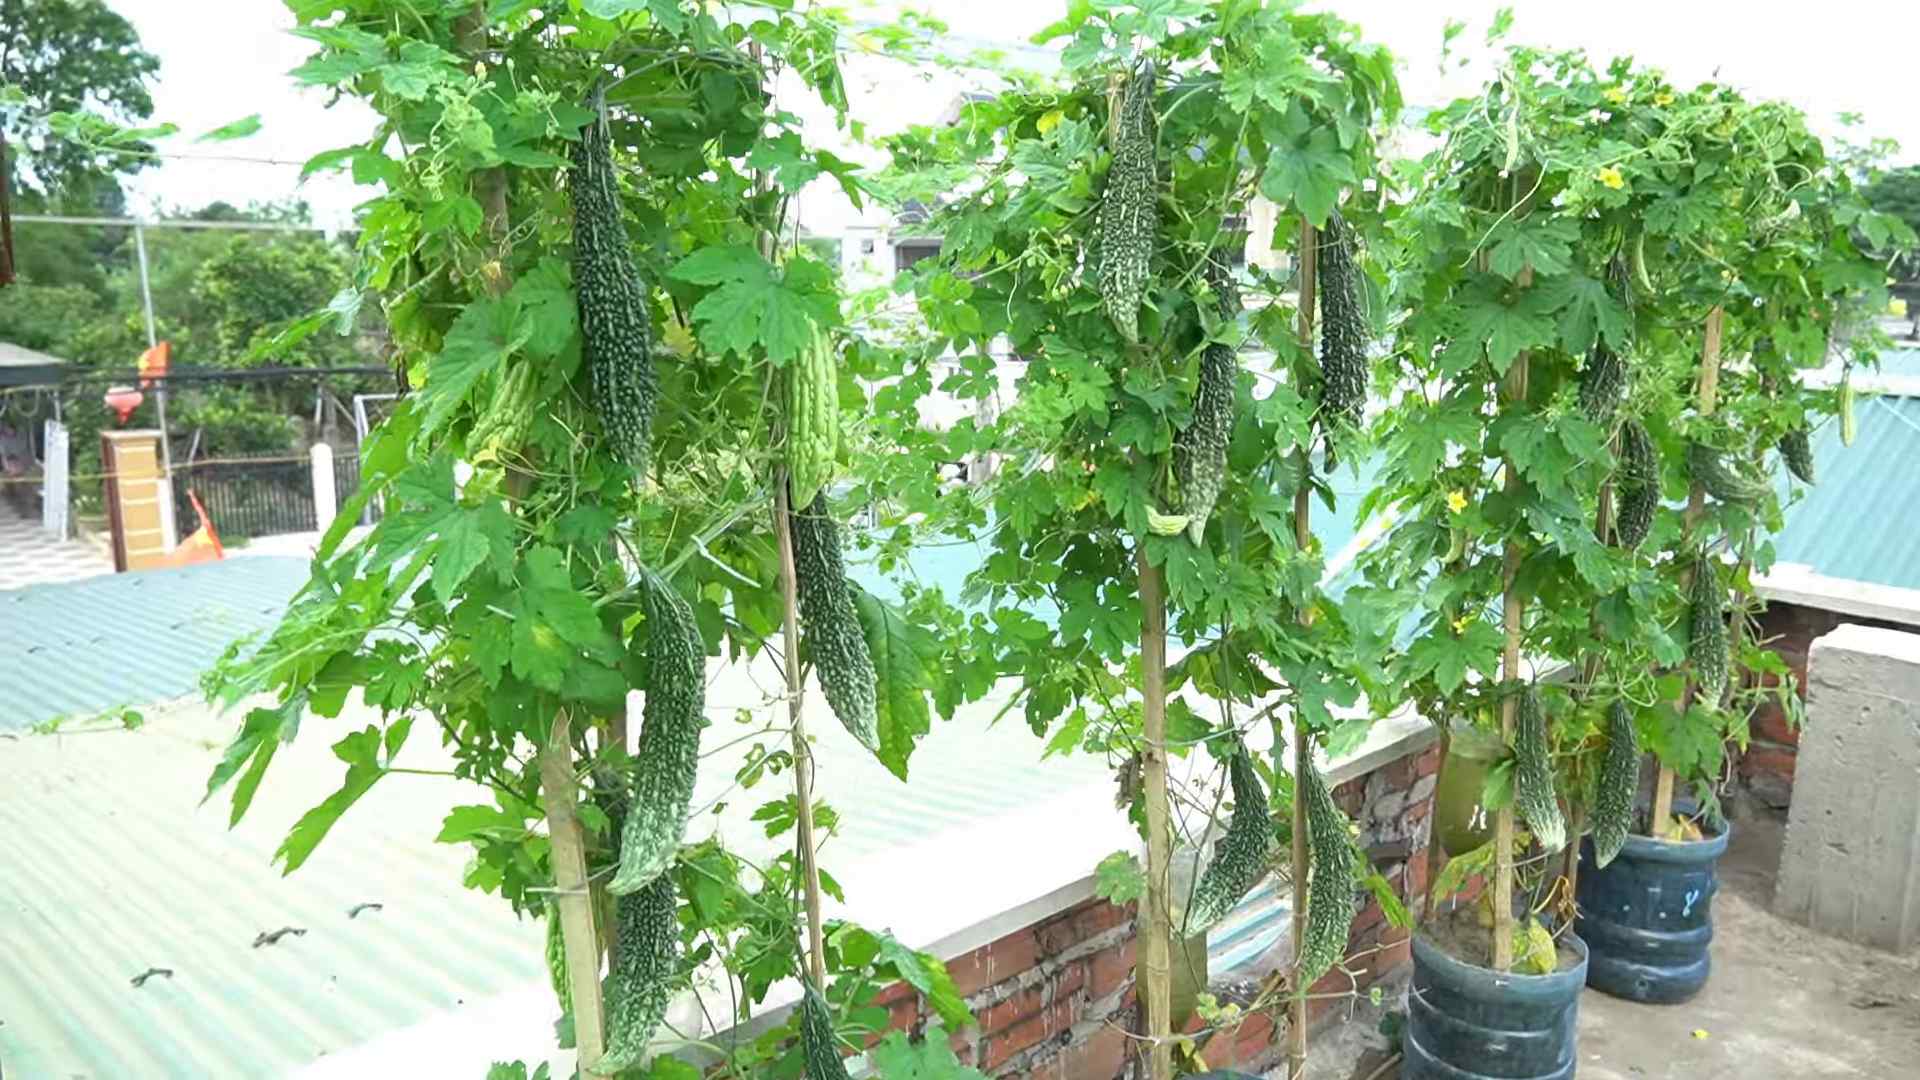
Bitter melon is a vine, so it needs a trellis or other support structure to climb on. This will help keep the fruits off the ground and improve air circulation.
1. Installing the Trellis: Install the trellis or support structure near the plants. Make sure it’s sturdy enough to support the weight of the vines and fruits. I’ve used everything from simple bamboo stakes to elaborate metal trellises.
2. Training the Vines: As the vines grow, gently guide them onto the trellis. You can use plant ties or twine to secure them to the support structure.
3. Pruning: Prune the vines regularly to encourage branching and fruit production. Remove any dead or yellowing leaves. I usually pinch off the growing tips to encourage side shoots.
Phase 4: Watering and Fertilizing
Proper watering and fertilization are essential for healthy growth and abundant fruit production.
1. Watering: Water your bitter melon plants regularly, especially during hot, dry weather. Aim to keep the soil consistently moist, but not soggy. Water deeply and less frequently, rather than shallowly and often.
2. Fertilizing: Fertilize your plants every 2-3 weeks with a balanced fertilizer. I prefer using an organic fertilizer, such as compost tea or fish emulsion. Follow the instructions on the fertilizer package.
Phase 5: Pest and Disease Control
Bitter melon can be susceptible to certain pests and diseases. Here’s how to deal with them:
* Common Pests: Aphids, spider mites, and squash bugs are common pests that can attack bitter melon plants. You can control them with insecticidal soap, neem oil, or by handpicking them off the plants.
* Common Diseases: Powdery mildew and downy mildew are common fungal diseases that can affect bitter melon plants. You can prevent them by providing good air circulation and avoiding overhead watering. If you see signs of these diseases, treat the plants with a fungicide.
Phase 6: Harvesting Your Bitter Melons
The moment you’ve been waiting for! Harvesting your own bitter melons is incredibly rewarding.
1. Knowing When to Harvest: Bitter melons are typically ready to harvest about 2-3 months after planting. The fruits should be firm and green, with a slightly waxy coating. They should also be about 6-8 inches long.
2. Harvesting: Use a sharp knife or pruning shears to cut the fruits from the vine. Be careful not to damage the vine.
3. Enjoying Your Harvest: Bitter melon can be eaten raw, cooked, or pickled. It has a distinctive bitter taste, which some people find appealing. You can reduce the bitterness by soaking the slices in salt water for 30 minutes before cooking. I love stir-frying it with eggs and garlic!
Conclusion
So, there you have it! Growing your own bitter melon might seem daunting at first, but with this simple DIY trick, you’re well on your way to harvesting a bounty of this nutritious and unique vegetable. We’ve walked you through the process, highlighting the key steps to ensure success, from seed preparation to providing the ideal growing environment.
But why is this DIY approach a must-try? Beyond the satisfaction of nurturing a plant from seed to fruit, growing your own bitter melon allows you to control the entire process. You can choose organic methods, avoiding harmful pesticides and ensuring the freshest, most flavorful produce possible. Store-bought bitter melon can sometimes be expensive and difficult to find, especially if you’re looking for specific varieties. By growing your own, you have access to a consistent supply, ready to be incorporated into your favorite dishes.
Furthermore, this method encourages experimentation! Feel free to explore different trellising systems to maximize space and sunlight exposure. Consider companion planting with herbs like basil or marigolds to deter pests naturally. You can even try different soil amendments to see what works best for your specific growing conditions.
Variations to consider:
* Vertical Gardening: If you’re short on space, consider growing your bitter melon vertically on a trellis or fence. This not only saves space but also improves air circulation around the plant, reducing the risk of fungal diseases.
* Container Gardening: Bitter melon can also be grown in containers, making it ideal for balconies or patios. Choose a large container with good drainage and use a well-draining potting mix.
* Grafting: For more advanced gardeners, grafting bitter melon onto a more vigorous rootstock can improve disease resistance and yield.
* Different Varieties: Experiment with different varieties of bitter melon to find the ones that best suit your taste and growing conditions. Some varieties are more bitter than others, while some are more productive.
We’ve focused on a specific technique to boost your chances of success, but remember that gardening is a journey of learning and adaptation. Don’t be afraid to experiment and adjust your approach based on your own observations and experiences.
Ultimately, the goal is to enjoy the process and reap the rewards of your hard work. Imagine the satisfaction of serving a delicious bitter melon stir-fry, knowing that you grew the main ingredient yourself!
We are confident that with a little effort and the right guidance, you can successfully grow bitter melon in your own backyard or even on your balcony. So, grab your seeds, prepare your soil, and get ready to embark on this rewarding gardening adventure.
We’re eager to hear about your experiences! Share your photos, tips, and challenges in the comments below. Let’s create a community of bitter melon enthusiasts and learn from each other. Happy gardening!
Frequently Asked Questions (FAQ)
What is the best time to plant bitter melon?
The ideal time to plant bitter melon is during the late spring or early summer, after the last frost has passed and the soil has warmed up to at least 65°F (18°C). Bitter melon thrives in warm weather and requires a long growing season of at least 90-120 days. If you live in a region with a shorter growing season, you can start the seeds indoors 4-6 weeks before the last expected frost and transplant them outdoors once the weather warms up.
How much sunlight does bitter melon need?
Bitter melon requires at least 6-8 hours of direct sunlight per day to thrive. Choose a location in your garden that receives plenty of sunlight throughout the day. If you’re growing bitter melon in containers, make sure to place them in a sunny spot. Insufficient sunlight can lead to poor growth, reduced flowering, and smaller fruit.
What kind of soil is best for growing bitter melon?
Bitter melon prefers well-draining, fertile soil with a pH between 6.0 and 7.0. Amend your soil with compost or other organic matter to improve drainage and fertility. Avoid heavy clay soils, as they can become waterlogged and hinder root growth. If you’re growing bitter melon in containers, use a high-quality potting mix that is specifically formulated for vegetables.
How often should I water bitter melon?
Water bitter melon regularly, especially during hot, dry weather. Keep the soil consistently moist, but avoid overwatering, which can lead to root rot. Water deeply and less frequently, rather than shallowly and more often. Check the soil moisture regularly by sticking your finger into the soil. If the top inch of soil feels dry, it’s time to water. During fruiting, ensure consistent watering to prevent the fruits from becoming bitter or misshapen.
How do I fertilize bitter melon?
Bitter melon is a heavy feeder and benefits from regular fertilization. Apply a balanced fertilizer (e.g., 10-10-10) every 2-3 weeks during the growing season. You can also use organic fertilizers, such as compost tea or fish emulsion. Avoid over-fertilizing, as this can lead to excessive foliage growth and reduced fruit production. Side-dress the plants with compost or well-rotted manure to provide a slow-release source of nutrients.
How do I control pests and diseases on bitter melon?
Bitter melon can be susceptible to various pests and diseases, including aphids, spider mites, squash bugs, and powdery mildew. Inspect your plants regularly for signs of pests or diseases. Use organic pest control methods, such as insecticidal soap or neem oil, to control pests. Ensure good air circulation around the plants to prevent fungal diseases. Remove any infected leaves or fruits promptly to prevent the spread of disease. Consider using companion planting to deter pests naturally.
When is bitter melon ready to harvest?
Bitter melon is typically ready to harvest 8-12 weeks after planting, depending on the variety and growing conditions. The fruits are usually harvested when they are still green and slightly immature. Overripe bitter melon will turn yellow or orange and become more bitter. Harvest the fruits by cutting them from the vine with a sharp knife or pruning shears. Handle the fruits carefully to avoid bruising.
How do I reduce the bitterness of bitter melon?
Bitter melon is known for its distinctive bitter taste, but there are several ways to reduce the bitterness. Before cooking, you can soak the sliced bitter melon in salted water for 30 minutes to an hour. This helps to draw out some of the bitter compounds. You can also blanch the bitter melon in boiling water for a few minutes before cooking. Another technique is to remove the white pith and seeds from the center of the fruit, as this is where most of the bitterness is concentrated. Cooking bitter melon with acidic ingredients, such as vinegar or lemon juice, can also help to balance the bitterness.
Can I save seeds from my bitter melon plants?
Yes, you can save seeds from your bitter melon plants, but keep in mind that the resulting plants may not be true to type if the parent plants were cross-pollinated with other varieties. To save seeds, allow the fruits to fully ripen on the vine until they turn yellow or orange. Remove the seeds from the fruit and wash them thoroughly. Spread the seeds out on a paper towel to dry completely. Store the dried seeds in an airtight container in a cool, dry place.
Is bitter melon good for my health?
Yes, bitter melon is a highly nutritious vegetable with numerous health benefits. It is rich in vitamins, minerals, and antioxidants. Bitter melon has been shown to help regulate blood sugar levels, making it beneficial for people with diabetes. It also has anti-inflammatory and anti-cancer properties. Incorporating bitter melon into your diet can contribute to overall health and well-being.


Leave a Comment