

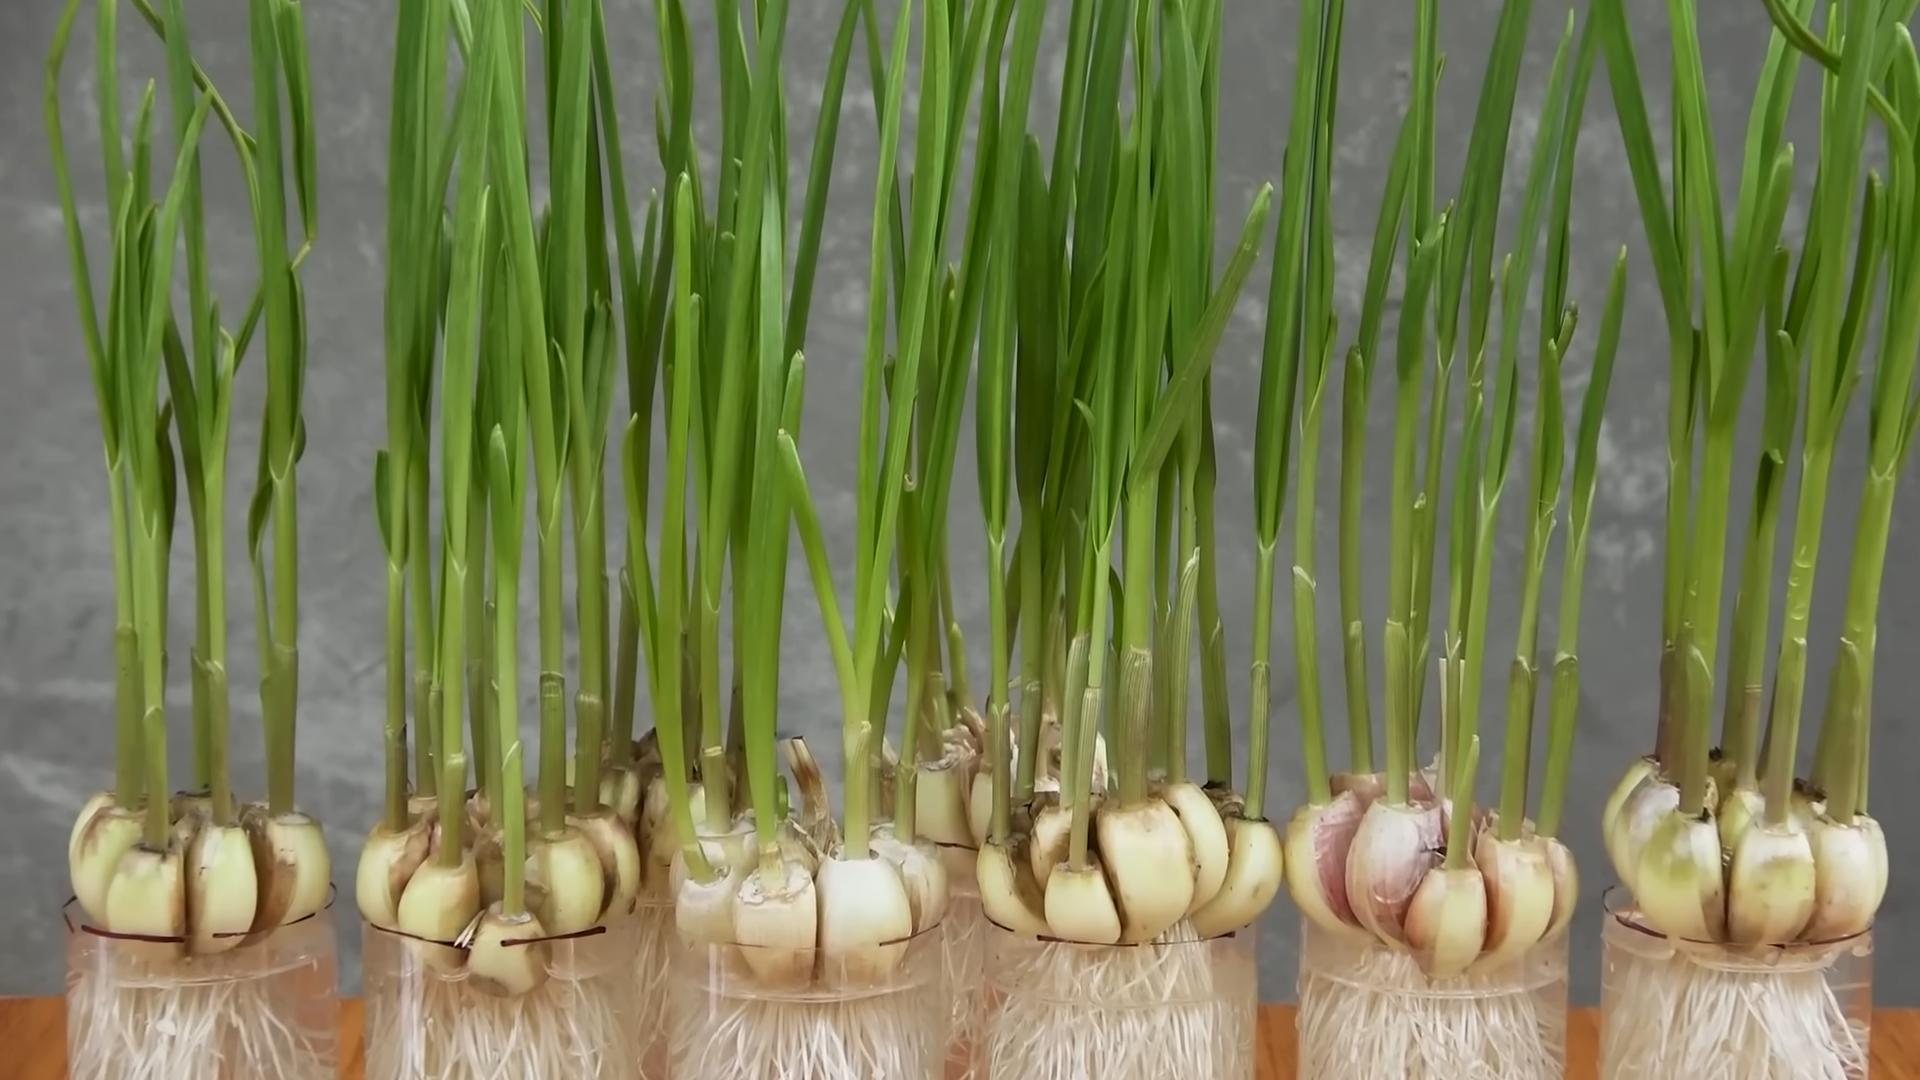
Grow Garlic in Plastic Bottles: Imagine harvesting plump, flavorful garlic cloves right from your windowsill, all thanks to repurposed plastic bottles! Sounds too good to be true? Well, get ready to be amazed because this DIY gardening trick is not only incredibly easy but also a fantastic way to recycle and enjoy fresh, homegrown goodness.
Garlic, a culinary staple with roots stretching back thousands of years, has been cultivated for its medicinal and flavorful properties across various cultures. From ancient Egypt, where it fueled the pyramid builders, to modern kitchens worldwide, garlic remains a beloved ingredient. But what if I told you that you don’t need a sprawling garden to enjoy the taste of freshly grown garlic?
In today’s world, where space is a premium and sustainability is key, finding innovative ways to garden is more important than ever. Many of us crave the taste of homegrown produce but lack the space or resources for a traditional garden. That’s where this ingenious DIY hack comes in. Learning how to grow garlic in plastic bottles allows you to bypass the limitations of space and soil quality, bringing the joy of gardening right into your home. Plus, it’s a fantastic way to reduce plastic waste and contribute to a greener lifestyle. So, let’s dive in and discover how you can transform those empty plastic bottles into thriving garlic gardens!
Grow Garlic Indoors: A Simple DIY Bottle Garden
Hey there, fellow gardening enthusiasts! Ever thought about growing your own garlic indoors? It’s easier than you think, and a fantastic way to have fresh garlic greens (and eventually bulbs!) right at your fingertips. Plus, it’s a great way to recycle those plastic bottles piling up. I’m going to walk you through a super simple method using plastic bottles. Let’s get started!
What You’ll Need
Before we dive in, let’s gather our supplies. This is a pretty low-cost project, which is always a win in my book!
* **Plastic Bottles:** You’ll need at least two plastic bottles per garlic plant. I recommend using 2-liter bottles, but any size will work as long as they’re big enough to hold soil and allow for root growth. Clear or translucent bottles are best so you can monitor the soil moisture.
* **Garlic Cloves:** Choose organic garlic cloves from your local grocery store or farmer’s market. Organic is important to avoid any chemical treatments that might hinder growth. Look for plump, healthy cloves.
* **Potting Soil:** A good quality potting mix is essential for providing the nutrients your garlic needs. Avoid using garden soil, as it can be too dense and may contain pests or diseases.
* **Gravel or Pebbles:** These are for drainage. We want to keep the soil moist, not waterlogged.
* **Scissors or a Utility Knife:** For cutting the plastic bottles. Be careful!
* **Water:** For watering your garlic.
* **Spray Bottle (Optional):** For misting the garlic greens.
* **Gloves (Optional):** To keep your hands clean.
* **Marker (Optional):** For labeling your bottles.
Preparing the Bottles: Creating Your Vertical Garden
This is where we transform those plastic bottles into mini-gardens. It’s a bit like crafting, but with a delicious reward at the end!
1. **Clean the Bottles:** Thoroughly wash the plastic bottles with soap and water to remove any residue. Rinse them well and let them dry completely. This helps prevent mold and bacteria growth.
2. **Cut the Bottles:** This is the trickiest part, so take your time and be careful. You’ll need to cut each bottle into two sections.
* **Bottle 1 (Top Section):** Cut the bottle about 2/3 of the way down from the top. You want to create a funnel-shaped piece that will sit inside the bottom section. Keep the cap on this section.
* **Bottle 2 (Bottom Section):** Cut the bottle about 1/3 of the way down from the bottom. This will be the base of your planter.
3. **Drill Drainage Holes (Important!):** In the bottom section of *both* bottles, drill or poke several drainage holes. This is crucial to prevent water from pooling at the bottom and rotting the garlic roots. I usually aim for about 5-6 holes, evenly spaced.
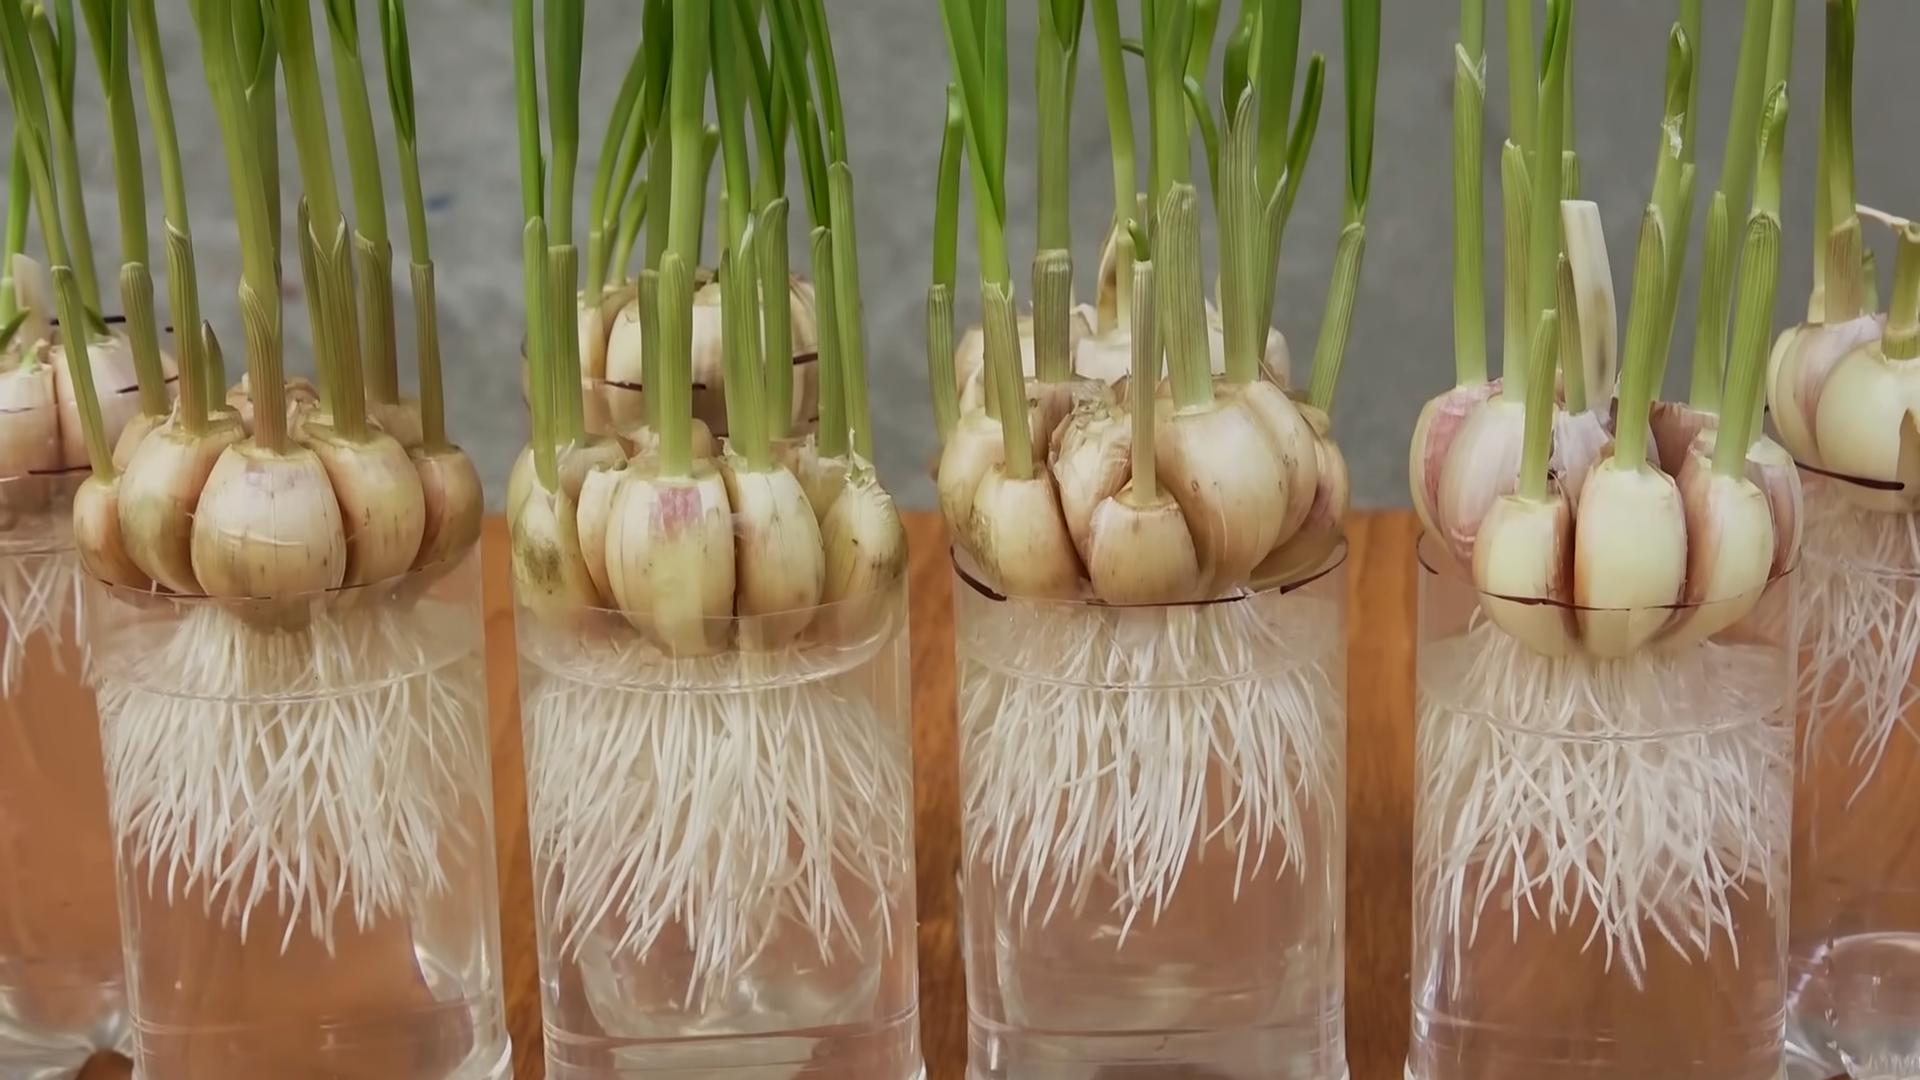
4. **Assemble the Planter:** Now, invert the top section (the funnel-shaped piece) and place it inside the bottom section. The bottle cap should be pointing downwards. This creates a self-watering system.
Planting the Garlic: Giving Life to Your Garden
Now for the fun part – planting the garlic! This is where we get our hands dirty and start the growing process.
1. **Add Drainage Layer:** Pour a layer of gravel or pebbles into the bottom of the bottom section of the bottle. This will help with drainage and prevent the soil from becoming waterlogged. About an inch or two is sufficient.
2. **Fill with Soil:** Fill the inverted top section (the funnel) with potting soil. Leave about an inch of space at the top. Gently pat down the soil to remove any air pockets.
3. Prepare the Garlic Cloves: Gently separate the cloves from the garlic bulb. Leave the papery skin on each clove intact. This protects the clove and helps prevent it from drying out.
4. **Plant the Cloves:** Make a small hole in the soil, about 1-2 inches deep. Place the garlic clove in the hole, pointy end facing upwards. Cover the clove with soil and gently pat it down. Space the cloves about 2-3 inches apart if you’re planting multiple cloves in one bottle.
5. **Water Thoroughly:** Water the soil thoroughly until water drains out of the drainage holes in the bottom section. This ensures that the soil is evenly moist.
Caring for Your Garlic: Nurturing Your Indoor Garden
Growing garlic indoors is relatively low-maintenance, but there are a few key things to keep in mind to ensure success.
1. **Location, Location, Location:** Place your garlic bottle garden in a sunny location. A south-facing window is ideal, as it will provide the most sunlight. Garlic needs at least 6 hours of sunlight per day to thrive. If you don’t have enough natural light, you can supplement with a grow light.
2. **Watering:** Water your garlic when the top inch of soil feels dry to the touch. Avoid overwatering, as this can lead to root rot. The self-watering system in the bottle will help maintain consistent moisture levels. Check the bottom section of the bottle – if there’s standing water, you’re overwatering.
3. **Fertilizing:** Garlic is a heavy feeder, so it benefits from regular fertilization. Use a balanced liquid fertilizer, diluted to half strength, every 2-3 weeks. Follow the instructions on the fertilizer packaging.
4. **Misting:** Misting the garlic greens with water every few days can help keep them healthy and prevent them from drying out. This is especially important in dry indoor environments.
5. **Pest Control:** Keep an eye out for pests, such as aphids or spider mites. If you notice any pests, treat them with an insecticidal soap or neem oil.
6. **Rotating:** Rotate the bottles every few days to ensure that all sides of the garlic receive equal sunlight. This will help prevent the plants from leaning towards the light source.
Harvesting: Enjoying the Fruits (or Bulbs!) of Your Labor
There are two ways to harvest your garlic: for the greens or for the bulbs.
* **Harvesting Garlic Greens:** You can start harvesting garlic greens as soon as they are a few inches tall. Simply snip off the greens with scissors, leaving about an inch of growth. The plant will continue to produce new greens. Garlic greens have a mild garlic flavor and can be used in salads, soups, and other dishes.
* **Harvesting Garlic Bulbs:** If you want to harvest garlic bulbs, you’ll need to wait about 8-9 months after planting. The leaves will start to turn yellow and brown when the bulbs are ready to harvest. Gently dig up the bulbs and let them dry in a well-ventilated area for a few weeks. Once the bulbs are dry, you can store them in a cool, dry place.
Troubleshooting: Addressing Common Issues
Even with the best care, you might encounter a few challenges along the way. Here are some common issues and how to address them:
* **Yellowing Leaves:** This can be caused by overwatering, underwatering, or nutrient deficiencies. Check the soil moisture and adjust your watering schedule accordingly. If the soil is dry, water thoroughly. If the soil is soggy, allow it to dry out before watering again. Fertilize with a balanced liquid fertilizer to address any nutrient deficiencies.
* **Slow Growth:** This can be caused by insufficient sunlight, poor soil, or pests. Make sure your garlic is getting at least 6 hours of sunlight per day. Use a good quality potting mix and fertilize regularly. Check for pests and treat them accordingly.
* **Root Rot:** This is caused by overwatering and poor drainage. Make sure your bottles have adequate drainage holes. Allow the soil to dry out between waterings. If root rot is severe, you may need to repot the garlic in fresh soil.
* **Pests:** Aphids, spider mites, and other pests can attack garlic. Treat them with an insecticidal soap or neem oil.
Extra Tips and Tricks
* **Label Your Bottles:** Use a marker to label your bottles with the date you planted the garlic. This will help you keep track of when to harvest.
* **Experiment with Different Varieties:** Try growing different varieties of garlic to see which ones you like best.
* **Succession Planting:** Plant new garlic cloves every few weeks to ensure a continuous supply of fresh garlic greens.
* **Get Creative with Decoration:** Decorate your plastic bottles with paint, stickers, or other materials to make them more visually appealing.
* Recycle the Soil: Once you’ve harvested your garlic, you can recycle the soil by adding it to your compost pile or using it to amend your garden soil.
Growing garlic indoors in plastic bottles is a fun, easy, and rewarding project. With a little bit of care and attention, you can enjoy fresh garlic greens and bulbs all year round. Happy gardening!
Conclusion
So, there you have it! Growing garlic in plastic bottles is not just a quirky gardening experiment; it’s a genuinely effective and rewarding way to cultivate your own fresh, flavorful garlic, even if you’re short on space or live in an apartment. We’ve walked you through the simple steps, highlighting the benefits of this method – from its space-saving efficiency to its environmentally friendly repurposing of plastic waste.
But why is this DIY trick a must-try? Because it empowers you to take control of your food source, offering a connection to the earth and the satisfaction of nurturing something from seed (or clove!) to harvest. Imagine the pride you’ll feel when you use your homegrown garlic in your favorite dishes, knowing you cultivated it yourself, right in your own home. The flavor of freshly grown garlic is simply unparalleled, far surpassing anything you can find in a grocery store. Plus, you’ll be reducing your carbon footprint by minimizing transportation and packaging waste.
Beyond the basic method, there’s plenty of room for experimentation. Try different varieties of garlic to discover your favorite flavor profiles. Elephant garlic, with its milder taste and enormous cloves, could be an interesting option. You could also experiment with different soil mixes to see what yields the best results in your specific climate and conditions. Consider adding a layer of mulch on top of the soil to help retain moisture and suppress weeds. And don’t be afraid to get creative with your bottle design! Paint them, decorate them, or even create a vertical garden by stacking multiple bottles.
This method is particularly beneficial for those who live in colder climates. The plastic bottles can provide a degree of insulation, protecting the garlic from harsh winter temperatures. You can also easily move the bottles indoors during extreme weather events.
We understand that gardening can sometimes seem daunting, but growing garlic in plastic bottles is surprisingly easy and forgiving. It’s a perfect project for beginners and experienced gardeners alike. The key is to provide adequate drainage, sunlight, and consistent watering. With a little patience and care, you’ll be rewarded with a bountiful harvest of delicious, homegrown garlic.
So, what are you waiting for? Gather your plastic bottles, grab some garlic cloves, and embark on this exciting gardening adventure. We’re confident that you’ll be amazed by the results. And most importantly, we want to hear about your experience! Share your photos, tips, and challenges in the comments below. Let’s create a community of bottle-grown garlic enthusiasts and inspire others to embrace this sustainable and rewarding gardening technique. Let us know what kind of garlic you grew and how it tasted! We are excited to see your results!
Frequently Asked Questions (FAQ)
What kind of plastic bottles are best for growing garlic?
Ideally, you want to use sturdy, food-grade plastic bottles. Two-liter soda bottles or larger water bottles work well. Avoid using bottles that have contained harsh chemicals or pesticides, as these could contaminate your soil and garlic. Make sure to thoroughly clean the bottles before using them. Clear or translucent bottles are preferable as they allow you to monitor the soil moisture levels. Darker bottles can also be used, but you’ll need to be more diligent about checking the soil.
How many garlic cloves can I plant in one bottle?
The number of cloves you can plant depends on the size of the bottle. For a standard two-liter bottle, you can typically plant 3-4 cloves, spacing them evenly around the bottle. Make sure to leave enough room for the garlic to grow and develop bulbs. Overcrowding can lead to smaller bulbs and increased risk of disease. If you’re using larger bottles, you can plant more cloves accordingly.
What kind of soil should I use for growing garlic in plastic bottles?
A well-draining potting mix is essential for growing garlic in plastic bottles. You can use a commercially available potting mix or create your own by combining equal parts of garden soil, compost, and perlite or vermiculite. The compost will provide nutrients, while the perlite or vermiculite will improve drainage and aeration. Avoid using heavy clay soil, as it can become waterlogged and suffocate the garlic roots.
How often should I water my garlic plants in plastic bottles?
Water your garlic plants regularly, keeping the soil consistently moist but not waterlogged. The frequency of watering will depend on the weather conditions and the type of soil you’re using. In general, water deeply when the top inch of soil feels dry to the touch. Avoid overwatering, as this can lead to root rot. Make sure the bottles have adequate drainage holes to prevent water from accumulating at the bottom.
How much sunlight do garlic plants need?
Garlic plants need at least 6-8 hours of direct sunlight per day to thrive. Place your plastic bottles in a sunny location, such as a south-facing window or balcony. If you don’t have enough natural sunlight, you can supplement with grow lights. Rotate the bottles regularly to ensure that all sides of the plants receive adequate sunlight.
When is the best time to plant garlic in plastic bottles?
The best time to plant garlic in plastic bottles is in the fall, about 4-6 weeks before the first frost. This allows the garlic cloves to develop roots before winter sets in. In warmer climates, you can plant garlic in the late fall or early winter. The key is to provide a period of cold stratification, which is essential for bulb development.
How long does it take for garlic to grow in plastic bottles?
Garlic typically takes about 8-9 months to mature. You can expect to harvest your garlic in the late spring or early summer, when the leaves start to turn yellow and brown. To check if the bulbs are ready, carefully dig up one plant and examine the bulb. If the bulb is large and well-formed, it’s time to harvest the rest of your garlic.
Can I grow garlic indoors in plastic bottles?
Yes, you can grow garlic indoors in plastic bottles, but you’ll need to provide adequate sunlight or use grow lights. Indoor-grown garlic may not produce bulbs as large as those grown outdoors, but you can still harvest the green shoots for use in cooking. Make sure to provide good ventilation and avoid overwatering.
What are some common problems when growing garlic in plastic bottles?
Some common problems when growing garlic in plastic bottles include root rot, pests, and nutrient deficiencies. Root rot can be prevented by using well-draining soil and avoiding overwatering. Pests, such as aphids and spider mites, can be controlled with insecticidal soap or neem oil. Nutrient deficiencies can be addressed by fertilizing with a balanced fertilizer.
How do I harvest and store garlic grown in plastic bottles?
To harvest garlic, carefully dig up the plants and gently shake off the soil. Allow the bulbs to cure in a dry, well-ventilated place for 2-3 weeks. Once the bulbs are cured, you can store them in a cool, dark place for several months. You can also braid the garlic leaves together and hang them for storage.
Leave a Comment