

Grow Pea Shoots Easily and unlock a world of fresh, vibrant flavor right in your own home! Have you ever wondered how to bring the taste of spring to your table, even in the dead of winter? Well, I’m here to tell you it’s easier than you think! For centuries, cultures around the globe have cherished the delicate sweetness of pea shoots, using them in everything from stir-fries to salads. In some Asian cuisines, they’re even considered a symbol of prosperity and new beginnings.
But you don’t need a sprawling garden or a green thumb to enjoy these nutritional powerhouses. In fact, grow pea shoots easily with my simple DIY guide, and you’ll be harvesting your own delicious greens in just a matter of weeks! Imagine adding a burst of freshness to your next sandwich, or impressing your friends with a gourmet salad featuring your very own homegrown pea shoots.
In today’s busy world, finding healthy and affordable food options can be a challenge. That’s why I’m so excited to share this easy and rewarding project with you. Not only will you save money on groceries, but you’ll also have the satisfaction of knowing exactly where your food comes from. So, ditch the expensive store-bought greens and let’s get started on this fun and flavorful adventure!
Grow Pea Shoots Easily: A Beginner’s Guide
Hey there, fellow plant enthusiasts! Ever wanted to grow something super easy, nutritious, and delicious right in your kitchen? Well, look no further than pea shoots! They’re incredibly simple to cultivate, require minimal space, and are ready to harvest in just a week or two. Plus, they add a fresh, vibrant flavor to salads, stir-fries, and sandwiches. I’m going to walk you through the whole process, step-by-step, so you can enjoy your own homegrown pea shoots in no time.
What You’ll Need
Before we dive in, let’s gather our supplies. The beauty of this project is that you probably already have most of these things lying around!
* Pea Seeds: This is the most important ingredient! You’ll want to use dried peas specifically meant for sprouting or gardening. Avoid using split peas, as they won’t sprout. I personally love using “Dun” peas, but any variety of garden pea will work. You can find these at most garden centers or online.
* Growing Tray or Container: You can use almost anything for this! A shallow plastic tray, a repurposed takeout container, or even a baking dish will work perfectly. Just make sure it has drainage holes or you’re prepared to be very careful with watering.
* Growing Medium: I prefer using coconut coir, but you can also use potting soil, seed starting mix, or even just paper towels. Coconut coir is great because it’s lightweight, holds moisture well, and is sustainable.
* Water: Good old H2O! A spray bottle is helpful for keeping the pea shoots moist.
* Weight (Optional): A small plate or another tray that fits inside your growing container. This helps the pea shoots establish strong roots.
* Dark Place: A cabinet, closet, or even just covering the tray with a towel will do. This is important for the initial sprouting phase.
* Scissors or Shears: For harvesting your delicious pea shoots!
Step-by-Step Instructions
Okay, let’s get our hands dirty (or, well, maybe just a little damp)!
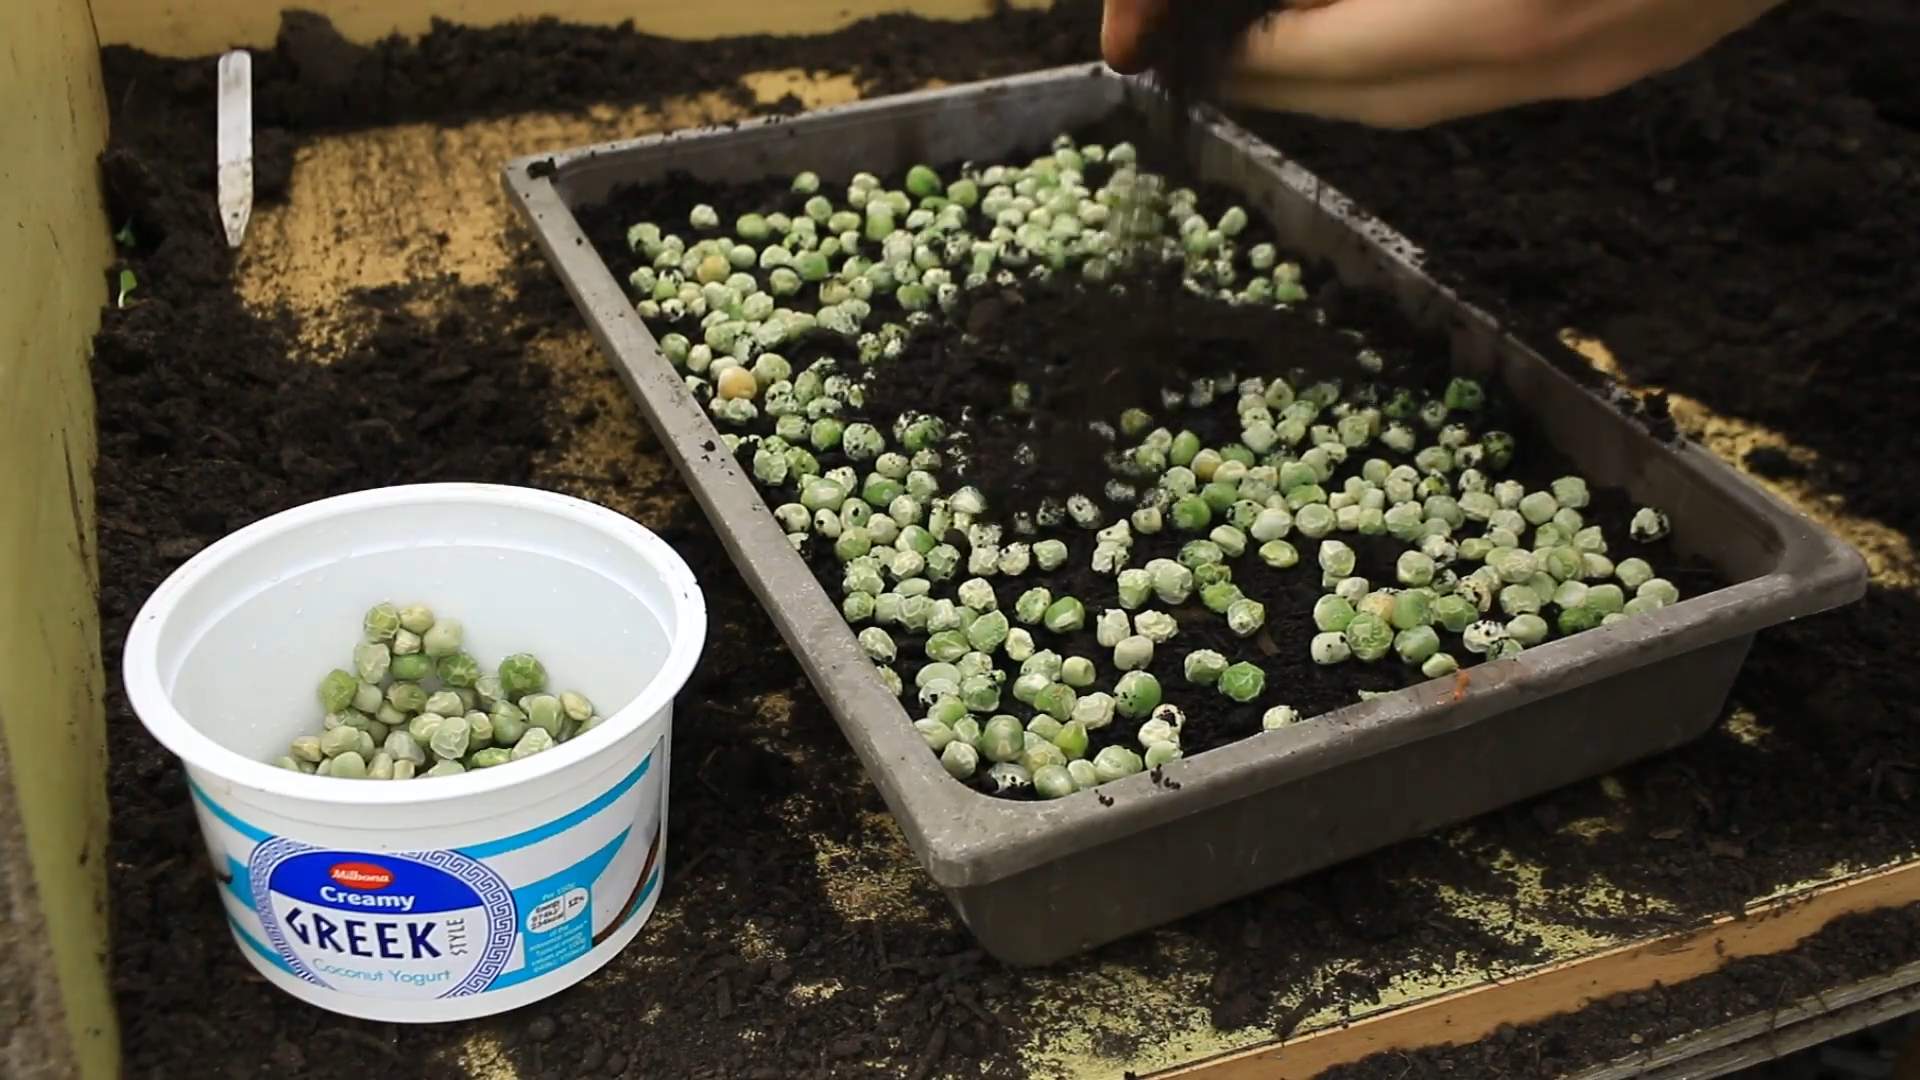
1. Soak the Pea Seeds: This is a crucial step to kickstart the germination process. Place your pea seeds in a bowl and cover them with plenty of water. Let them soak for 8-12 hours, or even overnight. You’ll notice they’ll plump up considerably as they absorb the water. This softens the seed coat and makes it easier for the sprouts to emerge.
2. Prepare Your Growing Container: Now, let’s get our growing container ready. If your container doesn’t have drainage holes, you’ll need to be extra careful not to overwater. Fill your container with your chosen growing medium. If you’re using coconut coir, you’ll want to moisten it first. It should be damp, but not soggy. Spread the coir evenly across the bottom of the container, about 1-2 inches deep. If you’re using soil, gently pat it down to create a level surface.
3. Sow the Pea Seeds: Drain the soaked pea seeds and spread them evenly over the surface of the growing medium. You want a fairly dense layer of seeds, but not so crowded that they’re overlapping significantly. Think of it like a green carpet in the making!
4. Cover the Seeds: Gently press the seeds into the growing medium. You don’t need to bury them completely, just make sure they’re making good contact with the moist coir or soil. Then, lightly cover the seeds with a thin layer of the growing medium. This helps to keep them moist and in the dark, which promotes germination.
5. Weighting (Optional but Recommended): This step is optional, but I highly recommend it. Place a small plate or another tray that fits inside your growing container on top of the seeds. This gentle pressure helps the pea shoots develop stronger roots, which will result in healthier and more productive plants.
6. Darkness is Key: Now, place your growing container in a dark place. A cabinet, closet, or even just covering the tray with a towel will work perfectly. The darkness encourages the seeds to focus on root development.
7. Watering: Keep the growing medium consistently moist, but not soggy. Use a spray bottle to gently mist the surface of the soil or coir every day. You want to keep the seeds and sprouts hydrated, but avoid overwatering, which can lead to mold or rot.
The Sprouting Phase
This is where the magic happens!
1. Check Daily: After a few days (usually 2-3), you should start to see the pea seeds sprouting. Tiny white roots will emerge, followed by small green shoots.
2. Continue Watering: Keep the growing medium moist by misting it daily.
3. Remove the Weight (If Used): Once the pea shoots have sprouted and are starting to lift the weight, remove it.
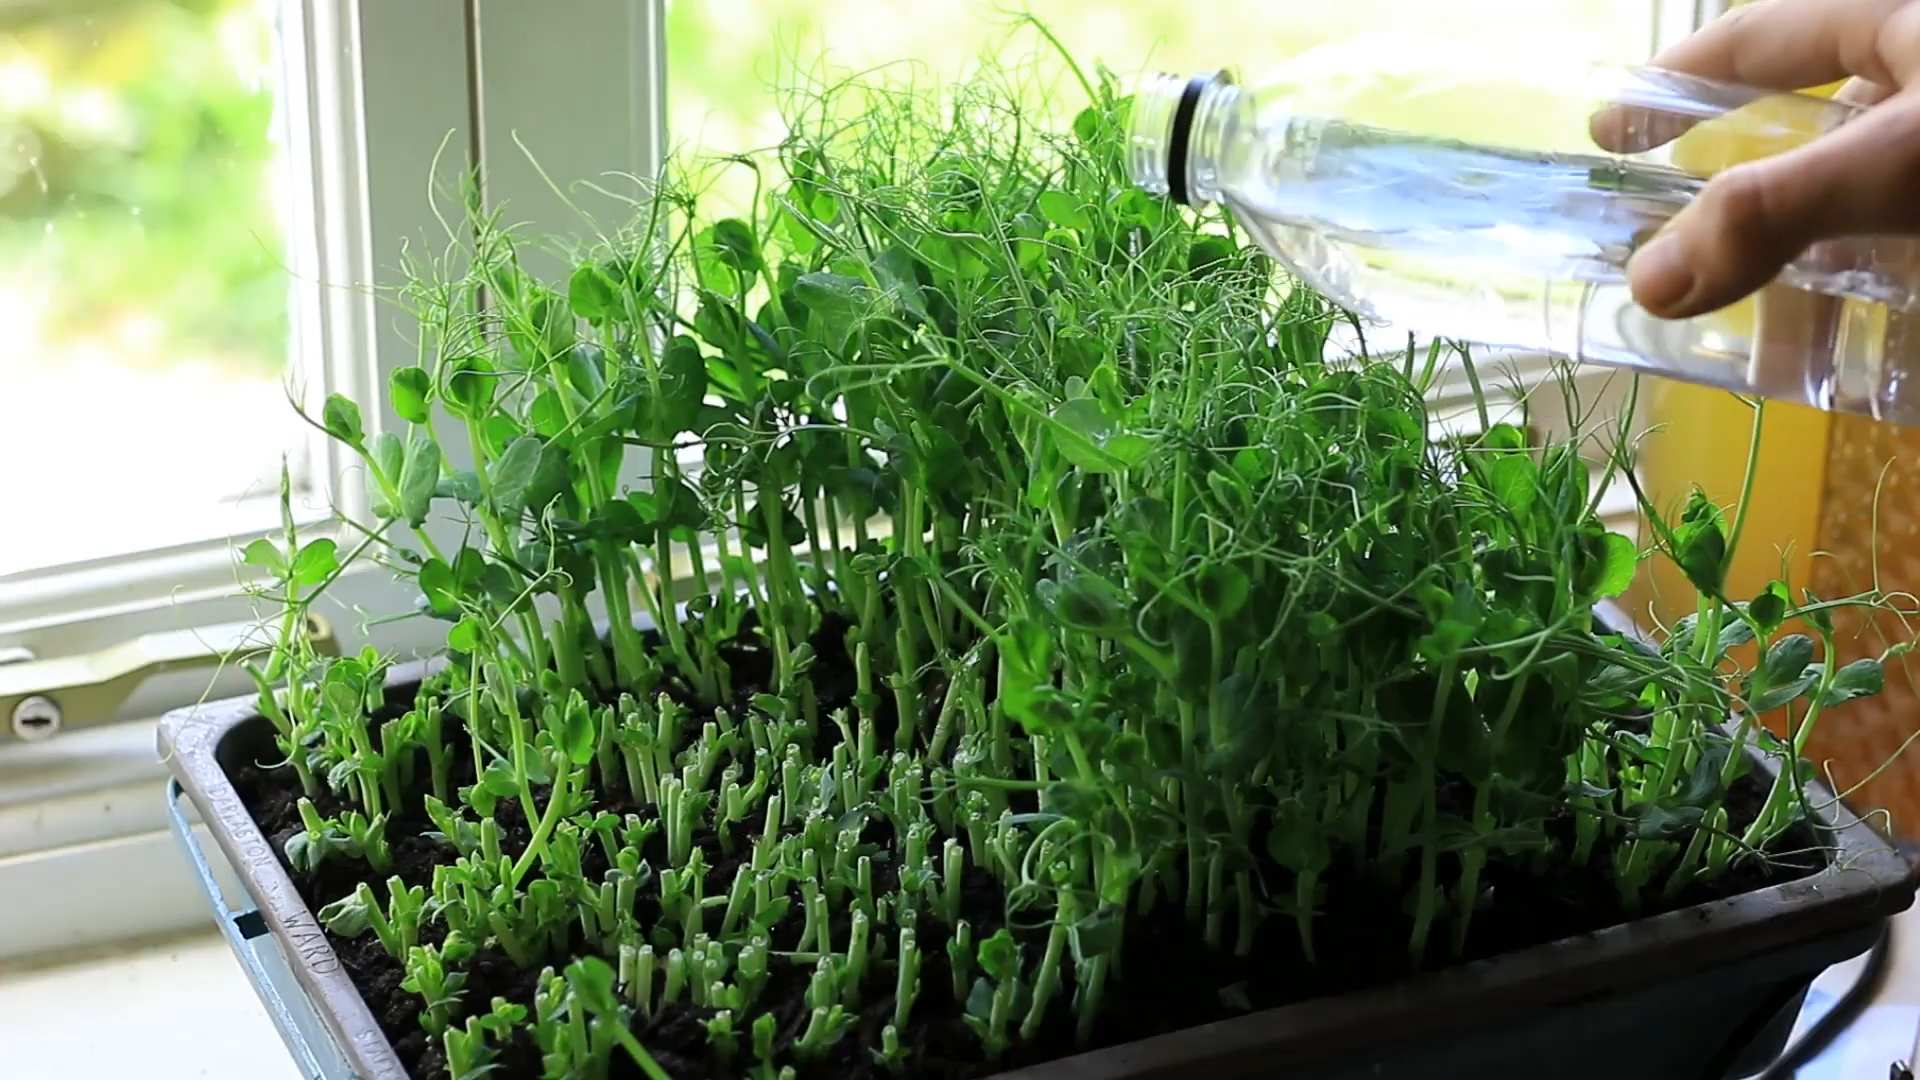
4. Introduce Light Gradually: After about 3-4 days in the dark, it’s time to introduce the pea shoots to light. Start by placing them in a dimly lit area for a day or two, then gradually move them to a brighter location. Avoid direct sunlight at first, as this can scorch the delicate shoots. A windowsill with indirect sunlight is ideal.
The Growing Phase
Now that your pea shoots have sprouted, it’s time to let them grow and flourish!
1. Light and Air Circulation: Provide your pea shoots with plenty of indirect sunlight. Good air circulation is also important to prevent mold or mildew.
2. Watering: Continue to keep the growing medium moist, but not soggy. You may need to water more frequently now that the pea shoots are growing and using more water.
3. Watch Them Grow: You’ll be amazed at how quickly these little guys grow! They can grow several inches in just a few days.
Harvesting Your Pea Shoots
The best part!
1. When to Harvest: Your pea shoots are ready to harvest when they are about 4-6 inches tall and have several leaves. This usually takes about 1-2 weeks from the time you sowed the seeds.
2. How to Harvest: Use scissors or shears to cut the pea shoots just above the lowest set of leaves. This will allow the plant to regrow and produce another harvest.
3. Enjoy Your Harvest: Rinse the pea shoots and enjoy them in salads, stir-fries, sandwiches, or as a garnish. They have a fresh, slightly sweet, and pea-like flavor.
Tips and Tricks for Success
Here are a few extra tips to help you grow the best pea shoots possible:
* Choose the Right Seeds: As I mentioned earlier, make sure you’re using pea seeds specifically meant for sprouting or gardening. Avoid using split peas, as they won’t sprout.
* Don’t Overwater: Overwatering is one of the most common mistakes people make when growing pea shoots. Soggy soil can lead to mold and rot.
* Provide Adequate Light: Pea shoots need plenty of light to grow properly. If you don’t have enough natural light, you can supplement with a grow light.
* Harvest Regularly: Harvesting regularly encourages the pea shoots to continue growing and producing.
* Second Harvest: After your first harvest, you can often get a second harvest from the same plants. Just continue to water and provide light, and they should regrow in a week or two.
* Experiment with Varieties: There are many different varieties of pea seeds you can use to grow pea shoots. Experiment with different varieties to find your favorite flavor.
* Troubleshooting: If you notice any mold or mildew, remove the affected pea shoots immediately and improve air circulation. If your pea shoots are yellowing, they may not be getting enough light or nutrients.
Why Grow Pea Shoots?
Besides being incredibly easy and fun to grow, pea shoots are also packed with nutrients! They’re a good source of vitamins A, C, and K, as well as folate and fiber. They’re also low in calories and fat. Plus, they’re a sustainable and eco-friendly way to add fresh greens to your diet.
So, what are you waiting for? Give it a try! I promise you’ll be amazed at how easy and rewarding it is to grow your own pea shoots. Happy growing!
Conclusion
So, there you have it! Growing your own pea shoots is not only incredibly simple, but it’s also a rewarding experience that brings fresh, vibrant flavor right to your kitchen. Forget those expensive, pre-packaged containers from the grocery store. With just a few basic supplies and a little bit of patience, you can cultivate a continuous supply of these nutritious and delicious greens.
Why is this DIY trick a must-try? Because it empowers you to control the quality and freshness of your food. You know exactly what’s going into your pea shoots – no pesticides, no questionable additives, just pure, natural goodness. Plus, it’s a fantastic way to reduce your carbon footprint by eliminating the need for transportation and packaging associated with store-bought produce. And let’s not forget the sheer joy of watching something grow from seed to table! It’s a mini-garden right in your home, offering a touch of green even in the dead of winter.
But the benefits don’t stop there. Pea shoots are packed with vitamins, minerals, and antioxidants, making them a powerhouse of nutrition. They’re a fantastic addition to salads, sandwiches, stir-fries, soups, and even smoothies. Their delicate, slightly sweet flavor adds a unique touch to any dish.
Looking for variations? Experiment with different types of peas! While snow peas and sugar snap peas are popular choices, you can also try using field peas or even dried peas from the grocery store (just make sure they haven’t been treated with any chemicals). You can also adjust the growing medium to suit your preferences. Some people prefer using soil, while others find that hydroponic methods work just as well. Consider adding a diluted liquid fertilizer after the first week to boost growth and yield. For a spicier kick, try adding a pinch of red pepper flakes to the growing medium. And if you’re feeling adventurous, try growing your pea shoots in different containers – from repurposed plastic containers to decorative planters, the possibilities are endless.
The key to success with this DIY trick is consistency. Make sure to keep the growing medium consistently moist, but not waterlogged. Provide adequate light, either natural or artificial, to encourage healthy growth. And harvest your pea shoots regularly to promote continued production. Don’t be afraid to experiment and find what works best for you and your growing environment.
We wholeheartedly encourage you to try this simple yet satisfying DIY trick. Growing pea shoots easily is within everyone’s reach, regardless of your gardening experience. It’s a fun, educational, and delicious way to connect with nature and enjoy the fruits (or rather, shoots) of your labor.
Once you’ve tried it, we’d love to hear about your experience! Share your tips, tricks, and photos with us in the comments below. Let’s create a community of pea shoot enthusiasts and inspire others to embrace the joy of homegrown goodness. What varieties did you try? What dishes did you incorporate them into? What challenges did you face, and how did you overcome them? Your insights can help others succeed and discover the magic of growing their own pea shoots. So go ahead, give it a try, and let us know how it goes! Happy growing!
Frequently Asked Questions (FAQs)
What kind of peas should I use for growing pea shoots?
The best types of peas for growing pea shoots are snow peas, sugar snap peas, and field peas. You can also use dried peas from the grocery store, but make sure they are not treated with any chemicals or preservatives. Organic peas are always a good choice to ensure you’re growing healthy, chemical-free shoots. Experiment with different varieties to find your favorite flavor and texture. Some varieties may grow faster or produce more abundant shoots than others.
How much light do pea shoots need?
Pea shoots need adequate light to grow properly. Ideally, they should receive at least 4-6 hours of direct sunlight per day. If you don’t have access to enough natural light, you can use artificial grow lights. Fluorescent or LED grow lights are a good option. Position the lights a few inches above the pea shoots to provide optimal illumination. Insufficient light can result in leggy, pale shoots that are less flavorful.
How often should I water my pea shoots?
Pea shoots need to be kept consistently moist, but not waterlogged. Water them regularly, typically once or twice a day, depending on the humidity and temperature of your environment. Check the growing medium regularly and water when the top inch feels dry to the touch. Avoid overwatering, as this can lead to mold or mildew growth. A spray bottle can be helpful for gently misting the pea shoots without disturbing the delicate seedlings.
How long does it take for pea shoots to grow?
Pea shoots typically take about 1-3 weeks to grow, depending on the variety of peas, the growing conditions, and the amount of light they receive. You can start harvesting them when they are about 4-6 inches tall. The more you harvest, the more they will grow back. Regular harvesting encourages continued production and prevents the shoots from becoming too tough or bitter.
How do I harvest pea shoots?
To harvest pea shoots, simply snip them off with scissors or your fingers just above the lowest set of leaves. This will encourage the plant to produce new shoots. Harvest regularly to keep the plants producing. You can harvest pea shoots multiple times from the same planting. After a few harvests, the plants may start to slow down their production, at which point you can start a new batch.
Can I grow pea shoots indoors all year round?
Yes, you can grow pea shoots indoors all year round. This is one of the great advantages of growing them yourself. As long as you provide them with adequate light, water, and ventilation, you can enjoy fresh pea shoots regardless of the season. Consider using a dedicated growing area or shelf to create a consistent and controlled environment for your pea shoots.
What are some common problems when growing pea shoots, and how can I fix them?
Some common problems when growing pea shoots include mold or mildew growth, leggy shoots, and slow growth. Mold or mildew growth can be prevented by avoiding overwatering and providing good ventilation. Leggy shoots are usually caused by insufficient light, so make sure your pea shoots are getting enough sunlight or artificial light. Slow growth can be caused by a variety of factors, including poor soil quality, lack of nutrients, or inadequate watering. Try adding a diluted liquid fertilizer to the growing medium to boost growth.
Are pea shoots nutritious?
Yes, pea shoots are very nutritious. They are a good source of vitamins A, C, and K, as well as folate, iron, and fiber. They are also a good source of antioxidants, which can help protect your body against damage from free radicals. Adding pea shoots to your diet is a great way to boost your nutrient intake and enjoy a healthy and delicious food.
How do I store pea shoots after harvesting?
After harvesting pea shoots, store them in the refrigerator in a plastic bag or container. They will stay fresh for about 3-5 days. To help them stay fresh longer, you can wrap them in a damp paper towel before storing them in the bag or container. Avoid washing them until you are ready to use them, as this can cause them to spoil more quickly.
What are some ways to use pea shoots in cooking?
Pea shoots are incredibly versatile and can be used in a variety of dishes. They can be added to salads, sandwiches, stir-fries, soups, and smoothies. They can also be used as a garnish for various dishes. Their delicate, slightly sweet flavor adds a unique touch to any meal. Try experimenting with different recipes and find your favorite ways to enjoy pea shoots. They are a delicious and nutritious addition to any diet.
Leave a Comment