

Grow Pears at Home? Absolutely! Imagine stepping into your backyard and plucking a juicy, sun-ripened pear straight from your own tree. Sounds like a dream, right? Well, it doesn’t have to be! This DIY guide is packed with simple, effective tricks to help you cultivate your very own pear paradise, even if you think you don’t have a green thumb.
For centuries, pears have been cherished not only for their delicious taste but also for their ornamental beauty. Cultivated since ancient times in both Europe and Asia, pears have held cultural significance, often symbolizing longevity and prosperity. Think of the classic still-life paintings featuring perfectly formed pears – a testament to their enduring appeal!
But why should you bother learning to grow pears at home? Let’s face it, store-bought pears often lack the intense flavor and satisfying texture of homegrown fruit. Plus, you’ll know exactly what’s gone into nurturing your pears, avoiding potentially harmful pesticides and ensuring a truly organic treat. In this article, I’ll share my favorite DIY hacks and tips that will empower you to successfully grow pears at home, regardless of your experience level. From choosing the right variety to mastering the art of pruning, I’ve got you covered. Get ready to enjoy the sweet rewards of your own backyard orchard!
Growing Pears at Home: A DIY Guide to Sweet Success
Okay, so you want to grow pears at home? Awesome! It’s totally doable, and honestly, there’s nothing quite like biting into a pear you’ve nurtured from a tiny sapling. It takes a little patience, but trust me, the reward is worth it. I’m going to walk you through everything you need to know, from choosing the right variety to harvesting your delicious pears.
Choosing the Right Pear Variety
This is probably the most important decision you’ll make. Not all pears are created equal, and some are better suited for certain climates than others. Plus, you’ll need to consider pollination!
* Climate Considerations: Pears generally need a certain amount of “chill hours” – that’s the number of hours below 45°F (7°C) during the winter. This chilling period is essential for proper bud development and fruit production. If you live in a warmer climate, you’ll need to choose a low-chill variety.
* Popular Pear Varieties:
* ‘Bartlett’: A classic, all-purpose pear. Great for eating fresh, canning, or baking. Needs about 800 chill hours.
* ‘Bosc’: A crisp, slightly spicy pear, excellent for baking. Needs about 600-700 chill hours.
* ‘Anjou’: A juicy, sweet pear that’s good for eating fresh or in salads. Comes in green and red varieties. Needs about 800-900 chill hours.
* ‘Comice’: Known as the “Christmas pear,” it’s incredibly sweet and juicy. Needs about 700-800 chill hours.
* ‘Kieffer’: A hardy, disease-resistant pear that’s good for warmer climates. Needs only about 200-300 chill hours.
* ‘Asian Pears (e.g., ‘Hosui’, ‘Shinseiki’): These are crisp and juicy like apples, and often require fewer chill hours.
* Pollination: Most pear trees are not self-pollinating, meaning they need another pear variety nearby to produce fruit. You’ll need to plant two different pear varieties that bloom at the same time. Some nurseries sell “self-fruitful” pear trees, but even these often produce better crops with a pollinator.
* Good Pollination Partners: ‘Bartlett’ and ‘D’Anjou’ are often used as pollinators for each other. ‘Kieffer’ can pollinate many other varieties. Check with your local nursery for specific recommendations based on the varieties you choose.
Preparing the Planting Site
Okay, you’ve picked your pear varieties. Now it’s time to get your hands dirty! Proper site preparation is key to a healthy, productive pear tree.
* Sunlight: Pears need at least 6-8 hours of direct sunlight per day. Choose a location that gets plenty of sun.
* Soil: Pears prefer well-drained soil that’s slightly acidic (pH 6.0-7.0). Avoid planting in areas where water tends to pool.
* Soil Testing: It’s a good idea to get your soil tested before planting. This will tell you the pH level and nutrient content of your soil. You can usually get a soil test kit from your local garden center or agricultural extension office.
* Amending the Soil: Based on your soil test results, you may need to amend the soil. If your soil is too alkaline, you can add sulfur or peat moss to lower the pH. If your soil is lacking in nutrients, you can add compost, manure, or a balanced fertilizer.
* Digging the Hole: Dig a hole that’s twice as wide as the root ball of your pear tree and just as deep. This will give the roots plenty of room to spread out.
Planting Your Pear Tree
Alright, the hole is dug, the soil is prepped, and you’re ready to plant! Here’s how to do it:
1. Remove the Tree from the Container: Gently remove the pear tree from its container. If the roots are tightly bound, gently loosen them with your fingers. You can also use a sharp knife to make a few vertical cuts in the root ball.
2. Position the Tree in the Hole: Place the tree in the hole, making sure that the top of the root ball is level with the surrounding soil.
3. Backfill the Hole: Backfill the hole with the amended soil, gently tamping it down as you go. Be careful not to compact the soil too much.
4. Water Thoroughly: Water the tree thoroughly after planting. This will help settle the soil and get the roots off to a good start.
5. Mulch: Apply a layer of mulch around the base of the tree. Mulch helps retain moisture, suppress weeds, and regulate soil temperature. Use organic mulch such as wood chips, straw, or shredded bark. Keep the mulch a few inches away from the trunk of the tree to prevent rot.
6. Staking (Optional): If your tree is young and spindly, you may want to stake it for support. Use two stakes placed on opposite sides of the tree, and tie the tree to the stakes with soft twine or tree ties. Make sure the ties are not too tight, as this can damage the bark.
Caring for Your Pear Tree
Planting is just the beginning! To keep your pear tree healthy and productive, you’ll need to provide ongoing care.
* Watering: Water your pear tree regularly, especially during dry periods. Young trees need more frequent watering than established trees. Water deeply, soaking the soil around the root zone.
* Fertilizing: Fertilize your pear tree in the spring, before new growth begins. Use a balanced fertilizer that’s formulated for fruit trees. Follow the instructions on the fertilizer label.
* Pruning: Pruning is essential for maintaining the shape and health of your pear tree. Prune in late winter or early spring, before the tree starts to grow. Remove any dead, damaged, or diseased branches. Also, prune to open up the canopy and allow sunlight to penetrate.
* Young Trees: Focus on developing a strong central leader and well-spaced branches.
* Mature Trees: Prune to maintain the tree’s shape, remove crowded branches, and encourage fruit production.
* Pest and Disease Control: Pears are susceptible to a variety of pests and diseases. Monitor your tree regularly for signs of problems.
* Common Pests: Aphids, pear psylla, codling moths.
* Common Diseases: Fire blight, pear scab.
* Organic Pest and Disease Control: Use organic methods such as insecticidal soap, horticultural oil, and copper fungicide to control pests and diseases.
* Thinning Fruit: If your pear tree produces a heavy crop of fruit, you may need to thin the fruit. Thinning helps to improve the size and quality of the remaining fruit. Remove excess fruit when the pears are about the size of a dime. Leave about 6-8 inches between fruits.
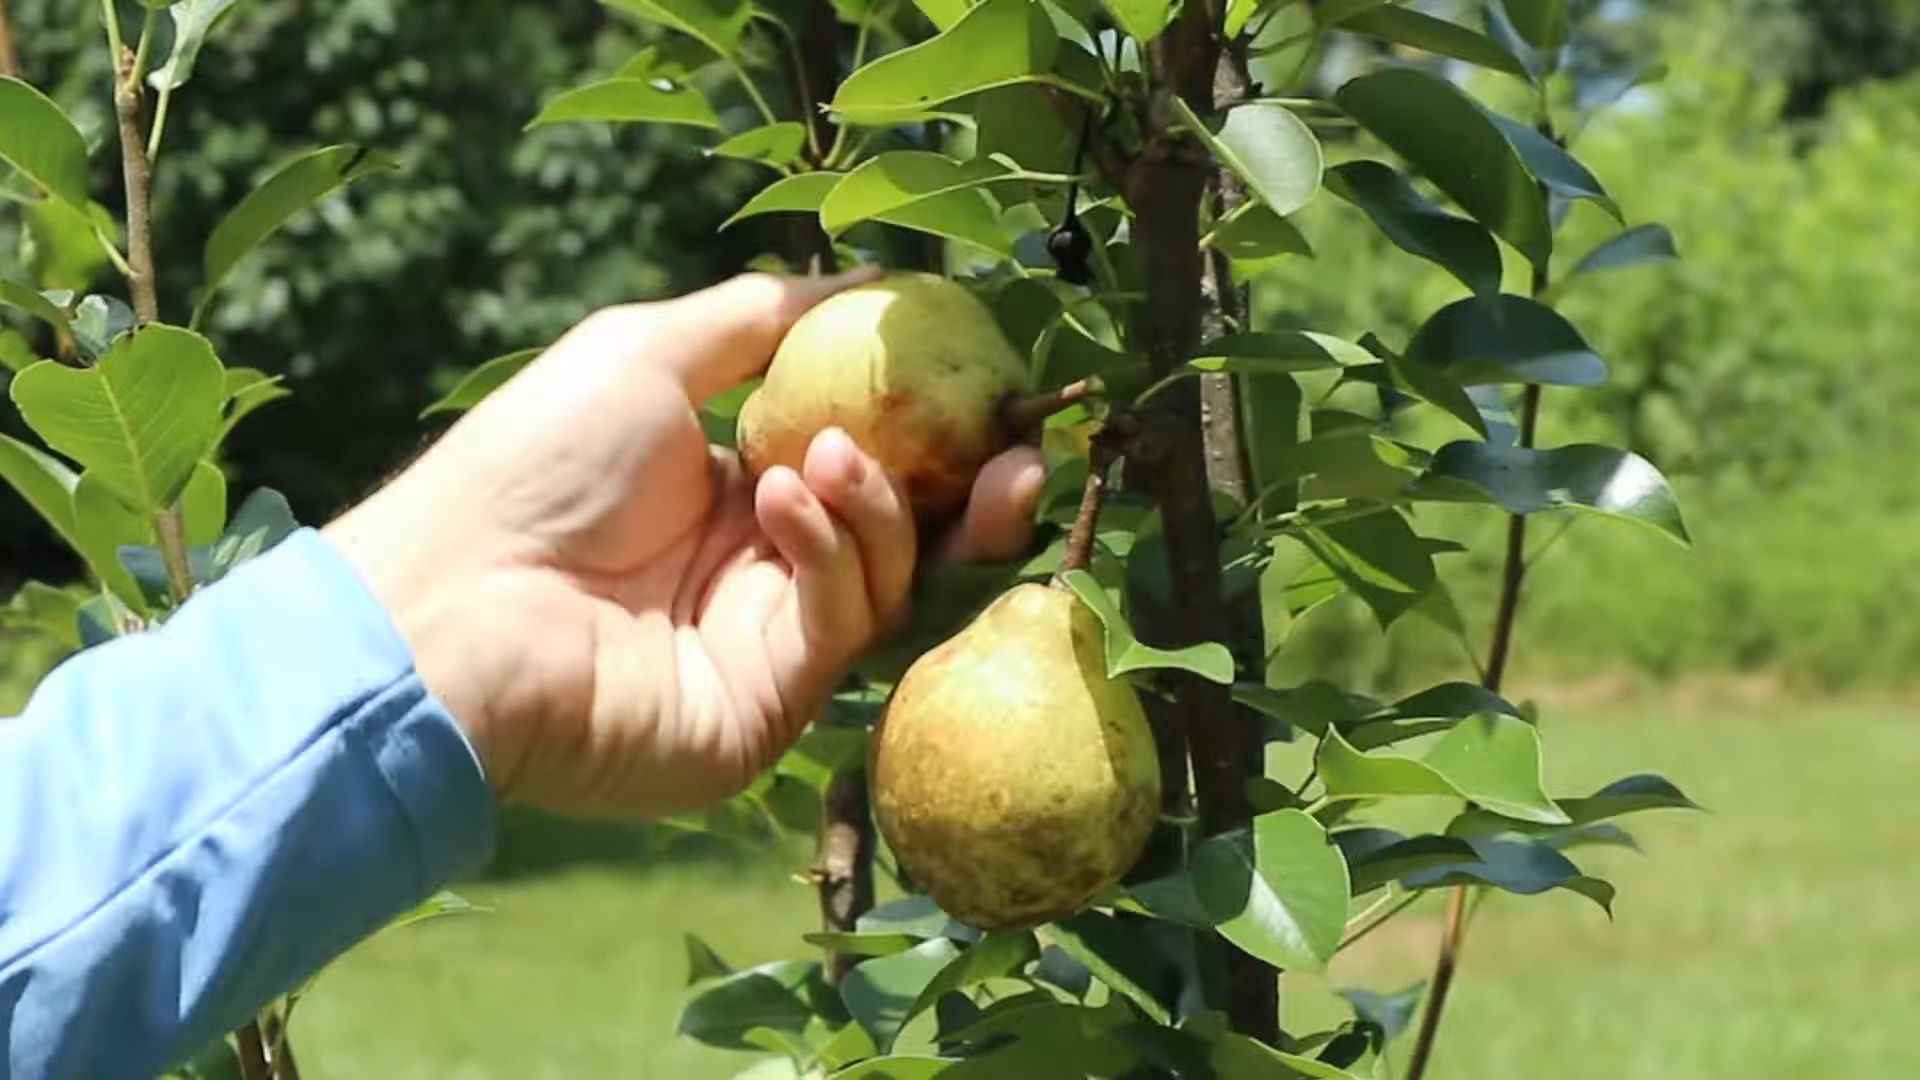
Harvesting Your Pears
The moment you’ve been waiting for! Harvesting your own pears is incredibly satisfying.
* When to Harvest: Pears are best harvested when they are mature but still firm. They will ripen off the tree. The exact timing of harvest will depend on the variety and your local climate.
* Harvesting Technique: Gently twist the pear and lift it upward. If it’s ripe, it should come off the tree easily.
* Ripening: Place the pears in a cool, dark place to ripen. They should ripen in a few days to a week. You can speed up the ripening process by placing the pears in a paper bag with a ripe banana or apple.
* Storage: Ripe pears can be stored in the refrigerator for a few weeks.
Troubleshooting
Even with the best care, you might encounter some problems along the way. Here are a few common issues and how to address them:
* No Fruit: If your pear tree isn’t producing fruit, it could be due to a number of factors, including lack of pollination, insufficient sunlight, or improper pruning. Make sure you have a pollinator variety nearby, that your tree is getting enough sun, and that you’re pruning correctly.
* Small Fruit: Small fruit can be caused by overbearing (too many fruits on the tree) or insufficient watering or fertilization. Thin the fruit and make sure your tree is getting enough water and nutrients.
* Pest and Disease Problems: Regularly inspect your tree for signs of pests and diseases. Treat problems promptly with appropriate organic or chemical controls.
Enjoying Your Homegrown Pears
Congratulations! You’ve successfully grown your own pears. Now it’s time to enjoy the fruits (literally!) of your labor. Eat them fresh,

Conclusion
So, there you have it! Growing pears at home might seem daunting at first, but with a little patience, the right knowledge, and this straightforward DIY trick, you’ll be well on your way to harvesting your own delicious, juicy pears. This isn’t just about saving money; it’s about experiencing the satisfaction of nurturing something from a sapling to a fruit-bearing tree, connecting with nature, and enjoying the unparalleled flavor of homegrown produce.
The beauty of this method lies in its adaptability. Feel free to experiment with different pear varieties to find your favorites. Consider the climate in your area and choose cultivars known for their resilience and productivity in your specific region. You can also explore different grafting techniques if you’re feeling adventurous, potentially combining the best traits of different pear trees into one super-productive specimen. Think about espaliering your pear tree against a wall or fence to save space and create a beautiful, living piece of art.
Remember, success in growing pears at home often comes down to consistent care and attention. Regular watering, proper fertilization, and vigilant pest control are essential for healthy growth and abundant fruit production. Don’t be afraid to get your hands dirty and learn as you go. Every pear tree is unique, and you’ll develop a deeper understanding of its needs as you observe its growth patterns and respond to its specific requirements.
We wholeheartedly encourage you to give this DIY trick a try. Imagine the pride you’ll feel when you bite into a perfectly ripe pear, knowing that you nurtured it from the very beginning. And don’t keep your success (or your learning experiences!) to yourself. Share your journey with us! Post pictures of your pear trees, tell us about the challenges you faced, and let us know what worked best for you. Your insights could inspire others to embark on their own pear-growing adventures. Let’s create a community of home orchardists, sharing knowledge and celebrating the joys of homegrown fruit. So, grab your tools, select your pear variety, and get ready to experience the rewarding world of growing pears at home. You won’t regret it!
Frequently Asked Questions (FAQs)
Q: What is the best time of year to plant a pear tree?
A: The ideal time to plant a pear tree is during the dormant season, either in late fall or early spring. This allows the tree to establish its roots before the growing season begins. Avoid planting during the heat of summer or when the ground is frozen. If you live in an area with mild winters, fall planting is often preferred, as it gives the tree more time to settle in before the spring growth spurt. In colder climates, spring planting is generally recommended to avoid potential winter damage to the young roots.
Q: How much space does a pear tree need?
A: The amount of space a pear tree needs depends on the variety and rootstock. Standard-sized pear trees can require up to 20 feet of spacing between trees, while dwarf varieties may only need 8-10 feet. Consider the mature size of the tree when planning your orchard layout. Proper spacing is crucial for adequate sunlight penetration, air circulation, and ease of maintenance. Overcrowding can lead to reduced fruit production and increased susceptibility to diseases. Espaliering is a great option for smaller spaces.
Q: What kind of soil is best for pear trees?
A: Pear trees thrive in well-drained, fertile soil with a slightly acidic to neutral pH (around 6.0-7.0). Heavy clay soils can be problematic, as they retain too much moisture and can lead to root rot. Amend clay soils with organic matter, such as compost or well-rotted manure, to improve drainage and aeration. Sandy soils, on the other hand, may drain too quickly and require frequent watering. Adding organic matter to sandy soils will help improve their water-holding capacity. Before planting, it’s always a good idea to conduct a soil test to determine the pH and nutrient levels.
Q: How often should I water my pear tree?
A: Watering frequency depends on the age of the tree, the climate, and the soil type. Young pear trees require more frequent watering than established trees. During the first year, water deeply and regularly, especially during dry spells. Established trees generally need watering only during prolonged periods of drought. Avoid overwatering, as this can lead to root rot. A good rule of thumb is to water when the top inch of soil feels dry to the touch. Mulching around the base of the tree can help retain moisture and reduce the need for frequent watering.
Q: Do pear trees need to be pollinated?
A: Most pear varieties require cross-pollination to produce fruit. This means that you need to plant at least two different pear varieties that bloom at the same time to ensure successful pollination. Some pear varieties are self-pollinating, but even these will often produce more fruit when cross-pollinated. Bees are the primary pollinators of pear trees, so it’s important to create a bee-friendly environment in your garden. Avoid using pesticides that can harm bees, and consider planting flowers that attract pollinators.
Q: How do I prune a pear tree?
A: Pruning is essential for maintaining the health and productivity of your pear tree. The best time to prune is during the dormant season, in late winter or early spring. Pruning helps to shape the tree, remove dead or diseased branches, and improve air circulation and sunlight penetration. When pruning, focus on removing crossing branches, water sprouts (vertical shoots that grow from the trunk or branches), and suckers (shoots that grow from the roots). Aim for an open, vase-shaped structure that allows sunlight to reach all parts of the tree.
Q: What are some common pests and diseases that affect pear trees?
A: Pear trees are susceptible to a variety of pests and diseases, including aphids, pear psylla, codling moths, fire blight, and pear scab. Regular monitoring is crucial for early detection and treatment. Use organic pest control methods whenever possible, such as insecticidal soap, horticultural oil, and beneficial insects. Proper sanitation, such as removing fallen leaves and fruit, can help prevent the spread of diseases. Choose disease-resistant pear varieties to minimize the risk of infection.
Q: How long does it take for a pear tree to produce fruit?
A: The time it takes for a pear tree to produce fruit depends on the variety, rootstock, and growing conditions. Standard-sized pear trees can take 4-7 years to bear fruit, while dwarf varieties may start producing fruit in 2-4 years. Grafted trees often produce fruit sooner than trees grown from seed. Proper care, including regular watering, fertilization, and pruning, can help accelerate fruit production. Be patient, and your pear tree will eventually reward you with a bountiful harvest.
Q: Can I grow a pear tree in a container?
A: Yes, you can grow a pear tree in a container, but you’ll need to choose a dwarf variety and a large container (at least 20 gallons). Use a well-draining potting mix and provide regular watering and fertilization. Container-grown pear trees may require more frequent pruning to maintain their size and shape. They also need to be protected from extreme temperatures during the winter. Container growing is a great option for those with limited space or poor soil conditions.
Leave a Comment