

Grow potatoes at home, even if you think you don’t have the space! Imagine harvesting your own creamy, earthy potatoes, fresh from your balcony or backyard. Sounds dreamy, right? Well, it’s more achievable than you might think, and I’m here to show you how with some simple, fun DIY tricks.
Potatoes have been a staple food for centuries, with roots tracing back to the Andes Mountains. They’ve nourished civilizations and fueled culinary creativity across the globe. But you don’t need to be a seasoned farmer to enjoy the satisfaction of growing your own.
In today’s busy world, connecting with nature can feel like a luxury. But what if you could bring a little bit of the garden to your home? Learning how to grow potatoes at home offers a fantastic way to de-stress, learn a new skill, and enjoy the freshest, most flavorful potatoes imaginable. Plus, knowing exactly where your food comes from is incredibly rewarding. This DIY guide will provide you with easy-to-follow steps and clever hacks to maximize your potato yield, no matter your space constraints. Let’s get digging!
Grow Your Own Potatoes: A Beginner’s Guide to Spudtastic Success!
Hey there, fellow gardening enthusiasts! Ever dreamt of digging up your own fresh, flavorful potatoes right in your backyard (or even on your balcony)? Well, dream no more! Growing potatoes at home is surprisingly easy and incredibly rewarding. I’m going to walk you through everything you need to know to get started, from choosing the right potatoes to harvesting your bounty. Get ready to become a potato pro!
Choosing Your Seed Potatoes
First things first, you can’t just plant any old potato from the grocery store. Those are often treated to prevent sprouting. You need “seed potatoes,” which are potatoes specifically grown for planting. Here’s what to look for:
* Certified Seed Potatoes: These are the best option. They’re guaranteed to be disease-free and true to type. You can find them at garden centers, nurseries, and online retailers.
* Variety is the Spice of Life (and Potatoes!): Consider what kind of potatoes you like to eat. Do you prefer creamy Yukon Golds, starchy Russets, or colorful fingerlings? Different varieties have different growing requirements and maturity times, so do a little research to find what works best for your climate and taste.
* Size Matters (Sort Of): Small to medium-sized seed potatoes are ideal. If you have larger ones, you can cut them into pieces, making sure each piece has at least one or two “eyes” (those little buds that will sprout).
Sprouting Your Seed Potatoes (Chitting)
This step isn’t strictly necessary, but it gives your potatoes a head start and can result in an earlier harvest. “Chitting” simply means encouraging your seed potatoes to sprout before planting.
* Why Chit? Chitting helps the potato develop strong sprouts, which will grow into healthy plants. It also allows you to identify any potatoes that might be diseased or not viable before you plant them.
* How to Chit:
* Place your seed potatoes in a cool, bright, and well-ventilated area. An egg carton or a shallow tray works well.
* Make sure the “eyes” are facing upwards.
* Avoid direct sunlight, which can dry out the potatoes.
* Over the next few weeks, you’ll see sprouts emerging from the eyes.
* Once the sprouts are about an inch long and green, your potatoes are ready to plant!
Preparing Your Planting Site
Potatoes need plenty of sunlight and well-drained soil. Here’s how to get your planting site ready:
* Sunlight is Key: Choose a spot that gets at least 6-8 hours of direct sunlight per day.
* Soil Matters: Potatoes prefer loose, well-drained soil that’s rich in organic matter. Amend your soil with compost, aged manure, or other organic materials to improve drainage and fertility.
* Soil pH: Potatoes prefer a slightly acidic soil pH of around 6.0 to 6.5. You can test your soil pH with a soil testing kit and amend it accordingly.
* Clear the Area: Remove any weeds, rocks, or other debris from the planting area.
Planting Your Potatoes
Now for the fun part! Here’s how to plant your seed potatoes:
1. Dig Trenches: Dig trenches that are about 4-6 inches deep and 2-3 feet apart.
2. Space Your Potatoes: Place your seed potatoes (or cut pieces) in the trenches, with the sprouts facing upwards. Space them about 12 inches apart.
3. Cover with Soil: Cover the potatoes with soil, gently patting it down.
4. Water Well: Water the planting area thoroughly.
Hilling Your Potatoes
As your potato plants grow, you’ll need to “hill” them. This involves mounding soil around the base of the plants.
* Why Hill? Hilling encourages the plants to produce more potatoes along the stems that are buried in the soil. It also helps to protect the developing potatoes from sunlight, which can cause them to turn green and produce a bitter-tasting toxin called solanine.
* When to Hill: Start hilling when the plants are about 6-8 inches tall.
* How to Hill: Use a hoe or shovel to gently pull soil from the sides of the trench and mound it around the base of the plants, covering the lower part of the stems. Repeat this process every few weeks as the plants grow, until the mounds are about 12 inches high.
Watering and Fertilizing
Potatoes need consistent moisture, especially during tuber development.
* Watering: Water your potato plants deeply and regularly, especially during dry periods. Aim for about 1-2 inches of water per week. Avoid overwatering, which can lead to rot.
* Fertilizing: Potatoes are heavy feeders, so they benefit from regular fertilization. Use a balanced fertilizer (e.g., 10-10-10) or a fertilizer specifically formulated for potatoes. Follow the instructions on the fertilizer package. You can also side-dress your plants with compost or aged manure.
Pest and Disease Control
Potatoes can be susceptible to various pests and diseases. Here are some common problems and how to deal with them:
* Colorado Potato Beetles: These beetles can defoliate your plants. Handpick them off the plants or use an insecticide specifically labeled for potato beetles.
* Flea Beetles: These tiny beetles can create small holes in the leaves. Use row covers to protect your plants or apply an insecticide.
* Potato Blight: This fungal disease can cause the leaves and stems to turn brown and die. Choose blight-resistant varieties and practice good sanitation. Remove and destroy any infected plants.
* Scab: This disease causes rough, scabby lesions on the potatoes. Avoid planting potatoes in alkaline soil and use disease-free seed potatoes.
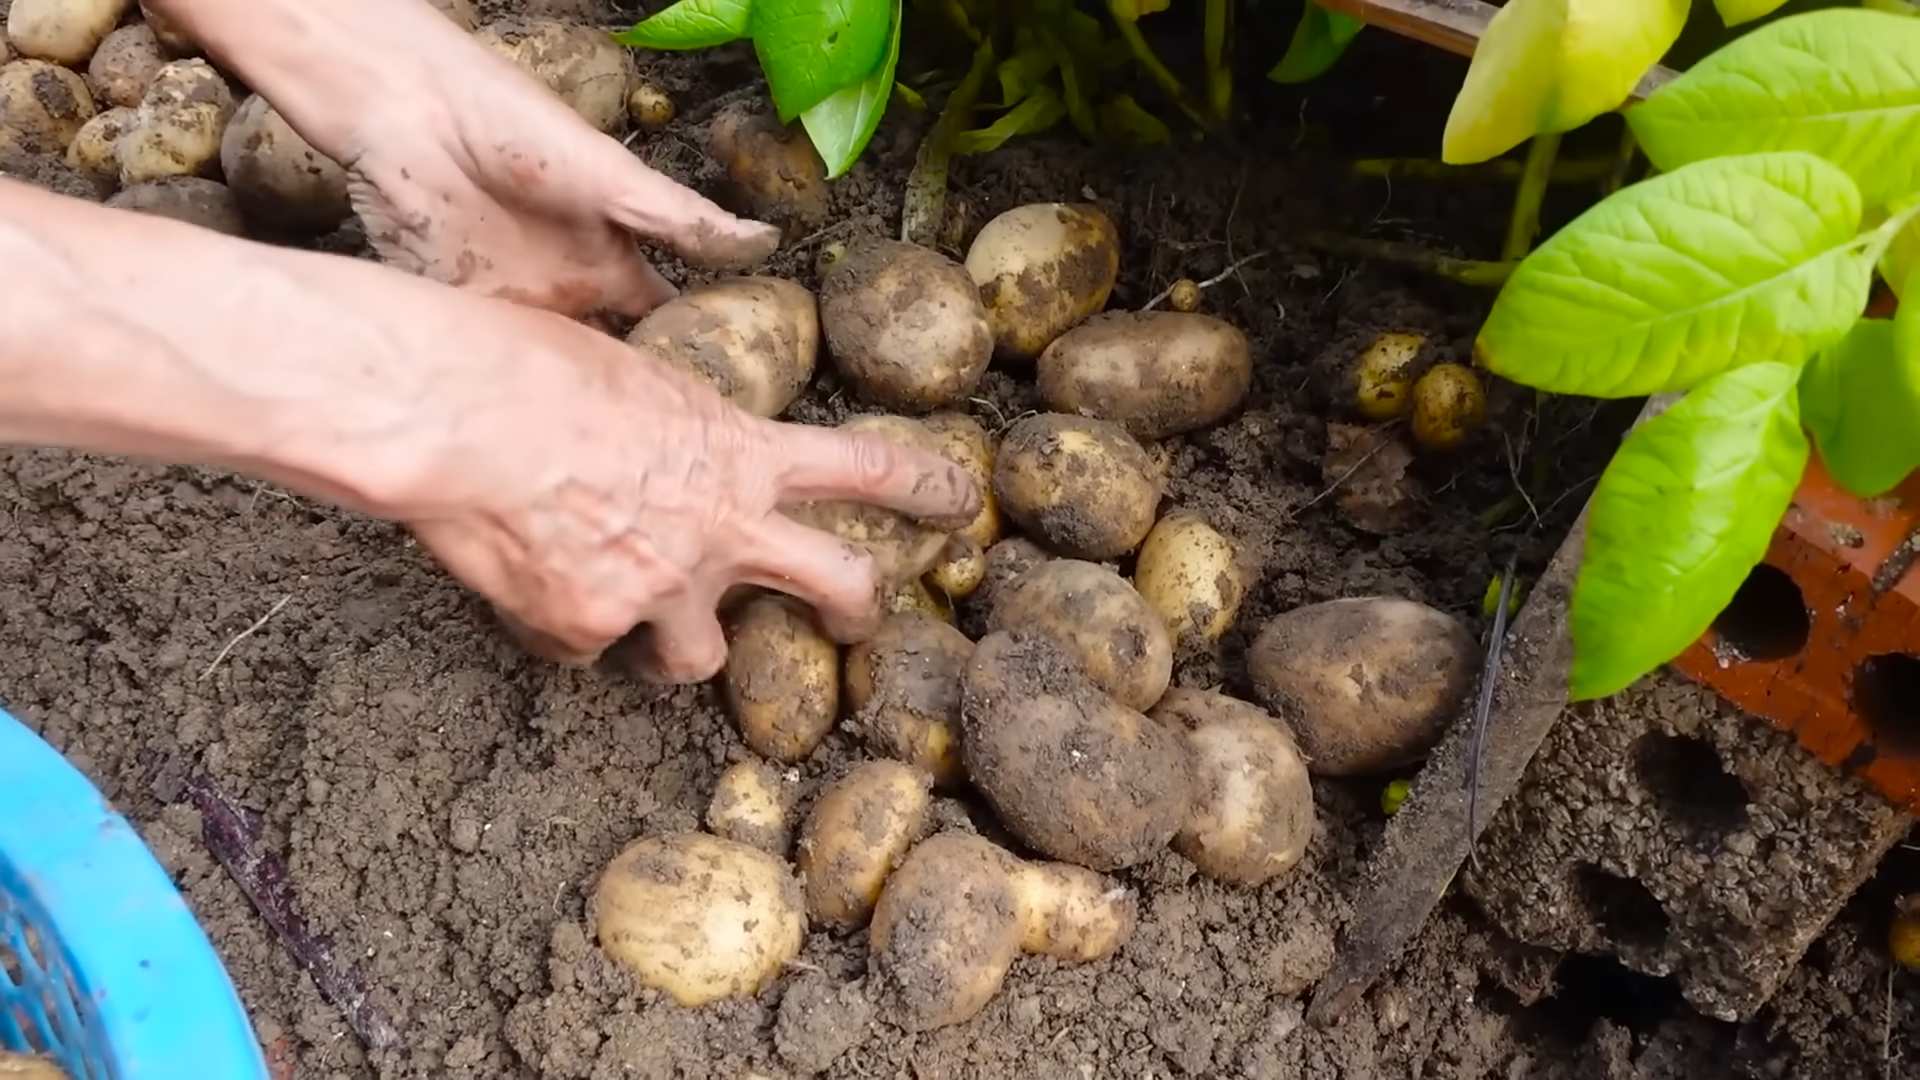
Harvesting Your Potatoes
The moment you’ve been waiting for! Here’s how to harvest your potatoes:
* When to Harvest: The timing of your harvest depends on the variety of potato you’re growing and whether you want “new potatoes” or mature potatoes.
* New Potatoes: These are small, tender potatoes that are harvested early, before the plants have fully matured. You can start harvesting new potatoes about 2-3 weeks after the plants have finished flowering. Gently dig around the base of the plants and remove a few potatoes, leaving the rest to continue growing.
* Mature Potatoes: These are larger, more starchy potatoes that are harvested after the plants have died back. Wait until the foliage has turned yellow and brown and started to die back. This usually takes about 80-100 days after planting.
* How to Harvest:
1. Use a garden fork or shovel to carefully dig around the base of the plants, being careful not to damage the potatoes.
2. Gently lift the plants out of the ground and remove the potatoes.
3. Brush off any excess soil.
* Curing and Storing:
* Curing: Cure your potatoes by spreading them out in a cool, dark, and well-ventilated area for about 1-2 weeks. This allows the skins to harden and helps to prevent rot.
* Storing: Store your cured potatoes in a cool, dark, and dry place, such as a root cellar or a basement. The ideal storage temperature is around 40-50°F (4-10°C). Avoid storing potatoes near apples or onions, as they can release gases that can cause the potatoes to sprout or rot.
Growing Potatoes in Containers
Don’t have a garden? No problem! You can grow potatoes in containers.
* Choosing a Container: Select a large container that is at least 15-20 gallons in size. A grow bag or a large bucket with drainage holes works well.
* Potting Mix: Use a well-draining potting mix that is rich in organic matter.
* Planting: Plant your seed potatoes in the container, following the same instructions as for planting in the ground.
* Hilling: As the plants grow, add more potting mix to the container, covering the lower part of the stems.
* Watering and Fertilizing: Water and fertilize your container-grown potatoes regularly.
* Harvesting: When it’s time to harvest, simply dump the contents of the container onto a tarp and pick out the potatoes.
Troubleshooting
Even with the best planning, things can sometimes go wrong. Here are a few common problems and how to fix them:
* No Sprouts: If your seed potatoes don’t sprout, they may be old or diseased. Try using fresh seed potatoes from a reputable source.
* Yellowing Leaves: Yellowing leaves can be a sign of nutrient deficiency, overwatering, or disease. Check your

Conclusion
So, there you have it! Growing potatoes at home is not only achievable but also incredibly rewarding. Forget the store-bought spuds, often lacking in flavor and freshness. Imagine the satisfaction of harvesting your own, knowing exactly where they came from and how they were grown. This DIY trick transforms your garden, balcony, or even a sunny windowsill into a miniature potato farm.
Why is this a must-try? Because it puts you in control. You choose the variety, the soil, and the growing conditions, ensuring the best possible flavor and quality. Plus, it’s a fantastic way to reduce your carbon footprint and connect with nature. There’s something truly special about nurturing a plant from seed (or in this case, a seed potato) to harvest.
But the benefits don’t stop there. Growing your own potatoes is also a budget-friendly alternative to buying them at the supermarket. And let’s be honest, who doesn’t love the taste of freshly dug, homegrown potatoes? They’re simply unmatched.
Ready to take your potato game to the next level? Consider these variations:
* Experiment with different potato varieties: From Yukon Gold to Russet to fingerling potatoes, each variety offers a unique flavor and texture. Try growing a few different types to find your favorites.
* Vertical gardening: If you’re short on space, try growing potatoes in a potato tower or a large container. This method maximizes your yield in a small area.
* Organic gardening: Use organic soil, compost, and fertilizer to grow potatoes that are free from harmful chemicals.
* Companion planting: Plant potatoes alongside beneficial plants like marigolds or basil to deter pests and improve soil health.
Don’t be intimidated if you’re a beginner. Growing potatoes at home is easier than you might think. With a little bit of planning and effort, you can enjoy a bountiful harvest of delicious, homegrown potatoes.
We encourage you to give this DIY trick a try. It’s a fun, educational, and rewarding experience that the whole family can enjoy. And once you’ve tasted the difference between homegrown and store-bought potatoes, you’ll never go back.
So, grab some seed potatoes, prepare your soil, and get ready to embark on your potato-growing adventure. We can’t wait to hear about your experiences! Share your photos, tips, and stories in the comments below. Let’s create a community of home potato growers and inspire others to discover the joys of growing their own food. Happy growing!
Frequently Asked Questions (FAQ)
What are seed potatoes and where can I get them?
Seed potatoes are potatoes that are specifically grown to be planted and grown into new potato plants. They are different from regular potatoes you buy at the grocery store, as they are certified disease-free and have been properly stored to encourage sprouting. You can purchase seed potatoes from garden centers, nurseries, and online retailers. Look for certified seed potatoes to ensure you’re starting with healthy, disease-free stock. Different varieties are available, so choose ones that suit your taste and growing conditions.
How do I prepare seed potatoes for planting?
Chitting, or pre-sprouting, your seed potatoes can give them a head start. About 4-6 weeks before planting, place the seed potatoes in a cool, bright location (but not in direct sunlight) to encourage them to sprout. Egg cartons or trays work well for this. The sprouts should be short and sturdy. If the sprouts are long and spindly, the location is too warm and dark. Before planting, you can cut larger seed potatoes into smaller pieces, ensuring each piece has at least one or two “eyes” (sprouts). Allow the cut pieces to dry for a day or two to prevent rotting.
What kind of soil is best for growing potatoes?
Potatoes prefer well-drained, loose soil that is rich in organic matter. Sandy loam soil is ideal. Avoid heavy clay soil, as it can become waterlogged and hinder potato growth. Amend your soil with compost, aged manure, or other organic matter to improve drainage and fertility. The ideal soil pH for potatoes is between 6.0 and 6.8.
How much sunlight do potatoes need?
Potatoes need at least 6-8 hours of direct sunlight per day to thrive. Choose a planting location that receives plenty of sunlight. If you’re growing potatoes in containers, make sure to place them in a sunny spot.
How often should I water my potato plants?
Water your potato plants regularly, especially during dry periods. Keep the soil consistently moist, but avoid overwatering, which can lead to rot. Water deeply when you water, ensuring the water reaches the roots. A good rule of thumb is to water when the top inch of soil feels dry to the touch.
What is “hilling” and why is it important?
Hilling is the process of mounding soil around the base of the potato plants as they grow. This encourages the plants to produce more potatoes along the buried stems. As the plants grow taller, gradually add more soil around the stems, leaving only the top leaves exposed. Hilling also helps to protect the developing potatoes from sunlight, which can cause them to turn green and produce solanine, a toxic compound.
How do I know when my potatoes are ready to harvest?
The timing of harvest depends on the potato variety and your growing conditions. Generally, potatoes are ready to harvest when the plants begin to flower or when the foliage starts to die back. You can harvest “new potatoes” (small, immature potatoes) a few weeks after flowering. For mature potatoes, wait until the foliage has completely died back before digging them up.
How do I harvest potatoes?
Use a garden fork or shovel to carefully dig up the potatoes, being careful not to damage them. Gently loosen the soil around the plants and lift them out of the ground. Brush off any excess soil and allow the potatoes to dry in a cool, dry place for a few days before storing them.
How do I store potatoes?
Store potatoes in a cool, dark, and well-ventilated place, such as a root cellar or basement. The ideal storage temperature is between 40 and 50 degrees Fahrenheit. Avoid storing potatoes near apples or onions, as they can release gases that cause potatoes to spoil. Properly stored potatoes can last for several months.
What are some common potato pests and diseases?
Some common potato pests include potato beetles, aphids, and wireworms. Common potato diseases include blight, scab, and rot. To prevent pests and diseases, choose disease-resistant varieties, practice crop rotation, and maintain good soil health. You can also use organic pest control methods, such as insecticidal soap or neem oil.
Can I grow potatoes in containers?
Yes, you can absolutely grow potatoes in containers! Choose a large container (at least 10 gallons) with drainage holes. Fill the container with well-draining potting mix and plant your seed potatoes. As the plants grow, add more soil to the container, just like you would with hilling in the garden. Container-grown potatoes may require more frequent watering and fertilization than those grown in the ground.
What fertilizer should I use for potatoes?
Potatoes benefit from a balanced fertilizer that is rich in phosphorus and potassium. A fertilizer with an NPK ratio of 5-10-10 or 10-20-20 is a good choice. Apply fertilizer at planting time and again when the plants begin to flower. Follow the instructions on the fertilizer package for application rates. You can also use organic fertilizers, such as compost tea or bone meal.
Leave a Comment