

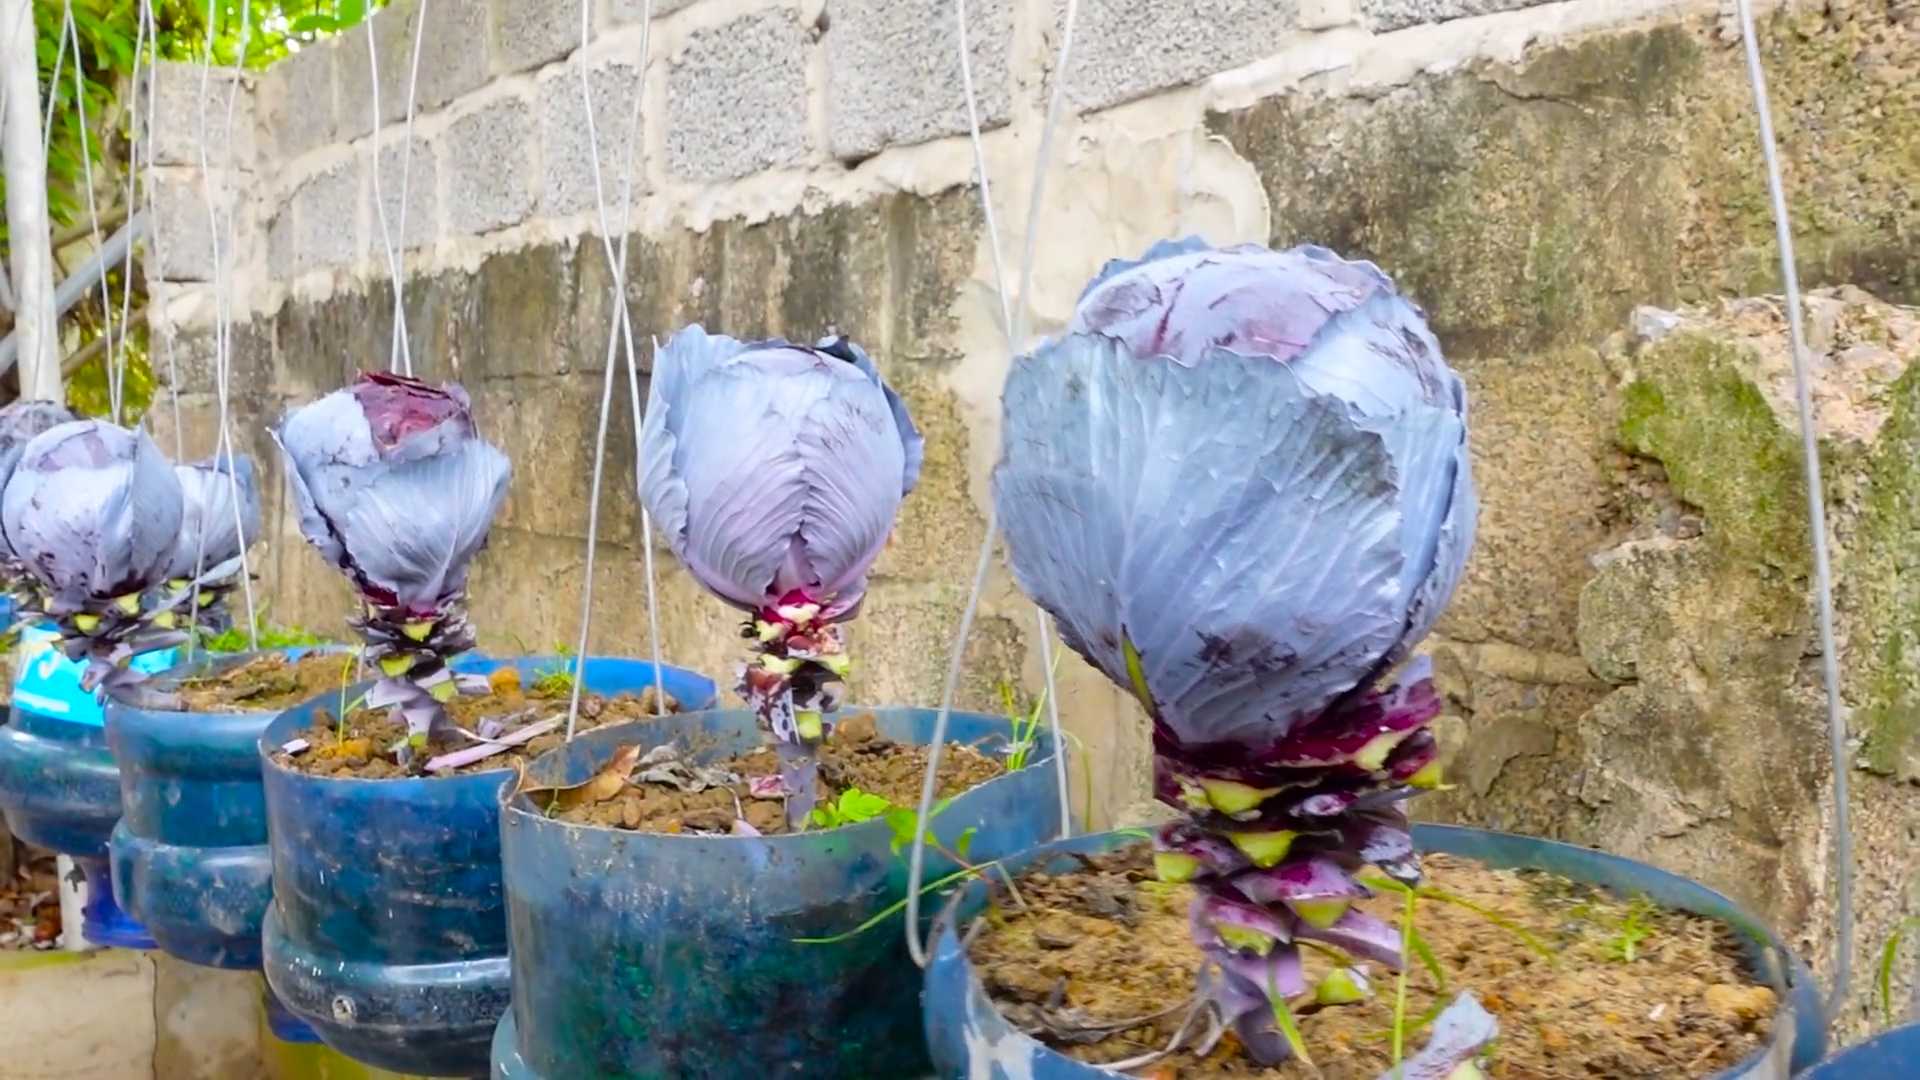
Grow Queen Cabbage Indoors? Absolutely! Imagine harvesting fresh, vibrant Queen Cabbage right from your windowsill, even when the weather outside is frightful. It’s not just a dream; it’s a deliciously achievable reality with a few clever DIY tricks. For centuries, cultivating vegetables indoors has been a practice rooted in necessity and ingenuity, from ancient Roman greenhouses to modern-day urban farms. Think about it – extending your growing season, controlling the environment, and enjoying the satisfaction of nurturing your own food, regardless of external conditions.
But why Queen Cabbage specifically? Well, this regal vegetable is packed with nutrients and flavor, making it a fantastic addition to your diet. Plus, let’s be honest, there’s something incredibly rewarding about successfully grow Queen Cabbage indoors, proving that you don’t need acres of land to enjoy the fruits (or rather, vegetables!) of your labor. In this article, I’m going to share some simple, effective DIY hacks that will empower you to cultivate your own thriving indoor Queen Cabbage garden. Whether you’re a seasoned gardener or a complete beginner, these tips will help you overcome common challenges and reap a bountiful harvest. So, let’s get our hands dirty (figuratively, of course – we’re indoors!) and embark on this exciting journey together!
Growing Queen Cabbage Indoors: A Royal DIY Project
Hey there, fellow plant enthusiasts! Ever dreamt of having fresh, vibrant Queen Cabbage right at your fingertips, even if you don’t have a sprawling garden? Well, dream no more! I’m going to walk you through the surprisingly simple process of growing these beauties indoors. Get ready to add a touch of royalty to your indoor garden!
What You’ll Need: The Royal Decree of Supplies
Before we embark on this regal gardening adventure, let’s gather our supplies. Think of it as assembling your royal court of tools and materials.
* Queen Cabbage Seeds: Obviously! Look for reputable suppliers to ensure good germination rates. I prefer organic seeds whenever possible.
* Seed Starting Tray or Small Pots: These will be our cabbage nurseries.
* Seed Starting Mix: This is crucial! It’s lighter and more sterile than regular potting soil, giving your seedlings the best start.
* Potting Soil: Once the seedlings are bigger, they’ll need a more nutrient-rich environment.
* Larger Pots (at least 12 inches in diameter): These will be the cabbage’s permanent homes.
* Grow Lights: Queen Cabbage needs plenty of light, especially indoors. LED grow lights are energy-efficient and effective.
* Watering Can or Spray Bottle: For gentle watering.
* Fertilizer: A balanced liquid fertilizer will keep your cabbages happy and healthy.
* pH Meter (optional but recommended): Cabbage prefers slightly acidic soil.
* Heat Mat (optional): Can speed up germination.
* Spray Bottle with Water: To maintain humidity.
Phase 1: Sowing the Seeds of Royalty
This is where the magic begins! We’re going to plant our Queen Cabbage seeds and nurture them into tiny seedlings.
1. Prepare Your Seed Starting Tray or Pots: Fill your seed starting tray or small pots with seed starting mix. Gently tap the tray or pots to settle the mix.
2. Sow the Seeds: Make a small indentation (about ¼ inch deep) in the center of each cell or pot. Place 2-3 seeds in each indentation. This increases the chances of at least one seed germinating.
3. Cover the Seeds: Gently cover the seeds with a thin layer of seed starting mix.
4. Water Gently: Use a spray bottle or watering can with a gentle nozzle to moisten the soil. Avoid overwatering, which can lead to rot. The soil should be damp, not soggy.
5. Provide Warmth and Light: Place the seed starting tray or pots on a heat mat (if using) and under grow lights. Maintain a temperature of around 70-75°F (21-24°C). Keep the grow lights on for 14-16 hours per day.
6. Maintain Humidity: Cover the seed starting tray with a humidity dome or plastic wrap to create a humid environment. Remove the cover for a few hours each day to allow for air circulation and prevent mold growth.
7. Monitor Germination: Keep the soil consistently moist but not waterlogged. You should see seedlings emerge in about 7-14 days.
Phase 2: Nurturing the Young Queens
Once your seedlings have emerged, it’s time to provide them with the care they need to grow strong and healthy.
1. Thin the Seedlings: Once the seedlings have their first true leaves (the second set of leaves that appear after the initial seed leaves), thin them out by snipping off the weaker seedlings at the soil line. Leave only the strongest seedling in each cell or pot.
2. Adjust Grow Lights: As the seedlings grow, adjust the height of the grow lights to keep them about 2-4 inches above the plants. This will prevent the seedlings from becoming leggy (tall and spindly).
3. Water Regularly: Water the seedlings when the top inch of soil feels dry to the touch. Avoid overwatering, which can lead to root rot.
4. Fertilize Sparingly: Start fertilizing the seedlings with a diluted liquid fertilizer (half strength) about once a week. This will provide them with the nutrients they need to grow.
5. Harden Off the Seedlings (Optional): If you plan to eventually move your cabbages outdoors, you’ll need to harden them off. This involves gradually exposing them to outdoor conditions over a period of 1-2 weeks. Start by placing them outdoors for a few hours each day in a sheltered location, gradually increasing the amount of time they spend outdoors.
Phase 3: Transplanting to Royal Estates (Larger Pots)
Now that our seedlings are thriving, it’s time to move them to their permanent homes – larger pots where they can truly flourish.
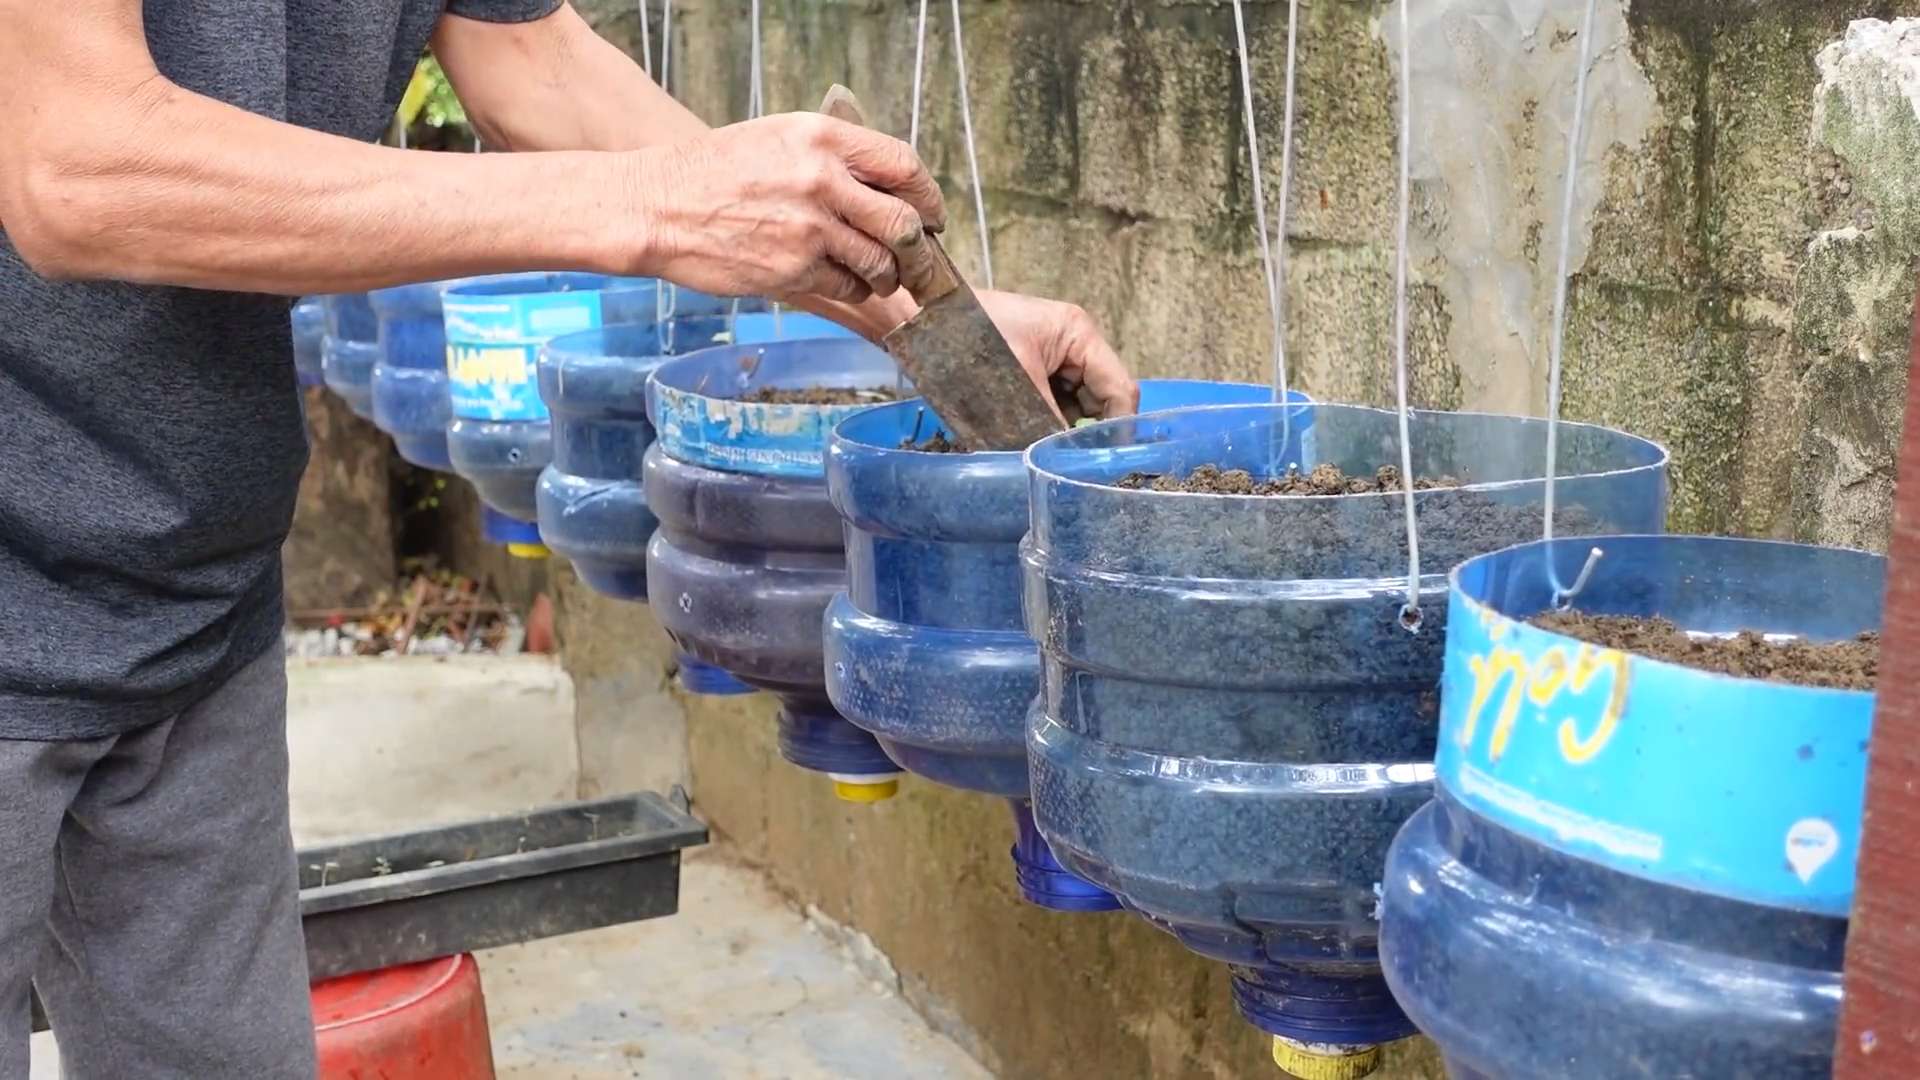
1. Prepare the Larger Pots: Fill the larger pots (at least 12 inches in diameter) with potting soil. Make sure the pots have drainage holes to prevent waterlogging.
2. Transplant the Seedlings: Gently remove the seedlings from their seed starting tray or pots. Be careful not to damage the roots.
3. Plant the Seedlings: Make a hole in the center of each pot that is large enough to accommodate the seedling’s root ball. Place the seedling in the hole and gently backfill with potting soil.
4. Water Thoroughly: Water the transplanted seedlings thoroughly to help them settle in.
5. Provide Support (Optional): If your Queen Cabbage plants start to get top-heavy, you may need to provide them with support, such as stakes or tomato cages.
Phase 4: Maintaining Your Royal Cabbage Patch
Now that your Queen Cabbage plants are settled in their larger pots, it’s time to provide them with the ongoing care they need to thrive.
1. Light: Queen Cabbage needs at least 6 hours of direct sunlight per day. If you’re growing them indoors, you’ll need to supplement with grow lights. Keep the grow lights on for 14-16 hours per day.
2. Watering: Water your cabbage plants regularly, especially during hot, dry weather. The soil should be consistently moist but not waterlogged. Check the soil moisture regularly by sticking your finger into the soil. If the top inch of soil feels dry, it’s time to water.
3. Fertilizing: Fertilize your cabbage plants every 2-3 weeks with a balanced liquid fertilizer. Follow the instructions on the fertilizer label.
4. Temperature: Queen Cabbage prefers cool temperatures, ideally between 60-70°F (15-21°C). Avoid exposing them to temperatures above 80°F (27°C) for extended periods of time.
5. Humidity: Queen Cabbage prefers moderate humidity. If the air in your home is dry, you can increase the humidity by placing a humidifier near the plants or by misting them with water regularly.
6. Pest Control: Keep an eye out for pests, such as aphids, cabbage worms, and slugs. If you find any pests, you can remove them by hand or treat the plants with an organic insecticide. I’ve had good luck with neem oil.
7. Soil pH: Queen Cabbage prefers slightly acidic soil with a pH of 6.0-6.8. You can test the soil pH using a pH meter and adjust it as needed. If the soil is too alkaline, you can add sulfur to lower the pH. If the soil is too acidic, you can add lime to raise the pH.
Phase 5: Harvesting Your Royal Bounty
The moment you’ve been waiting for! It’s time to harvest your beautiful Queen Cabbage.
1. Harvest Time: Queen Cabbage is typically ready to harvest in about 70-80 days from planting. The heads should be firm and compact.
2. Harvesting Technique: To harvest, use a sharp knife to cut the cabbage head from the stem. Leave a few outer leaves on the stem, as these can help protect the plant from pests and diseases.
3. Storage: Store your harvested Queen Cabbage in the refrigerator for up to 2 weeks.
Troubleshooting: Royal Problems and Solutions
Even with the best care, you might encounter some challenges along the way. Here are a few common problems and how to address them:
* Leggy Seedlings: This usually means they’re not getting enough light. Move the grow lights closer or provide more light.
* Yellowing Leaves: Could be a sign of overwatering, underwatering, or nutrient deficiency. Check the soil moisture and fertilize if needed.
* Pest Infestation: Identify the pest and use an appropriate organic control method.
* Slow Growth: Make sure the plants are getting enough light, water, and nutrients. Check the soil pH.
And there you have it! Growing Queen Cabbage indoors is a rewarding experience that brings
Conclusion
So, there you have it! Growing Queen Cabbage indoors might seem like a challenge reserved for seasoned gardeners, but with a little know-how and the right approach, it’s entirely achievable and incredibly rewarding. This DIY trick isn’t just about saving money; it’s about connecting with your food source, enjoying the freshest possible ingredients, and experiencing the satisfaction of nurturing something from seed to table, all within the comfort of your own home.
Why is this a must-try? Because store-bought cabbage, even the freshest varieties, simply can’t compare to the vibrant flavor and nutritional value of homegrown Queen Cabbage. Imagine adding crisp, sweet leaves to your salads, stir-fries, or even fermenting your own sauerkraut with cabbage you’ve nurtured yourself. The possibilities are endless! Plus, growing indoors allows you to bypass seasonal limitations, providing you with a steady supply of this nutritious vegetable year-round.
But the benefits extend beyond just taste and convenience. Indoor gardening is a fantastic stress reliever, a rewarding hobby, and a great way to introduce children to the wonders of nature. It’s a chance to learn about plant life cycles, develop patience, and appreciate the effort that goes into producing the food we eat.
Don’t be afraid to experiment! Try different varieties of Queen Cabbage to find your favorite flavor profile. Consider using different types of grow lights to optimize growth. You can even explore companion planting within your indoor garden, pairing your cabbage with herbs like dill or chamomile to deter pests and enhance flavor. Another variation is to try succession planting, starting new seeds every few weeks to ensure a continuous harvest.
We understand that embarking on a new gardening adventure can feel daunting, but we’re confident that with the information provided, you’ll be well-equipped to succeed. Remember to start small, be patient, and don’t be afraid to learn from your mistakes. Every gardener, regardless of experience, faces challenges along the way. The key is to persevere and enjoy the process.
We wholeheartedly encourage you to give this DIY trick a try. You’ll be amazed at how easy and rewarding it is to grow your own Queen Cabbage indoors. And most importantly, we want to hear about your experience! Share your successes, your challenges, and any tips or tricks you discover along the way. Post photos of your thriving cabbage plants, share your favorite recipes using your homegrown harvest, and connect with other indoor gardeners in the comments section below. Let’s build a community of passionate growers and inspire others to embrace the joy of homegrown food. So, grab your seeds, prepare your soil, and get ready to embark on a delicious and rewarding journey of growing Queen Cabbage indoors!
Frequently Asked Questions (FAQ)
1. What are the best Queen Cabbage varieties to grow indoors?
While most Queen Cabbage varieties can be grown indoors, some are better suited for container gardening than others. Look for compact or dwarf varieties that won’t outgrow your space too quickly. Some popular choices include ‘Golden Acre’, ‘Early Jersey Wakefield’, and ‘Dwarf Blue Vates’. These varieties tend to be more manageable in pots and still produce delicious, flavorful heads. Researching the specific needs of each variety before planting is always a good idea. Consider factors like maturity time and head size to choose the best fit for your indoor growing setup.
2. What type of grow lights do I need for growing Queen Cabbage indoors?
Queen Cabbage requires ample light to thrive, especially when grown indoors. LED grow lights are generally the most efficient and cost-effective option. Look for full-spectrum LED lights that provide a balanced range of light wavelengths, mimicking natural sunlight. The wattage you need will depend on the size of your growing area and the number of plants you’re growing. As a general guideline, aim for at least 30-40 watts per square foot. Fluorescent grow lights are another option, but they tend to be less energy-efficient than LEDs. Position the lights close enough to the plants (but not too close to burn them) to ensure they receive adequate light. Adjust the height of the lights as the plants grow to maintain optimal light exposure.
3. What kind of soil is best for growing Queen Cabbage in containers?
Queen Cabbage prefers well-draining, nutrient-rich soil. A good potting mix specifically formulated for vegetables is ideal. Avoid using garden soil, as it can be too heavy and may not drain properly in containers. You can also create your own potting mix by combining equal parts of peat moss, perlite, and vermiculite. Adding compost or other organic matter to the mix will further enhance its nutrient content. Ensure the soil pH is slightly acidic, around 6.0 to 6.8. You can test the pH of your soil using a soil testing kit.
4. How often should I water my indoor Queen Cabbage plants?
Watering frequency will depend on several factors, including the size of your containers, the type of soil you’re using, and the ambient temperature and humidity. As a general rule, water your Queen Cabbage plants when the top inch of soil feels dry to the touch. Water thoroughly until excess water drains out of the bottom of the container. Avoid overwatering, as this can lead to root rot. During warmer months or when the plants are actively growing, you may need to water more frequently. Check the soil moisture regularly and adjust your watering schedule accordingly.
5. How do I fertilize my indoor Queen Cabbage plants?
Queen Cabbage is a heavy feeder and requires regular fertilization to thrive. Use a balanced liquid fertilizer specifically formulated for vegetables. Follow the instructions on the fertilizer label for application rates and frequency. Start fertilizing your plants a few weeks after they’ve sprouted and continue throughout the growing season. You can also supplement with organic fertilizers like compost tea or fish emulsion. Avoid over-fertilizing, as this can burn the roots and damage the plants.
6. How do I deal with pests and diseases on my indoor Queen Cabbage plants?
Even indoors, Queen Cabbage plants can be susceptible to pests and diseases. Common pests include aphids, cabbage worms, and spider mites. Regularly inspect your plants for signs of infestation. If you spot any pests, you can try removing them by hand or using insecticidal soap or neem oil. For diseases, ensure good air circulation around your plants and avoid overwatering. If you notice any signs of disease, such as yellowing leaves or spots, remove the affected leaves immediately. You can also use a fungicide if necessary. Prevention is key, so maintain a clean growing environment and monitor your plants regularly.
7. How long does it take to grow Queen Cabbage indoors?
The time it takes to grow Queen Cabbage indoors will depend on the variety you’re growing and the growing conditions. Generally, it takes about 60-90 days from seed to harvest. Some faster-maturing varieties may be ready in as little as 50 days. Provide your plants with optimal light, water, and nutrients to ensure they grow quickly and healthily.
8. How do I know when my Queen Cabbage is ready to harvest?
Queen Cabbage is ready to harvest when the head is firm and compact. The size of the head will vary depending on the variety. Gently squeeze the head to check for firmness. If it feels solid, it’s likely ready to harvest. Use a sharp knife to cut the head from the stem, leaving a few outer leaves intact.
9. Can I grow Queen Cabbage indoors year-round?
Yes, one of the biggest advantages of growing Queen Cabbage indoors is that you can grow it year-round, regardless of the outdoor climate. By providing your plants with adequate light, water, and nutrients, you can enjoy a continuous harvest of fresh cabbage throughout the year.
10. What are some creative ways to use my homegrown Queen Cabbage?
The possibilities are endless! Use your homegrown Queen Cabbage in salads, stir-fries, soups, and stews. You can also ferment it to make sauerkraut or kimchi. Try shredding it and adding it to coleslaw or using it as a filling for cabbage rolls. Get creative and experiment with different recipes to discover your favorite ways to enjoy your homegrown harvest.
Leave a Comment