

Grow Sponge Gourd at Home? Absolutely! Imagine stepping into your backyard and harvesting fresh, vibrant sponge gourds, ready to be transformed into delicious meals or even natural sponges. It’s easier than you think, and this DIY guide is your ticket to a thriving gourd garden.
For centuries, sponge gourds, also known as loofah gourds, have been cultivated across Asia and Africa, not just for their culinary uses but also for their incredible versatility. From traditional medicine to household cleaning, this humble gourd has played a significant role in various cultures. I remember my grandmother using loofah for bathing, and the gentle exfoliation it provided was unmatched!
But why should you bother to grow sponge gourd at home? Well, store-bought loofahs can be expensive and often contain synthetic materials. Growing your own ensures you have a sustainable, all-natural supply. Plus, it’s incredibly rewarding to nurture a plant from seed to harvest. This DIY project not only saves you money but also connects you with nature and provides a fun, educational experience for the whole family. Ready to get your hands dirty? Let’s dive in!
Grow Your Own Delicious Sponge Gourd: A DIY Guide
Hey there, fellow gardening enthusiasts! I’m so excited to share my experience growing sponge gourds at home. It’s a rewarding process, and the fresh, homegrown gourds are absolutely delicious in stir-fries, soups, and more. Don’t be intimidated – with a little patience and this guide, you’ll be harvesting your own sponge gourds in no time!
What You’ll Need:
Before we dive in, let’s gather our supplies. Here’s a list of everything you’ll need to successfully grow sponge gourds:
* Sponge Gourd Seeds: Choose a variety that suits your climate and space. You can find these online or at your local garden center.
* Seed Starting Trays or Pots: These are perfect for getting your seeds started indoors.
* Seed Starting Mix: A light and airy mix designed for optimal germination.
* Larger Pots (if starting indoors): You’ll need these to transplant your seedlings into before moving them outdoors. Aim for at least 12-inch diameter pots.
* Well-Draining Soil: Sponge gourds thrive in rich, well-draining soil. Amend your garden soil with compost or aged manure.
* Compost or Aged Manure: This will provide essential nutrients for healthy growth.
* Trellis or Support Structure: Sponge gourds are climbers, so they need a sturdy trellis or fence to grow on.
* Gardening Gloves: To protect your hands.
* Watering Can or Hose: For regular watering.
* Fertilizer (Optional): A balanced fertilizer can boost growth and fruit production.
* Pruning Shears or Scissors: For trimming and shaping the vines.
* Patience and Enthusiasm!: Gardening takes time and care, so bring your positive attitude!
Getting Started: Seed Germination
The first step is to germinate your sponge gourd seeds. I prefer to start them indoors to give them a head start, especially if you live in a cooler climate.
1. Soak the Seeds: Before planting, soak the sponge gourd seeds in lukewarm water for 24 hours. This helps to soften the seed coat and encourages faster germination. I usually put them in a small bowl on my kitchen counter.
2. Prepare Seed Starting Trays: Fill your seed starting trays or small pots with seed starting mix. Make sure the mix is moist but not soggy.
3. Plant the Seeds: Make a small hole (about 1/2 inch deep) in the center of each cell or pot. Place one or two seeds in each hole and cover them gently with the seed starting mix.
4. Water Gently: Water the trays or pots gently to avoid disturbing the seeds. I use a spray bottle to mist the surface.
5. Provide Warmth and Light: Sponge gourd seeds need warmth to germinate. Place the trays in a warm location, such as on top of a refrigerator or in a sunny windowsill. If you don’t have a sunny windowsill, you can use a grow light. Aim for a temperature of around 70-80°F (21-27°C).
6. Keep the Soil Moist: Keep the seed starting mix consistently moist, but not waterlogged. Check the moisture level daily and water as needed.
7. Wait for Germination: Germination usually takes about 7-14 days. Be patient and keep an eye on your trays. Once the seedlings emerge, move them to a brighter location.
Transplanting Your Seedlings
Once your seedlings have developed a few sets of true leaves (the leaves that look like miniature versions of the adult leaves), it’s time to transplant them into larger pots or directly into your garden.
1. Harden Off the Seedlings: Before transplanting outdoors, you need to “harden off” the seedlings. This means gradually exposing them to outdoor conditions over a period of about a week. Start by placing the trays or pots in a sheltered location outdoors for a few hours each day, gradually increasing the amount of time they spend outside. This helps them acclimate to the sun, wind, and temperature changes.
2. Prepare the Planting Site: Choose a sunny location in your garden with well-draining soil. Sponge gourds need at least 6-8 hours of sunlight per day. Amend the soil with compost or aged manure to improve its fertility and drainage.
3. Dig Planting Holes: Dig holes that are slightly larger than the root balls of your seedlings. Space the holes about 2-3 feet apart.
4. Carefully Remove Seedlings: Gently remove the seedlings from their trays or pots, being careful not to damage the roots. If the roots are tightly bound, gently loosen them with your fingers.
5. Plant the Seedlings: Place the seedlings in the planting holes and backfill with soil. Gently firm the soil around the base of the plants.
6. Water Thoroughly: Water the newly transplanted seedlings thoroughly to help them settle in.
7. Add Support: Install a trellis or other support structure near the seedlings. Sponge gourds are vigorous climbers and need something to climb on. I’ve used everything from simple bamboo stakes to elaborate wooden trellises.
Caring for Your Sponge Gourd Plants
Now that your sponge gourd plants are in the ground, it’s time to provide them with the care they need to thrive.
1. Water Regularly: Sponge gourds need consistent moisture, especially during hot, dry weather. Water deeply whenever the top inch of soil feels dry to the touch. Avoid overwatering, as this can lead to root rot.
2. Fertilize (Optional): If you want to boost growth and fruit production, you can fertilize your sponge gourd plants every few weeks with a balanced fertilizer. Follow the instructions on the fertilizer package. I like to use a liquid fertilizer diluted in water.
3. Prune the Vines: Pruning can help to improve air circulation and encourage fruit production. Remove any dead or yellowing leaves. You can also trim the tips of the vines to encourage branching.
4. Control Pests and Diseases: Keep an eye out for pests and diseases. Common pests that affect sponge gourds include aphids, squash bugs, and vine borers. You can control these pests with insecticidal soap or neem oil. Common diseases include powdery mildew and downy mildew. You can prevent these diseases by providing good air circulation and avoiding overhead watering. If you notice any signs of disease, treat the plants with a fungicide.
5. Pollination: Sponge gourds produce separate male and female flowers. The female flowers have a small fruit behind them, while the male flowers do not. Pollination is necessary for the female flowers to develop into fruit. If you don’t see any fruit developing, you may need to hand-pollinate the flowers. To hand-pollinate, use a small paintbrush to transfer pollen from the male flowers to the female flowers.
Harvesting Your Sponge Gourds
The moment you’ve been waiting for! Harvesting your own sponge gourds is incredibly satisfying.
1. Timing is Key: Sponge gourds are typically ready to harvest about 2-3 months after planting. The exact timing will depend on the variety and growing conditions.
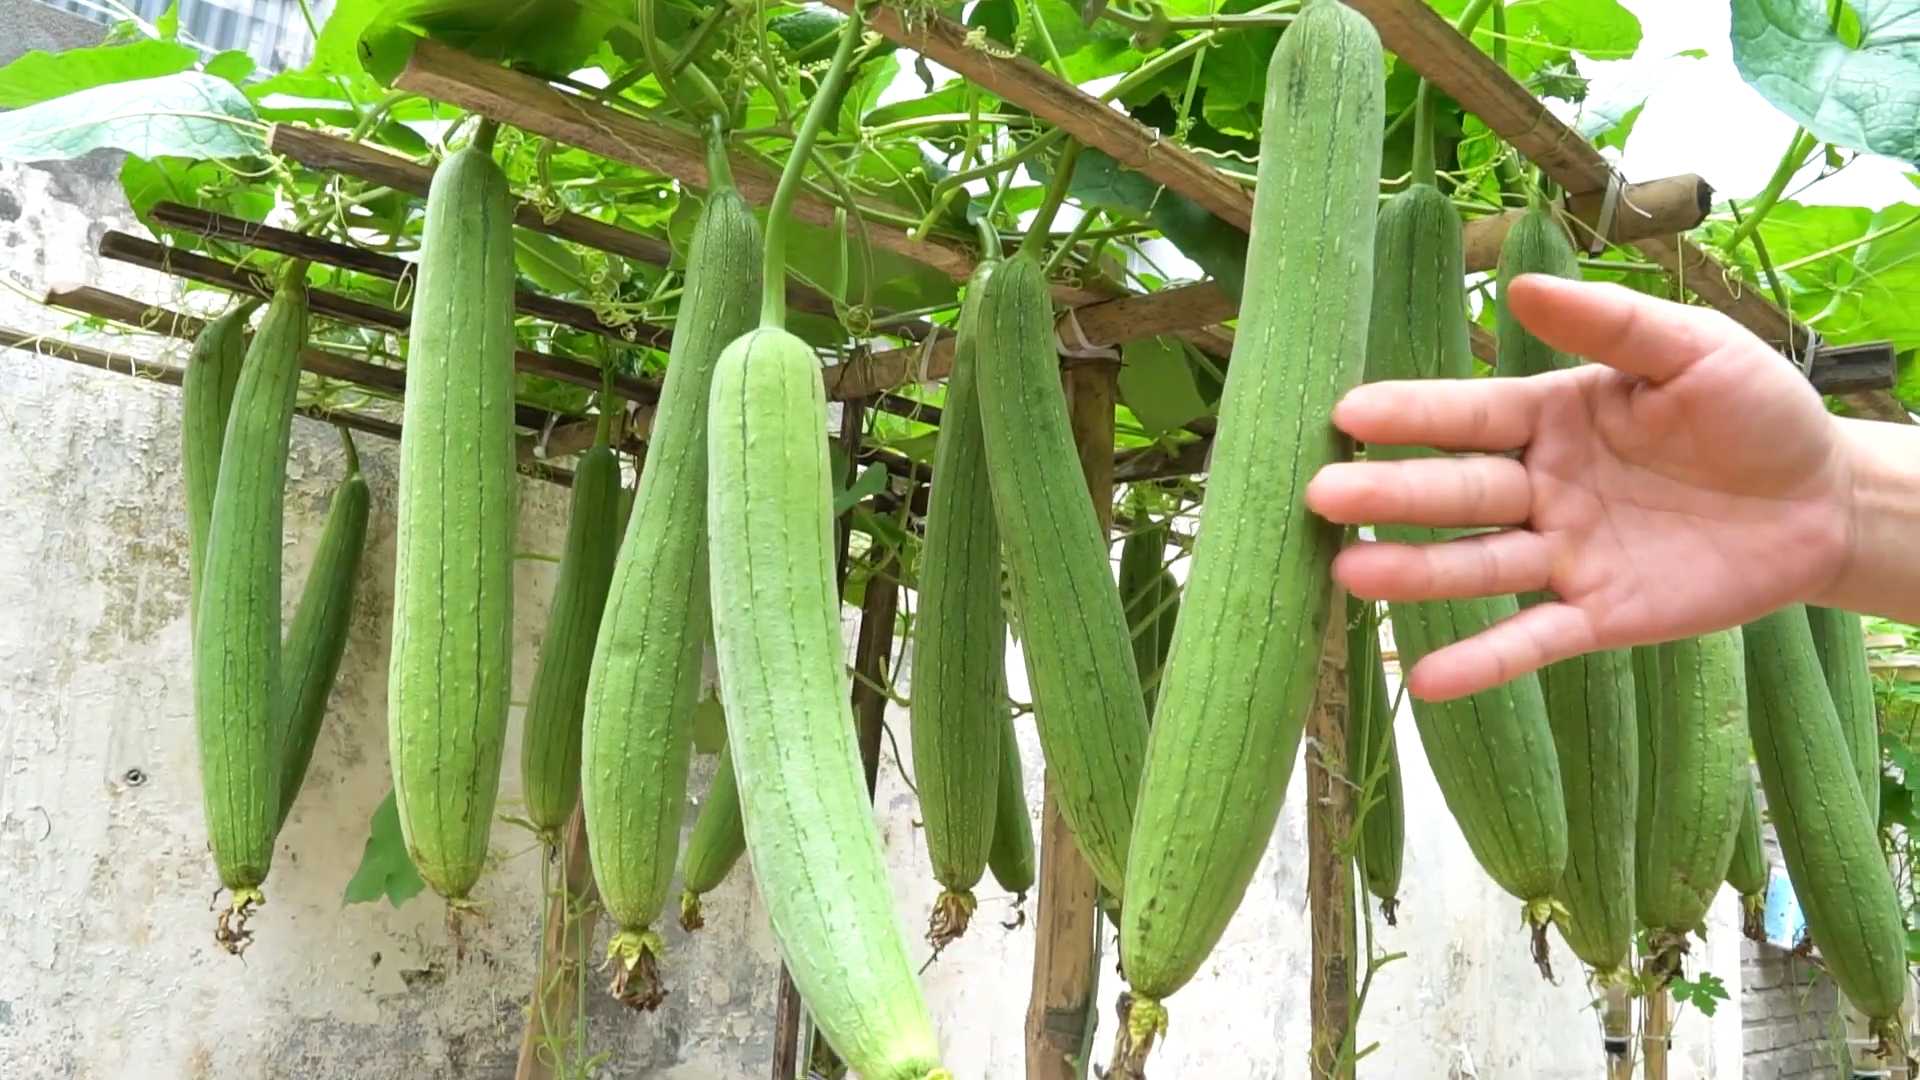
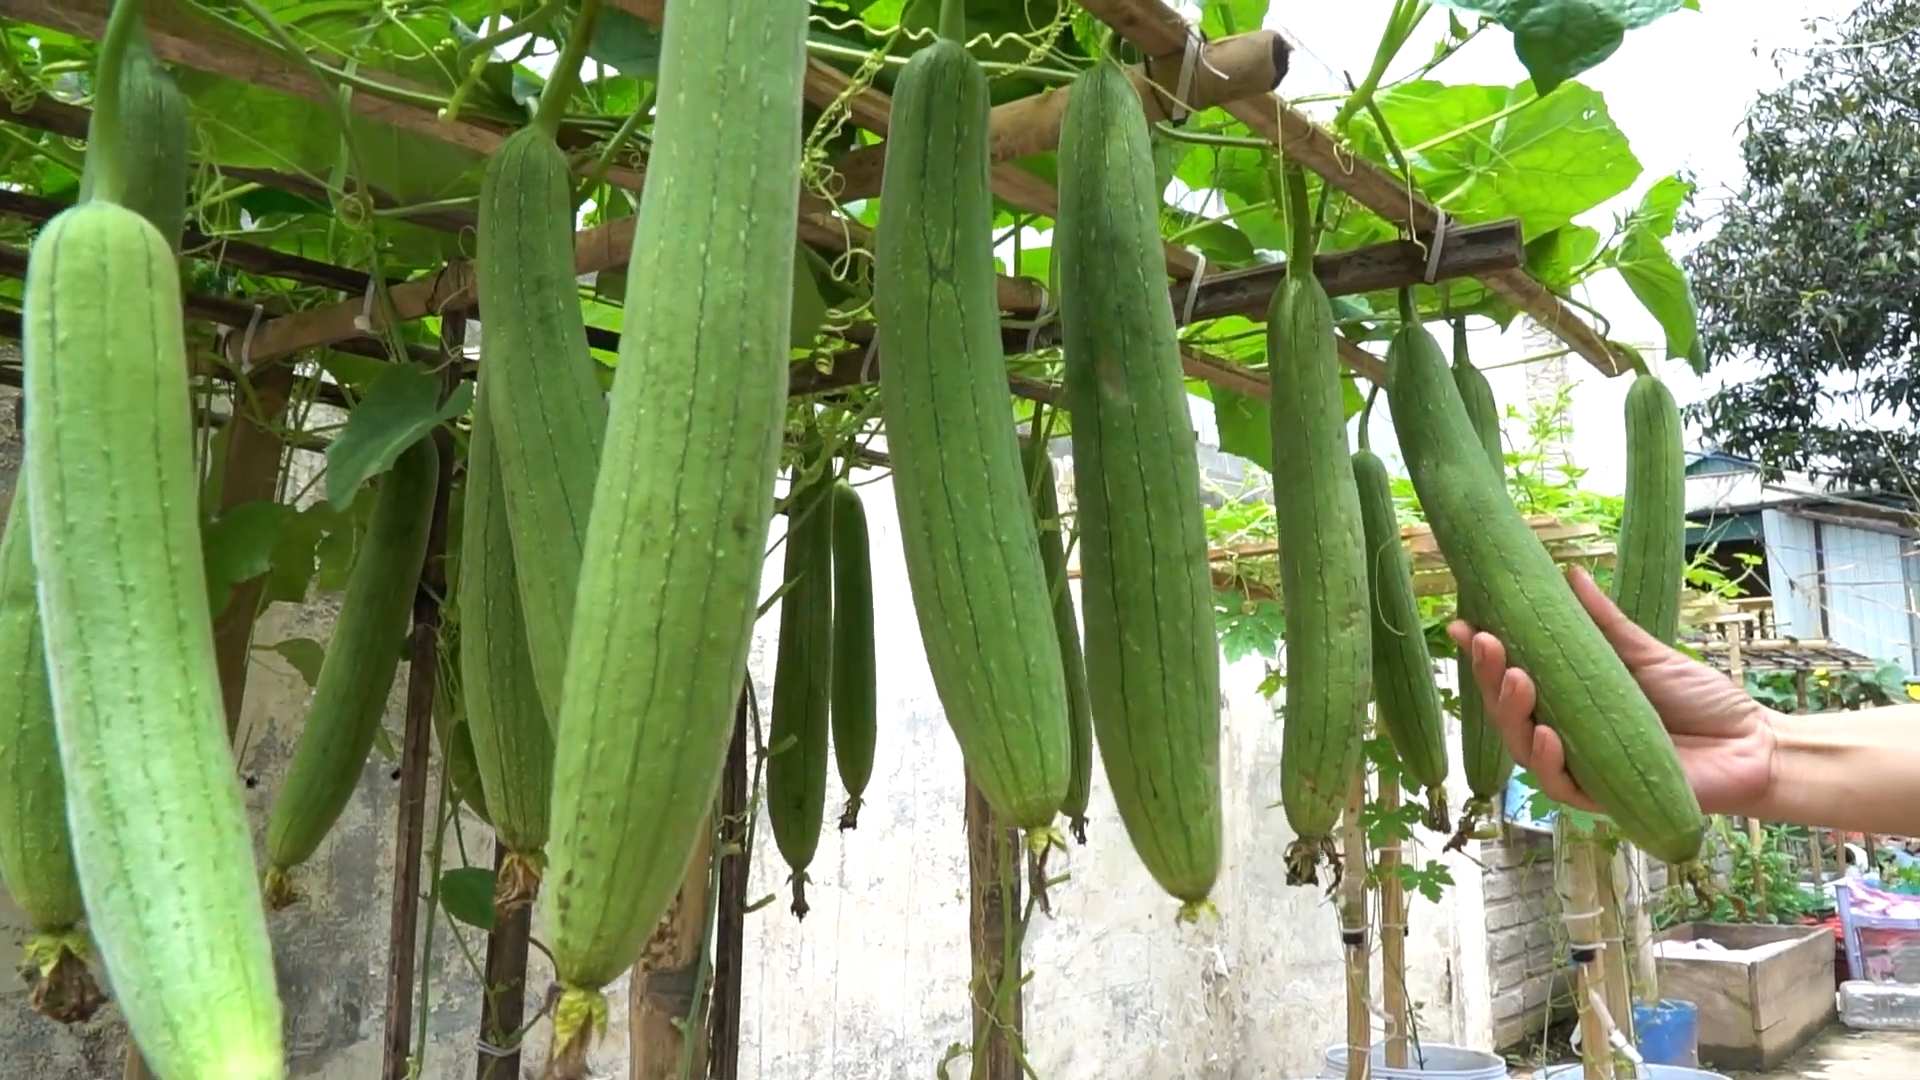
2. Check for Size and Tenderness: Harvest the gourds when they are young and tender, usually when they are about 6-12 inches long. The skin should be smooth and easily punctured with your fingernail. If the skin is tough and hard, the gourd is likely overripe and will be fibrous.
3. Use a Sharp Knife: Use a sharp knife or pruning shears to cut the gourd from the vine, leaving a short stem attached.
4. Enjoy Your Harvest: Sponge gourds can be stored in the refrigerator for up to a week. They are delicious in stir-fries, soups, and stews. You can also use them to make loofah sponges by allowing them to mature on the vine until the skin dries and the flesh decomposes.
Making Loofah Sponges (Optional)
If you want to make your own loofah sponges, here’s how:
1. Allow Gourds to Mature: Leave the gourds on the vine until the skin turns brown and dry. The gourds will become very lightweight.
2. Harvest the Mature Gourds: Cut the mature gourds from the vine.
3. Soak in Water: Soak the gourds in water for several days to soften the skin.
4. Remove the Skin: Once the skin is soft, you can peel it off by hand. You may need to use a knife to help remove stubborn pieces.
5. Remove the Seeds: Shake out the seeds from the inside of the gourd. You can save these seeds for planting next year.
6. Rinse and Dry: Rinse the loofah sponge thoroughly with water and allow it to dry completely in the sun.
7. Cut and Shape
Conclusion
So, there you have it! Growing your own sponge gourd at home is not only achievable but also incredibly rewarding. From seed to scrub, you’ll witness the fascinating life cycle of this versatile vegetable and gain a deep appreciation for the fruits (or rather, gourds) of your labor. This DIY project is a must-try for several compelling reasons.
Firstly, you gain complete control over the growing process. You know exactly what goes into your sponge gourd, avoiding potentially harmful pesticides and herbicides often used in commercial farming. This translates to a healthier and more flavorful final product. Secondly, it’s an incredibly sustainable practice. You’re reducing your carbon footprint by eliminating the need for transportation and packaging associated with store-bought sponge gourds. Plus, you can compost any unused parts of the plant, further enriching your garden soil. Thirdly, and perhaps most importantly, it’s a deeply satisfying experience. There’s something truly special about nurturing a plant from a tiny seed to a thriving vine laden with gourds.
But the fun doesn’t stop there! Once you’ve mastered the basics, you can experiment with different varieties of sponge gourd. Try growing the smaller, more tender varieties for stir-fries or the larger, more fibrous ones specifically for making sponges. You can also explore different trellising methods to maximize your yield and create a visually stunning garden feature. Consider companion planting with herbs like basil or marigolds to deter pests and attract beneficial insects.
Don’t be afraid to get creative and personalize your sponge gourd growing experience.
And speaking of sponges, once your gourds have matured and dried, the possibilities are endless. You can use them for everything from exfoliating your skin to scrubbing your dishes. They make fantastic natural cleaning tools that are both effective and eco-friendly. You can even cut them into different shapes and sizes to suit your specific needs.
We wholeheartedly encourage you to embark on this exciting journey of growing sponge gourd at home. It’s a project that’s both educational and practical, and it’s sure to bring you joy and satisfaction. So, grab some seeds, prepare your garden, and get ready to witness the magic of nature unfold.
We’re confident that you’ll be amazed by the results. And once you’ve harvested your first batch of homegrown sponge gourds, we’d love to hear about your experience! Share your tips, tricks, and photos with us in the comments below. Let’s create a community of passionate sponge gourd growers and inspire others to embrace this rewarding DIY project. Let us know what challenges you faced and how you overcame them. Your insights could be invaluable to other aspiring gardeners. Remember, every garden is unique, and every gardener has something to contribute. So, don’t be shy – share your sponge gourd success story with the world! We are especially interested in hearing about your local climate and how it affected your growing process. Did you have to make any adjustments to the recommended techniques? What kind of soil did you use? What was your watering schedule like? All of these details can help other gardeners in similar climates to successfully grow their own sponge gourd.
Finally, remember that patience is key. Growing sponge gourd takes time and effort, but the rewards are well worth it. Don’t get discouraged if you encounter setbacks along the way. Every gardener faces challenges, and learning from those challenges is part of the fun. So, embrace the process, enjoy the journey, and get ready to reap the benefits of your homegrown sponge gourd. Happy gardening!
FAQ
What is the best time of year to plant sponge gourd seeds?
Sponge gourd thrives in warm weather, so the best time to plant seeds is after the last frost, when the soil has warmed up to at least 65°F (18°C). In most regions, this is typically in late spring or early summer. If you live in a cooler climate, you can start the seeds indoors 4-6 weeks before the last expected frost and then transplant them outdoors once the weather warms up. Starting indoors gives the seedlings a head start and increases your chances of a successful harvest.
How much space does a sponge gourd vine need?
Sponge gourd vines are vigorous growers and require plenty of space to spread out. Ideally, you should provide at least 6-8 feet of space between plants. They also need a strong trellis or support structure to climb on. A sturdy fence, pergola, or even a custom-built trellis will work well. Make sure the support structure is strong enough to handle the weight of the mature vines and gourds. Insufficient space can lead to overcrowding, reduced yields, and increased susceptibility to diseases.
How often should I water my sponge gourd plants?
Sponge gourd plants need consistent moisture, especially during hot weather. Water deeply and regularly, aiming to keep the soil consistently moist but not waterlogged. A good rule of thumb is to water 2-3 times per week, depending on the weather conditions. Mulching around the base of the plants can help retain moisture and suppress weeds. During periods of heavy rain, you may need to reduce watering to prevent root rot. Check the soil moisture regularly by sticking your finger into the soil a few inches deep. If the soil feels dry, it’s time to water.
What kind of fertilizer should I use for sponge gourd?
Sponge gourd plants benefit from regular fertilization. Use a balanced fertilizer with equal amounts of nitrogen, phosphorus, and potassium (e.g., 10-10-10) during the growing season. You can also supplement with organic fertilizers like compost or well-rotted manure. Apply fertilizer every 2-3 weeks, following the instructions on the fertilizer package. Avoid over-fertilizing, as this can lead to excessive foliage growth and reduced fruit production. A soil test can help you determine the specific nutrient needs of your soil and guide your fertilizer choices.
How do I know when my sponge gourd is ready to harvest for sponges?
The timing of harvest depends on whether you want to use the sponge gourd for cooking or for making sponges. For cooking, harvest the gourds when they are young and tender, typically when they are about 6-8 inches long. For making sponges, allow the gourds to mature fully on the vine until they turn brown and the skin becomes hard and dry. This can take several months. Once the gourds are dry, you can harvest them and remove the skin and seeds to reveal the sponge-like interior. The gourd should feel light and hollow when it is ready to harvest for sponges.
How do I dry and process sponge gourd for use as a sponge?
Once you’ve harvested the mature, dried sponge gourds, the next step is to process them to remove the skin, seeds, and pulp, leaving only the fibrous sponge. First, soak the gourd in water for a few days to soften the skin. Then, use a knife or vegetable peeler to remove the skin. Next, cut off one end of the gourd and shake out the seeds. Rinse the inside of the gourd thoroughly to remove any remaining pulp. Finally, allow the sponge to dry completely in a well-ventilated area. You can then cut the sponge into desired shapes and sizes for various uses.
Are there any pests or diseases that commonly affect sponge gourd plants?
Yes, sponge gourd plants can be susceptible to certain pests and diseases. Common pests include aphids, squash bugs, and vine borers. Diseases include powdery mildew, downy mildew, and fungal infections. To prevent pest and disease problems, practice good garden hygiene, such as removing weeds and debris, providing good air circulation, and avoiding overhead watering. You can also use organic pest control methods, such as insecticidal soap or neem oil, to control pests. If you notice signs of disease, treat the plants with a fungicide according to the product instructions. Regular monitoring of your plants can help you catch problems early and prevent them from spreading.
Can I grow sponge gourd in a container?
Yes, you can grow sponge gourd in a container, but you’ll need a large container with good drainage. A container that is at least 20 gallons in size is recommended. Use a high-quality potting mix and provide a strong trellis or support structure for the vine to climb on. Container-grown sponge gourd plants may require more frequent watering and fertilization than those grown in the ground. Choose a sunny location for your container garden and monitor the plants regularly for pests and diseases. While container growing is possible, in-ground planting generally yields better results due to the larger root system that can develop.
How long does it take for a sponge gourd to mature?
The time it takes for a sponge gourd to mature depends on the variety, growing conditions, and climate. Generally, it takes about 90-120 days from planting to harvest for mature gourds suitable for making sponges. Younger gourds for cooking can be harvested earlier, typically around 60-70 days after planting. Keep in mind that these are just estimates, and the actual time may vary. Monitor your plants regularly and harvest the gourds when they reach the desired size and maturity.
Can I eat the leaves and flowers of the sponge gourd plant?
Yes, the young leaves and flowers of the sponge gourd plant are edible and can be used in various culinary dishes. The leaves can be cooked like spinach or added to soups and stews. The flowers can be stuffed, battered, and fried, or used as a garnish. However, it’s important to only consume young, tender leaves and flowers, as older ones


Leave a Comment