

Grow Your Own Bok Choy, and unlock a world of fresh, crisp flavor right outside your door! Have you ever dreamed of strolling into your garden and harvesting vibrant, healthy greens for a delicious stir-fry or salad? Well, dream no more! This DIY guide is your key to cultivating this nutritious and versatile vegetable with ease.
Bok choy, also known as pak choi, has a rich history rooted in Chinese cuisine, dating back over 5,000 years. It’s been a staple in Asian diets for centuries, prized for its mild, slightly sweet taste and impressive nutritional profile. But you don’t need to be a seasoned gardener or live in Asia to enjoy this leafy green. I’m here to show you how simple it is to grow your own bok choy, no matter your experience level.
In today’s world, where we’re increasingly conscious of where our food comes from, growing your own produce is more appealing than ever. Not only does it guarantee freshness and quality, but it also allows you to avoid harmful pesticides and support sustainable practices. Plus, let’s be honest, there’s something incredibly satisfying about nurturing a plant from seed to table. This DIY trick will save you money at the grocery store, reduce your carbon footprint, and provide you with a constant supply of delicious, healthy bok choy. So, grab your gardening gloves, and let’s get started!
Grow Your Own Bok Choy: A Beginner’s Guide
Hey there, fellow gardening enthusiasts! I’m so excited to share my experience with growing bok choy. It’s surprisingly easy, even if you’re a complete newbie like I was when I started. Bok choy is a delicious and nutritious leafy green that adds a fantastic crunch to stir-fries, soups, and salads. Plus, growing your own means you get the freshest, most flavorful bok choy possible. Let’s dive in!
Choosing Your Bok Choy Variety
Before we get our hands dirty, let’s talk about bok choy varieties. There are a few different types, and choosing the right one can make a difference in your success.
* **Shanghai Bok Choy:** This is probably the most common type. It has light green stems and spoon-shaped leaves. It’s known for its mild flavor and quick growth. I personally love this one because it’s so versatile.
* **Baby Bok Choy:** As the name suggests, this is a smaller version of Shanghai bok choy. It’s perfect for single servings and has a slightly sweeter taste.
* **Purple Lady Bok Choy:** If you want to add a pop of color to your garden (and your plate!), this is the one for you. It has beautiful purple leaves and a slightly more peppery flavor.
* **Dwarf Bok Choy:** This variety is compact and great for container gardening or small spaces.
I recommend starting with Shanghai or Baby Bok Choy. They’re relatively easy to grow and widely available.
Getting Started: Seeds vs. Seedlings
You have two options when it comes to starting your bok choy: seeds or seedlings.
* **Seeds:** Starting from seeds is more economical, and you have a wider variety to choose from. However, it requires a bit more patience and attention.
* **Seedlings:** Buying seedlings gives you a head start, but you’re limited to what’s available at your local nursery.
I’ve tried both methods, and honestly, I prefer starting from seeds. It’s just so rewarding to watch them sprout and grow into beautiful bok choy plants.
Planting Your Bok Choy
Okay, let’s get down to the nitty-gritty! Here’s a step-by-step guide to planting your bok choy, whether you’re starting from seeds or seedlings.
Planting from Seeds
1. **Choose the Right Time:** Bok choy is a cool-season crop, which means it thrives in cooler temperatures. The best time to plant is in early spring or late summer/early fall. Avoid planting during the hottest months of summer, as the heat can cause the plants to bolt (go to seed prematurely). I usually aim for planting in late August for a fall harvest.
2. **Prepare the Soil:** Bok choy prefers well-drained, fertile soil. Amend your soil with compost or other organic matter to improve its drainage and nutrient content. I like to add a generous amount of compost to my garden beds before planting.
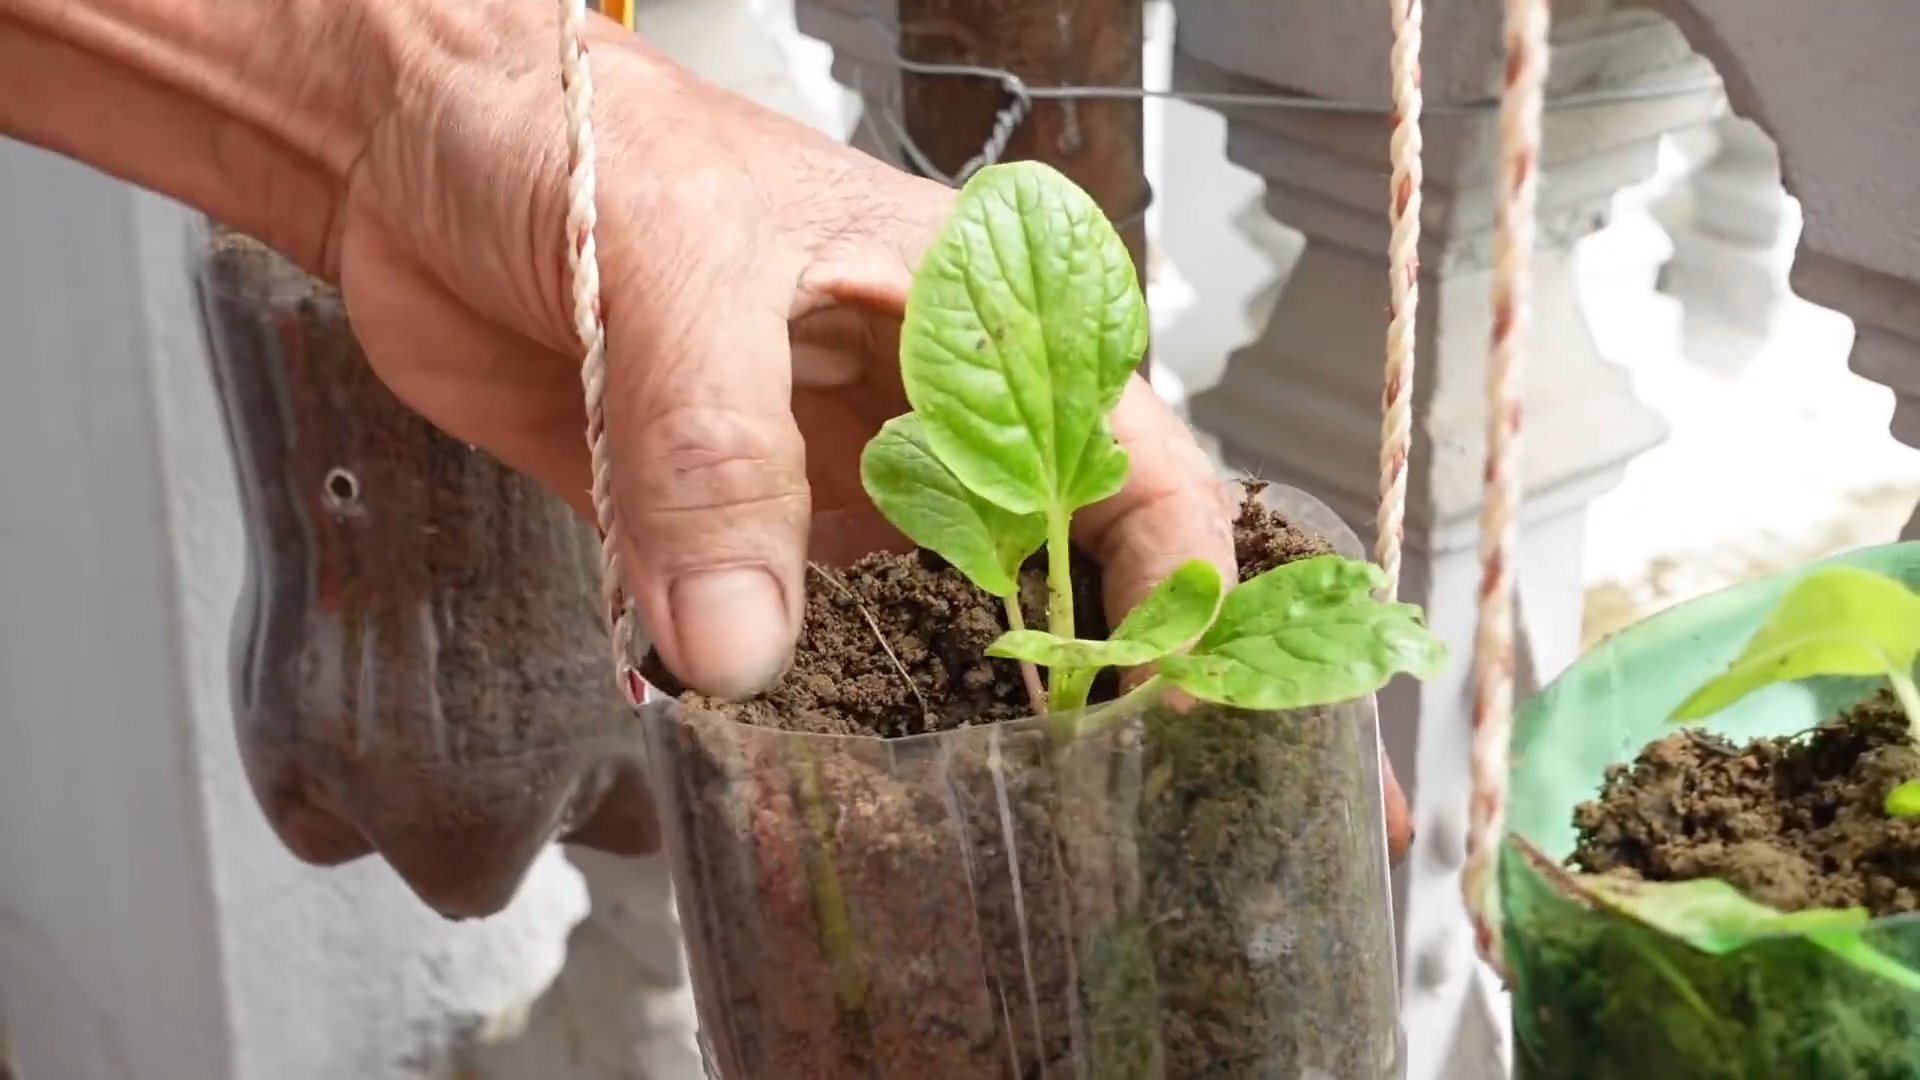
3. **Sow the Seeds:** Sow the seeds about 1/4 to 1/2 inch deep and 1-2 inches apart. You can sow them directly in the garden or start them indoors in seed trays. If you’re starting them indoors, transplant them to the garden when they have a few true leaves.
4. **Water Gently:** Water the seeds gently after planting to avoid disturbing them. Keep the soil consistently moist but not waterlogged. I use a watering can with a gentle shower head to avoid washing away the seeds.
5. **Thin the Seedlings:** Once the seedlings emerge and have a few true leaves, thin them to about 6-8 inches apart. This will give them enough space to grow and prevent overcrowding. Don’t just pull them out! Gently snip them at the soil line with scissors to avoid disturbing the roots of the remaining plants.
Planting Seedlings
1. **Choose Healthy Seedlings:** Select seedlings that are healthy and vibrant, with no signs of disease or pests. Avoid seedlings that are root-bound (the roots are tightly circling the bottom of the pot).
2. **Prepare the Planting Hole:** Dig a hole that is slightly larger than the root ball of the seedling.
3. **Gently Remove the Seedling:** Gently remove the seedling from its container, being careful not to damage the roots. If the roots are root-bound, gently loosen them before planting.
4. **Plant the Seedling:** Place the seedling in the hole and backfill with soil. Make sure the top of the root ball is level with the surrounding soil.
5. **Water Thoroughly:** Water the seedling thoroughly after planting to help it establish its roots.
Caring for Your Bok Choy
Now that your bok choy is planted, it’s time to give it the care it needs to thrive.
* **Watering:** Bok choy needs consistent moisture to grow well. Water regularly, especially during dry periods. Aim to keep the soil consistently moist but not waterlogged. I usually water my bok choy every other day, or more often if the weather is hot and dry.
* **Fertilizing:** Bok choy is a heavy feeder, so it benefits from regular fertilization. Use a balanced fertilizer or side-dress with compost every few weeks. I like to use a liquid seaweed fertilizer, which is gentle and effective.
* **Weeding:** Keep the area around your bok choy free of weeds. Weeds compete with the bok choy for nutrients and water. I try to weed my garden beds at least once a week.
* **Pest Control:** Bok choy can be susceptible to pests such as aphids, cabbage worms, and flea beetles. Inspect your plants regularly for signs of pests and take action if necessary. I’ve found that neem oil is effective against many common garden pests. You can also use row covers to protect your plants from pests.
* **Sunlight:** Bok choy prefers partial shade, especially during the hottest part of the day. If you’re growing it in full sun, provide some shade during the afternoon. I’ve had success growing bok choy under a shade cloth during the summer months.
Harvesting Your Bok Choy
The best part of growing your own bok choy is, of course, harvesting it! You can harvest bok choy at any stage of growth, depending on your preference.
* **Baby Bok Choy:** Harvest baby bok choy when the leaves are about 4-6 inches long. You can harvest the entire plant or just the outer leaves.
* **Mature Bok Choy:** Harvest mature bok choy when the heads are firm and compact. You can harvest the entire plant or just the outer leaves.
To harvest, simply cut the bok choy at the base of the plant with a sharp knife. I like to harvest my bok choy in the morning, when the leaves are crisp and fresh.
Troubleshooting
Even with the best care, you might encounter some problems when growing bok choy. Here are a few common issues and how to address them:
* **Bolting:** Bolting is when the plant prematurely goes to seed. This is usually caused by hot weather or stress. To prevent bolting, plant bok choy in the cool season and provide shade during the hottest part of the day.
* **Aphids:** Aphids are small, sap-sucking insects that can infest bok choy. They can cause the leaves to become distorted and yellow. To control aphids, spray the plants with insecticidal soap or neem oil.
* **Cabbage Worms:** Cabbage worms are the larvae of cabbage butterflies. They can eat holes in the leaves of bok choy. To control cabbage worms, handpick them off the plants or spray with Bacillus thuringiensis (Bt).
* **Flea Beetles:** Flea beetles are small, jumping insects that can chew small holes in the leaves of bok choy. To control flea beetles, use row covers to protect your plants or spray with neem oil.
Enjoying Your Harvest
Now that you’ve harvested your bok choy, it’s time to enjoy it! Bok choy is a versatile vegetable that can be used in a variety of dishes.
* **Stir-fries:** Bok choy is a classic ingredient in stir-fries. It adds a delicious crunch and mild flavor.
* **Soups:** Bok choy can be added to soups for extra flavor and nutrients.
* **Salads:** Baby bok choy can be used in salads for a mild and refreshing taste.
* **Steaming:** Steamed bok choy is a simple and healthy side dish.
* **Sautéing:** Sautéed bok choy is a quick and easy way to prepare it.
I personally love adding bok choy to my stir-fries. It’s so easy to prepare and adds a wonderful texture and flavor.
Extending Your Harvest
To extend your bok choy harvest, consider succession planting. This means planting new seeds or seedlings every few weeks. This will ensure that you have a continuous supply of bok choy throughout the growing season. I usually plant a new batch of bok choy every 2-3 weeks to keep my harvest going.
Conclusion
So, there you have it! Growing your own bok choy at home is not only achievable, but it’s also incredibly rewarding. From seed to stir-fry, the journey is filled with the satisfaction of nurturing your own food and enjoying the unparalleled freshness that store-bought produce simply can’t match. We’ve walked you through the simple steps, from choosing the right seeds and preparing your soil to providing the optimal growing conditions and harvesting your bounty.
Why is this DIY trick a must-try? Because it puts you in control. You know exactly what goes into your bok choy – no pesticides, no hidden chemicals, just pure, wholesome goodness. Plus, it’s a fantastic way to connect with nature, learn about the growing process, and reduce your carbon footprint by minimizing transportation. And let’s not forget the cost savings! A packet of seeds is far more economical than buying bok choy week after week.
But the benefits extend beyond the practical. There’s a certain magic in watching a tiny seed sprout and transform into a vibrant, leafy vegetable. It’s a reminder of the power of nature and the simple joys of life. And when you finally harvest your own bok choy, the taste is simply exquisite. It’s crisper, sweeter, and more flavorful than anything you’ll find in the supermarket.
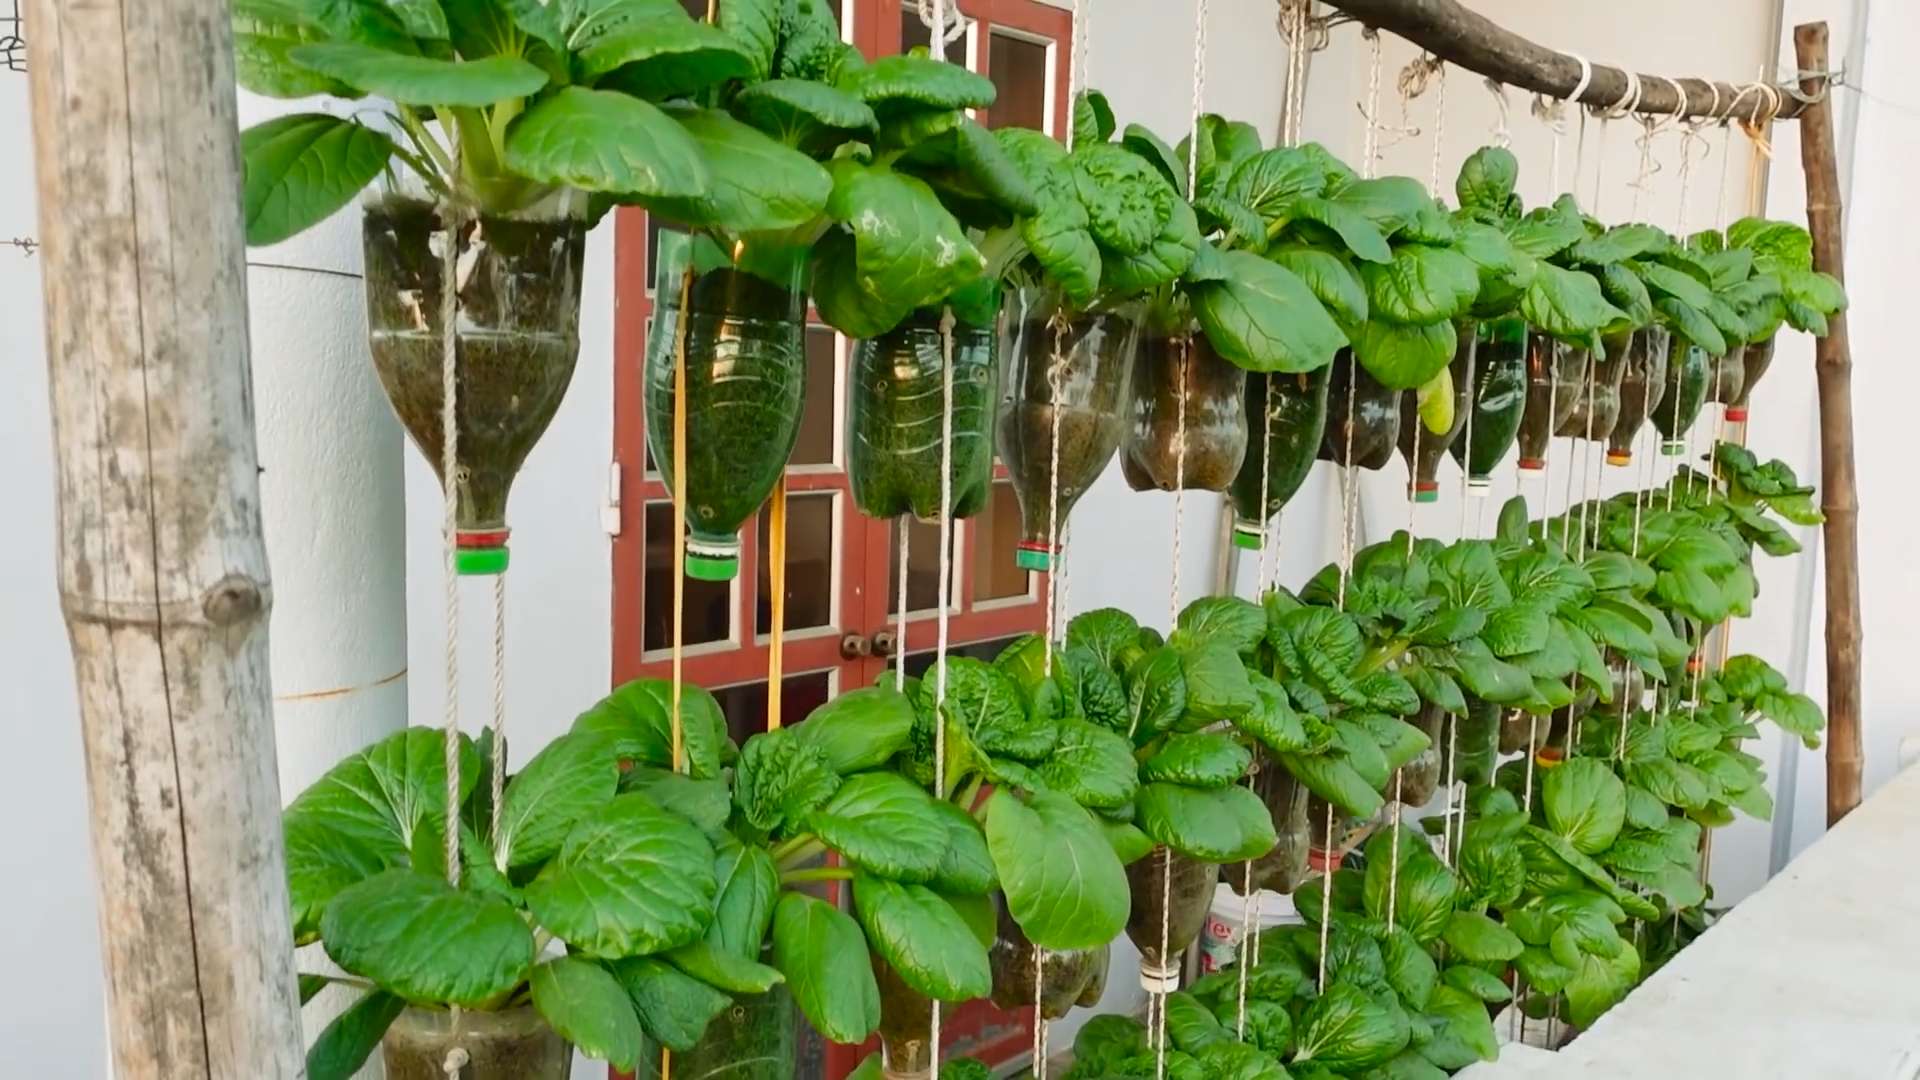
Looking for variations? Consider growing different varieties of bok choy! Baby bok choy is perfect for quick stir-fries, while Shanghai bok choy offers a slightly milder flavor. You can also experiment with companion planting. Try planting your bok choy alongside herbs like dill or chamomile to deter pests and attract beneficial insects. Another fun variation is succession planting. Plant a new batch of seeds every few weeks to ensure a continuous harvest throughout the growing season. If you’re short on space, bok choy thrives in containers, making it ideal for balconies and patios. Just be sure to choose a pot that’s at least 12 inches deep to accommodate the roots.
Don’t be intimidated if you’re a beginner gardener. Bok choy is a relatively easy vegetable to grow, and even if you make a few mistakes along the way, you’ll still learn valuable lessons. The key is to be patient, observant, and willing to experiment.
We wholeheartedly encourage you to give this DIY trick a try. Start small, be consistent, and don’t be afraid to ask for help if you need it. There are countless online resources and gardening communities that can provide support and guidance.
Once you’ve harvested your first batch of homegrown bok choy, we’d love to hear about your experience! Share your photos, tips, and recipes with us in the comments below. Let’s create a community of bok choy enthusiasts and inspire others to embrace the joys of growing their own food. Growing your own **bok choy** is a journey, not just a destination. Enjoy the process, savor the flavor, and reap the rewards of your hard work. Happy gardening!
Frequently Asked Questions (FAQ)
What is the best time of year to plant bok choy?
Bok choy is a cool-season crop, meaning it thrives in cooler temperatures. The best time to plant it is in early spring or late summer/early fall. Avoid planting during the hottest months of summer, as the heat can cause the plants to bolt (go to seed prematurely), resulting in bitter-tasting leaves. For a spring crop, start seeds indoors 4-6 weeks before the last expected frost. For a fall crop, sow seeds directly into the garden in late summer/early fall, about 6-8 weeks before the first expected frost.
How much sunlight does bok choy need?
Bok choy needs at least 4-6 hours of sunlight per day to thrive. While it can tolerate some shade, especially during the hottest part of the day, insufficient sunlight can result in leggy, weak plants. Choose a location in your garden that receives plenty of morning sun and some afternoon shade, especially in warmer climates. If you’re growing bok choy indoors, use grow lights to supplement natural sunlight.
What kind of soil is best for growing bok choy?
Bok choy prefers well-drained, fertile soil that is rich in organic matter. The ideal soil pH is between 6.0 and 7.5. Before planting, amend your soil with compost, aged manure, or other organic materials to improve drainage, fertility, and water retention. Avoid heavy clay soils, as they can become waterlogged and inhibit root growth. If you have clay soil, consider growing bok choy in raised beds or containers.
How often should I water bok choy?
Bok choy needs consistent moisture to thrive. Water deeply and regularly, especially during dry periods. Aim to keep the soil consistently moist but not waterlogged. Check the soil moisture regularly by sticking your finger about an inch into the soil. If it feels dry, it’s time to water. Avoid overhead watering, as it can promote fungal diseases. Instead, water at the base of the plants.
What are some common pests and diseases that affect bok choy?
Bok choy is susceptible to several common pests and diseases, including aphids, flea beetles, cabbage worms, and downy mildew. To prevent pest and disease problems, practice good garden hygiene. Remove weeds and debris regularly, and rotate your crops each year. Inspect your plants regularly for signs of pests or diseases, and take action promptly if you notice any problems. You can use organic pest control methods, such as insecticidal soap or neem oil, to control aphids and other pests. For fungal diseases, ensure good air circulation and avoid overhead watering.
How do I harvest bok choy?
You can harvest bok choy at any stage of growth, depending on your preference. For baby bok choy, harvest when the leaves are about 4-6 inches long. For mature bok choy, harvest when the heads are firm and compact, typically about 6-8 weeks after planting. To harvest, simply cut the entire head of bok choy at the base with a sharp knife. You can also harvest individual leaves as needed, starting with the outer leaves.
Can I grow bok choy in containers?
Yes, bok choy grows well in containers, making it a great option for gardeners with limited space. Choose a pot that is at least 12 inches deep and wide to accommodate the roots. Use a well-draining potting mix that is rich in organic matter. Water regularly and fertilize every few weeks with a balanced fertilizer. Place the container in a location that receives at least 4-6 hours of sunlight per day.
How do I store bok choy after harvesting?
To store bok choy after harvesting, rinse it thoroughly and pat it dry. Wrap the bok choy in a damp paper towel and place it in a plastic bag in the refrigerator. It will keep for up to a week. You can also freeze bok choy, but it will lose some of its texture. To freeze, blanch the bok choy in boiling water for 2-3 minutes, then plunge it into ice water to stop the cooking process. Drain well and pack into freezer bags or containers.
Why is my bok choy bolting (going to seed)?
Bolting is a common problem with bok choy, especially during hot weather. Bolting occurs when the plant is stressed, causing it to produce flowers and seeds prematurely. To prevent bolting, plant bok choy during the cooler months of spring or fall. Provide adequate water and shade during hot weather. Choose bolt-resistant varieties of bok choy. If your bok choy does bolt, you can still harvest the leaves, but they may taste bitter.
Can I eat the flowers of bok choy?
Yes, the flowers of bok choy are edible and have a mild, slightly sweet flavor. They can be added to salads, stir-fries, or used as a garnish. However, once the plant has bolted, the leaves may become bitter, so it’s best to harvest the flowers before the leaves become too bitter.

Leave a Comment