

Growing Bananas at Home might seem like a tropical dream reserved for those living in sun-drenched climates, but I’m here to tell you that with a few clever tricks and a dash of DIY spirit, you can cultivate your own little banana paradise, no matter where you live!
For centuries, bananas have been a staple food and a symbol of abundance in many cultures. From their origins in Southeast Asia to their widespread cultivation across the globe, these potassium-rich fruits have nourished and delighted people for generations. Imagine the satisfaction of harvesting your own homegrown bananas, knowing you’ve connected with this rich history and brought a touch of the tropics to your own backyard (or balcony!).
But why bother with the effort? Well, store-bought bananas are often picked green and ripened artificially, which can impact their flavor and nutritional value. Plus, growing bananas at home allows you to choose unique varieties that you might not find in your local supermarket. More importantly, in today’s world, where sustainability and self-sufficiency are becoming increasingly important, learning to grow your own food is a rewarding and empowering experience. This DIY guide will equip you with the knowledge and techniques you need to successfully grow bananas at home, even if you’re a complete beginner. Get ready to embark on a fun and fruitful adventure!
Growing Bananas at Home: Your DIY Guide to Tropical Fruit in Your Backyard
Hey there, fellow plant enthusiasts! Ever dreamed of harvesting your own bananas right in your backyard? It might sound like a tropical fantasy, but with a little know-how and some patience, you can absolutely grow bananas at home, even if you don’t live in the tropics. I’m going to walk you through everything you need to know, from choosing the right variety to dealing with pests. Let’s get started!
Choosing the Right Banana Variety
The first step to banana-growing success is selecting a variety that suits your climate and space. Not all bananas are created equal! Some are giants that need tons of room, while others are more compact and cold-hardy.
Here’s a breakdown of some popular options:
* Dwarf Cavendish: This is a classic choice for home growers. It’s relatively small (8-10 feet tall), produces delicious fruit, and is fairly tolerant of cooler temperatures. This is the one I recommend for beginners!
* Grand Nain: Similar to Dwarf Cavendish but slightly larger (10-12 feet). It’s a prolific producer and has excellent fruit quality.
* Ice Cream (Blue Java): This variety is known for its unique blue-tinged fruit that tastes like vanilla ice cream! It’s a bit more challenging to grow, but the reward is well worth it.
* Rojo (Red Dacca): A beautiful banana with reddish-purple pseudostems and sweet, slightly tangy fruit. It’s a bit more sensitive to cold than some other varieties.
* Orinoco: A cold-hardy variety that can tolerate temperatures down to the low 20s (Fahrenheit) for short periods. The fruit is starchy and best cooked.
Things to consider when choosing:
* Climate: How cold does it get in your area? Choose a variety that can tolerate your winter temperatures.
* Space: How much room do you have? Dwarf varieties are best for smaller gardens or containers.
* Taste: What kind of banana do you like to eat? Do some research to find a variety that suits your palate.
Preparing the Planting Site
Bananas are heavy feeders, so preparing the soil properly is crucial. They also need plenty of sunlight and protection from strong winds.
Here’s what you need to do:
1. Choose a sunny location: Bananas need at least 6-8 hours of direct sunlight per day.
2. Amend the soil: Bananas thrive in rich, well-drained soil. Amend your soil with plenty of organic matter, such as compost, aged manure, or peat moss. I usually dig in a generous amount of compost a few weeks before planting.
3. Ensure good drainage: Bananas don’t like soggy feet. If your soil is heavy clay, consider planting in a raised bed or amending it with sand and perlite to improve drainage.
4. Protect from wind: Strong winds can damage banana plants, especially when they’re young. Plant them in a sheltered location or provide windbreaks, such as fences or shrubs.
Planting Your Banana Plant
Now comes the fun part – planting your banana plant! You can start with a rhizome (a horizontal underground stem), a sucker (a small offshoot from the main plant), or a tissue-cultured plant. I’ve had the best luck with tissue-cultured plants, as they’re usually disease-free and grow quickly.
Follow these steps:
1. Dig a hole: Dig a hole that’s twice as wide and as deep as the root ball of your banana plant.
2. Place the plant in the hole: Gently remove the plant from its container and place it in the hole. Make sure the top of the root ball is level with the surrounding soil.
3. Backfill the hole: Fill the hole with the amended soil, gently firming it around the plant.
4. Water thoroughly: Water the plant deeply after planting to help settle the soil and encourage root growth.
5. Mulch around the plant: Apply a layer of mulch around the base of the plant to help retain moisture, suppress weeds, and regulate soil temperature. I like to use straw or wood chips.
Caring for Your Banana Plant
Once your banana plant is in the ground, it’s time to provide it with the care it needs to thrive. This includes watering, fertilizing, and protecting it from pests and diseases.
Watering
Bananas need plenty of water, especially during the growing season. Water deeply and regularly, especially during hot, dry weather. The soil should be consistently moist but not waterlogged. I usually water my banana plants every 2-3 days during the summer.
Fertilizing
Bananas are heavy feeders and need regular fertilization to produce healthy growth and abundant fruit.
Here’s a fertilizing schedule I recommend:
1. Spring: Apply a balanced fertilizer (e.g., 10-10-10) every 4-6 weeks.
2. Summer: Increase the frequency of fertilization to every 2-3 weeks. Use a fertilizer that’s high in potassium, which is essential for fruit development. I like to use a fertilizer specifically formulated for bananas.
3. Fall: Reduce the frequency of fertilization to once a month.
4. Winter: Do not fertilize during the winter months, as the plant is dormant.
You can also supplement with organic fertilizers, such as compost tea or fish emulsion.
Pruning
Banana plants don’t need a lot of pruning, but it’s important to remove any dead or damaged leaves. You should also remove any suckers that grow from the base of the plant, unless you want to propagate new plants. I usually leave one or two suckers to replace the main plant after it fruits.
Pest and Disease Control
Bananas can be susceptible to a variety of pests and diseases, including:
* Aphids: These small, sap-sucking insects can weaken the plant and transmit diseases. Control them with insecticidal soap or neem oil.
* Spider mites: These tiny pests can cause yellowing and stippling of the leaves. Control them with insecticidal soap or horticultural oil.
* Banana weevils: These beetles can damage the pseudostem and roots of the plant. Control them with insecticides or by removing infested plant material.
* Fusarium wilt (Panama disease): This fungal disease can cause yellowing and wilting of the leaves, eventually killing the plant. There is no cure for Fusarium wilt, so it’s important to choose disease-resistant varieties.
* Black Sigatoka: This fungal disease causes leaf spots and can reduce fruit yield. Control it with fungicides or by removing infected leaves.
I always recommend inspecting your banana plants regularly for signs of pests or diseases. Early detection and treatment are key to preventing serious problems.
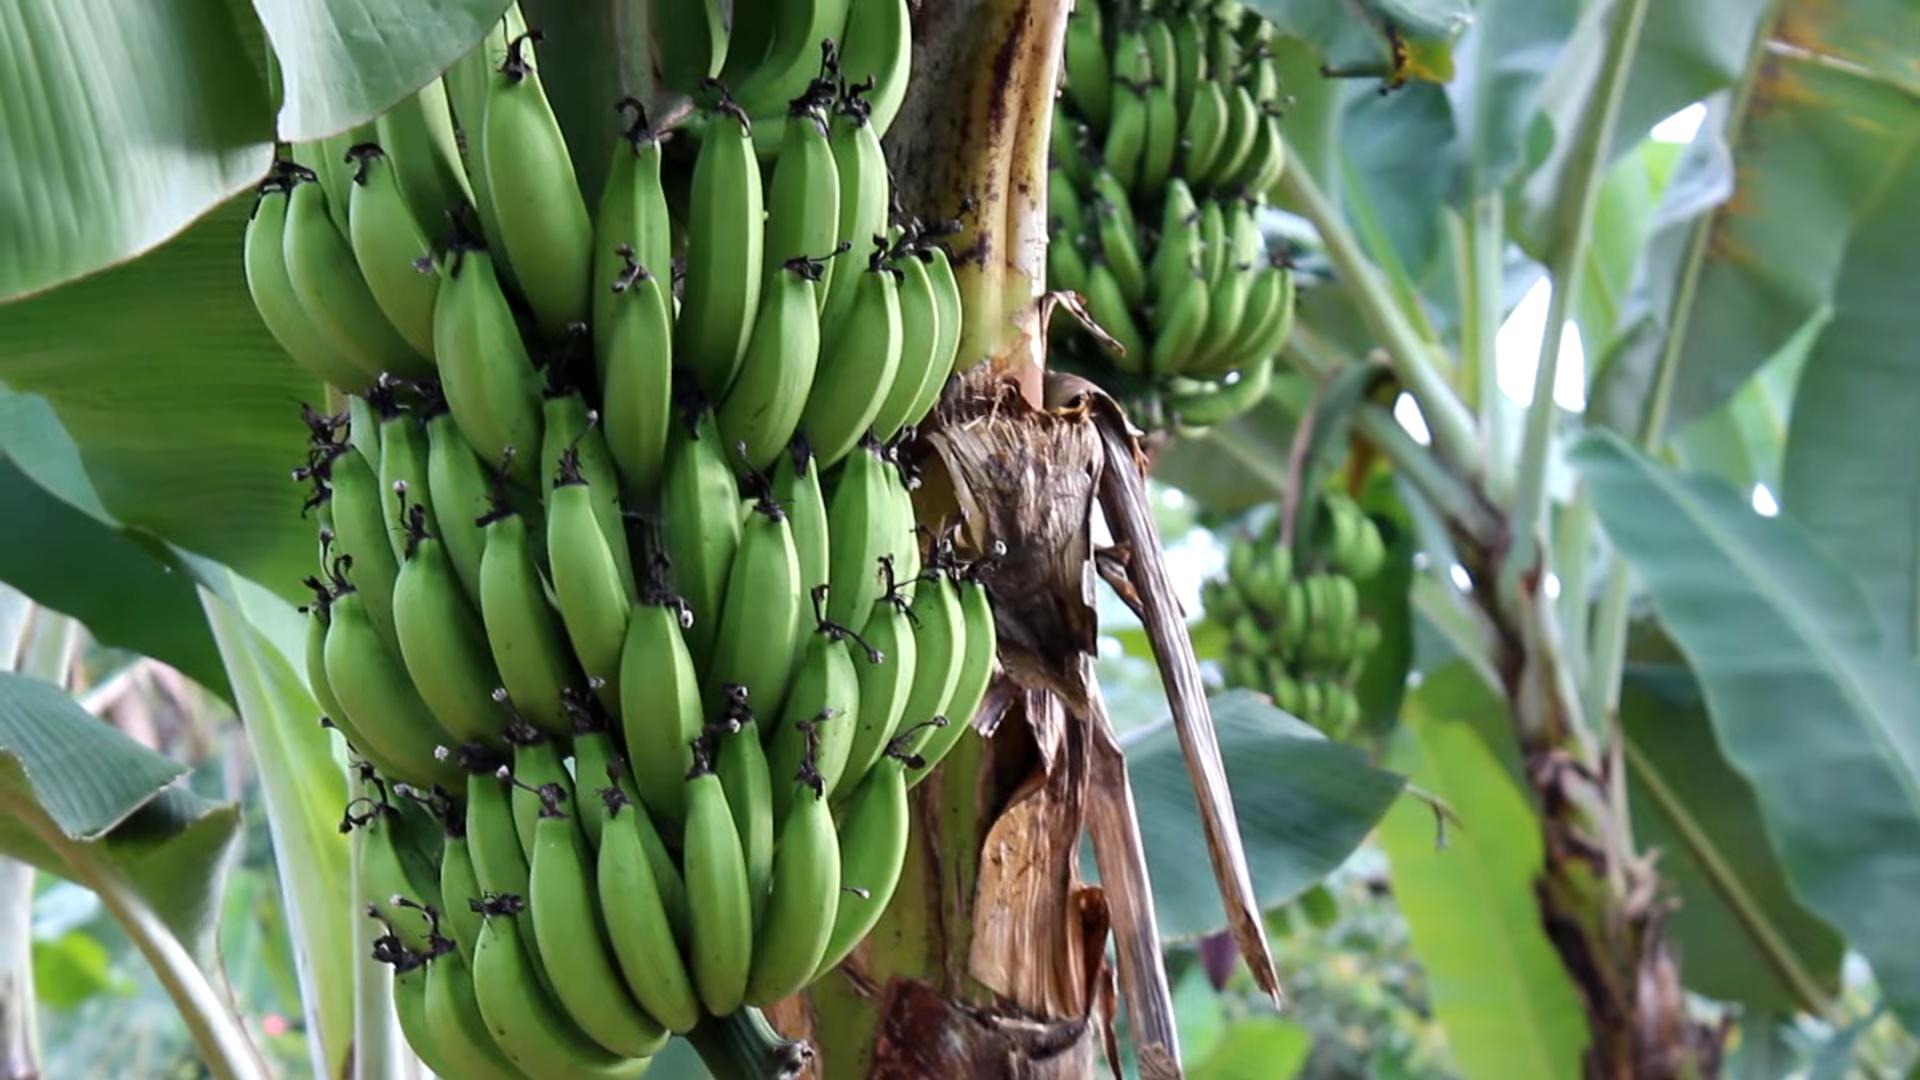
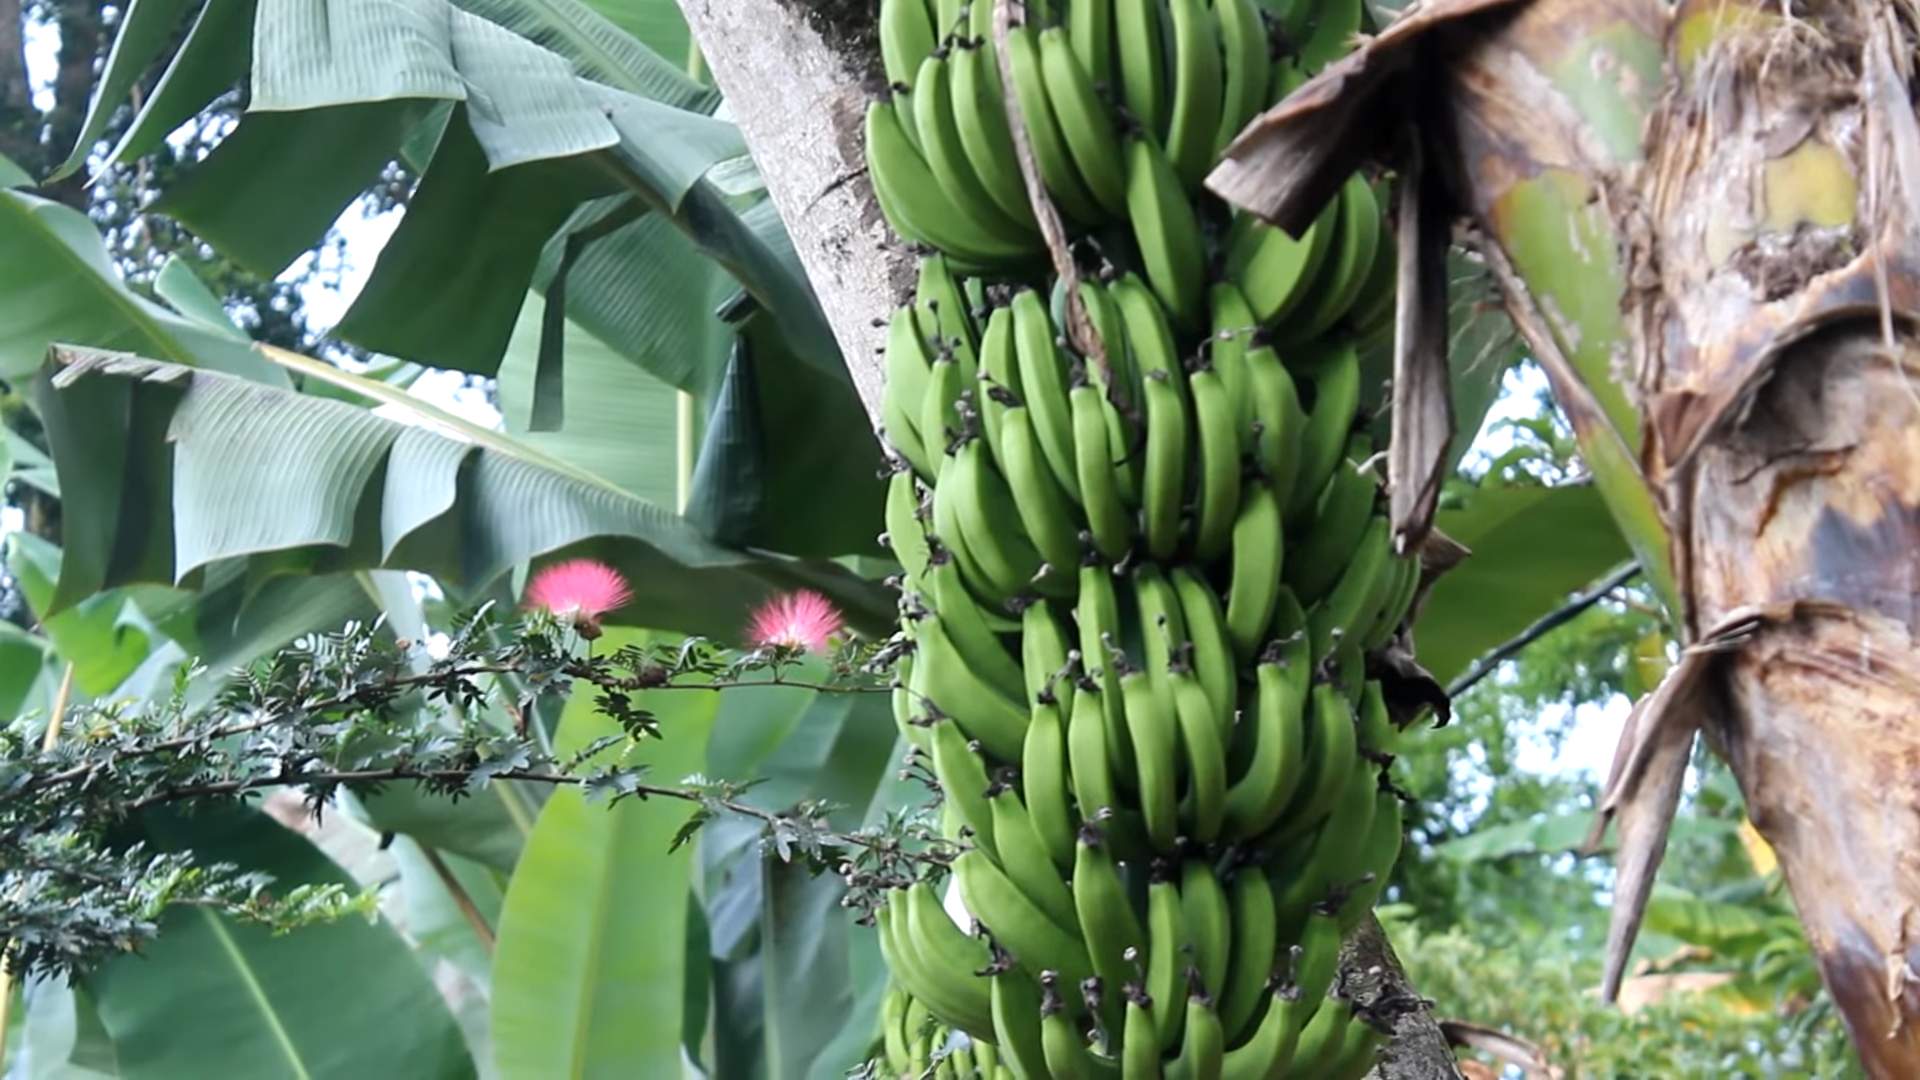
Harvesting Your Bananas
After about 9-12 months, your banana plant will produce a flower stalk, which will eventually develop into a bunch of bananas. The time it takes for the bananas to ripen depends on the variety and the climate.
Here’s how to tell when your bananas are ready to harvest:
1. The bananas will become plump and rounded.
2. The ridges on the bananas will become less prominent.
3. The bananas will start to turn yellow (or red, depending on the variety).
To harvest your bananas, cut the entire bunch from the plant with a sharp knife. Hang the bunch in a cool, dry place to ripen. You can also cut individual hands of bananas as they ripen.
Important Note: After your banana plant fruits, the main pseudostem will die. However, the suckers that you left will continue to grow and produce new plants. You can remove the old pseudostem after it has completely died.
Overwintering Banana Plants in Colder Climates
If you live in a colder climate, you’ll need to protect your banana plants from frost and freezing temperatures. Here are a few options:
* Container growing: Grow your banana plant in a large container that can be moved indoors during the winter.
* Mulching: Apply a thick layer of mulch around the base of the plant to insulate the roots.
* Wrapping: Wrap the pseudostem with burlap or blankets to protect it from frost.
* Cutting back: Cut back the pseudostem to a few feet above the ground and cover it with a tarp or blanket.
I personally use a combination of mulching and wrapping for my banana plants. It’s worked well for me for several years.
Propagating Banana Plants
If you want to expand your banana collection, you can propagate new plants from suckers.
Here’s how:
1. Wait until the sucker is about 1-2 feet tall.
2. Carefully dig around the base of the sucker, exposing the rhizome.
3.
Conclusion
So, there you have it! Growing bananas at home, while it might seem like a tropical dream reserved for warmer climates, is entirely achievable with a little know-how and dedication. This DIY trick, focusing on creating the perfect microclimate and providing the necessary nutrients, is a game-changer for banana enthusiasts eager to harvest their own sweet, homegrown fruit.
Why is this a must-try? Because the satisfaction of nurturing a banana plant from a small pup to a fruit-bearing beauty is unparalleled. Imagine the bragging rights when you serve up a banana bread made with bananas you grew yourself! Beyond the personal satisfaction, you’re also gaining access to fresher, potentially organic fruit, free from the travel and handling that store-bought bananas endure. Plus, banana plants are stunning additions to any garden or indoor space, adding a touch of the exotic to your everyday life.
But don’t stop there! Experiment with different banana varieties to find the perfect fit for your space and taste preferences. Dwarf Cavendish is a popular choice for indoor growing due to its manageable size, but explore other options like Rajapuri or Ice Cream bananas for unique flavors and textures. Consider companion planting to further enhance your banana plant’s health and productivity. Herbs like basil and mint can deter pests, while nitrogen-fixing plants like beans can enrich the soil.
And remember, success with growing bananas at home hinges on consistency. Regular watering, proper fertilization, and diligent pest control are key. Don’t be discouraged by initial setbacks. Every plant is different, and learning its specific needs is part of the fun.
We wholeheartedly encourage you to give this DIY trick a try. Transform your patio, balcony, or even a sunny corner of your living room into a mini-banana plantation. The rewards, both in terms of delicious fruit and sheer gardening joy, are well worth the effort.
Once you’ve embarked on your banana-growing adventure, we’d love to hear about your experiences! Share your tips, triumphs, and even your challenges in the comments below. Let’s build a community of home banana growers and learn from each other’s successes. Don’t forget to share pictures of your thriving banana plants and bountiful harvests! Your insights could inspire others to take the plunge and discover the joys of growing their own bananas at home.
Frequently Asked Questions (FAQ)
Q: What is the best banana variety to grow at home?
A: The best banana variety depends largely on your growing space and climate. For indoor growing, Dwarf Cavendish is a popular choice due to its compact size (typically reaching 6-10 feet). Other good options include Goldfinger, Rajapuri, and Ice Cream bananas. Consider your local climate and the amount of space you have available when making your selection. Research the specific needs of each variety to ensure you can provide the right growing conditions.
Q: How much sunlight do banana plants need?
A: Banana plants thrive in bright, indirect sunlight. Ideally, they need at least 6-8 hours of sunlight per day. If growing indoors, place your banana plant near a south-facing window or supplement with grow lights. If growing outdoors, choose a location that receives plenty of sunlight but is sheltered from strong winds. Insufficient sunlight can lead to stunted growth and reduced fruit production.
Q: What kind of soil is best for banana plants?
A: Banana plants prefer well-draining, fertile soil that is rich in organic matter. A slightly acidic to neutral pH (6.0-7.0) is ideal. You can create a suitable soil mix by combining equal parts potting soil, compost, and perlite or vermiculite. Good drainage is crucial to prevent root rot. Avoid heavy clay soils that retain too much moisture.
Q: How often should I water my banana plant?
A: Banana plants need consistent moisture, especially during the growing season. Water deeply whenever the top inch of soil feels dry to the touch. Avoid overwatering, which can lead to root rot. Reduce watering during the winter months when the plant’s growth slows down. The frequency of watering will depend on factors such as temperature, humidity, and the size of the pot.
Q: How do I fertilize my banana plant?
A: Banana plants are heavy feeders and require regular fertilization to thrive. Use a balanced fertilizer (e.g., 10-10-10) or a fertilizer specifically formulated for banana plants. Fertilize every 2-3 weeks during the growing season (spring and summer). Reduce fertilization during the winter months. You can also supplement with organic fertilizers such as compost tea or fish emulsion.
Q: How long does it take for a banana plant to produce fruit?
A: The time it takes for a banana plant to produce fruit varies depending on the variety, growing conditions, and climate. Generally, it takes 9-15 months from planting to harvest. Some faster-growing varieties may produce fruit in as little as 6 months, while others may take up to 2 years. Providing optimal growing conditions, including adequate sunlight, water, and fertilizer, will help speed up the fruiting process.
Q: How do I protect my banana plant from pests and diseases?
A: Common pests that can affect banana plants include aphids, spider mites, and mealybugs. Regularly inspect your plant for signs of infestation and treat promptly with insecticidal soap or neem oil. Root rot is a common disease caused by overwatering. Ensure good drainage and avoid letting the plant sit in standing water. Other potential diseases include Panama disease and black Sigatoka. Choose disease-resistant varieties and practice good sanitation to prevent these problems.
Q: Can I grow a banana plant indoors in a container?
A: Yes, you can successfully grow banana plants indoors in containers. Choose a dwarf variety that is well-suited for indoor growing. Use a large pot with good drainage and a well-draining soil mix. Provide plenty of sunlight or supplement with grow lights. Water regularly and fertilize as needed. Be prepared to repot the plant as it grows.
Q: How do I harvest bananas from my plant?
A: Bananas are typically ready to harvest when they are plump and the ridges on the fruit become rounded. The color of the fruit will also change from green to yellow, depending on the variety. Cut the entire bunch of bananas from the plant using a sharp knife or pruning shears. Hang the bunch in a cool, dry place to ripen. You can also separate individual bananas from the bunch and ripen them in a paper bag with an apple or banana peel.
Q: What do I do with the banana plant after harvesting the fruit?
A: After harvesting the fruit, the main stem of the banana plant will die back. However, new shoots (pups) will emerge from the base of the plant. You can allow one or two of these pups to grow and replace the original stem. Remove the remaining pups to prevent overcrowding. The new pups will eventually produce fruit, continuing the cycle.
Leave a Comment