

Growing Gourds at Home can seem like a daunting task, conjuring images of sprawling vines and endless patience. But what if I told you that cultivating these fascinating fruits could be a surprisingly rewarding and accessible DIY project, even if you’re short on space or experience? Forget the store-bought decorations this year; imagine the satisfaction of crafting your own unique birdhouses, bowls, or even musical instruments from gourds you’ve nurtured yourself!
The history of gourds is deeply intertwined with human civilization. For millennia, across cultures from Africa to Asia to the Americas, gourds have served as essential tools for carrying water, storing food, and creating art. Their versatility and durability made them invaluable to our ancestors, and that legacy continues today.
In our modern world, where sustainability and self-sufficiency are increasingly valued, growing gourds at home offers a tangible connection to that history. Plus, let’s be honest, who doesn’t love a good DIY project that results in something beautiful and functional? This article is packed with simple, effective tricks and hacks to help you successfully cultivate gourds, regardless of your gardening experience. We’ll cover everything from seed selection to harvesting and curing, ensuring you have all the knowledge you need to transform your backyard (or even your balcony!) into a thriving gourd patch. Get ready to unleash your inner gardener and create something truly special!
Growing Gourds: A Beginner’s Guide to a Bountiful Harvest
Okay, so you’re thinking about growing gourds? Awesome! It’s a super rewarding experience, and you end up with some really cool decorations or craft materials. I’ve grown gourds for years, and I’m excited to share my tips and tricks with you. It might seem daunting at first, but trust me, with a little planning and effort, you’ll be swimming in gourds before you know it!
Choosing Your Gourd Variety
First things first, you need to decide what kind of gourds you want to grow. There are two main types: ornamental gourds and hard-shelled gourds.
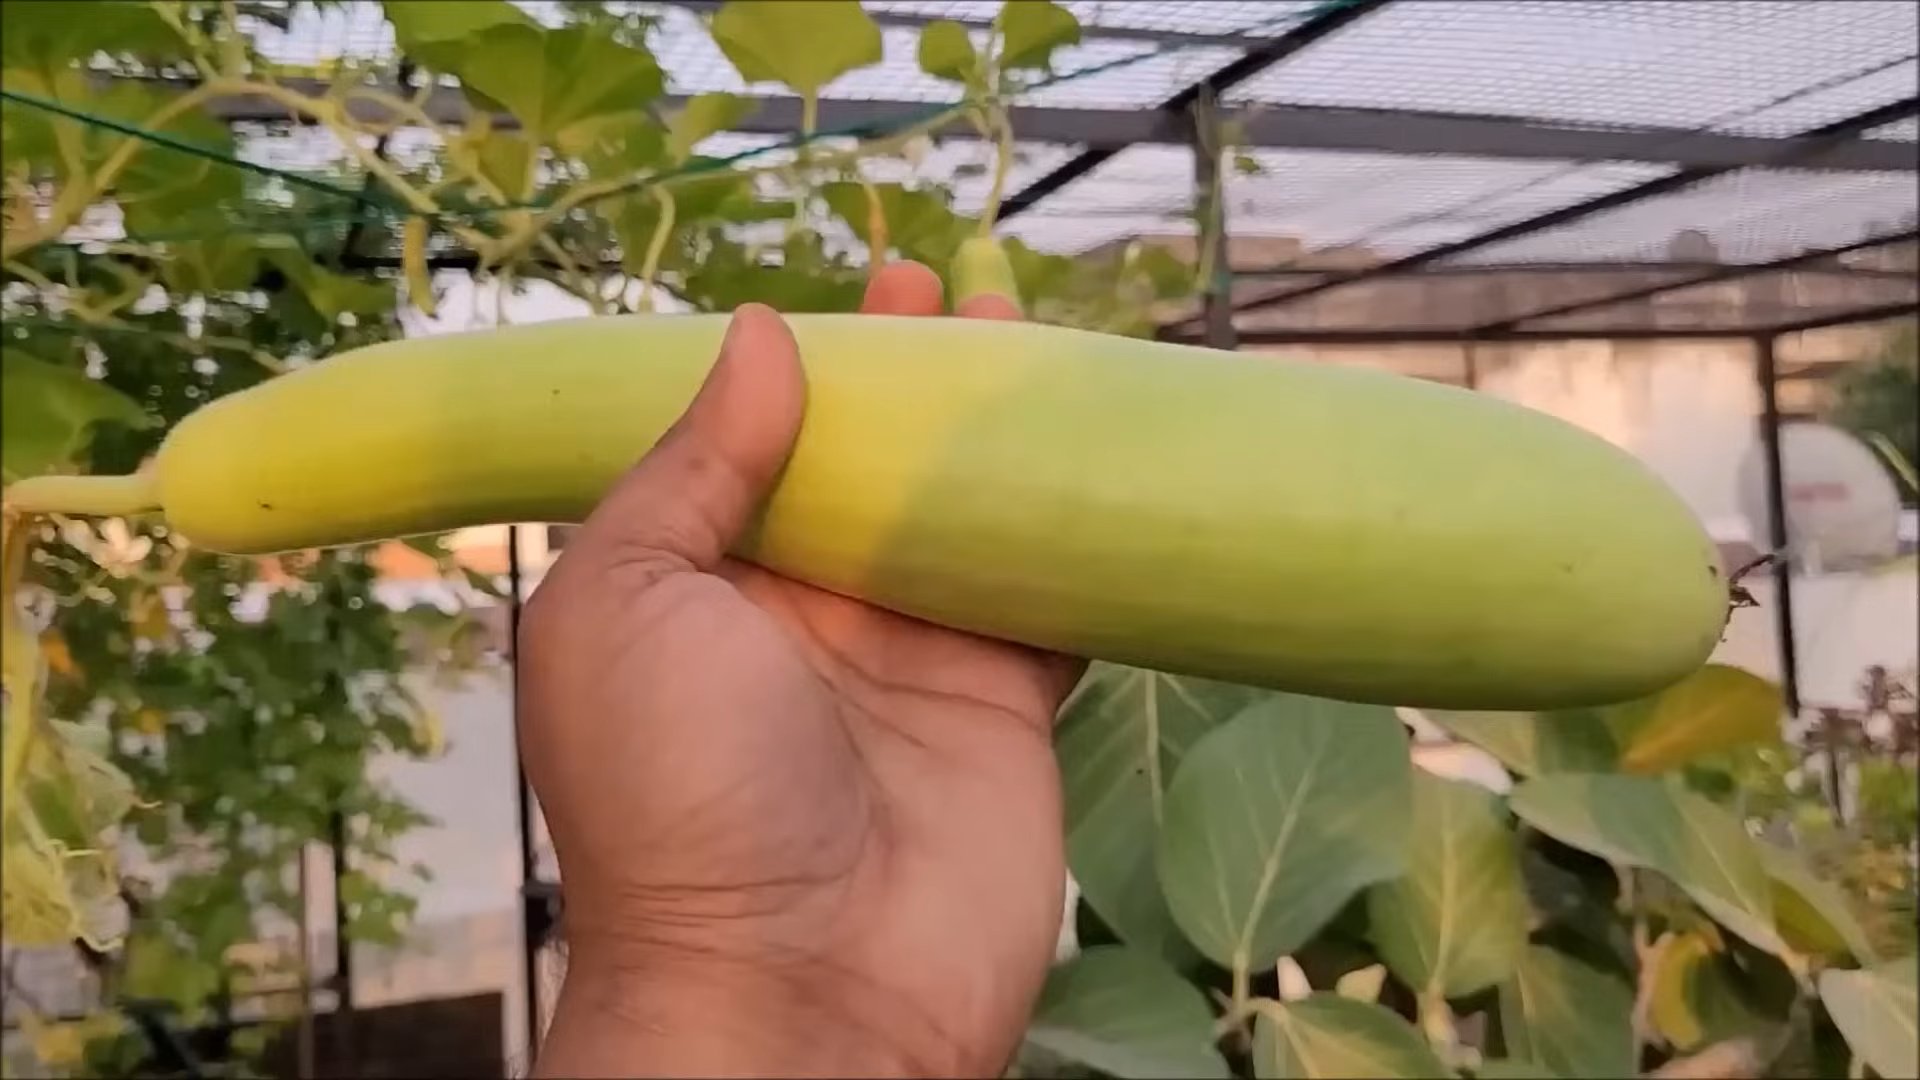
* Ornamental Gourds: These are the small, colorful gourds you often see in fall decorations. They come in all sorts of shapes, sizes, and colors. They’re generally not edible, but they’re super fun to grow and decorate with.
* Hard-Shelled Gourds: These are the gourds you can dry and use for crafts, like birdhouses, bowls, or musical instruments. They take longer to mature and require a bit more patience, but the results are totally worth it. Popular varieties include bottle gourds, dipper gourds, and luffa gourds (yes, luffas are gourds!).
Once you’ve decided on the type, research specific varieties that do well in your climate. Check your local nurseries or online seed catalogs for options. I personally love growing birdhouse gourds – they’re so satisfying to turn into little homes for our feathered friends!
Preparing Your Gourd-Growing Paradise
Gourds are hungry plants, so soil preparation is key. They also need a lot of space to sprawl.
* Sunlight: Gourds need at least 6-8 hours of direct sunlight per day. Choose a location that gets plenty of sun.
* Soil: Gourds thrive in well-drained, fertile soil. Amend your soil with plenty of compost or well-rotted manure before planting. This will provide the nutrients they need to grow big and strong.
* Space: Gourds are vines, and they can get HUGE. Give them plenty of room to spread out. If you’re growing them on the ground, allow at least 4-6 feet between plants. If you’re growing them on a trellis, make sure the trellis is sturdy enough to support the weight of the mature vines and gourds. I’ve seen trellises collapse under the weight of a bountiful gourd harvest, and it’s not a pretty sight!
* Support: Speaking of trellises, consider using one! Growing gourds vertically saves space and helps to keep the gourds off the ground, which can prevent rot. You can use a sturdy fence, a pergola, or build your own trellis.
Planting Your Gourd Seeds
You can either start your gourd seeds indoors or direct sow them in the garden. I usually prefer to start them indoors, especially if I live in an area with a shorter growing season.
* Starting Seeds Indoors: Start your seeds indoors about 4-6 weeks before the last expected frost. Use peat pots or biodegradable pots, as gourds don’t like to have their roots disturbed. Plant 2-3 seeds per pot, about 1 inch deep. Keep the soil moist and warm (around 70-80°F). Once the seedlings emerge, thin them to one plant per pot.
* Direct Sowing: If you’re direct sowing, wait until the soil has warmed up to at least 65°F. Plant the seeds about 1 inch deep and 4-6 feet apart. Water well.
* Germination: Gourd seeds can be a bit slow to germinate. Be patient! It can take anywhere from 7-21 days for them to sprout.
Caring for Your Growing Gourds
Once your gourd plants are established, it’s time to give them some TLC.
* Watering: Gourds need consistent moisture, especially during hot, dry weather. Water deeply and regularly, especially when the fruits are developing. Avoid overhead watering, as this can lead to fungal diseases.
* Fertilizing: Feed your gourd plants with a balanced fertilizer every 2-3 weeks. You can also side-dress them with compost or manure.
* Weeding: Keep the area around your gourd plants free of weeds. Weeds compete with the gourds for nutrients and water.
* Pest Control: Gourds can be susceptible to pests like squash bugs, squash vine borers, and cucumber beetles. Inspect your plants regularly and take action if you see any signs of infestation. You can use organic pest control methods like insecticidal soap or neem oil. I’ve found that hand-picking the pests off the plants is also effective, albeit a bit tedious.
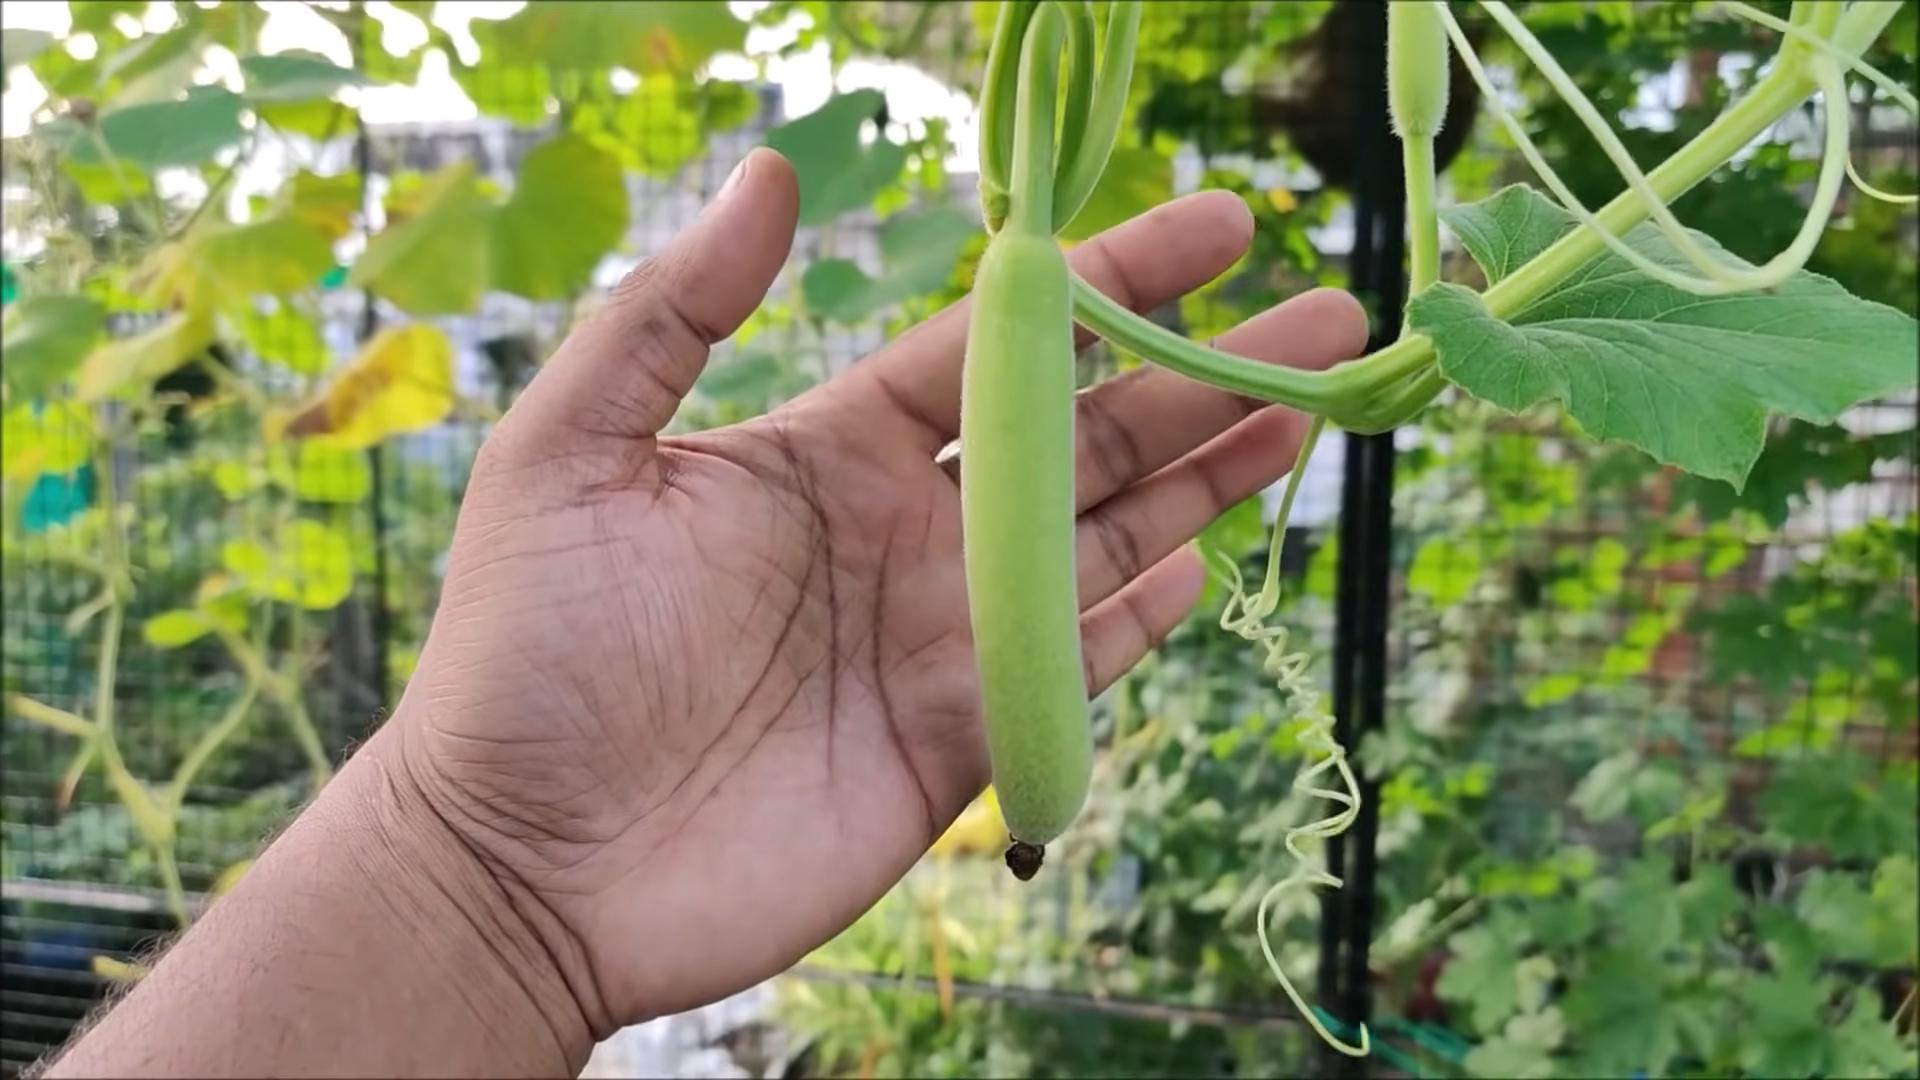
* Pollination: Gourds have separate male and female flowers. The female flowers need to be pollinated in order to produce fruit. If you’re not seeing many gourds developing, you may need to hand-pollinate the flowers. To do this, simply take a male flower and rub the pollen onto the stigma of a female flower. You can identify female flowers by the small gourd-like swelling at the base of the flower.
Harvesting Your Gourds
The timing of your gourd harvest depends on the type of gourd you’re growing.
* Ornamental Gourds: Harvest ornamental gourds when they are fully mature and the stems have started to dry out. Cut the gourds from the vine, leaving a few inches of stem attached.
* Hard-Shelled Gourds: Harvest hard-shelled gourds when the vines have completely dried out and the gourds are hard and lightweight. This usually happens in the fall, after the first frost. Cut the gourds from the vine, leaving a few inches of stem attached.
Drying and Curing Your Hard-Shelled Gourds
This is a crucial step for hard-shelled gourds! Proper drying and curing will prevent them from rotting.
1. Cleaning: Gently wash the gourds with soapy water to remove any dirt or debris.
2. Drying Location: Find a well-ventilated, dry place to dry your gourds. An attic, garage, or shed works well. Avoid direct sunlight, as this can cause the gourds to crack.
3. Arranging: Place the gourds on a rack or screen, making sure they don’t touch each other. This will allow air to circulate around them.
4. Patience is Key: Drying can take several weeks or even months, depending on the size and thickness of the gourds. Check them regularly for signs of rot. If you see any soft spots, discard the gourd immediately.
5. Listen for the Seeds: You’ll know the gourds are dry when you can hear the seeds rattling inside. The outer shell will also be hard and lightweight.
Cleaning Your Dried Gourds
Once the gourds are dry, you’ll need to clean them. This involves removing the outer skin and any mold that may have formed during the drying process.
1. Soaking (Optional): Soaking the gourds in water for a few hours can make it easier to remove the outer skin. However, be careful not to soak them for too long, as this can cause them to rot.
2. Scrubbing: Use a scrub brush or steel wool to remove the outer skin. You can also use a knife or scraper, but be careful not to damage the gourd.
3. Bleach Solution: To remove any mold, wash the gourds with a solution of 1 part bleach to 10 parts water.
4. Rinsing: Rinse the gourds thoroughly with clean water.
5. Drying Again: Allow the gourds to dry completely before using them for crafts.
Crafting with Your Gourds
Now for the fun part! Once your gourds are dry and clean, you can use them for all sorts of crafts.
* Painting: Paint your gourds with acrylic paints. You can create all sorts of designs, from simple patterns to intricate landscapes.
* Carving: Carve your gourds with wood carving tools. You can create intricate designs or simple shapes.
* Wood Burning: Use a wood burning tool to create designs on your gourds.
* Decoupage: Decoupage your gourds with paper, fabric, or other materials.
* Birdhouses: Turn your gourds into birdhouses by cutting a hole in the side and adding a perch.
* Bowls: Cut your gourds in half and use them as bowls.
* Musical Instruments: Turn your gourds into rattles or other musical instruments.
The possibilities are endless! Let your creativity run wild and have fun with your gourds.
Troubleshooting
Even with the best planning, sometimes things go wrong. Here are a few common problems and how to address them:
* G
Conclusion
So, there you have it! Growing gourds at home isn’t just a gardening project; it’s an adventure, a creative outlet, and a pathway to unique, handcrafted treasures. We’ve explored the ins and outs, from selecting the right seeds to curing your harvested masterpieces. But why is this DIY endeavor a must-try?
Firstly, the satisfaction of nurturing a plant from seed to harvest is unparalleled. Watching those tiny sprouts emerge and gradually transform into sprawling vines laden with gourds is a truly rewarding experience. Secondly, you gain complete control over the process. You can choose organic methods, tailor the growing conditions to your specific climate, and select gourd varieties that perfectly suit your artistic vision. Forget mass-produced, generic decorations; with homegrown gourds, you’re crafting one-of-a-kind pieces that reflect your personal style.
Thirdly, and perhaps most importantly, growing gourds offers incredible versatility. Imagine crafting birdhouses that blend seamlessly into your garden landscape, creating whimsical bowls and containers for your home, or even fashioning musical instruments with a rustic charm. The possibilities are truly endless!
Ready to take your gourd growing to the next level? Consider experimenting with different training techniques to shape your gourds as they grow. You can use trellises or supports to encourage unique forms, or even gently mold the gourds while they’re still young and pliable. Another fun variation is to try growing different varieties of gourds. From the classic bottle gourd to the colorful ornamental types, each variety offers its own unique characteristics and artistic potential. Don’t be afraid to get creative with your curing process too! Experiment with different drying methods and explore natural dyes to add even more character to your finished gourds.
But the real magic happens when you share your creations and experiences with others. Imagine the joy of gifting a handcrafted gourd birdhouse to a friend or showcasing your unique gourd art at a local craft fair. By sharing your passion for growing gourds, you’re not only inspiring others but also contributing to a vibrant community of DIY enthusiasts.
We wholeheartedly encourage you to embark on this gourd-growing journey. It’s a chance to connect with nature, unleash your creativity, and create lasting memories. So, grab some seeds, prepare your garden, and get ready to experience the joy of growing gourds at home. We can’t wait to see what amazing creations you come up with!
Don’t forget to share your experiences, tips, and photos with us in the comments below. Let’s build a community of gourd-growing enthusiasts and inspire each other with our unique creations! Happy growing!
Frequently Asked Questions (FAQ)
What is the best time of year to plant gourd seeds?
The ideal time to plant gourd seeds is after the last frost in your area, when the soil has warmed up to at least 65 degrees Fahrenheit. Gourds require a long growing season, typically 90-120 days, so starting them indoors 4-6 weeks before the last frost can give them a head start. Check your local climate and seed packet instructions for specific recommendations.
How much space do gourds need to grow?
Gourds are vigorous vines that require ample space to spread. Allow at least 4-6 feet between plants and rows. If you’re growing them on a trellis, ensure it’s sturdy enough to support the weight of the mature vines and gourds. Consider the mature size of the specific gourd variety you’re growing when determining spacing. Smaller ornamental gourds may require less space than larger bottle gourds.
What kind of soil is best for growing gourds?
Gourds thrive in well-drained, fertile soil that is rich in organic matter. Amend your soil with compost or well-rotted manure before planting to improve drainage and nutrient content. A slightly acidic to neutral soil pH (6.0-7.0) is ideal. Conduct a soil test to determine your soil’s pH and nutrient levels and amend accordingly.
How often should I water my gourd plants?
Gourds need consistent moisture, especially during hot, dry weather. Water deeply and regularly, aiming to keep the soil consistently moist but not waterlogged. Avoid overhead watering, as this can promote fungal diseases. Mulching around the plants can help retain moisture and suppress weeds. Check the soil moisture regularly and adjust your watering schedule as needed based on weather conditions.
What are some common pests and diseases that affect gourds?
Common pests that can affect gourds include squash bugs, squash vine borers, and aphids. Regularly inspect your plants for signs of infestation and take appropriate action, such as hand-picking pests, using insecticidal soap, or applying organic pesticides. Common diseases include powdery mildew and downy mildew. Ensure good air circulation around your plants and avoid overhead watering to prevent these diseases. Apply fungicides if necessary, following label instructions carefully.
How do I know when my gourds are ready to harvest?
Gourds are typically ready to harvest when the stems have dried and turned brown. The gourd itself should feel hard and lightweight. Gently tap the gourd; it should sound hollow. Leave the gourds on the vine as long as possible to allow them to fully mature and develop a hard shell. Harvest before the first frost to prevent damage.
What is the best way to cure gourds after harvesting?
Curing is essential for preserving gourds and preventing them from rotting. After harvesting, wash the gourds with soapy water and dry them thoroughly. Place them in a well-ventilated, dry, and dark location, such as a shed or garage. Avoid stacking the gourds on top of each other, as this can trap moisture and promote mold growth. Turn the gourds regularly to ensure even drying. The curing process can take several weeks to several months, depending on the size and thickness of the gourd.
How can I prevent mold from growing on my gourds during curing?
Mold is a common problem during the curing process. To prevent mold growth, ensure good air circulation around the gourds. You can use a fan to improve ventilation. Wipe the gourds regularly with a solution of water and bleach (1 part bleach to 10 parts water) to kill any mold spores. Remove any gourds that show signs of severe mold or rot to prevent the spread of infection.
Can I paint or decorate my gourds after they are cured?
Absolutely! Once your gourds are fully cured, they are ready to be painted, carved, or decorated in any way you like. Use acrylic paints, wood stains, or other craft supplies to create unique and personalized designs. Seal the finished gourds with a clear coat of varnish or sealant to protect the paint and prevent moisture damage. Let your creativity flow and transform your homegrown gourds into stunning works of art!
What are some creative ideas for using homegrown gourds?
The possibilities are endless! You can use gourds to create birdhouses, bowls, containers, musical instruments, lamps, ornaments, and much more. Carve intricate designs into the gourds, paint them with vibrant colors, or embellish them with beads, shells, or other decorative elements. Let your imagination guide you and create unique and functional art pieces that will add a touch of rustic charm to your home and garden. Growing gourds at home is a gateway to endless creativity.

Leave a Comment